User Guide
Page 26
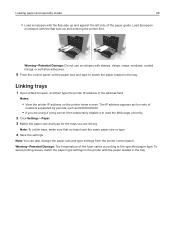
...: Do not use envelopes with the flap side up and entering the printer first. The IP address appears as four sets of the fuser varies according to load the Web page correctly. 2 Click Settings > Paper. 3 Match the paper size and type for the trays you are linking. Note: You...
...: Do not use envelopes with the flap side up and entering the printer first. The IP address appears as four sets of the fuser varies according to load the Web page correctly. 2 Click Settings > Paper. 3 Match the paper size and type for the trays you are linking. Note: You...
User Guide
Page 66
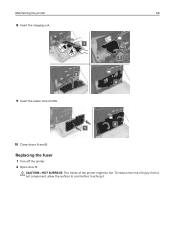
To reduce the risk of the printer might be hot. Replacing the fuser 1 Turn off the printer. 2 Open door B. CAUTION-HOT SURFACE: The inside of injury from a hot component, allow the surface to cool before touching it. Maintaining the printer 66 8 Insert the imaging unit. 9 Insert the waste toner bottle. 10 Close doors A and B.
To reduce the risk of the printer might be hot. Replacing the fuser 1 Turn off the printer. 2 Open door B. CAUTION-HOT SURFACE: The inside of injury from a hot component, allow the surface to cool before touching it. Maintaining the printer 66 8 Insert the imaging unit. 9 Insert the waste toner bottle. 10 Close doors A and B.
User Guide
Page 67
Maintaining the printer 67 3 Remove the fuser. 4 Unpack the new fuser. 5 Clean the fuser lens using the cotton swab that came with the package.
Maintaining the printer 67 3 Remove the fuser. 4 Unpack the new fuser. 5 Clean the fuser lens using the cotton swab that came with the package.
User Guide
Page 68
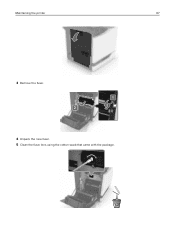
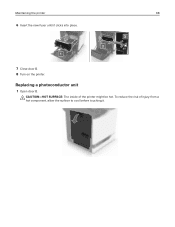
To reduce the risk of the printer might be hot. CAUTION-HOT SURFACE: The inside of injury from a hot component, allow the surface to cool before touching it clicks into place. 7 Close door B. 8 Turn on the printer. Maintaining the printer 68 6 Insert the new fuser until it . Replacing a photoconductor unit 1 Open door B.
To reduce the risk of the printer might be hot. CAUTION-HOT SURFACE: The inside of injury from a hot component, allow the surface to cool before touching it clicks into place. 7 Close door B. 8 Turn on the printer. Maintaining the printer 68 6 Insert the new fuser until it . Replacing a photoconductor unit 1 Open door B.
User Guide
Page 105
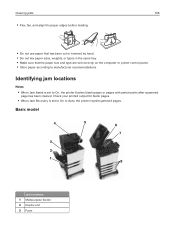
..., the printer flushes blank pages or pages with partial prints after a jammed page has been cleared. Basic model Jam locations 1 Multipurpose feeder 2 Duplex unit 3 Fuser Identifying jam locations Notes: • When Jam Assist is set to manufacturer recommendations. Check your printed output for blank pages. • When Jam Recovery is...
..., the printer flushes blank pages or pages with partial prints after a jammed page has been cleared. Basic model Jam locations 1 Multipurpose feeder 2 Duplex unit 3 Fuser Identifying jam locations Notes: • When Jam Assist is set to manufacturer recommendations. Check your printed output for blank pages. • When Jam Recovery is...

User Guide
Page 112
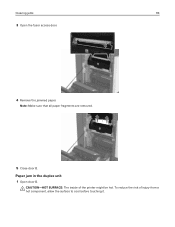
To reduce the risk of the printer might be hot. Paper jam in door B Paper jam in the fuser 1 Open door B. CAUTION-HOT SURFACE: The inside of injury from a hot component, allow the surface to cool before touching it . 3 Close door B. CAUTION-HOT SURFACE: The inside of injury from a hot component, allow the surface to cool before touching it . To reduce the risk of the printer might be hot. Clearing jams 112 2 Open door B, and then remove any paper fragments.
To reduce the risk of the printer might be hot. Paper jam in door B Paper jam in the fuser 1 Open door B. CAUTION-HOT SURFACE: The inside of injury from a hot component, allow the surface to cool before touching it . 3 Close door B. CAUTION-HOT SURFACE: The inside of injury from a hot component, allow the surface to cool before touching it . To reduce the risk of the printer might be hot. Clearing jams 112 2 Open door B, and then remove any paper fragments.
User Guide
Page 114
Clearing jams 114 3 Open the fuser access door. 4 Remove the jammed paper. CAUTION-HOT SURFACE: The inside of injury from a hot component, allow the surface to cool before touching it. To reduce the risk of the printer might be hot. Paper jam in the duplex unit 1 Open door B. Note: Make sure that all paper fragments are removed. 5 Close door B.
Clearing jams 114 3 Open the fuser access door. 4 Remove the jammed paper. CAUTION-HOT SURFACE: The inside of injury from a hot component, allow the surface to cool before touching it. To reduce the risk of the printer might be hot. Paper jam in the duplex unit 1 Open door B. Note: Make sure that all paper fragments are removed. 5 Close door B.

User Guide
Page 150
... equals 78.5 mm (3.09 in.), then replace the transfer roller. • If the distance between the defects equals 42.0 mm (1.65 in .), then replace the fuser. 2 Resend the print job. job.
... equals 78.5 mm (3.09 in.), then replace the transfer roller. • If the distance between the defects equals 42.0 mm (1.65 in .), then replace the fuser. 2 Resend the print job. job.
User Guide
Page 195
... printing 27 Forms and Favorites setting up 19 forwarding faxes 50 FTP address creating shortcuts 51 FTP server, scanning to using the control panel 51 fuser replacing 66 G green settings Eco‑Mode 101 hibernate mode 101 sleep mode 101 H hardware options installing 175 hardware options, adding print driver 188 held...
... printing 27 Forms and Favorites setting up 19 forwarding faxes 50 FTP address creating shortcuts 51 FTP server, scanning to using the control panel 51 fuser replacing 66 G green settings Eco‑Mode 101 hibernate mode 101 sleep mode 101 H hardware options installing 175 hardware options, adding print driver 188 held...
User Guide
Page 196
Index 196 door L 125 door N 124 duplex unit 112 finisher bin 116 fuser 112 multipurpose feeder 108 standard bin 111 staple cartridge 118, 127 staple finisher bin 126 trays 107 jams avoiding 104 locating jam areas 105 ... in trays 107 paper jam, clearing automatic document feeder 109 door J 122 door K 121 door L 125 door N 124 duplex unit 112 finisher bin 116 fuser 112 multipurpose feeder 108 standard bin 111 staple finisher bin 126 trays 107 paper jams avoiding 104 paper size setting 23 paper type setting...
Index 196 door L 125 door N 124 duplex unit 112 finisher bin 116 fuser 112 multipurpose feeder 108 standard bin 111 staple cartridge 118, 127 staple finisher bin 126 trays 107 jams avoiding 104 locating jam areas 105 ... in trays 107 paper jam, clearing automatic document feeder 109 door J 122 door K 121 door L 125 door N 124 duplex unit 112 finisher bin 116 fuser 112 multipurpose feeder 108 standard bin 111 staple finisher bin 126 trays 107 paper jams avoiding 104 paper size setting 23 paper type setting...

User Guide
Page 197
... Drive 21 printing held jobs from a Macintosh computer 29 from Windows 29 Push Button method 56 Q QR codes adding 21 R recycling Lexmark packaging 102 Lexmark products 102 toner cartridges 103 reducing a copy 32 repeat print jobs 29 printing from a Macintosh computer 29 printing from Windows 29 repeating ... toner bottle 81 replacing the ADF feed roller 89 replacing the ADF pick roller 87 replacing the ADF separator roller 91 replacing the fuser 66 replacing the pick roller 75 replacing the separator bracket 80 replacing the staple cartridge holder in the multiposition staple, hole punch fi...
... Drive 21 printing held jobs from a Macintosh computer 29 from Windows 29 Push Button method 56 Q QR codes adding 21 R recycling Lexmark packaging 102 Lexmark products 102 toner cartridges 103 reducing a copy 32 repeat print jobs 29 printing from a Macintosh computer 29 printing from Windows 29 repeating ... toner bottle 81 replacing the ADF feed roller 89 replacing the ADF pick roller 87 replacing the ADF separator roller 91 replacing the fuser 66 replacing the pick roller 75 replacing the separator bracket 80 replacing the staple cartridge holder in the multiposition staple, hole punch fi...


