User's Guide
Page 7
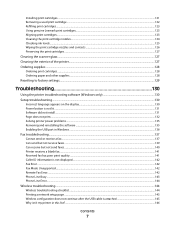
Installing print cartridges...121 Removing a used print cartridge ...122 Refilling print cartridges...123 Using genuine Lexmark print cartridges...123 Aligning print cartridges ...123 Cleaning the print cartridge nozzles...124 Checking ink levels...125 Wiping the print cartridge nozzles and contacts ...126 Preserving the print cartridges ...127 Cleaning the scanner glass...127 Cleaning the exterior of the printer...127 Ordering supplies...128...
Installing print cartridges...121 Removing a used print cartridge ...122 Refilling print cartridges...123 Using genuine Lexmark print cartridges...123 Aligning print cartridges ...123 Cleaning the print cartridge nozzles...124 Checking ink levels...125 Wiping the print cartridge nozzles and contacts ...126 Preserving the print cartridges ...127 Cleaning the scanner glass...127 Cleaning the exterior of the printer...127 Ordering supplies...128...
User's Guide
Page 13
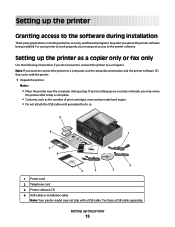
... grant access to do not want to connect the printer to a computer. Notes: • Place the printer near the computer during installation Third-party applications, including antivirus, security, and firewall programs may vary by model and region. • Do not attach the USB... to the printer software. Setting up the printer as the number of print cartridges, may alert you do so. 9 8 1 2 3 WI F I PRINTING 1 7 6 5 4 2 3 1 Power cord 2 Telephone cord 3 Printer software CD 4 USB cable or installation cable Note: Your printer model may move the printer after setup is complete...
... grant access to do not want to connect the printer to a computer. Notes: • Place the printer near the computer during installation Third-party applications, including antivirus, security, and firewall programs may vary by model and region. • Do not attach the USB... to the printer software. Setting up the printer as the number of print cartridges, may alert you do so. 9 8 1 2 3 WI F I PRINTING 1 7 6 5 4 2 3 1 Power cord 2 Telephone cord 3 Printer software CD 4 USB cable or installation cable Note: Your printer model may move the printer after setup is complete...
User's Guide
Page 14
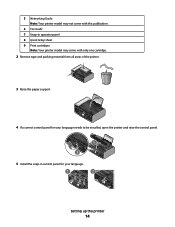
W I F I PRINTING 4 If a correct control panel for your language needs to be installed, open the printer and raise the control panel. 2 1 WI F I PRINTING 3 Raise the paper support. W I F I PRINTING 5 Install the snap-in operator panel 8 Quick Setup sheet 9 Print cartridges Note: Your printer model may not come with this publication. 6 Fax Guide 7 Snap-in control panel for your language. 1 2 Setting up the printer 14 5 Networking Guide Note: Your printer model may come with only one cartridge. 2 Remove tape and packing material from all areas of the printer.
W I F I PRINTING 4 If a correct control panel for your language needs to be installed, open the printer and raise the control panel. 2 1 WI F I PRINTING 3 Raise the paper support. W I F I PRINTING 5 Install the snap-in operator panel 8 Quick Setup sheet 9 Print cartridges Note: Your printer model may not come with this publication. 6 Fax Guide 7 Snap-in control panel for your language. 1 2 Setting up the printer 14 5 Networking Guide Note: Your printer model may come with only one cartridge. 2 Remove tape and packing material from all areas of the printer.
User's Guide
Page 22
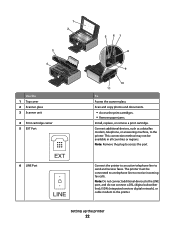
... 6 LINE Port EXT LINE 9 10 11 To Access the scanner glass. Scan and copy photos and documents. • Access the print cartridges. • Remove paper jams. Install, replace, or remove a print cartridge. This connection method may not be connected to a telephone line to receive incoming fax calls. The printer must be available in...
... 6 LINE Port EXT LINE 9 10 11 To Access the scanner glass. Scan and copy photos and documents. • Access the print cartridges. • Remove paper jams. Install, replace, or remove a print cartridge. This connection method may not be connected to a telephone line to receive incoming fax calls. The printer must be available in...
User's Guide
Page 46
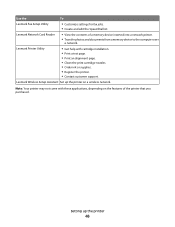
... edit the Speed Dial list. Note: Your printer may not come with cartridge installation. • Print a test page. • Print an alignment page. • Clean the print cartridge nozzles. • Order ink or supplies. • Register the printer. • Contact customer support. Lexmark Printer Utility • Get help with these applications, depending on a wireless...
... edit the Speed Dial list. Note: Your printer may not come with cartridge installation. • Print a test page. • Print an alignment page. • Clean the print cartridge nozzles. • Order ink or supplies. • Register the printer. • Contact customer support. Lexmark Printer Utility • Get help with these applications, depending on a wireless...
User's Guide
Page 121
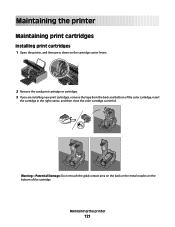
Maintaining the printer 121 Warning-Potential Damage: Do not touch the gold contact area on the back or the metal nozzles on the cartridge carrier levers. W I F I PRINTING 2 Remove the used print cartridge or cartridges. 3 If you are installing new print cartridges, remove the tape from the back and bottom of the cartridge. Maintaining the printer Maintaining print cartridges Installing print cartridges 1 Open the printer, and then press down on the bottom of the color cartridge, insert the cartridge in the right carrier, and then close the color cartridge carrier lid.
Maintaining the printer 121 Warning-Potential Damage: Do not touch the gold contact area on the back or the metal nozzles on the cartridge carrier levers. W I F I PRINTING 2 Remove the used print cartridge or cartridges. 3 If you are installing new print cartridges, remove the tape from the back and bottom of the cartridge. Maintaining the printer Maintaining print cartridges Installing print cartridges 1 Open the printer, and then press down on the bottom of the color cartridge, insert the cartridge in the right carrier, and then close the color cartridge carrier lid.

User's Guide
Page 125
...Lexmark Service Center to verify that the print quality has improved. Maintaining the printer 125 Checking ink levels Using the printer control panel 1 From the printer control panel, press , and then press OK. 2 Press OK again. If an exclamation point (!) appears on a cartridge, the ink level is low. Install a new cartridge..., if necessary. 3 Press to two more times, or wipe the print cartridge nozzles and contacts. A page prints, forcing ink through the print cartridge nozzles to clean them . ...
...Lexmark Service Center to verify that the print quality has improved. Maintaining the printer 125 Checking ink levels Using the printer control panel 1 From the printer control panel, press , and then press OK. 2 Press OK again. If an exclamation point (!) appears on a cartridge, the ink level is low. Install a new cartridge..., if necessary. 3 Press to two more times, or wipe the print cartridge nozzles and contacts. A page prints, forcing ink through the print cartridge nozzles to clean them . ...
User's Guide
Page 126
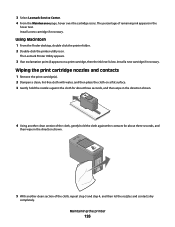
... Center. 4 From the Maintenance page, hover over the cartridge icons. The Lexmark Printer Utility appears. 3 If an exclamation point (!) appears on a flat surface. 3 Gently hold the nozzles against the cloth for about three seconds, and then... print cartridge(s). 2 Dampen a clean, lint-free cloth with water, and then place the cloth on a print cartridge, then the ink level is low. Maintaining the printer 126 The percentage of the cloth, repeat step 3 and step 4, and then let the nozzles and contacts dry completely. Install a new cartridge if necessary. Install a new cartridge if ...
... Center. 4 From the Maintenance page, hover over the cartridge icons. The Lexmark Printer Utility appears. 3 If an exclamation point (!) appears on a flat surface. 3 Gently hold the nozzles against the cloth for about three seconds, and then... print cartridge(s). 2 Dampen a clean, lint-free cloth with water, and then place the cloth on a print cartridge, then the ink level is low. Maintaining the printer 126 The percentage of the cloth, repeat step 3 and step 4, and then let the nozzles and contacts dry completely. Install a new cartridge if necessary. Install a new cartridge if ...
User's Guide
Page 127
... or detergents, as they may cause damage to your printer. 5 Make sure the paper support and paper exit tray are ready to install them. • Do not remove a cartridge from the paper support and paper exit tray. 3 Dampen a clean, lint-free cloth with water. 2 Gently wipe the scanner glass... clean. Preserving the print cartridges • Keep new cartridges in an airtight container. Cleaning the exterior of the printer, making sure to remove any ink residue that the printer is turned off and...
... or detergents, as they may cause damage to your printer. 5 Make sure the paper support and paper exit tray are ready to install them. • Do not remove a cartridge from the paper support and paper exit tray. 3 Dampen a clean, lint-free cloth with water. 2 Gently wipe the scanner glass... clean. Preserving the print cartridges • Keep new cartridges in an airtight container. Cleaning the exterior of the printer, making sure to remove any ink residue that the printer is turned off and...
User's Guide
Page 132
... security programs. 3 Do one or more of the following : CHECK MESSAGES If an error message appears, then resolve the error before trying to install the software. 8 When the installation is properly connected to the printer and plugged into the wall outlet. 6 Press to turn the printer off. 2 Disconnect the power cord from.... 6 If necessary, double-click setup.exe. 7 Follow the instructions on . Troubleshooting 132 REMOVE AND THEN RELOAD PAPER CHECK INK Check the ink levels, and then install new print cartridges if necessary.
... security programs. 3 Do one or more of the following : CHECK MESSAGES If an error message appears, then resolve the error before trying to install the software. 8 When the installation is properly connected to the printer and plugged into the wall outlet. 6 Press to turn the printer off. 2 Disconnect the power cord from.... 6 If necessary, double-click setup.exe. 7 Follow the instructions on . Troubleshooting 132 REMOVE AND THEN RELOAD PAPER CHECK INK Check the ink levels, and then install new print cartridges if necessary.
User's Guide
Page 139
.... 2 Scan the original document one or more of telephone rings. • If you are possible causes and solutions. CHECK INK Check the ink levels, and install a new cartridge if necessary.
.... 2 Scan the original document one or more of telephone rings. • If you are possible causes and solutions. CHECK INK Check the ink levels, and install a new cartridge if necessary.
User's Guide
Page 141
.... • Increase the fax scan resolution. CHECK INK Check the ink levels, and install a new print cartridge if necessary. CHECK INK Check the ink levels, and install a new print cartridge if necessary. There may have been removed. 1 2 3 Reinsert the print cartridges. Printer receives a blank fax These are possible solutions. Try one or more of the...
.... • Increase the fax scan resolution. CHECK INK Check the ink levels, and install a new print cartridge if necessary. CHECK INK Check the ink levels, and install a new print cartridge if necessary. There may have been removed. 1 2 3 Reinsert the print cartridges. Printer receives a blank fax These are possible solutions. Try one or more of the...

User's Guide
Page 173
.... Lexmark grants you the following rights provided you do not accept the terms of this single use only and is /are licensed for use the print cartridge terminates, and the used cartridge must limit the number of this License Agreement: a Use. You may Use one computer. The term "Use" means storing, loading, installing, executing...
.... Lexmark grants you the following rights provided you do not accept the terms of this single use only and is /are licensed for use the print cartridge terminates, and the used cartridge must limit the number of this License Agreement: a Use. You may Use one computer. The term "Use" means storing, loading, installing, executing...

User's Guide
Page 176
... cannot print to network printer 161 cannot send or receive fax 137 cards loading 72 memory card 92 cartridges, print aligning 123 cleaning 124 installing 121 ordering 128 preserving 127 removing 122 using genuine Lexmark 123 wiping 126 changing default settings 29 Power Saver timeout 29 temporary settings 29 Index 176 changing wireless...
... cannot print to network printer 161 cannot send or receive fax 137 cards loading 72 memory card 92 cartridges, print aligning 123 cleaning 124 installing 121 ordering 128 preserving 127 removing 122 using genuine Lexmark 123 wiping 126 changing default settings 29 Power Saver timeout 29 temporary settings 29 Index 176 changing wireless...
User's Guide
Page 178
... print cartridges 121 printer software 42, 135 installing printer on wired network (Macintosh) 70 on wired network (Windows) 70 on wireless network (Macintosh) 47 on wireless network (Windows) 47 installing printer on wired network (Macintosh) 70 installing printer on wired network (Windows) 70 installing wireless... MAC address 66 MAC address filtering 66 MAC address, finding 66 Mac printer software using 45 Macintosh installing printer on wired network (Ethernet) 70 installing printer on wireless network 47 magazine articles, loading on scanner glass 76 memory card inserting 92 printing ...
... print cartridges 121 printer software 42, 135 installing printer on wired network (Macintosh) 70 on wired network (Windows) 70 on wireless network (Macintosh) 47 on wireless network (Windows) 47 installing printer on wired network (Macintosh) 70 installing printer on wired network (Windows) 70 installing wireless... MAC address 66 MAC address filtering 66 MAC address, finding 66 Mac printer software using 45 Macintosh installing printer on wired network (Ethernet) 70 installing printer on wireless network 47 magazine articles, loading on scanner glass 76 memory card inserting 92 printing ...
User's Guide
Page 179
... 72 power button is not lit 131 power supply port 23 print cartridge carrier 22 print cartridge nozzles, cleaning 124 print cartridges aligning 123 cleaning 124 installing 121 ordering 128 preserving 127 refilling 123 removing 122 using genuine Lexmark 123 wiping 126 print jobs, canceling 87 print jobs, resuming 88... printer does not print wireless 151 printer does not print wirelessly 151 printer menus 26 printer receives blank fax 141 printer software installing 42 reinstalling 135 removing 135 printer to be configured does not appear in list of printers found on network 160 printing blocked ...
... 72 power button is not lit 131 power supply port 23 print cartridge carrier 22 print cartridge nozzles, cleaning 124 print cartridges aligning 123 cleaning 124 installing 121 ordering 128 preserving 127 refilling 123 removing 122 using genuine Lexmark 123 wiping 126 print jobs, canceling 87 print jobs, resuming 88... printer does not print wireless 151 printer does not print wirelessly 151 printer menus 26 printer receives blank fax 141 printer software installing 42 reinstalling 135 removing 135 printer to be configured does not appear in list of printers found on network 160 printing blocked ...
Fax Guide
Page 4
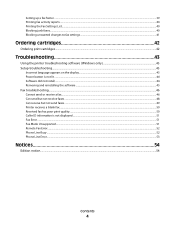
...40 Printing the Fax Settings List...40 Blocking junk faxes...40 Blocking unwanted changes to fax settings...41 Ordering cartridges 42 Ordering print cartridges...42 Troubleshooting 43 Using the printer troubleshooting software (Windows only 43 Setup troubleshooting...43 Incorrect language appears on ...the display...43 Power button is not lit ...44 Software did not install...44 Removing and reinstalling the software ...45 Fax ...
...40 Printing the Fax Settings List...40 Blocking junk faxes...40 Blocking unwanted changes to fax settings...41 Ordering cartridges 42 Ordering print cartridges...42 Troubleshooting 43 Using the printer troubleshooting software (Windows only 43 Setup troubleshooting...43 Incorrect language appears on ...the display...43 Power button is not lit ...44 Software did not install...44 Removing and reinstalling the software ...45 Fax ...

Fax Guide
Page 10
... wireless print server Connect the printer to a wireless network. The printer must be available in or removing a USB cable or installation cable. 10 Power supply with port Connect the printer to send and receive faxes. Warning-Potential Damage: Do not touch the ...port Connect the printer to receive incoming fax calls. Use the 3 Scanner unit 4 Print cartridge carrier 5 EXT Port To • Access the print cartridges. • Remove paper jams. Install, replace, or remove a print cartridge. Connect additional devices, such as a data/fax modem, telephone, or answering machine, ...
... wireless print server Connect the printer to a wireless network. The printer must be available in or removing a USB cable or installation cable. 10 Power supply with port Connect the printer to send and receive faxes. Warning-Potential Damage: Do not touch the ...port Connect the printer to receive incoming fax calls. Use the 3 Scanner unit 4 Print cartridge carrier 5 EXT Port To • Access the print cartridges. • Remove paper jams. Install, replace, or remove a print cartridge. Connect additional devices, such as a data/fax modem, telephone, or answering machine, ...
Fax Guide
Page 11
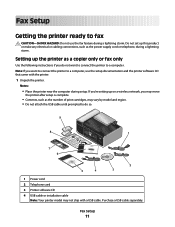
...Use the following instructions if you do so. 9 8 1 2 3 WI F I PRINTING 1 7 6 5 4 2 3 1 Power cord 2 Telephone cord 3 Printer software CD 4 USB cable or installation cable Note: Your printer model may not ship with the printer. 1 Unpack the printer. Notes: • Place the printer near the computer during a lightning storm.... Note: If you may move the printer after setup is complete. • Contents, such as the number of print cartridges, may vary by model and region. • Do not attach the USB cable until prompted to do not want to connect the printer ...
...Use the following instructions if you do so. 9 8 1 2 3 WI F I PRINTING 1 7 6 5 4 2 3 1 Power cord 2 Telephone cord 3 Printer software CD 4 USB cable or installation cable Note: Your printer model may not ship with the printer. 1 Unpack the printer. Notes: • Place the printer near the computer during a lightning storm.... Note: If you may move the printer after setup is complete. • Contents, such as the number of print cartridges, may vary by model and region. • Do not attach the USB cable until prompted to do not want to connect the printer ...

Fax Guide
Page 12
W I F I PRINTING 5 Install the snap-in operator panel 8 Quick Setup sheet 9 Print cartridges Note: Your printer model may come with only one cartridge. 2 Remove tape and packing material from all areas of the printer. W I F I PRINTING 4 If a correct control panel for your language needs to be installed, open the printer and raise the control panel. 2 1 WI F I PRINTING 3 Raise the paper support. 5 Networking Guide Note: Your printer model may not come with this publication. 6 Fax Guide 7 Snap-in control panel for your language. 1 2 Fax Setup 12
W I F I PRINTING 5 Install the snap-in operator panel 8 Quick Setup sheet 9 Print cartridges Note: Your printer model may come with only one cartridge. 2 Remove tape and packing material from all areas of the printer. W I F I PRINTING 4 If a correct control panel for your language needs to be installed, open the printer and raise the control panel. 2 1 WI F I PRINTING 3 Raise the paper support. 5 Networking Guide Note: Your printer model may not come with this publication. 6 Fax Guide 7 Snap-in control panel for your language. 1 2 Fax Setup 12


