User's Guide
Page 21
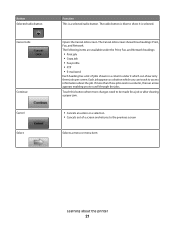
... button when more than three jobs exist in a column under it is selected. If more changes need to be made for a job or after clearing a paper jam. • Cancels an action or a selection • Cancels out of jobs shown in a column, then an arrow appears enabling you can show it which you...
... button when more than three jobs exist in a column under it is selected. If more changes need to be made for a job or after clearing a paper jam. • Cancels an action or a selection • Cancels out of jobs shown in a column, then an arrow appears enabling you can show it which you...
User's Guide
Page 59
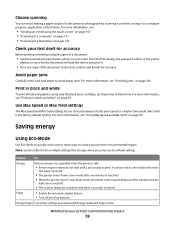
... the printer is idle. • Printer engine motors do not start until a job is the factory default setting. Avoid paper jams Carefully select and load paper to avoid paper jams. For more information, see "Using Max Speed and Max Yield" on page 142 Check your first draft for accuracy Before ... flash drive" on page 90. Choose scanning You can avoid making multiple copies of a document: • Use the Lexmark preview feature, which you can select from the Print dialog, the Lexmark Toolbar, or the printer display, to see : • "Sending an e-mail using only the black toner cartridge,...
... the printer is idle. • Printer engine motors do not start until a job is the factory default setting. Avoid paper jams Carefully select and load paper to avoid paper jams. For more information, see "Using Max Speed and Max Yield" on page 142 Check your first draft for accuracy Before ... flash drive" on page 90. Choose scanning You can avoid making multiple copies of a document: • Use the Lexmark preview feature, which you can select from the Print dialog, the Lexmark Toolbar, or the printer display, to see : • "Sending an e-mail using only the black toner cartridge,...
User's Guide
Page 181
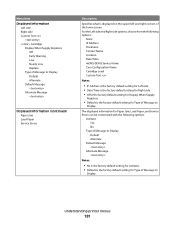
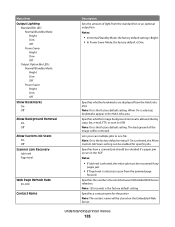
...Off Early Warning Low Nearly Low Replace Type of Message to Display Default Alternate Default Message Alternate Message Displayed Information (continued) Paper Jam Load Paper Service Errors Description Specifies what is displayed on the upper left and right corners of the home screen For the Left ...default setting for Activate. • Default is the factory default setting for Type of Message to Display. The displayed information for Paper Jam, Load Paper, and Service Errors can be customized with the following options: None IP Address Hostname Contact Name Location Date/Time mDNS/DDNS ...
...Off Early Warning Low Nearly Low Replace Type of Message to Display Default Alternate Default Message Alternate Message Displayed Information (continued) Paper Jam Load Paper Service Errors Description Specifies what is displayed on the upper left and right corners of the home screen For the Left ...default setting for Activate. • Default is the factory default setting for Type of Message to Display. The displayed information for Paper Jam, Load Paper, and Service Errors can be customized with the following options: None IP Address Hostname Contact Name Location Date/Time mDNS/DDNS ...
User's Guide
Page 183
... bookmarks are displayed from the Held Jobs area Note: On is selected, the Allow Custom Job Scans setting can be rescanned if any pages jam. • If Page level is selected, bookmarks appear in the ADF Notes: • If Job level is selected, the entire job ... removed. If On is the factory default setting. Specifies how a scanned job should be reloaded if a paper jam occurs in the Held Jobs area. When On is selected, rescan from the jammed page forward. Specifies a contact name for specific jobs. Understanding printer menus 183 Specifies whether image background removal...
... bookmarks are displayed from the Held Jobs area Note: On is selected, the Allow Custom Job Scans setting can be rescanned if any pages jam. • If Page level is selected, bookmarks appear in the ADF Notes: • If Job level is selected, the entire job ... removed. If On is the factory default setting. Specifies how a scanned job should be reloaded if a paper jam occurs in the Held Jobs area. When On is selected, rescan from the jammed page forward. Specifies a contact name for specific jobs. Understanding printer menus 183 Specifies whether image background removal...
User's Guide
Page 230
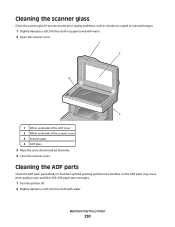
... the scanner glass if you encounter print quality problems, such as streaks on the ADF parts may cause print quality issues and false 290-294 paper jam messages. 1 Turn the printer off. 2 Slightly dampen a soft, lint-free cloth with water. 2 Open the scanner cover. 1 2 4 3 1 White underside of the ADF cover 2 White ...3 Wipe the areas shown and let them dry. 4 Close the scanner cover. Residue on copied or scanned images. 1 Slightly dampen a soft, lint-free cloth or paper towel with water. Cleaning the ADF parts Clean the ADF parts periodically to maintain optimal printing performance.
... the scanner glass if you encounter print quality problems, such as streaks on the ADF parts may cause print quality issues and false 290-294 paper jam messages. 1 Turn the printer off. 2 Slightly dampen a soft, lint-free cloth with water. 2 Open the scanner cover. 1 2 4 3 1 White underside of the ADF cover 2 White ...3 Wipe the areas shown and let them dry. 4 Close the scanner cover. Residue on copied or scanned images. 1 Slightly dampen a soft, lint-free cloth or paper towel with water. Cleaning the ADF parts Clean the ADF parts periodically to maintain optimal printing performance.
User's Guide
Page 267
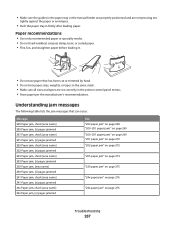
.... Message 200 Paper jam, check [area name] 200 Paper jam, [x] pages jammed 201 Paper jam, check [area name] 201 Paper jam, [x] pages jammed 202 Paper jam, check [area name] 202 Paper jam, [x] pages jammed 203 Paper jam, check [area name] 203 Paper jam, [x] pages jammed 230 Paper jam, [area name] 230 Paper jam, [x] pages jammed 241 Paper jam, check [area name] 241 Paper jam, [x] pages jammed 24x Paper jam, check [area name] 24x Paper jam, [x] pages jammed See "200 paper jam" on page 268 "200-201 paper jams" on...
.... Message 200 Paper jam, check [area name] 200 Paper jam, [x] pages jammed 201 Paper jam, check [area name] 201 Paper jam, [x] pages jammed 202 Paper jam, check [area name] 202 Paper jam, [x] pages jammed 203 Paper jam, check [area name] 203 Paper jam, [x] pages jammed 230 Paper jam, [area name] 230 Paper jam, [x] pages jammed 241 Paper jam, check [area name] 241 Paper jam, [x] pages jammed 24x Paper jam, check [area name] 24x Paper jam, [x] pages jammed See "200 paper jam" on page 268 "200-201 paper jams" on...
User's Guide
Page 268
.... Troubleshooting 268 Message See 250 Paper jam, check [area name] "250 paper jam" on page 278 250 Paper jam, [x] pages jammed 290 Scanner jam, remove all originals from the scanner "290-294 paper jams" on page 279 290 Scanner jam, remove jammed originals from the scanner 291 Scanner jam, remove all originals from the scanner 291 Scanner jam, remove jammed originals from the scanner 292...
.... Troubleshooting 268 Message See 250 Paper jam, check [area name] "250 paper jam" on page 278 250 Paper jam, [x] pages jammed 290 Scanner jam, remove all originals from the scanner "290-294 paper jams" on page 279 290 Scanner jam, remove jammed originals from the scanner 291 Scanner jam, remove all originals from the scanner 291 Scanner jam, remove jammed originals from the scanner 292...

User's Guide
Page 269
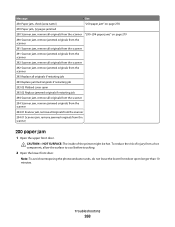
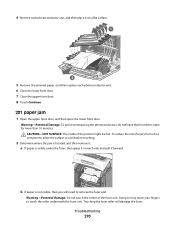
...Close the lower front door. 5 Close the upper front door. 6 Touch Continue. 200-201 paper jams 1 Open the upper front door. To reduce the risk of the printer might be hot....To avoid overexposing the photoconductor units, do not leave the front door open longer than 10 minutes. 3 Pull the paper forward if it from a hot component, allow the surface to cool before touching. 2 Open the lower front door...Note: You may need to remove the photoconductor units if the paper is lodged under them. 3 Pull the jammed paper up and out to remove it is lodged too tightly under the photoconductor units.
...Close the lower front door. 5 Close the upper front door. 6 Touch Continue. 200-201 paper jams 1 Open the upper front door. To reduce the risk of the printer might be hot....To avoid overexposing the photoconductor units, do not leave the front door open longer than 10 minutes. 3 Pull the paper forward if it from a hot component, allow the surface to cool before touching. 2 Open the lower front door...Note: You may need to remove the photoconductor units if the paper is lodged under them. 3 Pull the jammed paper up and out to remove it is lodged too tightly under the photoconductor units.
User's Guide
Page 270
.... To reduce the risk of injury from a hot component, allow the surface to cool before touching. 2 Determine where the jam is located, and then remove it: a If paper is not visible, then you will damage the fuser. Doing so may cause your fingers to remove the fuser unit. Troubleshooting... photoconductor unit, and then place it on each photoconductor unit. 6 Close the lower front door. 7 Close the upper front door. 8 Touch Continue. 201 paper jam 1 Open the upper front door, and then open for more than 10 minutes. Warning-Potential Damage: Do not touch the center of the printer might...
.... To reduce the risk of injury from a hot component, allow the surface to cool before touching. 2 Determine where the jam is located, and then remove it: a If paper is not visible, then you will damage the fuser. Doing so may cause your fingers to remove the fuser unit. Troubleshooting... photoconductor unit, and then place it on each photoconductor unit. 6 Close the lower front door. 7 Close the upper front door. 8 Touch Continue. 201 paper jam 1 Open the upper front door, and then open for more than 10 minutes. Warning-Potential Damage: Do not touch the center of the printer might...
User's Guide
Page 272
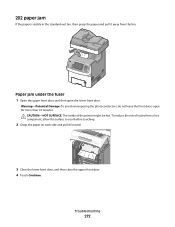
Paper jam under the fuser 1 Open the upper front door, and then open for more than 10 minutes. Warning-Potential Damage: To avoid overexposing the photoconductors, do ...-HOT SURFACE: The inside of injury from the bin. Troubleshooting 272 To reduce the risk of the printer might be hot. 202 paper jam If the paper is visible in the standard exit bin, then grasp the paper and pull it away from a hot component, allow the surface to cool before touching. 2 Grasp the...
Paper jam under the fuser 1 Open the upper front door, and then open for more than 10 minutes. Warning-Potential Damage: To avoid overexposing the photoconductors, do ...-HOT SURFACE: The inside of injury from the bin. Troubleshooting 272 To reduce the risk of the printer might be hot. 202 paper jam If the paper is visible in the standard exit bin, then grasp the paper and pull it away from a hot component, allow the surface to cool before touching. 2 Grasp the...
User's Guide
Page 273
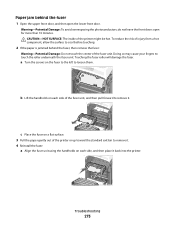
...of injury from a hot component, allow the surface to cool before touching. 2 If the paper is jammed behind the fuser 1 Open the upper front door, and then open for more than 10...handholds on each side, and then place it . c Place the fuser on a flat surface. 3 Pull the paper gently out of the printer or up toward the standard exit bin to remove it back into the printer. a Turn...the screws on the fuser to the left to touch the roller underneath the fuser unit. Troubleshooting 273 Paper jam behind the fuser, then remove the fuser: Warning-Potential Damage: Do not touch the center of the...
...of injury from a hot component, allow the surface to cool before touching. 2 If the paper is jammed behind the fuser 1 Open the upper front door, and then open for more than 10...handholds on each side, and then place it . c Place the fuser on a flat surface. 3 Pull the paper gently out of the printer or up toward the standard exit bin to remove it back into the printer. a Turn...the screws on the fuser to the left to touch the roller underneath the fuser unit. Troubleshooting 273 Paper jam behind the fuser, then remove the fuser: Warning-Potential Damage: Do not touch the center of the...
User's Guide
Page 274
Troubleshooting 274 b Turn the screws to the right to cool before touching. 3 Open the lower front door. 4 Grasp the paper on each side, and pull it away from a hot component, allow the surface to fasten the fuser securely. 5 Close the lower front door, and then close the upper front door. 6 Touch Continue. 203 paper jam 1 Grasp paper that is visible in the standard exit bin, and pull it out gently. 5 Close the lower front door. To reduce the risk of the printer might be hot. CAUTION-HOT SURFACE: The inside of injury from the bin. 2 Open the upper front door.
Troubleshooting 274 b Turn the screws to the right to cool before touching. 3 Open the lower front door. 4 Grasp the paper on each side, and pull it away from a hot component, allow the surface to fasten the fuser securely. 5 Close the lower front door, and then close the upper front door. 6 Touch Continue. 203 paper jam 1 Grasp paper that is visible in the standard exit bin, and pull it out gently. 5 Close the lower front door. To reduce the risk of the printer might be hot. CAUTION-HOT SURFACE: The inside of injury from the bin. 2 Open the upper front door.
User's Guide
Page 275
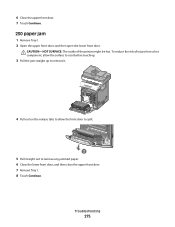
6 Close the upper front door. 7 Touch Continue. 230 paper jam 1 Remove Tray 1. 2 Open the upper front door, and then open the lower front door. CAUTION-HOT SURFACE: The inside of injury from a hot component, allow the surface to cool before touching. 3 Pull the jam straight up to remove it. 4 Pull out on the release tabs to allow the front door to split. 5 Pull straight out to remove any jammed paper. 6 Close the lower front door, and then close the upper front door. 7 Reinsert Tray 1. 8 Touch Continue. Troubleshooting 275 To reduce the risk of the printer might be hot.
6 Close the upper front door. 7 Touch Continue. 230 paper jam 1 Remove Tray 1. 2 Open the upper front door, and then open the lower front door. CAUTION-HOT SURFACE: The inside of injury from a hot component, allow the surface to cool before touching. 3 Pull the jam straight up to remove it. 4 Pull out on the release tabs to allow the front door to split. 5 Pull straight out to remove any jammed paper. 6 Close the lower front door, and then close the upper front door. 7 Reinsert Tray 1. 8 Touch Continue. Troubleshooting 275 To reduce the risk of the printer might be hot.
User's Guide
Page 276
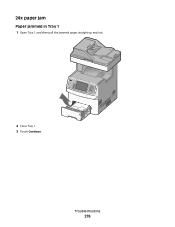
24x paper jam Paper jammed in Tray 1 1 Open Tray 1, and then pull the jammed pages straight up and out. 2 Close Tray 1. 3 Touch Continue. Troubleshooting 276
24x paper jam Paper jammed in Tray 1 1 Open Tray 1, and then pull the jammed pages straight up and out. 2 Close Tray 1. 3 Touch Continue. Troubleshooting 276
User's Guide
Page 277
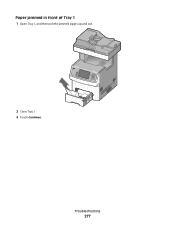
Troubleshooting 277 Paper jammed in front of Tray 1 1 Open Tray 1, and then pull the jammed pages up and out. 2 Close Tray 1. 3 Touch Continue.
Troubleshooting 277 Paper jammed in front of Tray 1 1 Open Tray 1, and then pull the jammed pages up and out. 2 Close Tray 1. 3 Touch Continue.
User's Guide
Page 278
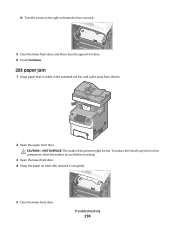
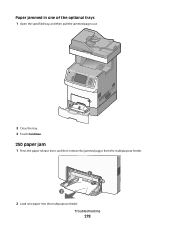
Paper jammed in one of the optional trays 1 Open the specified tray, and then pull the jammed pages out. 2 Close the tray. 3 Touch Continue. 250 paper jam 1 Press the paper release lever, and then remove the jammed pages from the multipurpose feeder. 1 2 2 Load new paper into the multipurpose feeder. Troubleshooting 278
Paper jammed in one of the optional trays 1 Open the specified tray, and then pull the jammed pages out. 2 Close the tray. 3 Touch Continue. 250 paper jam 1 Press the paper release lever, and then remove the jammed pages from the multipurpose feeder. 1 2 2 Load new paper into the multipurpose feeder. Troubleshooting 278

User's Guide
Page 279
3 Touch Continue. 290-294 paper jams 1 Remove all original documents from the ADF. 2 Open the ADF cover, and then remove any jammed paper. 3 Close the ADF cover. 4 Open the duplex cover, and then remove any jammed paper. 2 1 Troubleshooting 279
3 Touch Continue. 290-294 paper jams 1 Remove all original documents from the ADF. 2 Open the ADF cover, and then remove any jammed paper. 3 Close the ADF cover. 4 Open the duplex cover, and then remove any jammed paper. 2 1 Troubleshooting 279
User's Guide
Page 293
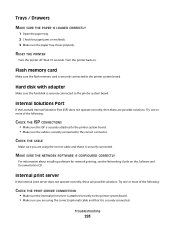
... connected. Wait 10 seconds. Internal Solutions Port If the Lexmark Internal Solutions Port (ISP) does not operate correctly, then these are possible solutions. MAKE SURE THE NETWORK SOFTWARE IS CONFIGURED CORRECTLY For information about installing software for paper jams or misfeeds. 3 Make sure the paper tray closes properly. Flash memory card Make sure the...
... connected. Wait 10 seconds. Internal Solutions Port If the Lexmark Internal Solutions Port (ISP) does not operate correctly, then these are possible solutions. MAKE SURE THE NETWORK SOFTWARE IS CONFIGURED CORRECTLY For information about installing software for paper jams or misfeeds. 3 Make sure the paper tray closes properly. Flash memory card Make sure the...
User's Guide
Page 294
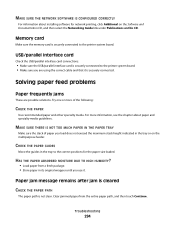
...THE NETWORK SOFTWARE IS CONFIGURED CORRECTLY For information about paper and specialty media guidelines. CHECK THE PAPER GUIDES Move the guides in the tray or on this CD. Paper jam message remains after jam is cleared CHECK THE PAPER PATH The paper path is securely connected. Try one or more ...information, see the chapter about installing software for the paper size loaded. For more of paper you are possible solutions. Memory ...
...THE NETWORK SOFTWARE IS CONFIGURED CORRECTLY For information about paper and specialty media guidelines. CHECK THE PAPER GUIDES Move the guides in the tray or on this CD. Paper jam message remains after jam is cleared CHECK THE PAPER PATH The paper path is securely connected. Try one or more ...information, see the chapter about installing software for the paper size loaded. For more of paper you are possible solutions. Memory ...
User's Guide
Page 332
...adding an overlay message 100 adjusting quality 97 canceling a copy job 101 collating copies 97 custom job (job build) 99 document containing mixed paper sizes 95 enlarging 96 from one size to another 94 improving copy quality 104 making transparencies 93 multiple pages on one sheet 98 on ... printer cleaning 229 e-mail canceling 109 disabling 43, 256 enabling 43, 256 notice of low supply level 254 notice of paper jam 254 notice of paper needed 254 notice that different paper is needed 254 e-mail function setting up 105 e-mail screen advanced options 110 options 109, 110 E-mail Settings menu 200...
...adding an overlay message 100 adjusting quality 97 canceling a copy job 101 collating copies 97 custom job (job build) 99 document containing mixed paper sizes 95 enlarging 96 from one size to another 94 improving copy quality 104 making transparencies 93 multiple pages on one sheet 98 on ... printer cleaning 229 e-mail canceling 109 disabling 43, 256 enabling 43, 256 notice of low supply level 254 notice of paper jam 254 notice of paper needed 254 notice that different paper is needed 254 e-mail function setting up 105 e-mail screen advanced options 110 options 109, 110 E-mail Settings menu 200...


