User's Guide
Page 13
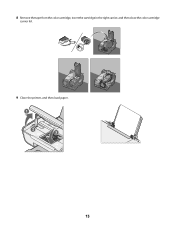
8 Remove the tape from the color cartridge, insert the cartridge in the right carrier, and then close the color cartridge carrier lid. 9 Close the printer, and then load paper. 1 2 3 13
8 Remove the tape from the color cartridge, insert the cartridge in the right carrier, and then close the color cartridge carrier lid. 9 Close the printer, and then load paper. 1 2 3 13

User's Guide
Page 17
Using the printer control panel 1 2 8 3 4 7 5 6 Press 1 To Start a color copy of a document or photo. 2 Start a black-and-white copy of a document or photo. 3 Start a 4 x 6-inch color photo copy. 4 Scan a document or photo to the computer. 5 Load or eject paper. 6 • Turn the printer on or off. • Cancel a print, copy, or scan job in progress. • Reset the printer. 7 Cancel a print, copy, or scan job in progress. 8 Set the number of copies. 17
Using the printer control panel 1 2 8 3 4 7 5 6 Press 1 To Start a color copy of a document or photo. 2 Start a black-and-white copy of a document or photo. 3 Start a 4 x 6-inch color photo copy. 4 Scan a document or photo to the computer. 5 Load or eject paper. 6 • Turn the printer on or off. • Cancel a print, copy, or scan job in progress. • Reset the printer. 7 Cancel a print, copy, or scan job in progress. 8 Set the number of copies. 17

User's Guide
Page 18
light • Determine if the color print cartridge is missing or invalid. 18 1 2 3 Check To 1 The display Determine the number of copies to be printed. 2 The • Determine if the color print cartridge needs to be replaced. light • Determine if the black or photo print cartridge is missing or invalid. 3 The • Determine if the black or photo print cartridge needs to be replaced.
light • Determine if the color print cartridge is missing or invalid. 18 1 2 3 Check To 1 The display Determine the number of copies to be printed. 2 The • Determine if the color print cartridge needs to be replaced. light • Determine if the black or photo print cartridge is missing or invalid. 3 The • Determine if the black or photo print cartridge needs to be replaced.

User's Guide
Page 19
...CD. Installing the optional XPS driver (Windows Vista users only) The XML Paper Specification (XPS) driver is an optional printer driver designed to the Lexmark Web site at www.lexmark.com. 2 From the home page, navigate through the menu selection, and then click Drivers & Downloads. 3 Choose...Before installing the XPS driver, you must install the XPS driver as an additional driver after you install the regular printer software. To use of the advanced XPS color and graphics features that automatically appears. 4 Double-click the Install icon. 5 Follow the instructions on the screens. ...
...CD. Installing the optional XPS driver (Windows Vista users only) The XML Paper Specification (XPS) driver is an optional printer driver designed to the Lexmark Web site at www.lexmark.com. 2 From the home page, navigate through the menu selection, and then click Drivers & Downloads. 3 Choose...Before installing the XPS driver, you must install the XPS driver as an additional driver after you install the regular printer software. To use of the advanced XPS color and graphics features that automatically appears. 4 Double-click the Install icon. 5 Follow the instructions on the screens. ...
User's Guide
Page 33
... one that can be framed, placed in an album, or shared with friends and family. • Lexmark PerfectFinishTM Photo Paper-A high-quality photo paper specifically designed for Lexmark inkjet printers, but compatible with all inkjet printers. Although inexpensive, it that is best when used for printing high-quality graphics. • Photo/Glossy paper-Photo paper with Lexmark's evercolorTM inks for eye-catching, color...
... one that can be framed, placed in an album, or shared with friends and family. • Lexmark PerfectFinishTM Photo Paper-A high-quality photo paper specifically designed for Lexmark inkjet printers, but compatible with all inkjet printers. Although inexpensive, it that is best when used for printing high-quality graphics. • Photo/Glossy paper-Photo paper with Lexmark's evercolorTM inks for eye-catching, color...
User's Guide
Page 39
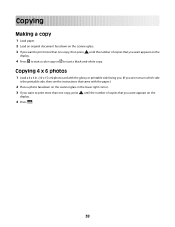
... sure which side is the printable side, then see the instructions that came with the paper.) 2 Place a photo facedown on the scanner glass in the lower right corner. 3 If you want to print more than one copy, then press until the number of copies that you want appears on the display. 4 Press to... start a color copy or to print more than one copy, press until the number of copies that you want appears...
... sure which side is the printable side, then see the instructions that came with the paper.) 2 Place a photo facedown on the scanner glass in the lower right corner. 3 If you want to print more than one copy, then press until the number of copies that you want appears on the display. 4 Press to... start a color copy or to print more than one copy, press until the number of copies that you want appears...
User's Guide
Page 45
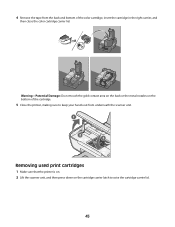
Warning-Potential Damage: Do not touch the gold contact area on the back or the metal nozzles on the cartridge carrier latch to keep your hands out from the back and bottom of the color cartridge, insert the cartridge in the right carrier, and then close the color cartridge carrier lid. 4 Remove the tape from underneath the scanner unit. 1 2 3 Removing used print cartridges 1 Make sure that the printer is on. 2 Lift the scanner unit, and then press down on the bottom of the cartridge. 5 Close the printer, making sure to raise the cartridge carrier lid. 45
Warning-Potential Damage: Do not touch the gold contact area on the back or the metal nozzles on the cartridge carrier latch to keep your hands out from the back and bottom of the color cartridge, insert the cartridge in the right carrier, and then close the color cartridge carrier lid. 4 Remove the tape from underneath the scanner unit. 1 2 3 Removing used print cartridges 1 Make sure that the printer is on. 2 Lift the scanner unit, and then press down on the bottom of the cartridge. 5 Close the printer, making sure to raise the cartridge carrier lid. 45
User's Guide
Page 48
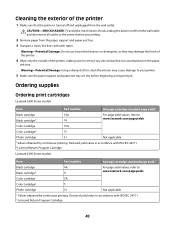
... only the outside of the printer 1 Make sure that has accumulated on the paper exit tray. Color cartridge 15A Color cartridge2 15 Photo cartridge 31 Not applicable 1Values obtained by continuous printing. Declared yield value in accordance with ISO/IEC 24711 2Licensed Return Program Cartridge Lexmark 2690 Series models Item Part number Average cartridge standard...
... only the outside of the printer 1 Make sure that has accumulated on the paper exit tray. Color cartridge 15A Color cartridge2 15 Photo cartridge 31 Not applicable 1Values obtained by continuous printing. Declared yield value in accordance with ISO/IEC 24711 2Licensed Return Program Cartridge Lexmark 2690 Series models Item Part number Average cartridge standard...
User's Guide
Page 68
...6 color copy 39 buttons, printer control panel 4 x 6 Copy 17 Black Copy 17 Cancel 17 Color Copy 17 Paper Feed 17 Power 17 Scan 17 Up arrow 17 C canceling print jobs 32 scan job 41 cards loading 25 cartridges, print installing 44 ordering 48 preserving 47 removing 45 using genuine Lexmark 46 ...wiping 46 cleaning exterior of the printer 48 copying 39 4 x 6 photos 39 custom-size paper, loading 25, 36 custom-size paper, printing 36 D document multiple copies, printing 29 documents loading on scanner glass 40 loading on the scanner glass 26 printing 28 scanning...
...6 color copy 39 buttons, printer control panel 4 x 6 Copy 17 Black Copy 17 Cancel 17 Color Copy 17 Paper Feed 17 Power 17 Scan 17 Up arrow 17 C canceling print jobs 32 scan job 41 cards loading 25 cartridges, print installing 44 ordering 48 preserving 47 removing 45 using genuine Lexmark 46 ...wiping 46 cleaning exterior of the printer 48 copying 39 4 x 6 photos 39 custom-size paper, loading 25, 36 custom-size paper, printing 36 D document multiple copies, printing 29 documents loading on scanner glass 40 loading on the scanner glass 26 printing 28 scanning...


