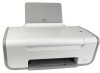
User's Guide
Page 8
... Where to find (North America) Where to find (rest of world) Telephone support Call us at www.lexmark.com. For the most recent telephone numbers available, see the printed warranty that came with your printer. 8 Support in English: Monday-Friday (8:00 AM-11:00 PM EST), Saturday (Noon-6:00 PM EST) Telephone numbers and...
... Where to find (North America) Where to find (rest of world) Telephone support Call us at www.lexmark.com. For the most recent telephone numbers available, see the printed warranty that came with your printer. 8 Support in English: Monday-Friday (8:00 AM-11:00 PM EST), Saturday (Noon-6:00 PM EST) Telephone numbers and...
User's Guide
Page 9
Visit our Web site at printer. Note: For additional information about contacting Lexmark, see the Statement of Limited Warranty section, click Inkjet & All-In-One Printers. 4 Scroll through the Web page to view the warranty. materials and workmanship for a www.lexmark.com. Select a country or region, and then select the Customer Support link. Record the following information (located...
Visit our Web site at printer. Note: For additional information about contacting Lexmark, see the Statement of Limited Warranty section, click Inkjet & All-In-One Printers. 4 Scroll through the Web page to view the warranty. materials and workmanship for a www.lexmark.com. Select a country or region, and then select the Customer Support link. Record the following information (located...
User's Guide
Page 11
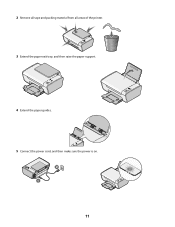
2 Remove all tape and packing material from all areas of the printer. 3 Extend the paper exit tray, and then raise the paper support. 2 1 4 Extend the paper guides. 5 Connect the power cord, and then make sure the power is on. 2 1 11
2 Remove all tape and packing material from all areas of the printer. 3 Extend the paper exit tray, and then raise the paper support. 2 1 4 Extend the paper guides. 5 Connect the power cord, and then make sure the power is on. 2 1 11
User's Guide
Page 15
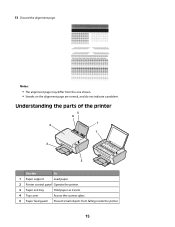
Understanding the parts of the printer 5 6 1 4 7 3 2 Use the To 1 Paper support Load paper. 2 Printer control panel Operate the printer. 3 Paper exit tray Hold paper as it exits. 4 Top cover Access the scanner glass. 5 Paper feed guard Prevent small objects from the one shown. • Streaks on the alignment page are normal, and do not indicate a problem. 13 Discard the alignment page. Notes: • The alignment page may differ from falling inside the printer. 15
Understanding the parts of the printer 5 6 1 4 7 3 2 Use the To 1 Paper support Load paper. 2 Printer control panel Operate the printer. 3 Paper exit tray Hold paper as it exits. 4 Top cover Access the scanner glass. 5 Paper feed guard Prevent small objects from the one shown. • Streaks on the alignment page are normal, and do not indicate a problem. 13 Discard the alignment page. Notes: • The alignment page may differ from falling inside the printer. 15
User's Guide
Page 16
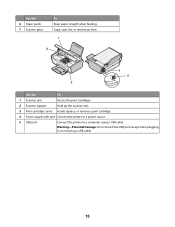
Use the 6 Paper guide 7 Scanner glass To Keep paper straight when feeding. Copy, scan, fax, or remove an item. 1 2 4 5 3 Use the To 1 Scanner unit Access the print cartridges. 2 Scanner support Hold up the scanner unit. 3 Print cartridge carrier Install, replace, or remove a print cartridge. 4 Power supply with port Connect the printer to a power source. 5 USB port Connect the printer to a computer using a USB cable. Warning-Potential Damage: Do not touch the USB port except when plugging in or removing a USB cable. 16
Use the 6 Paper guide 7 Scanner glass To Keep paper straight when feeding. Copy, scan, fax, or remove an item. 1 2 4 5 3 Use the To 1 Scanner unit Access the print cartridges. 2 Scanner support Hold up the scanner unit. 3 Print cartridge carrier Install, replace, or remove a print cartridge. 4 Power supply with port Connect the printer to a power source. 5 USB port Connect the printer to a computer using a USB cable. Warning-Potential Damage: Do not touch the USB port except when plugging in or removing a USB cable. 16
User's Guide
Page 20
... see the XPS readme file on all printers. Use the LexmarkTM Productivity Studio or Lexmark FastPics Lexmark Fax Solutions Software To • Scan, copy, fax, e-mail, or print a photo or document. • Transfer photos. • Make photo greeting cards. • Adjust settings for USB, and then click Next. 5 Click... programs and what they can help you purchased a printer that does not scan or fax items, then the printer software will not support these programs are available on the installation software CD. Use the Lexmark Fax Setup Utility to install some additional programs. The...
... see the XPS readme file on all printers. Use the LexmarkTM Productivity Studio or Lexmark FastPics Lexmark Fax Solutions Software To • Scan, copy, fax, e-mail, or print a photo or document. • Transfer photos. • Make photo greeting cards. • Adjust settings for USB, and then click Next. 5 Click... programs and what they can help you purchased a printer that does not scan or fax items, then the printer software will not support these programs are available on the installation software CD. Use the Lexmark Fax Setup Utility to install some additional programs. The...
User's Guide
Page 22
Use the To Lexmark Printer Utility • Get help with these applications, depending on a wireless network. Note: Your printer may not come with cartridge installation. • Print a test page. • Print an alignment page. • Clean the print cartridge nozzles. • Order ink or supplies. • Register the printer. • Contact customer support. Lexmark Wireless Setup Assistant Set up the printer on the features of the printer that you purchased. 22
Use the To Lexmark Printer Utility • Get help with these applications, depending on a wireless network. Note: Your printer may not come with cartridge installation. • Print a test page. • Print an alignment page. • Clean the print cartridge nozzles. • Order ink or supplies. • Register the printer. • Contact customer support. Lexmark Wireless Setup Assistant Set up the printer on the features of the printer that you purchased. 22
User's Guide
Page 23
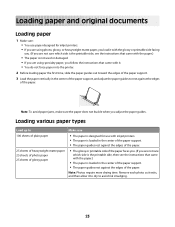
...against the edges of the paper. Note: Photos require more drying time. Loading paper and original documents Loading paper 1 Make sure: • You use paper designed for use with inkjet printers. • The paper is loaded in the center of the paper support, and adjust the paper guides to avoid ...ink smudging. 23 Loading various paper types Load up to Make sure 100 sheets of plain paper • The paper is designed for inkjet printers. • If you are using photo, glossy, or heavyweight matte paper,...
...against the edges of the paper. Note: Photos require more drying time. Loading paper and original documents Loading paper 1 Make sure: • You use paper designed for use with inkjet printers. • The paper is loaded in the center of the paper support, and adjust the paper guides to avoid ...ink smudging. 23 Loading various paper types Load up to Make sure 100 sheets of plain paper • The paper is designed for inkjet printers. • If you are using photo, glossy, or heavyweight matte paper,...
User's Guide
Page 24
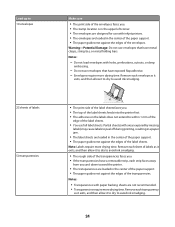
...does not extend to avoid ink smudging. 24 Envelopes require more drying time. Partial sheets (with inkjet printers. • The envelopes are loaded in the center of the paper support. • The paper guides rest against the edges of the envelopes. Remove each sheet of labels...metal clasps, string ties, or metal folding bars. Do not load envelopes with paper backing sheets are loaded in the center of the paper support. • The paper guides rest against the edges of the transparencies. Notes: • Transparencies with holes, perforations, cutouts, or deep ...
...does not extend to avoid ink smudging. 24 Envelopes require more drying time. Partial sheets (with inkjet printers. • The envelopes are loaded in the center of the paper support. • The paper guides rest against the edges of the envelopes. Remove each sheet of labels...metal clasps, string ties, or metal folding bars. Do not load envelopes with paper backing sheets are loaded in the center of the paper support. • The paper guides rest against the edges of the transparencies. Notes: • Transparencies with holes, perforations, cutouts, or deep ...

User's Guide
Page 25
... 5.0-17.0 inches • The paper is loaded in the center of the paper support. • The paper guides rest against the edges of the paper. 25 Note: Photo cards require more drying time. Note: For best results, load transfers one at a time. • The print side of the cards faces you . •...; The transfers are loaded in the center of the paper support. • The paper guides rest against the...
... 5.0-17.0 inches • The paper is loaded in the center of the paper support. • The paper guides rest against the edges of the paper. 25 Note: Photo cards require more drying time. Note: For best results, load transfers one at a time. • The print side of the cards faces you . •...; The transfers are loaded in the center of the paper support. • The paper guides rest against the...
User's Guide
Page 26
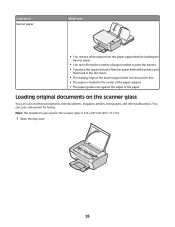
You can scan and then print photos, text documents, magazine articles, newspapers, and other publications. Note: The maximum scan area for faxing. Load up to banner paper Make sure • You remove all the paper from the paper support before loading the banner paper. • You tear off ...place the required stack of banner paper behind the printer, and then feed in .). 1 Open the top cover. 26 Loading original documents on the scanner glass You can scan a document for the scanner glass is loaded in the center of the paper support. • The paper guides rest against the edges...
You can scan and then print photos, text documents, magazine articles, newspapers, and other publications. Note: The maximum scan area for faxing. Load up to banner paper Make sure • You remove all the paper from the paper support before loading the banner paper. • You tear off ...place the required stack of banner paper behind the printer, and then feed in .). 1 Open the top cover. 26 Loading original documents on the scanner glass You can scan a document for the scanner glass is loaded in the center of the paper support. • The paper guides rest against the edges...
User's Guide
Page 28
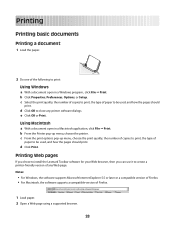
...up menu, choose the printer. e Click OK or Print. b Click Properties, Preferences, Options, or Setup. d Click Print. Notes: • For Windows, the software supports Microsoft Internet Explorer 5.5 or later or a compatible version of Firefox. • For Macintosh, the software supports a compatible version of ...If you chose to install the Lexmark Toolbar software for your Web browser, then you can use it to create a printer-friendly version of any printer software dialogs. Printing Printing basic documents Printing a document 1 Load the paper. 2 Do one of the following to print: ...
...up menu, choose the printer. e Click OK or Print. b Click Properties, Preferences, Options, or Setup. d Click Print. Notes: • For Windows, the software supports Microsoft Internet Explorer 5.5 or later or a compatible version of Firefox. • For Macintosh, the software supports a compatible version of ...If you chose to install the Lexmark Toolbar software for your Web browser, then you can use it to create a printer-friendly version of any printer software dialogs. Printing Printing basic documents Printing a document 1 Load the paper. 2 Do one of the following to print: ...
User's Guide
Page 48
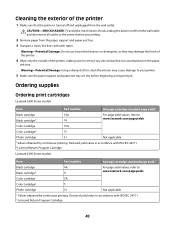
...cartridge standard page yield 1 Black cartridge 4A Black cartridge2 4 For page yield values, refer to www.lexmark.com/pageyields. Color cartridge 5A Color cartridge2 5 Photo cartridge 31 Not applicable 1 Values obtained by continuous printing. CAUTION-SHOCK HAZARD: To avoid the risk ...of electric shock, unplug the power cord from the wall outlet and disconnect all cables to your printer. 5 Make sure the paper support...
...cartridge standard page yield 1 Black cartridge 4A Black cartridge2 4 For page yield values, refer to www.lexmark.com/pageyields. Color cartridge 5A Color cartridge2 5 Photo cartridge 31 Not applicable 1 Values obtained by continuous printing. CAUTION-SHOCK HAZARD: To avoid the risk ...of electric shock, unplug the power cord from the wall outlet and disconnect all cables to your printer. 5 Make sure the paper support...
User's Guide
Page 50
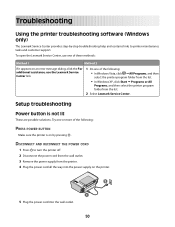
... Start ΠPrograms or All Programs, and then select the printer program folder from the list. 2 Select Lexmark Service Center. DISCONNECT AND RECONNECT THE POWER CORD 1 Press to printer maintenance tasks and customer support. To open the Lexmark Service Center, use the Lexmark Service Center link. 1 Do one of these methods: Method 1 Method 2 If it appears on...
... Start ΠPrograms or All Programs, and then select the printer program folder from the list. 2 Select Lexmark Service Center. DISCONNECT AND RECONNECT THE POWER CORD 1 Press to printer maintenance tasks and customer support. To open the Lexmark Service Center, use the Lexmark Service Center link. 1 Do one of these methods: Method 1 Method 2 If it appears on...

User's Guide
Page 51
These are supported: Windows Vista, Windows XP, Windows 2000 with the USB symbol. The USB port is damaged, use a new one. 2 Firmly plug the square end of the USB cable into the back of the printer. 3 Firmly plug the rectangular end of the USB cable into the USB port of the computer. ... DVD drive icon. 51 CHECK THAT YOUR COMPUTER MEETS THE MINIMUM SYSTEM REQUIREMENTS LISTED ON THE PRINTER BOX CHECK THE USB CONNECTION 1 Check the USB cable for any security programs. 3 Do one or more of the following operating systems are some other electrical devices have been using. 7 ...
These are supported: Windows Vista, Windows XP, Windows 2000 with the USB symbol. The USB port is damaged, use a new one. 2 Firmly plug the square end of the USB cable into the back of the printer. 3 Firmly plug the rectangular end of the USB cable into the USB port of the computer. ... DVD drive icon. 51 CHECK THAT YOUR COMPUTER MEETS THE MINIMUM SYSTEM REQUIREMENTS LISTED ON THE PRINTER BOX CHECK THE USB CONNECTION 1 Check the USB cable for any security programs. 3 Do one or more of the following operating systems are some other electrical devices have been using. 7 ...

User's Guide
Page 57
... to state or imply that only that does not infringe any time. All rights reserved. 57 For Lexmark technical support, visit support.lexmark.com. Bldg 004-2/CSC 740 New Circle Road NW Lexington, KY 40550 USA © 2008 Lexmark International, Inc. This publication could include technical inaccuracies or typographical errors. References in later editions. Improvements...
... to state or imply that only that does not infringe any time. All rights reserved. 57 For Lexmark technical support, visit support.lexmark.com. Bldg 004-2/CSC 740 New Circle Road NW Lexington, KY 40550 USA © 2008 Lexmark International, Inc. This publication could include technical inaccuracies or typographical errors. References in later editions. Improvements...

User's Guide
Page 60
...par Santé Canada. The Alert sign indicates that there are applicable if your printer has a wireless network card installed This product is available from the Director of Manufacturing and Technical Support, Lexmark International, S. Le terme « IC » précédant le .../EC on the approximation and harmonization of the laws of the Member States relating to electromagnetic compatibility and safety of Manufacturing and Technical Support, Lexmark International, Inc., S.A., Boigny, France. This product may not be used outdoors. Si le matériel (ou son antenne ...
...par Santé Canada. The Alert sign indicates that there are applicable if your printer has a wireless network card installed This product is available from the Director of Manufacturing and Technical Support, Lexmark International, S. Le terme « IC » précédant le .../EC on the approximation and harmonization of the laws of the Member States relating to electromagnetic compatibility and safety of Manufacturing and Technical Support, Lexmark International, Inc., S.A., Boigny, France. This product may not be used outdoors. Si le matériel (ou son antenne ...

User's Guide
Page 66
...America. 9 LIMITATION OF LIABILITY. This License Agreement is governed by you except to the extent necessary to "sign" a contract with Lexmark. 66 Lexmark may reject or terminate this information in any goods and services and personal property taxes, resulting from this License Agreement electronically. The Software... Program. 12 LIMITATION ON ACTIONS. The UN Convention on this page or use information you fail to comply with respect to support services performed with any other claim whatsoever related to the subject matter of , or is as set forth in any equivalent ...
...America. 9 LIMITATION OF LIABILITY. This License Agreement is governed by you except to the extent necessary to "sign" a contract with Lexmark. 66 Lexmark may reject or terminate this information in any goods and services and personal property taxes, resulting from this License Agreement electronically. The Software... Program. 12 LIMITATION ON ACTIONS. The UN Convention on this page or use information you fail to comply with respect to support services performed with any other claim whatsoever related to the subject matter of , or is as set forth in any equivalent ...

User's Guide
Page 67
... the Software Program). This License Agreement (including any addendum or amendment to this License Agreement that you and Lexmark relating to enter into this contract. 19 ENTIRE AGREEMENT. Except as otherwise provided for support services conflict with the terms of this License Agreement, the terms of this License Agreement and, if applicable...
... the Software Program). This License Agreement (including any addendum or amendment to this License Agreement that you and Lexmark relating to enter into this contract. 19 ENTIRE AGREEMENT. Except as otherwise provided for support services conflict with the terms of this License Agreement, the terms of this License Agreement and, if applicable...

User's Guide
Page 69
... 16 paper support 15 power supply port 16 print cartridge carrier 16 printer control panel 15 scanner glass 16 scanner support 16 scanner unit 16 top cover 15 USB port 16 photo cards, loading 25 photo paper, loading 23 photos copying 4 x 6 photos 39 loading on the scanner glass 26 printing photos using FastPics ...48 preserving 47 refilling 46 removing 45 using genuine Lexmark 46 wiping 46 print jobs, canceling 32 print settings saving and deleting 37 printer setting up without a computer 10 printer control panel 15 using 17 printer software installing 19 reinstalling 54 removing 54 printing ...
... 16 paper support 15 power supply port 16 print cartridge carrier 16 printer control panel 15 scanner glass 16 scanner support 16 scanner unit 16 top cover 15 USB port 16 photo cards, loading 25 photo paper, loading 23 photos copying 4 x 6 photos 39 loading on the scanner glass 26 printing photos using FastPics ...48 preserving 47 refilling 46 removing 45 using genuine Lexmark 46 wiping 46 print jobs, canceling 32 print settings saving and deleting 37 printer setting up without a computer 10 printer control panel 15 using 17 printer software installing 19 reinstalling 54 removing 54 printing ...


