User's Guide
Page 10
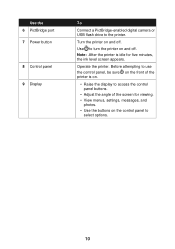
...panel, be sure on the front of the printer is idle for viewing. • View menus, settings, messages, and photos. • Use the buttons on the control panel to turn the printer on . • Raise the display to the printer. Note: .After the printer is on and off . Use the 6 ...PictBridge port 7 Power button 8 Control panel 9 Display To Connect a PictBridge-enabled digital camera or USB flash drive to access the control panel buttons. • Adjust the angle of the screen for five minutes, the ink level...
...panel, be sure on the front of the printer is idle for viewing. • View menus, settings, messages, and photos. • Use the buttons on the control panel to turn the printer on . • Raise the display to the printer. Note: .After the printer is on and off . Use the 6 ...PictBridge port 7 Power button 8 Control panel 9 Display To Connect a PictBridge-enabled digital camera or USB flash drive to access the control panel buttons. • Adjust the angle of the screen for five minutes, the ink level...
User's Guide
Page 36
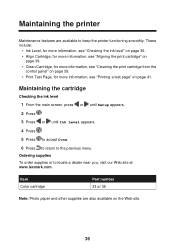
Item Color cartridge Part number 33 or 35 Note: Photo paper and other supplies are available to keep the printer functioning smoothly. These include: • Ink Level, for more information, see "Checking the ink level" on page 36. • Align Cartridge, for more information, see "Aligning the print ...Checking the ink level 1 From the main screen, press or until Setup appears. 2 Press . 3 Press or until Ink Level appears. 4 Press . 5 Press to accept Done. 6 Press to return to locate a dealer near you, visit our Web site at www.lexmark.com. Maintaining the printer Maintenance features ...
Item Color cartridge Part number 33 or 35 Note: Photo paper and other supplies are available to keep the printer functioning smoothly. These include: • Ink Level, for more information, see "Checking the ink level" on page 36. • Align Cartridge, for more information, see "Aligning the print ...Checking the ink level 1 From the main screen, press or until Setup appears. 2 Press . 3 Press or until Ink Level appears. 4 Press . 5 Press to accept Done. 6 Press to return to locate a dealer near you, visit our Web site at www.lexmark.com. Maintaining the printer Maintenance features ...
User's Guide
Page 45
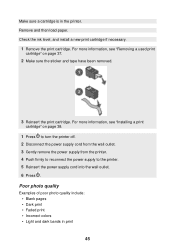
Make sure a cartridge is in print 45 Poor photo quality Examples of poor photo quality include: • Blank pages • Dark print • Faded print • Incorrect colors • Light and dark bands in the printer. Remove and then load paper. For more information, see "Installing a ... removed. 3 Reinsert the print cartridge. Check the ink level, and install a new print cartridge if necessary. 1 Remove the print cartridge. For more information, see "Removing a used print cartridge" on page 38. 1 Press to turn the printer off. 2 Disconnect the power supply cord from the...
Make sure a cartridge is in print 45 Poor photo quality Examples of poor photo quality include: • Blank pages • Dark print • Faded print • Incorrect colors • Light and dark bands in the printer. Remove and then load paper. For more information, see "Installing a ... removed. 3 Reinsert the print cartridge. Check the ink level, and install a new print cartridge if necessary. 1 Remove the print cartridge. For more information, see "Removing a used print cartridge" on page 38. 1 Press to turn the printer off. 2 Disconnect the power supply cord from the...


