User's Guide
Page 3
... printer 7 Understanding the printer 9 Printer parts...9 Using the control panel 11 Navigating the display menus 13 Loading paper into the printer 15 Loading paper 15 Selecting the paper size 16 Selecting the paper type 16 Getting started printing photos 17 Previewing photos 17 Selecting and printing photos 17 Printing an index page 17 Printing all photos from a photo storage device 19 Printing multiple copies of a photo 19 Changing the print quality 19 Selecting and editing photos 21 Adjusting the print area 21 Adjusting the appearance of photos 22 Using Color...
... printer 7 Understanding the printer 9 Printer parts...9 Using the control panel 11 Navigating the display menus 13 Loading paper into the printer 15 Loading paper 15 Selecting the paper size 16 Selecting the paper type 16 Getting started printing photos 17 Previewing photos 17 Selecting and printing photos 17 Printing an index page 17 Printing all photos from a photo storage device 19 Printing multiple copies of a photo 19 Changing the print quality 19 Selecting and editing photos 21 Adjusting the print area 21 Adjusting the appearance of photos 22 Using Color...
User's Guide
Page 5
... or cabling connections, such as the power cord or telephone, during a lightning storm. Other trademarks are the property of Lexmark International, Inc., registered in the user documentation, to copy certain materials without permission or license, including documents, images, and currency. CAUTION: A caution identifies something that could damage your product hardware or software. Copyright advisory It may be illegal to a professional service...
... or cabling connections, such as the power cord or telephone, during a lightning storm. Other trademarks are the property of Lexmark International, Inc., registered in the user documentation, to copy certain materials without permission or license, including documents, images, and currency. CAUTION: A caution identifies something that could damage your product hardware or software. Copyright advisory It may be illegal to a professional service...
User's Guide
Page 6
... printer will not read a memory card if a second memory card or a USB flash drive is inserted, if a PictBridge-enabled digital camera is connected, or a camera phone is detected. CD • Insert only one memory card at www.lexmark.com for late-breaking information about supported Bluetooth adapters. • Follow the instructions provided with the printer. • Consult the Lexmark Web site at a time. Things you want to print a photo while using the control panel, a photo...
... printer will not read a memory card if a second memory card or a USB flash drive is inserted, if a PictBridge-enabled digital camera is connected, or a camera phone is detected. CD • Insert only one memory card at www.lexmark.com for late-breaking information about supported Bluetooth adapters. • Follow the instructions provided with the printer. • Consult the Lexmark Web site at a time. Things you want to print a photo while using the control panel, a photo...
User's Guide
Page 7
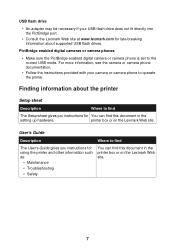
... your USB flash drive does not fit directly into the PictBridge port. • Consult the Lexmark Web site at www.lexmark.com for You can find this document in the setting up hardware. USB flash drive • An adapter may be necessary if your camera or camera phone to find The Setup sheet gives you instructions for using the printer and other information such as: • Maintenance • Troubleshooting •...
... your USB flash drive does not fit directly into the PictBridge port. • Consult the Lexmark Web site at www.lexmark.com for You can find this document in the setting up hardware. USB flash drive • An adapter may be necessary if your camera or camera phone to find The Setup sheet gives you instructions for using the printer and other information such as: • Maintenance • Troubleshooting •...
User's Guide
Page 9
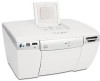
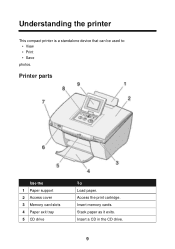
Insert a CD in the CD drive. 9 Stack paper as it exits. Understanding the printer This compact printer is a standalone device that can be used to: • View • Print • Save photos. Access the print cartridge. Insert memory cards. Printer parts Use the 1 Paper support 2 Access cover 3 Memory card slots 4 Paper exit tray 5 CD drive To Load paper.
Insert a CD in the CD drive. 9 Stack paper as it exits. Understanding the printer This compact printer is a standalone device that can be used to: • View • Print • Save photos. Access the print cartridge. Insert memory cards. Printer parts Use the 1 Paper support 2 Access cover 3 Memory card slots 4 Paper exit tray 5 CD drive To Load paper.
User's Guide
Page 11
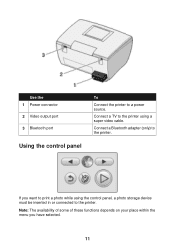
Note: The availability of some of these functions depends on your place within the menu you want to the printer. Connect a Bluetooth adapter (only) to a power source. Connect a TV to the printer using the control panel, a photo storage device must be inserted in or connected to print a photo while using a super video cable. If you have selected. 11 Use the 1 Power connector 2 Video output port 3 Bluetooth port Using the control panel To Connect the printer to the printer.
Note: The availability of some of these functions depends on your place within the menu you want to the printer. Connect a Bluetooth adapter (only) to a power source. Connect a TV to the printer using the control panel, a photo storage device must be inserted in or connected to print a photo while using a super video cable. If you have selected. 11 Use the 1 Power connector 2 Video output port 3 Bluetooth port Using the control panel To Connect the printer to the printer.

User's Guide
Page 12
... effect when you are on the opening screen of a menu. • Edit photos, such as cropping, enhancing the image, and removing red-eye. • Change the number of copies. Note: This button has no effect when you are on the opening screen of a menu. • Start printing. • Start a slideshow. • Start copying to a CD or USB flash drive. Note: This button is only lit when available...
... effect when you are on the opening screen of a menu. • Edit photos, such as cropping, enhancing the image, and removing red-eye. • Change the number of copies. Note: This button has no effect when you are on the opening screen of a menu. • Start printing. • Start a slideshow. • Start copying to a CD or USB flash drive. Note: This button is only lit when available...
User's Guide
Page 13
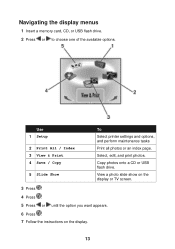
Navigating the display menus 1 Insert a memory card, CD, or USB flash drive. 2 Press or to choose one of the available options. Select, edit, and print photos. Copy photos onto a CD or USB flash drive. View a photo slide show on the display or TV screen. 3 Press . 4 Press . 5 Press or until the option you want appears. 6 Press . 7 Follow the instructions on the display. 13 Use 1 Setup 2 Print All / Index 3 View & Print 4 Save / Copy 5 Slide Show To Select printer settings and options, and perform maintenance tasks Print all photos or an index page.
Navigating the display menus 1 Insert a memory card, CD, or USB flash drive. 2 Press or to choose one of the available options. Select, edit, and print photos. Copy photos onto a CD or USB flash drive. View a photo slide show on the display or TV screen. 3 Press . 4 Press . 5 Press or until the option you want appears. 6 Press . 7 Follow the instructions on the display. 13 Use 1 Setup 2 Print All / Index 3 View & Print 4 Save / Copy 5 Slide Show To Select printer settings and options, and perform maintenance tasks Print all photos or an index page.
User's Guide
Page 14
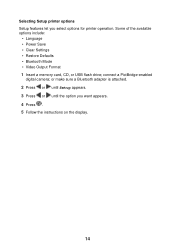
or make sure a Bluetooth adapter is attached. 2 Press or until Setup appears. 3 Press or until the option you select options for printer operation. connect a PictBridge-enabled digital camera; Selecting Setup printer options Setup features let you want appears. 4 Press . 5 Follow the instructions on the display. 14 Some of the available options include: • Language • Power Save • Clear Settings • Restore Defaults • Bluetooth Mode • Video Output Format 1 Insert a memory card, CD, or USB flash drive;
or make sure a Bluetooth adapter is attached. 2 Press or until Setup appears. 3 Press or until the option you select options for printer operation. connect a PictBridge-enabled digital camera; Selecting Setup printer options Setup features let you want appears. 4 Press . 5 Follow the instructions on the display. 14 Some of the available options include: • Language • Power Save • Clear Settings • Restore Defaults • Bluetooth Mode • Video Output Format 1 Insert a memory card, CD, or USB flash drive;
User's Guide
Page 26
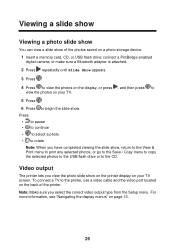
Video output The printer lets you have completed viewing the slide show, return to the View & Print menu to print any selected photos, or go to the Save / Copy menu to copy the selected photos to the USB flash drive or to begin the slide show. connect a PictBridge-enabled digital camera; For more information, see "Navigating the display menus" on a photo storage device. 1 Insert a memory card, CD, or USB flash drive; Press •...
Video output The printer lets you have completed viewing the slide show, return to the View & Print menu to print any selected photos, or go to the Save / Copy menu to copy the selected photos to the USB flash drive or to begin the slide show. connect a PictBridge-enabled digital camera; For more information, see "Navigating the display menus" on a photo storage device. 1 Insert a memory card, CD, or USB flash drive; Press •...
User's Guide
Page 27
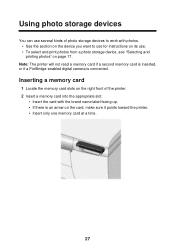
Using photo storage devices You can use . • To select and print photos from a photo storage device, see "Selecting and printing photos" on the card, make sure it points toward the printer. • Insert only one memory card at a time. 27 Note: The printer will not read a memory card if a second memory card is inserted, or if a PictBridge-enabled digital camera is an arrow on page 17. Inserting a memory card 1 Locate the memory card slots on the...
Using photo storage devices You can use . • To select and print photos from a photo storage device, see "Selecting and printing photos" on the card, make sure it points toward the printer. • Insert only one memory card at a time. 27 Note: The printer will not read a memory card if a second memory card is inserted, or if a PictBridge-enabled digital camera is an arrow on page 17. Inserting a memory card 1 Locate the memory card slots on the...

User's Guide
Page 34
..., use the buttons on the camera to operate the printer. 1 Insert one end of the USB cable into the PictBridge port on the front of the printer. Note: Use only the USB cable that came with the coated side facing you insert the memory card into the printer. For more information, see the camera documentation. 3 Follow the instructions in the camera. Note: Be sure the size of the paper loaded...
..., use the buttons on the camera to operate the printer. 1 Insert one end of the USB cable into the PictBridge port on the front of the printer. Note: Use only the USB cable that came with the coated side facing you insert the memory card into the printer. For more information, see the camera documentation. 3 Follow the instructions in the camera. Note: Be sure the size of the paper loaded...

User's Guide
Page 39
..., see "Cleaning the print cartridge from the control panel Clean the print cartridge when you : • Have installed a new cartridge • Want to improve print quality 1 Press or until Setup appears. 2 Press . 3 Press or until Align Cartridge appears. 4 Press . 5 Press to accept Align. 6 Press to accept Done. 7 Press to return to align the cartridge? Do you aligned the cartridge to accept Yes. appears. 5 Press to improve print quality, print your photo again. If...
..., see "Cleaning the print cartridge from the control panel Clean the print cartridge when you : • Have installed a new cartridge • Want to improve print quality 1 Press or until Setup appears. 2 Press . 3 Press or until Align Cartridge appears. 4 Press . 5 Press to accept Align. 6 Press to accept Done. 7 Press to return to align the cartridge? Do you aligned the cartridge to accept Yes. appears. 5 Press to improve print quality, print your photo again. If...
User's Guide
Page 41
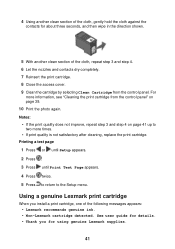
... print cartridge. 8 Close the access cover. 9 Clean the cartridge by selecting Clean Cartridge from the control panel" on page 41 up to the Setup menu. Using a genuine Lexmark print cartridge When you for using genuine Lexmark supplies. 41 Printing a test page 1 Press or until Setup appears. 2 Press . 3 Press until Print Test Page appears. 4 Press twice. 5 Press to return to two more information, see "Cleaning the print cartridge from the control panel. For more times. • If print quality is not satisfactory after cleaning, replace the print cartridge...
... print cartridge. 8 Close the access cover. 9 Clean the cartridge by selecting Clean Cartridge from the control panel" on page 41 up to the Setup menu. Using a genuine Lexmark print cartridge When you for using genuine Lexmark supplies. 41 Printing a test page 1 Press or until Setup appears. 2 Press . 3 Press until Print Test Page appears. 4 Press twice. 5 Press to return to two more information, see "Cleaning the print cartridge from the control panel. For more times. • If print quality is not satisfactory after cleaning, replace the print cartridge...
User's Guide
Page 45
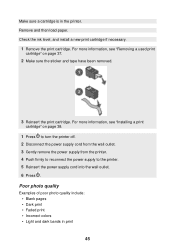
... poor photo quality include: • Blank pages • Dark print • Faded print • Incorrect colors • Light and dark bands in the printer. Check the ink level, and install a new print cartridge if necessary. 1 Remove the print cartridge. For more information, see "Removing a used print cartridge" on page 38. 1 Press to turn the printer off. 2 Disconnect the power supply cord from the wall outlet. 3 Gently remove the power supply from the printer. 4 Push firmly to reconnect the power supply...
... poor photo quality include: • Blank pages • Dark print • Faded print • Incorrect colors • Light and dark bands in the printer. Check the ink level, and install a new print cartridge if necessary. 1 Remove the print cartridge. For more information, see "Removing a used print cartridge" on page 38. 1 Press to turn the printer off. 2 Disconnect the power supply cord from the wall outlet. 3 Gently remove the power supply from the printer. 4 Push firmly to reconnect the power supply...
User's Guide
Page 46
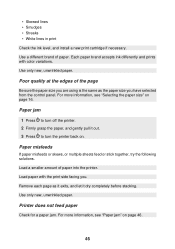
... multiple sheets feed or stick together, try the following solutions. Load paper with color variations. Poor quality at the edges of paper into the printer. Remove each page as the paper size you . • Skewed lines • Smudges • Streaks • White lines in print Check the ink level, and install a new print cartridge if necessary. Use only new, unwrinkled paper. For more information, see "Paper jam" on page 46. 46 Printer does not feed paper Check for a paper jam. Paper jam 1 Press to turn the printer back...
... multiple sheets feed or stick together, try the following solutions. Load paper with color variations. Poor quality at the edges of paper into the printer. Remove each page as the paper size you . • Skewed lines • Smudges • Streaks • White lines in print Check the ink level, and install a new print cartridge if necessary. Use only new, unwrinkled paper. For more information, see "Paper jam" on page 46. 46 Printer does not feed paper Check for a paper jam. Paper jam 1 Press to turn the printer back...

User's Guide
Page 53
The Power Saver Mode saves energy by the time the product spends in each mode's energy usage. 53 The factory default Power Saver Timeout for this product is not used for a specified period of time, called Power Saver. Setting the Power Saver Timeout to calculate energy usage. Since power consumption claims are provided in power units of the product. By using the printer configuration menus, the Power Saver Timeout can...
The Power Saver Mode saves energy by the time the product spends in each mode's energy usage. 53 The factory default Power Saver Timeout for this product is not used for a specified period of time, called Power Saver. Setting the Power Saver Timeout to calculate energy usage. Since power consumption claims are provided in power units of the product. By using the printer configuration menus, the Power Saver Timeout can...

User's Guide
Page 54
... 48 cards memory 27 CD drive 9 using 30 Clean Cartridge feature 39 cleaning print nozzles using control panel 39 Color Effects feature 24 control panel 9 display 9 using 11 Copies setting 19 Copy Photos 13 cropping photos 21 D Device Name 32 digital camera cannot print 48 digital camera (PictBridge-enabled) 34 display, control panel 9 DPOF settings 34 E emission notices 50 enhancing an image 23 error message 1102 48 error messages troubleshooting 48 F FCC notices 50 finding information 7 publications 7 Web site 8 flash drives see USB flash drives G general troubleshooting 43 I Image Enhance...
... 48 cards memory 27 CD drive 9 using 30 Clean Cartridge feature 39 cleaning print nozzles using control panel 39 Color Effects feature 24 control panel 9 display 9 using 11 Copies setting 19 Copy Photos 13 cropping photos 21 D Device Name 32 digital camera cannot print 48 digital camera (PictBridge-enabled) 34 display, control panel 9 DPOF settings 34 E emission notices 50 enhancing an image 23 error message 1102 48 error messages troubleshooting 48 F FCC notices 50 finding information 7 publications 7 Web site 8 flash drives see USB flash drives G general troubleshooting 43 I Image Enhance...

User's Guide
Page 55
... moving print area 21 multiple copies, printing 19 N nothing happens when memory card is inserted 47 notices 50, 52 O ordering supplies 36 P page does not print 44 paper loading 15 sizes 15 paper exit tray 9 paper jam 46 paper misfeeds 46 paper size selecting 16 Paper Size setting 16 paper support 9 Paper Type setting 16 part number cartridge 36 personal digital assistant 32 phone camera 32 photo storage device troubleshooting 47 photos adjusting print area 21 cropping 21 editing 21 previewing 17 printing from PictBridge-enabled...
... moving print area 21 multiple copies, printing 19 N nothing happens when memory card is inserted 47 notices 50, 52 O ordering supplies 36 P page does not print 44 paper loading 15 sizes 15 paper exit tray 9 paper jam 46 paper misfeeds 46 paper size selecting 16 Paper Size setting 16 paper support 9 Paper Type setting 16 part number cartridge 36 personal digital assistant 32 phone camera 32 photo storage device troubleshooting 47 photos adjusting print area 21 cropping 21 editing 21 previewing 17 printing from PictBridge-enabled...
User's Guide
Page 56
...-enabled camera 34 test page 41 using DPOF settings 34 publications finding 7 Q quality poor 45 R recycling Lexmark products 42 red eye, removing 23 Remove Red-Eye feature 23 removing print cartridge 37 rotating photos 21 U USB flash drives inserting 29 USB port 11 using CD drive 30 V video output 26 video output port 26 View & Print 13 W Web site finding 8 Z zooming photos 21 S safety information 5 selecting paper size 16 photos 17 print quality 19 selecting paper types 16 Sepia Tone Print 24 Setup...
...-enabled camera 34 test page 41 using DPOF settings 34 publications finding 7 Q quality poor 45 R recycling Lexmark products 42 red eye, removing 23 Remove Red-Eye feature 23 removing print cartridge 37 rotating photos 21 U USB flash drives inserting 29 USB port 11 using CD drive 30 V video output 26 video output port 26 View & Print 13 W Web site finding 8 Z zooming photos 21 S safety information 5 selecting paper size 16 photos 17 print quality 19 selecting paper types 16 Sepia Tone Print 24 Setup...


