User's Guide
Page 3
... started 6 Finding information about the printer 7 Understanding the printer 9 Printer parts...9 Using the control panel 11 Navigating the display menus 13 Loading paper into the printer 15 Loading paper 15 Selecting the paper size 16 Selecting the paper type 16 Getting started printing photos 17 Previewing photos 17 Selecting and printing photos 17 Printing an index page...
... started 6 Finding information about the printer 7 Understanding the printer 9 Printer parts...9 Using the control panel 11 Navigating the display menus 13 Loading paper into the printer 15 Loading paper 15 Selecting the paper size 16 Selecting the paper type 16 Getting started printing photos 17 Previewing photos 17 Selecting and printing photos 17 Printing an index page...
User's Guide
Page 4
Using photo storage devices 27 Inserting a memory card 27 Inserting a USB flash drive 29 Using the CD drive 30 Printing directly from digital cameras, mobile phones, and PDAs 32 Printing from mobile phones 32 Bluetooth wireless support 32 Using a PictBridge-enabled digital camera to control printing photos............34 Printing a DPOF selection 34 Maintaining the printer 36 Maintaining the cartridge 36 Refilling the print cartridge 42 Troubleshooting 43 General troubleshooting 43 Photo storage device troubleshooting 47 Error messages 48 Notices 50 Index 54 4
Using photo storage devices 27 Inserting a memory card 27 Inserting a USB flash drive 29 Using the CD drive 30 Printing directly from digital cameras, mobile phones, and PDAs 32 Printing from mobile phones 32 Bluetooth wireless support 32 Using a PictBridge-enabled digital camera to control printing photos............34 Printing a DPOF selection 34 Maintaining the printer 36 Maintaining the cartridge 36 Refilling the print cartridge 42 Troubleshooting 43 General troubleshooting 43 Photo storage device troubleshooting 47 Error messages 48 Notices 50 Index 54 4
User's Guide
Page 6
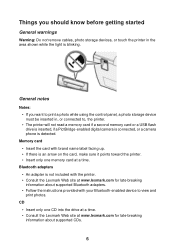
... before getting started General warnings Warning: Do not remove cables, photo storage devices, or touch the printer in , or connected to view and print photos. Things you want to print a photo while using the control panel, a photo storage device must be inserted in the area shown while the light... is detected. Bluetooth adapters • An adapter is not included with the printer. • Consult the Lexmark Web site at www.lexmark.com ...
... before getting started General warnings Warning: Do not remove cables, photo storage devices, or touch the printer in , or connected to view and print photos. Things you want to print a photo while using the control panel, a photo storage device must be inserted in the area shown while the light... is detected. Bluetooth adapters • An adapter is not included with the printer. • Consult the Lexmark Web site at www.lexmark.com ...
User's Guide
Page 9
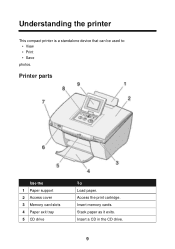
Access the print cartridge. Insert memory cards. Understanding the printer This compact printer is a standalone device that can be used to: • View • Print • Save photos. Stack paper as it exits. Printer parts Use the 1 Paper support 2 Access cover 3 Memory card slots 4 Paper exit tray 5 CD drive To Load paper. Insert a CD in the CD drive. 9
Access the print cartridge. Insert memory cards. Understanding the printer This compact printer is a standalone device that can be used to: • View • Print • Save photos. Stack paper as it exits. Printer parts Use the 1 Paper support 2 Access cover 3 Memory card slots 4 Paper exit tray 5 CD drive To Load paper. Insert a CD in the CD drive. 9
User's Guide
Page 10
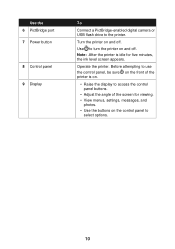
... to access the control panel buttons. • Adjust the angle of the printer is idle for viewing. • View menus, settings, messages, and photos. • Use the buttons on the control panel to turn the printer on and off . Operate the printer. Use the 6 PictBridge port 7 Power button 8 Control panel 9 Display To Connect a PictBridge..., be sure on the front of the screen for five minutes, the ink level screen appears. Use to select options. 10 Before attempting to the printer. Turn the printer on and off .
... to access the control panel buttons. • Adjust the angle of the printer is idle for viewing. • View menus, settings, messages, and photos. • Use the buttons on the control panel to turn the printer on and off . Operate the printer. Use the 6 PictBridge port 7 Power button 8 Control panel 9 Display To Connect a PictBridge..., be sure on the front of the screen for five minutes, the ink level screen appears. Use to select options. 10 Before attempting to the printer. Turn the printer on and off .
User's Guide
Page 11
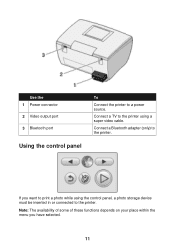
Note: The availability of some of these functions depends on your place within the menu you want to the printer. Connect a TV to the printer using the control panel, a photo storage device must be inserted in or connected to print a photo while using a super video cable. If you have selected. 11 Use the 1 Power connector 2 Video output port 3 Bluetooth port Using the control panel To Connect the printer to the printer. Connect a Bluetooth adapter (only) to a power source.
Note: The availability of some of these functions depends on your place within the menu you want to the printer. Connect a TV to the printer using the control panel, a photo storage device must be inserted in or connected to print a photo while using a super video cable. If you have selected. 11 Use the 1 Power connector 2 Video output port 3 Bluetooth port Using the control panel To Connect the printer to the printer. Connect a Bluetooth adapter (only) to a power source.
User's Guide
Page 13
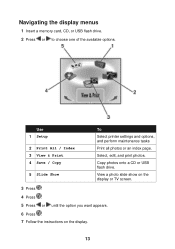
View a photo slide show on the display or TV screen. 3 Press . 4 Press . 5 Press or until the option you want appears. 6 Press . 7 Follow the instructions on the display. 13 Use 1 Setup 2 Print All / Index 3 View & Print 4 Save / Copy 5 Slide Show To Select printer settings and options, and perform maintenance tasks Print all photos or an index page. Select, edit, and print photos. Copy photos onto a CD or USB flash drive. Navigating the display menus 1 Insert a memory card, CD, or USB flash drive. 2 Press or to choose one of the available options.
View a photo slide show on the display or TV screen. 3 Press . 4 Press . 5 Press or until the option you want appears. 6 Press . 7 Follow the instructions on the display. 13 Use 1 Setup 2 Print All / Index 3 View & Print 4 Save / Copy 5 Slide Show To Select printer settings and options, and perform maintenance tasks Print all photos or an index page. Select, edit, and print photos. Copy photos onto a CD or USB flash drive. Navigating the display menus 1 Insert a memory card, CD, or USB flash drive. 2 Press or to choose one of the available options.
User's Guide
Page 15
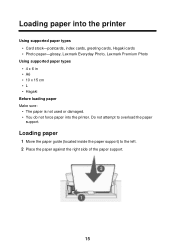
Loading paper into the printer Using supported paper types • Card stock-postcards, index cards, greeting cards, Hagaki cards • Photo paper-glossy, Lexmark Everyday Photo, Lexmark Premium Photo Using supported paper types • 4 x 6 in • A6 • 10 x 15 cm •L • Hagaki ...Before loading paper Make sure: • The paper is not used or damaged. • You do not force paper into the printer. ...
Loading paper into the printer Using supported paper types • Card stock-postcards, index cards, greeting cards, Hagaki cards • Photo paper-glossy, Lexmark Everyday Photo, Lexmark Premium Photo Using supported paper types • 4 x 6 in • A6 • 10 x 15 cm •L • Hagaki ...Before loading paper Make sure: • The paper is not used or damaged. • You do not force paper into the printer. ...
User's Guide
Page 17
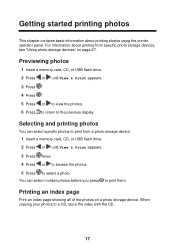
For information about printing photos using the printer operator panel. Selecting and printing photos You can select multiple photos before you press to print from specific photo storage devices, see "Using photo storage devices" on a photo storage device. When copying your photos to select a photo. You can select specific photos to print them. Printing an index page Print an index page...
For information about printing photos using the printer operator panel. Selecting and printing photos You can select multiple photos before you press to print from specific photo storage devices, see "Using photo storage devices" on a photo storage device. When copying your photos to select a photo. You can select specific photos to print them. Printing an index page Print an index page...
User's Guide
Page 21
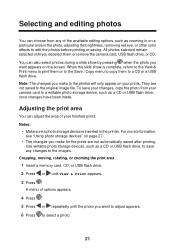
... on page 27. • The changes you want to adjust appears. 6 Press to the images. Use writable photo storage devices, such as zooming in the printer. Note: The changes you deselect them to edit the photos before printing or saving. They are not automatically saved after printing. Adjusting the print area You can...
... on page 27. • The changes you want to adjust appears. 6 Press to the images. Use writable photo storage devices, such as zooming in the printer. Note: The changes you deselect them to edit the photos before printing or saving. They are not automatically saved after printing. Adjusting the print area You can...
User's Guide
Page 26
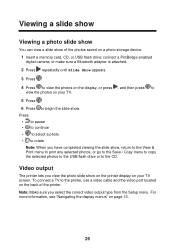
... page 13. 26 Note: Make sure you have completed viewing the slide show on the printer display on your TV. 5 Press . 6 Press to the printer, use a video cable and the video port located on a photo storage device. 1 Insert a memory card, CD, or USB flash drive; For more information, see "Navigating... the display menus" on your TV screen. Viewing a slide show Viewing a photo slide show You can view a slide show of the photos saved on the back of the printer. To connect a TV to begin the slide show. Press • to pause • to continue •...
... page 13. 26 Note: Make sure you have completed viewing the slide show on the printer display on your TV. 5 Press . 6 Press to the printer, use a video cable and the video port located on a photo storage device. 1 Insert a memory card, CD, or USB flash drive; For more information, see "Navigating... the display menus" on your TV screen. Viewing a slide show Viewing a photo slide show You can view a slide show of the photos saved on the back of the printer. To connect a TV to begin the slide show. Press • to pause • to continue •...
User's Guide
Page 27
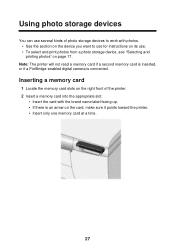
... page 17. Inserting a memory card 1 Locate the memory card slots on the right front of the printer. 2 Insert a memory card into the appropriate slot. • Insert the card with photos. • See the section on the device you want to use for instructions on the card, make sure it points toward... the printer. • Insert only one memory card at a time. 27 Note: The printer will not read a memory card if a second memory...
... page 17. Inserting a memory card 1 Locate the memory card slots on the right front of the printer. 2 Insert a memory card into the appropriate slot. • Insert the card with photos. • See the section on the device you want to use for instructions on the card, make sure it points toward... the printer. • Insert only one memory card at a time. 27 Note: The printer will not read a memory card if a second memory...
User's Guide
Page 29
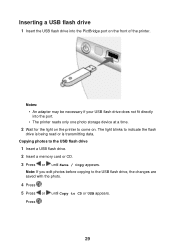
Press . 29 Note: If you edit photos before copying to the USB flash drive, the changes are saved with the photo. 4 Press . 5 Press or until Save / Copy appears. The light blinks to CD or USB appears. Notes: • An adapter may be necessary if your USB ... a USB flash drive 1 Insert the USB flash drive into the port. • The printer reads only one photo storage device at a time. 2 Wait for the light on the printer to the USB flash drive 1 Insert a USB flash drive. 2 Insert a memory card or CD. 3 Press or until Copy to indicate the flash drive is...
Press . 29 Note: If you edit photos before copying to the USB flash drive, the changes are saved with the photo. 4 Press . 5 Press or until Save / Copy appears. The light blinks to CD or USB appears. Notes: • An adapter may be necessary if your USB ... a USB flash drive 1 Insert the USB flash drive into the port. • The printer reads only one photo storage device at a time. 2 Wait for the light on the printer to the USB flash drive 1 Insert a USB flash drive. 2 Insert a memory card or CD. 3 Press or until Copy to indicate the flash drive is...
User's Guide
Page 30
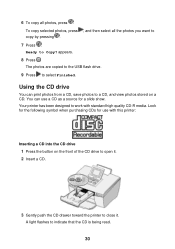
...copy by pressing . 7 Press . The photos are copied to the USB flash drive. 9 Press to a CD, and view photos stored on the front of the CD drive to open it. 2 Insert a CD. 3 Gently push the CD drawer toward the printer to close it. appears. 8 Press . Your printer has been designed to work with... this printer: Inserting a CD into the CD drive 1 Press the...
...copy by pressing . 7 Press . The photos are copied to the USB flash drive. 9 Press to a CD, and view photos stored on the front of the CD drive to open it. 2 Insert a CD. 3 Gently push the CD drawer toward the printer to close it. appears. 8 Press . Your printer has been designed to work with... this printer: Inserting a CD into the CD drive 1 Press the...
User's Guide
Page 32
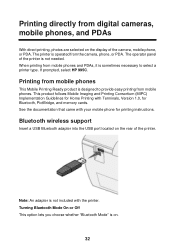
Printing directly from digital cameras, mobile phones, and PDAs With direct printing, photos are selected on the display of the printer is not needed. See the documentation that came with the printer. Turning Bluetooth Mode On or Off This option lets you choose whether "Bluetooth Mode" is operated from the camera, phone, or PDA... Printing with Terminals, Version 1.0, for printing instructions. If prompted, select HP 995C. Printing from mobile phones This Mobile Printing Ready product is designed to select a printer type. The printer is on the rear of the...
Printing directly from digital cameras, mobile phones, and PDAs With direct printing, photos are selected on the display of the printer is not needed. See the documentation that came with the printer. Turning Bluetooth Mode On or Off This option lets you choose whether "Bluetooth Mode" is operated from the camera, phone, or PDA... Printing with Terminals, Version 1.0, for printing instructions. If prompted, select HP 995C. Printing from mobile phones This Mobile Printing Ready product is designed to select a printer type. The printer is on the rear of the...

User's Guide
Page 34
... a PictBridge-enabled digital camera to control printing photos Connect a PictBridge-enabled digital camera to the printer, and use photo paper with the digital camera. 2 Insert the other end of the cable into the PictBridge port on the front of the printer. Note: Use only the USB cable that came... side facing you. If your digital camera supports DPOF, you can specify which photos to select and print photos. The printer recognizes these settings when you specified in the DPOF selection. 1 Make sure the printer is still in the camera documentation to print, and how many of the paper...
... a PictBridge-enabled digital camera to control printing photos Connect a PictBridge-enabled digital camera to the printer, and use photo paper with the digital camera. 2 Insert the other end of the cable into the PictBridge port on the front of the printer. Note: Use only the USB cable that came... side facing you. If your digital camera supports DPOF, you can specify which photos to select and print photos. The printer recognizes these settings when you specified in the DPOF selection. 1 Make sure the printer is still in the camera documentation to print, and how many of the paper...
User's Guide
Page 36
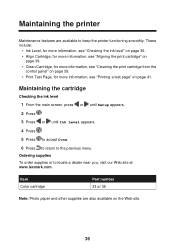
...return to locate a dealer near you, visit our Web site at www.lexmark.com. Item Color cartridge Part number 33 or 35 Note: Photo paper and other supplies are available to keep the printer functioning smoothly. Ordering supplies To order supplies or to the previous menu. ...Maintaining the printer Maintenance features are also available on page 41. These include: •...
...return to locate a dealer near you, visit our Web site at www.lexmark.com. Item Color cartridge Part number 33 or 35 Note: Photo paper and other supplies are available to keep the printer functioning smoothly. Ordering supplies To order supplies or to the previous menu. ...Maintaining the printer Maintenance features are also available on page 41. These include: •...
User's Guide
Page 43
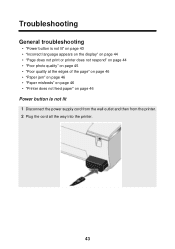
Troubleshooting General troubleshooting • "Power button is not lit" on page 43 • "Incorrect language appears on the display" on page 44 • "Page does not print or printer does not respond" on page 44 • "Poor photo quality" on page 45 • "Poor quality at the edges of the page" on page 46 • "Paper jam" on page 46 • "Paper misfeeds" on page 46 • "Printer does not feed paper" on page 46 Power button is not lit 1 Disconnect the power supply cord from the wall outlet and then from the printer. 2 Plug the cord all the way into the printer. 43
Troubleshooting General troubleshooting • "Power button is not lit" on page 43 • "Incorrect language appears on the display" on page 44 • "Page does not print or printer does not respond" on page 44 • "Poor photo quality" on page 45 • "Poor quality at the edges of the page" on page 46 • "Paper jam" on page 46 • "Paper misfeeds" on page 46 • "Printer does not feed paper" on page 46 Power button is not lit 1 Disconnect the power supply cord from the wall outlet and then from the printer. 2 Plug the cord all the way into the printer. 43
User's Guide
Page 45
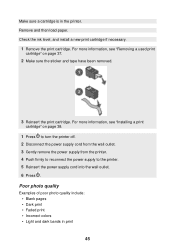
...from the wall outlet. 3 Gently remove the power supply from the printer. 4 Push firmly to reconnect the power supply to the printer. 5 Reinsert the power supply cord into the wall outlet. 6 Press . Poor photo quality Examples of poor photo quality include: • Blank pages • Dark print •...; Faded print • Incorrect colors • Light and dark bands in the printer. Check the ink level, and install a new print cartridge ...
...from the wall outlet. 3 Gently remove the power supply from the printer. 4 Push firmly to reconnect the power supply to the printer. 5 Reinsert the power supply cord into the wall outlet. 6 Press . Poor photo quality Examples of poor photo quality include: • Blank pages • Dark print •...; Faded print • Incorrect colors • Light and dark bands in the printer. Check the ink level, and install a new print cartridge ...
User's Guide
Page 47
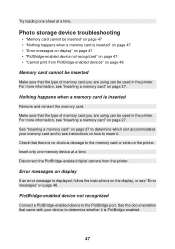
... Error messages on display If an error message is displayed, follow the instructions on the display, or see "Inserting a memory card" on the printer. PictBridge-enabled device not recognized Connect a PictBridge-enabled device to the memory card or slots on page 27. See the documentation that there is ... a memory card" on page 27 to determine which slot accommodates your device to insert it is no obvious damage to the PictBridge port. Photo storage device troubleshooting • "Memory card cannot be used in the printer. Try loading one memory device at a time.
... Error messages on display If an error message is displayed, follow the instructions on the display, or see "Inserting a memory card" on the printer. PictBridge-enabled device not recognized Connect a PictBridge-enabled device to the memory card or slots on page 27. See the documentation that there is ... a memory card" on page 27 to determine which slot accommodates your device to insert it is no obvious damage to the PictBridge port. Photo storage device troubleshooting • "Memory card cannot be used in the printer. Try loading one memory device at a time.


