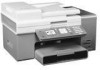

User's Guide
Page 2
... use the telephone to report a gas leak in the user documentation, to a properly grounded electrical outlet that is not responsible for the use of specific Lexmark components. Lexmark is near water or wet locations. SAVE THESE INSTRUCTIONS. Refer service or repairs, other replacement parts. If a telephone is designed, tested, and approved to... in the vicinity of some parts may not always be obvious. Safety information Use only the power supply and power supply cord provided with the printer software.
... use the telephone to report a gas leak in the user documentation, to a properly grounded electrical outlet that is not responsible for the use of specific Lexmark components. Lexmark is near water or wet locations. SAVE THESE INSTRUCTIONS. Refer service or repairs, other replacement parts. If a telephone is designed, tested, and approved to... in the vicinity of some parts may not always be obvious. Safety information Use only the power supply and power supply cord provided with the printer software.
User's Guide
Page 3
... ...23 Connecting to an answering machine ...24 Connecting to a computer with a modem...26 Networking the printer...28 Installing network printers...28 Networking the printer ...28 Installing the printer on a network ...28 Installing the printer on additional network computers 28 Using a wireless network connection ...28 Using an Ethernet connection ...29 Shared printing...29 Tips for installing a network...
... ...23 Connecting to an answering machine ...24 Connecting to a computer with a modem...26 Networking the printer...28 Installing network printers...28 Networking the printer ...28 Installing the printer on a network ...28 Installing the printer on additional network computers 28 Using a wireless network connection ...28 Using an Ethernet connection ...29 Shared printing...29 Tips for installing a network...
User's Guide
Page 4
...Mode menu 51 Using the Setup menu...52 Using the Setup menu and submenus ...52 Using the Paper Handling submenu ...54 Using the Change Printer Default Settings submenu 54 Using the Change Copy Default Settings submenu 55 Using the Change Photo Default Settings submenu 55 Using the Change Print File...59 Printing the Print Settings List ...60 Using the Network Setup submenu...60 Using the Maintenance menu...62 Learning about the software 64 Using the printer software...64 Using the Productivity Suite...64 Using the All-In-One Center...65 Opening the All-In-One Center...65 Using the Scanning &...
...Mode menu 51 Using the Setup menu...52 Using the Setup menu and submenus ...52 Using the Paper Handling submenu ...54 Using the Change Printer Default Settings submenu 54 Using the Change Copy Default Settings submenu 55 Using the Change Photo Default Settings submenu 55 Using the Change Print File...59 Printing the Print Settings List ...60 Using the Network Setup submenu...60 Using the Maintenance menu...62 Learning about the software 64 Using the printer software...64 Using the Productivity Suite...64 Using the All-In-One Center...65 Opening the All-In-One Center...65 Using the Scanning &...
User's Guide
Page 7
... and contacts 145 Preserving the print cartridges...146 Cleaning the scanner glass...147 Ordering supplies...147 Removing the printer from the Tray 2 base 147 Using genuine Lexmark print cartridges 148 Refilling a print cartridge...148 Recycling Lexmark products...148 Troubleshooting...149 Setup troubleshooting...149 Incorrect language appears on the display 149 Setting the date...
... and contacts 145 Preserving the print cartridges...146 Cleaning the scanner glass...147 Ordering supplies...147 Removing the printer from the Tray 2 base 147 Using genuine Lexmark print cartridges 148 Refilling a print cartridge...148 Recycling Lexmark products...148 Troubleshooting...149 Setup troubleshooting...149 Incorrect language appears on the display 149 Setting the date...
User's Guide
Page 8
...162 Fax troubleshooting...162 Cannot send or receive a fax ...162 Can send but not receive faxes...163 Can receive but not send faxes...164 Printer receives a blank fax...165 Received fax has poor print quality ...165 Caller ID information is not displayed...166 Jams and misfeeds troubleshooting...166 Paper...168 Paper jam in Tray 1 or optional Tray 2...169 Paper jam in the small media feeder...170 Paper or specialty media misfeeds ...172 Printer does not feed paper, envelopes, or specialty media 173 Banner paper jams...173 Memory card troubleshooting...174 Memory card cannot be inserted...174 ...
...162 Fax troubleshooting...162 Cannot send or receive a fax ...162 Can send but not receive faxes...163 Can receive but not send faxes...164 Printer receives a blank fax...165 Received fax has poor print quality ...165 Caller ID information is not displayed...166 Jams and misfeeds troubleshooting...166 Paper...168 Paper jam in Tray 1 or optional Tray 2...169 Paper jam in the small media feeder...170 Paper or specialty media misfeeds ...172 Printer does not feed paper, envelopes, or specialty media 173 Banner paper jams...173 Memory card troubleshooting...174 Memory card cannot be inserted...174 ...
User's Guide
Page 11
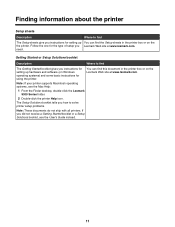
... Mac Help: 1 From the Finder desktop, double-click the Lexmark 9300 Series folder. 2 Double-click the printer Help icon. need. If you Lexmark Web site at www.lexmark.com. You can find this document in the printer box or on the Lexmark Web site at www.lexmark.com. The Setup Solutions booklet tells you instructions for using...
... Mac Help: 1 From the Finder desktop, double-click the Lexmark 9300 Series folder. 2 Double-click the printer Help icon. need. If you Lexmark Web site at www.lexmark.com. You can find this document in the printer box or on the Lexmark Web site at www.lexmark.com. The Setup Solutions booklet tells you instructions for using...
User's Guide
Page 12
... supported by your printer) • Faxing (if supported by your printer) • Maintaining the printer • Connecting the printer to a network (if supported by your printer) • Troubleshooting problems with the other software, if your printer 1 Click Start ª Programs or All Programs ª Lexmark connects to a computer. 9300 Series. 2 Select Lexmark Solution Center. 12 Lexmark Solution Center Description...
... supported by your printer) • Faxing (if supported by your printer) • Maintaining the printer • Connecting the printer to a network (if supported by your printer) • Troubleshooting problems with the other software, if your printer 1 Click Start ª Programs or All Programs ª Lexmark connects to a computer. 9300 Series. 2 Select Lexmark Solution Center. 12 Lexmark Solution Center Description...

User's Guide
Page 13
...Warranty information varies by Lexmark International, Inc. Customer support Description Where to find (North America) Where to find (rest of world) Limited Warranty Information To view the limitations and conditions of Limited Warranty section, click Inkjet & All-In-One Printers. 4 Scroll through the...recent phone numbers available, see the Statement of country or region. Customer Support link. 4 Select your printer family. printer. Visit our Web site at www.lexmark.com. 2 Click Technical Support. Record the following information (located on the store receipt and the back...
...Warranty information varies by Lexmark International, Inc. Customer support Description Where to find (North America) Where to find (rest of world) Limited Warranty Information To view the limitations and conditions of Limited Warranty section, click Inkjet & All-In-One Printers. 4 Scroll through the...recent phone numbers available, see the Statement of country or region. Customer Support link. 4 Select your printer family. printer. Visit our Web site at www.lexmark.com. 2 Click Technical Support. Record the following information (located on the store receipt and the back...

User's Guide
Page 14
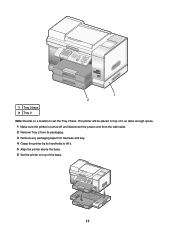
...Use for Windows and Macintosh operating systems. Instructions are connecting the printer using a wired network setup, you are included for wireless setup of the printer. Note: If you use a network cable that shipped with the printer. 14 Your power cord may look differently from the one ...18. For more information about connecting this cord, see "Choosing a fax connection" on setting up the printer Checking the box contents 1 2 3 4 5 8 7 6 Name Description 1 Black print cartridge 2 Color print cartridge Cartridges to the power supply port located at the back of the...
...Use for Windows and Macintosh operating systems. Instructions are connecting the printer using a wired network setup, you are included for wireless setup of the printer. Note: If you use a network cable that shipped with the printer. 14 Your power cord may look differently from the one ...18. For more information about connecting this cord, see "Choosing a fax connection" on setting up the printer Checking the box contents 1 2 3 4 5 8 7 6 Name Description 1 Black print cartridge 2 Color print cartridge Cartridges to the power supply port located at the back of the...
User's Guide
Page 15
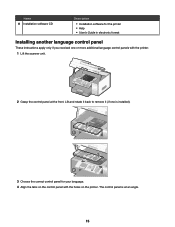
...the correct control panel for your language. 4 Align the tabs on the printer. Lift and rotate it back to remove it (if one or more additional language control panels with the holes on the control panel with the printer. 1 Lift the scanner unit. 2 Grasp the control panel at an ...angle. 15 Name 8 Installation software CD Description • Installation software for the printer • Help • User's Guide in electronic format Installing ...
...the correct control panel for your language. 4 Align the tabs on the printer. Lift and rotate it back to remove it (if one or more additional language control panels with the holes on the control panel with the printer. 1 Lift the scanner unit. 2 Grasp the control panel at an ...angle. 15 Name 8 Installation software CD Description • Installation software for the printer • Help • User's Guide in electronic format Installing ...

User's Guide
Page 16
5 Lower the control panel slightly at its underside. 2 Rotate the display forward to a comfortable viewing position. Installing the optional Tray 2 You can tilt the control panel display to adjust it snaps into place. 1 2 Adjusting the display for easier viewing. 1 Place your finger in the finger groove to increase the paper loading capacity of the printer. 16 Press the control panel down until it for easy viewing You can purchase and install an optional Tray 2 to grasp the display from its front.
5 Lower the control panel slightly at its underside. 2 Rotate the display forward to a comfortable viewing position. Installing the optional Tray 2 You can tilt the control panel display to adjust it snaps into place. 1 2 Adjusting the display for easier viewing. 1 Place your finger in the finger groove to increase the paper loading capacity of the printer. 16 Press the control panel down until it for easy viewing You can purchase and install an optional Tray 2 to grasp the display from its front.
User's Guide
Page 17
The printer will be placed on top of the base. 17 1 Tray 2 base 2 Tray 2 1 2 Note: Decide on top of it, so allow enough space. 1 Make sure the printer is turned off and disconnect the power cord from the wall outlet. 2 Remove Tray 2 from its packaging. 3 Remove any packaging tape from the base and tray. 4 Grasp the printer by its handholds to lift it. 5 Align the printer above the base. 6 Set the printer on a location to set the Tray 2 base.
The printer will be placed on top of the base. 17 1 Tray 2 base 2 Tray 2 1 2 Note: Decide on top of it, so allow enough space. 1 Make sure the printer is turned off and disconnect the power cord from the wall outlet. 2 Remove Tray 2 from its packaging. 3 Remove any packaging tape from the base and tray. 4 Grasp the printer by its handholds to lift it. 5 Align the printer above the base. 6 Set the printer on a location to set the Tray 2 base.
User's Guide
Page 18
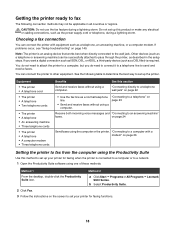
... All Programs ª Lexmark 9300 Series. See this product or make any electrical or cabling connections, such as a telephone or answering machine) can be applicable in the setup steps. on page 22 • Use the fax line as a telephone, an answering machine, or a computer modem. Getting the printer ready to fax The...
... All Programs ª Lexmark 9300 Series. See this product or make any electrical or cabling connections, such as a telephone or answering machine) can be applicable in the setup steps. on page 22 • Use the fax line as a telephone, an answering machine, or a computer modem. Getting the printer ready to fax The...

User's Guide
Page 19
...not connected to a computer or to a network. Spell out a name using the numbers associated with each letter as a standalone fax machine. 1 Turn the printer on a telephone or cell phone. 11 Press to save the information and exit. Using an RJ11 adapter Country/region • United Kingdom • Ireland &#...field, enter your fax number using a splitter because the fax feature may look different, but it will fit the telephone outlet used when your printer functions as you reach Your Fax Name. 10 Use the keypad to enter your name. Note: The UK adapter is highlighted. 7 Press . ...
...not connected to a computer or to a network. Spell out a name using the numbers associated with each letter as a standalone fax machine. 1 Turn the printer on a telephone or cell phone. 11 Press to save the information and exit. Using an RJ11 adapter Country/region • United Kingdom • Ireland &#...field, enter your fax number using a splitter because the fax feature may look different, but it will fit the telephone outlet used when your printer functions as you reach Your Fax Name. 10 Use the keypad to enter your name. Note: The UK adapter is highlighted. 7 Press . ...

User's Guide
Page 20
..., will not function properly. 2 Connect your telecommunications equipment directly to the EXT port on the back of the printer. Note: Once this plug is removed, any country- Warning: Do not touch cables or the printer in the area shown while actively sending or receiving a fax. 20 If your telecommunications equipment uses a US... from the EXT port on the back of the adapter. 2 Connect the telephone line of your chosen telecommunications equipment to the left outlet of the printer.
..., will not function properly. 2 Connect your telecommunications equipment directly to the EXT port on the back of the printer. Note: Once this plug is removed, any country- Warning: Do not touch cables or the printer in the area shown while actively sending or receiving a fax. 20 If your telecommunications equipment uses a US... from the EXT port on the back of the adapter. 2 Connect the telephone line of your chosen telecommunications equipment to the left outlet of the printer.

User's Guide
Page 21
Note: Once this plug is a plug installed in the EXT port of the printer. 21 This plug is necessary for the proper functioning of the printer. Country/region • Saudi Arabia • United Arab Emirates • Egypt • Bulgaria • Czech Republic • ...Turkey To connect a telephone, an answering machine, or other telecommunications equipment to the printer: 1 Remove the plug from the back of the printer. 2 Connect your telecommunications equipment directly to the printer by the adapter, as shown, will not function properly. or region-specific equipment that...
Note: Once this plug is a plug installed in the EXT port of the printer. 21 This plug is necessary for the proper functioning of the printer. Country/region • Saudi Arabia • United Arab Emirates • Egypt • Bulgaria • Czech Republic • ...Turkey To connect a telephone, an answering machine, or other telecommunications equipment to the printer: 1 Remove the plug from the back of the printer. 2 Connect your telecommunications equipment directly to the printer by the adapter, as shown, will not function properly. or region-specific equipment that...

User's Guide
Page 22
...the telephone cord into the LINE port of the telephone cord into an active telephone wall jack. Connecting directly to a telephone wall jack Connect the printer directly to a telephone wall jack to make copies or to send and receive faxes without using a computer. 1 Make sure you have a telephone ...cord (provided with a special RJ-11 plug in Germany Connect the printer directly to a telephone wall jack to send and receive faxes without using a computer. Do not remove the RJ-11 plug. Note: Do not remove...
...the telephone cord into the LINE port of the telephone cord into an active telephone wall jack. Connecting directly to a telephone wall jack Connect the printer directly to a telephone wall jack to make copies or to send and receive faxes without using a computer. 1 Make sure you have a telephone ...cord (provided with a special RJ-11 plug in Germany Connect the printer directly to a telephone wall jack to send and receive faxes without using a computer. Do not remove the RJ-11 plug. Note: Do not remove...

User's Guide
Page 23
For more information on connecting the printer to telecommunications equipment, see "Using an RJ11 adapter" on page 19. 1 Make sure you would like to use the same line for both fax and ...: • A telephone • Two telephone cords • A telephone wall jack 23 Connecting to a telephone Connect a telephone to the printer to use the fax line as a normal telephone line. Then set up the printer wherever your country or region. Note: Setup steps may vary depending on your answering machine, connect a second telephone line...
For more information on connecting the printer to telecommunications equipment, see "Using an RJ11 adapter" on page 19. 1 Make sure you would like to use the same line for both fax and ...: • A telephone • Two telephone cords • A telephone wall jack 23 Connecting to a telephone Connect a telephone to the printer to use the fax line as a normal telephone line. Then set up the printer wherever your country or region. Note: Setup steps may vary depending on your answering machine, connect a second telephone line...

User's Guide
Page 24
Connecting to an answering machine Connect an answering machine to the printer to a telephone, and then plug it into an active telephone wall jack. 3 Remove the protective plug from the EXT port of the printer. 4 Connect the other telephone cord to receive both incoming voice messages and faxes. 24 2 Connect one telephone cord to the LINE port of the printer, and then plug it into the EXT port of the printer.
Connecting to an answering machine Connect an answering machine to the printer to a telephone, and then plug it into an active telephone wall jack. 3 Remove the protective plug from the EXT port of the printer. 4 Connect the other telephone cord to receive both incoming voice messages and faxes. 24 2 Connect one telephone cord to the LINE port of the printer, and then plug it into the EXT port of the printer.

User's Guide
Page 25
Note: Setup steps may vary depending on page 19. 1 Make sure you have the following: • A telephone • An answering machine • Three telephone cords • A telephone wall jack 2 Connect one telephone cord into the LINE port of the printer, and then plug it into an active telephone wall jack. 3 Remove the protective plug from the EXT port of the printer. 4 Connect a second telephone cord from the telephone to telecommunications equipment, see "Using an RJ11 adapter" on your country or region. For more information on connecting the printer to the answering machine. 25
Note: Setup steps may vary depending on page 19. 1 Make sure you have the following: • A telephone • An answering machine • Three telephone cords • A telephone wall jack 2 Connect one telephone cord into the LINE port of the printer, and then plug it into an active telephone wall jack. 3 Remove the protective plug from the EXT port of the printer. 4 Connect a second telephone cord from the telephone to telecommunications equipment, see "Using an RJ11 adapter" on your country or region. For more information on connecting the printer to the answering machine. 25


