User's Guide
Page 4
... Using the Change Print File Default Settings submenu 56 Using the Change Fax Default Settings submenu 56 Using the Change Scan Default Settings submenu 59 Using the Change Bluetooth Default Settings submenu 59 Using the Change PictBridge Default Settings submenu 59 Printing the Print Settings List ...60 Using the Network Setup submenu...60 Using the Maintenance menu...62 Learning about the software 64 Using the printer software...64 Using the Productivity Suite...64 Using the All-In-One Center...65 Opening the All-In-One Center...65 Using the Scanning & Copying tab ...66 Using the Saved...
... Using the Change Print File Default Settings submenu 56 Using the Change Fax Default Settings submenu 56 Using the Change Scan Default Settings submenu 59 Using the Change Bluetooth Default Settings submenu 59 Using the Change PictBridge Default Settings submenu 59 Printing the Print Settings List ...60 Using the Network Setup submenu...60 Using the Maintenance menu...62 Learning about the software 64 Using the printer software...64 Using the Productivity Suite...64 Using the All-In-One Center...65 Opening the All-In-One Center...65 Using the Scanning & Copying tab ...66 Using the Saved...
User's Guide
Page 11
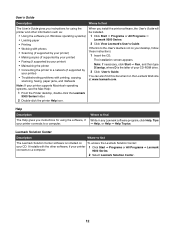
... the Mac Help: 1 From the Finder desktop, double-click the Lexmark 9300 Series folder. 2 Double-click the printer Help icon. need. If you how to solve printer setup problems. Note: These documents do not ship with all printers. Follow the one for the type of setup you instructions for setting up hardware and software (on Windows operating systems) and some basic instructions for setting up You can find the Setup sheets in the printer box or...
... the Mac Help: 1 From the Finder desktop, double-click the Lexmark 9300 Series folder. 2 Double-click the printer Help icon. need. If you how to solve printer setup problems. Note: These documents do not ship with all printers. Follow the one for the type of setup you instructions for setting up hardware and software (on Windows operating systems) and some basic instructions for setting up You can find the Setup sheets in the printer box or...
User's Guide
Page 12
... Windows operating systems) • Loading paper • Printing • Working with photos • Scanning (if supported by your printer) • Making copies (if supported by your printer) • Faxing (if supported by your printer) • Troubleshooting problems with printing, copying, scanning, faxing, paper jams, and misfeeds Note: If your printer supports Macintosh operating systems, see the Mac Help: 1 From the Finder desktop, double-click the Lexmark 9300 Series folder. 2 Double-click the printer Help icon. Note: If necessary, click Start ª Run, and then type D:\setup...
... Windows operating systems) • Loading paper • Printing • Working with photos • Scanning (if supported by your printer) • Making copies (if supported by your printer) • Faxing (if supported by your printer) • Troubleshooting problems with printing, copying, scanning, faxing, paper jams, and misfeeds Note: If your printer supports Macintosh operating systems, see the Mac Help: 1 From the Finder desktop, double-click the Lexmark 9300 Series folder. 2 Double-click the printer Help icon. Note: If necessary, click Start ª Run, and then type D:\setup...

User's Guide
Page 14
...Wired. 7 User's Guide or Setup Solutions Printed booklet that serves as a guide. A network cable is sometimes called an Ethernet cable. 6 Setup Guides Instructions on the product purchased. 3 Telephone cord Use for Windows and Macintosh operating systems. Instructions are connecting the printer using a wired network setup, you purchase separately. Note: Cartridge combinations vary depending on setting up the printer Checking the box contents 1 2 3 4 5 8 7 6 Name Description 1 Black print cartridge 2 Color print cartridge Cartridges to the power supply port located at...
...Wired. 7 User's Guide or Setup Solutions Printed booklet that serves as a guide. A network cable is sometimes called an Ethernet cable. 6 Setup Guides Instructions on the product purchased. 3 Telephone cord Use for Windows and Macintosh operating systems. Instructions are connecting the printer using a wired network setup, you purchase separately. Note: Cartridge combinations vary depending on setting up the printer Checking the box contents 1 2 3 4 5 8 7 6 Name Description 1 Black print cartridge 2 Color print cartridge Cartridges to the power supply port located at...

User's Guide
Page 28
... printer in the list, make sure you want to use on page 31. The following settings from your MAC address" on a network allows users at different computers to print to the printer. Repeat the steps for use an external print server (LexmarkTM n4000e, n4050e, or MarkNetTM n7000 series), see the installation instructions and User's Guide that all relevant devices are using , Ad-Hoc or Infrastructure) • The type of wireless network you are turned on the networking...
... printer in the list, make sure you want to use on page 31. The following settings from your MAC address" on a network allows users at different computers to print to the printer. Repeat the steps for use an external print server (LexmarkTM n4000e, n4050e, or MarkNetTM n7000 series), see the installation instructions and User's Guide that all relevant devices are using , Ad-Hoc or Infrastructure) • The type of wireless network you are turned on the networking...
User's Guide
Page 29
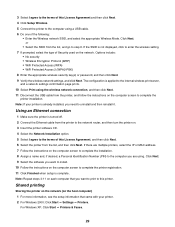
... wireless print server, and a network settings confirmation page prints. 10 Select Print using the wireless network connection, and then click Next. 11 Disconnect the USB cable from the printer, and follow the instructions on . 3 Insert the printer software CD. 4 Select the Network Installation option. 5 Select I agree to the terms of this License Agreement and then click Next. 4 Click Setup Wireless. 5 Connect the printer to the computer using . Using an Ethernet connection 1 Make sure the printer is complete. For Windows XP: Click Start ª Printers & Faxes...
... wireless print server, and a network settings confirmation page prints. 10 Select Print using the wireless network connection, and then click Next. 11 Disconnect the USB cable from the printer, and follow the instructions on . 3 Insert the printer software CD. 4 Select the Network Installation option. 5 Select I agree to the terms of this License Agreement and then click Next. 4 Click Setup Wireless. 5 Connect the printer to the computer using . Using an Ethernet connection 1 Make sure the printer is complete. For Windows XP: Click Start ª Printers & Faxes...
User's Guide
Page 32
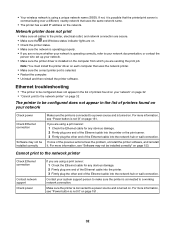
... address on page 151. Contact your network. • Make sure the printer driver is selected. • Restart the computer. • Uninstall and then reinstall the printer software. • Your wireless network is connected to a working network connection. If you are not sure whether your network is operating correctly, refer to your network documentation, or contact the person who set up your system support person to make sure the printer is using a print server: 1 Check the Ethernet cable...
... address on page 151. Contact your network. • Make sure the printer driver is selected. • Restart the computer. • Uninstall and then reinstall the printer software. • Your wireless network is connected to a working network connection. If you are not sure whether your network is operating correctly, refer to your network documentation, or contact the person who set up your system support person to make sure the printer is using a print server: 1 Check the Ethernet cable...

User's Guide
Page 53
... values as the new user default settings. You can also turn on the tray linking feature, if your active network, either Ethernet or wireless. The device must contain Microsoft Office documents with no photos. • The Print Files Mode menu is automatically selected if you insert a device containing documents with no photos. • The Photo Card Mode menu is inserted. Print Settings List Prints a list of user default settings which is a list of the photo settings and save the values as a memory card or flash drive is automatically...
... values as the new user default settings. You can also turn on the tray linking feature, if your active network, either Ethernet or wireless. The device must contain Microsoft Office documents with no photos. • The Print Files Mode menu is automatically selected if you insert a device containing documents with no photos. • The Photo Card Mode menu is inserted. Print Settings List Prints a list of user default settings which is a list of the photo settings and save the values as a memory card or flash drive is automatically...
User's Guide
Page 56
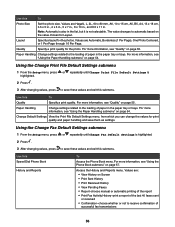
... loading of paper in the list, but it is highlighted. 2 Press . 3 After changing values, press to automatic based on page 54. For more information, see "Using the Paper Handling submenu" on page 55. Paper Handling Change settings related to save them as settings. or repeatedly until Change Fax Default Settings is not selectable. Paper Handling Change settings related to receive confirmation of successful fax transmissions 56 Use this Speed Dial Phone Book History and Reports To Access the Phone Book menu. Change Default Settings View the Print File Default...
... loading of paper in the list, but it is highlighted. 2 Press . 3 After changing values, press to automatic based on page 54. For more information, see "Using the Paper Handling submenu" on page 55. Paper Handling Change settings related to save them as settings. or repeatedly until Change Fax Default Settings is not selectable. Paper Handling Change settings related to receive confirmation of successful fax transmissions 56 Use this Speed Dial Phone Book History and Reports To Access the Phone Book menu. Change Default Settings View the Print File Default...
User's Guide
Page 60
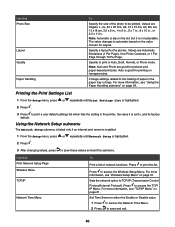
.... Set Time Server to either the Enable or Disable value. 1 Press to access the Network Time Menu. 2 Press to save these values and exit this Photo Size Layout Quality Paper Handling To Specify the size of the photo to , and its factory default. Use this submenu. Specify a layout for pictures and paper-based print jobs. Using the Network Setup submenu The Network Setup submenu is listed only if an internal print server is installed. 1 From the Setup menu, press or repeatedly until Print Settings List...
.... Set Time Server to either the Enable or Disable value. 1 Press to access the Network Time Menu. 2 Press to save these values and exit this Photo Size Layout Quality Paper Handling To Specify the size of the photo to , and its factory default. Use this submenu. Specify a layout for pictures and paper-based print jobs. Using the Network Setup submenu The Network Setup submenu is listed only if an internal print server is installed. 1 From the Setup menu, press or repeatedly until Print Settings List...

User's Guide
Page 63
... to change print cartridges. Reset all of your previously defined user default settings to reference the information and then discard the sheet. b Change the cartridges. b Use the Test Page to the factory default settings. a Press to start this task. The Test Page lists some information about the printer. a Press to start this task. Note: Items such as phone lists, time, date, and country code are reset. 63 Print a Test Page to choose either Yes or No. c Press . The Reset Menu Defaults screen appears. The Cartridge Installation screen appears...
... to change print cartridges. Reset all of your previously defined user default settings to reference the information and then discard the sheet. b Change the cartridges. b Use the Test Page to the factory default settings. a Press to start this task. The Test Page lists some information about the printer. a Press to start this task. Note: Items such as phone lists, time, date, and country code are reset. 63 Print a Test Page to choose either Yes or No. c Press . The Reset Menu Defaults screen appears. The Cartridge Installation screen appears...
User's Guide
Page 127
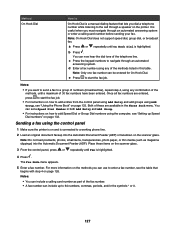
..., transparencies, photo paper, or thin media (such as part of these items on the scanner glass. 3 From the control panel, press or repeatedly until Fax is highlighted. 4 Press . d Enter a fax number using the control panel 1 Make sure the printer is on and is connected to a working phone line. 2 Load an original document faceup into the Automatic Document Feeder (ADF). Method On Hook Dial How to On Hook Dial is a manual dialing feature that begins with step 4 on page 126.
..., transparencies, photo paper, or thin media (such as part of these items on the scanner glass. 3 From the control panel, press or repeatedly until Fax is highlighted. 4 Press . d Enter a fax number using the control panel 1 Make sure the printer is on and is connected to a working phone line. 2 Load an original document faceup into the Automatic Document Feeder (ADF). Method On Hook Dial How to On Hook Dial is a manual dialing feature that begins with step 4 on page 126.
User's Guide
Page 149
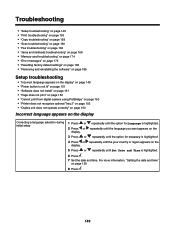
...; "Memory card troubleshooting" on page 174 • "Error messages" on page 175 • "Resetting factory default settings" on page 185 • "Removing and reinstalling the software" on page 185 Setup troubleshooting • "Incorrect language appears on the display" on page 149 • "Power button is not lit" on page 151 • "Software does not install" on page 151 • "Page does not print" on page 152 • "Cannot print from digital camera using PictBridge" on page 153 • "Printer does not recognize optional Tray...
...; "Memory card troubleshooting" on page 174 • "Error messages" on page 175 • "Resetting factory default settings" on page 185 • "Removing and reinstalling the software" on page 185 Setup troubleshooting • "Incorrect language appears on the display" on page 149 • "Power button is not lit" on page 151 • "Software does not install" on page 151 • "Page does not print" on page 152 • "Cannot print from digital camera using PictBridge" on page 153 • "Printer does not recognize optional Tray...
User's Guide
Page 163
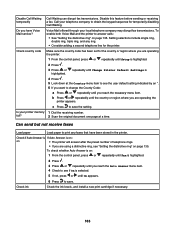
... where you are using a distinctive ring, see the user default setting indicated by an *. 6 If you want to change the County Code: a Press or repeatedly until you are operating the printer: 1 From the control panel, press or repeatedly until Setup is 4 Press . 5 Look down at a time. Can send but not receive faxes Load paper Load paper to save . Do you reach the Country menu item. Voice Mail offered through your printer memory 1 Dial the receiving number.
... where you are using a distinctive ring, see the user default setting indicated by an *. 6 If you want to change the County Code: a Press or repeatedly until you are operating the printer: 1 From the control panel, press or repeatedly until Setup is 4 Press . 5 Look down at a time. Can send but not receive faxes Load paper Load paper to save . Do you reach the Country menu item. Voice Mail offered through your printer memory 1 Dial the receiving number.
User's Guide
Page 193
...-In-One Center Maintain/Troubleshoot link 67 opening 65 Saved Images tab 67 Scanning & Copying tab 66 answering machine receiving a fax with 130 antiquing photos 108 assigning IP address 30 Attach to E-mail button 65 Auto Answer 132 Automatic Document Feeder loading documents 85 paper capacity 85 Automatic Document Feeder (ADF) 33 output tray 33 paper guide 33 tray 33 Automatic Image Sharpening 69 B banner paper jams 173 banner paper, loading 78 banner, printing 94 black and color ink low 177 black cartridge unavailable 176 black ink low 177 blocking host fax settings 139...
...-In-One Center Maintain/Troubleshoot link 67 opening 65 Saved Images tab 67 Scanning & Copying tab 66 answering machine receiving a fax with 130 antiquing photos 108 assigning IP address 30 Attach to E-mail button 65 Auto Answer 132 Automatic Document Feeder loading documents 85 paper capacity 85 Automatic Document Feeder (ADF) 33 output tray 33 paper guide 33 tray 33 Automatic Image Sharpening 69 B banner paper jams 173 banner paper, loading 78 banner, printing 94 black and color ink low 177 black cartridge unavailable 176 black ink low 177 blocking host fax settings 139...
User's Guide
Page 194
... memory 176 paper jam 175 paper load error 175 paper mismatch 176 paper or photo size error 175 paper out tray 1 176 paper out tray 2 176 paper tray removed 176 phone line busy 183 phone line error 183 photo and color ink low 179 photo ink low 179 printer carrier stall 179 rear cover open 175 remote fax error 184 right cartridge missing 180 scanner jam 175 unsupported fax mode 184 unsupported paper size 185 Ethernet connection using 29 Ethernet port 36 EXT port 36 e-mailing documents or photos 121 F factory default settings, resetting to 185 failed to connect 181 Fast Pics, using 72 Fax button...
... memory 176 paper jam 175 paper load error 175 paper mismatch 176 paper or photo size error 175 paper out tray 1 176 paper out tray 2 176 paper tray removed 176 phone line busy 183 phone line error 183 photo and color ink low 179 photo ink low 179 printer carrier stall 179 rear cover open 175 remote fax error 184 right cartridge missing 180 scanner jam 175 unsupported fax mode 184 unsupported paper size 185 Ethernet connection using 29 Ethernet port 36 EXT port 36 e-mailing documents or photos 121 F factory default settings, resetting to 185 failed to connect 181 Fast Pics, using 72 Fax button...
User's Guide
Page 195
..., checking 62, 67 ink, ordering 67 inserting Bluetooth adapter 110, 111 flash drives 99 memory cards 98 PictBridge-enabled digital camera 104 installing network printer 30 print cartridges 142 printer on a network 28 printer software 185 software and sharing printer on network 29 Tray 2 (optional) 16 invalid paper type 175 IP address, assigning 30 iron-on transfers, loading 78 J jams and misfeeds troubleshooting banner paper jams 173 paper jam in small media feeder 170 paper jam in the Automatic Document Feeder 167 paper jam in the duplex unit 168 paper jam...
..., checking 62, 67 ink, ordering 67 inserting Bluetooth adapter 110, 111 flash drives 99 memory cards 98 PictBridge-enabled digital camera 104 installing network printer 30 print cartridges 142 printer on a network 28 printer software 185 software and sharing printer on network 29 Tray 2 (optional) 16 invalid paper type 175 IP address, assigning 30 iron-on transfers, loading 78 J jams and misfeeds troubleshooting banner paper jams 173 paper jam in small media feeder 170 paper jam in the Automatic Document Feeder 167 paper jam in the duplex unit 168 paper jam...

User's Guide
Page 196
... (ADF) paper guide 33 Automatic Document Feeder (ADF) tray 33 control panel 33 duplex unit 36 Ethernet port 36 EXT port 36 LINE port 36 memory card slots 33 optional Tray 2 35 paper exit tray 33 paper tray (Tray 1) 33 PictBridge port 34 power supply port 36 print cartridge carrier 35 scanner glass 33 scanner unit 35 small media feeder 34 top cover 33 USB port 36 peer-to-peer method 30 Phone Book submenu 57 Phone Book, using 133 phone line busy 183 phone line error 183 Phone Number Search using when faxing 126 photo and color ink low 179 Photo Card Mode menu 45 photo cards, loading 78 Photo...
... (ADF) paper guide 33 Automatic Document Feeder (ADF) tray 33 control panel 33 duplex unit 36 Ethernet port 36 EXT port 36 LINE port 36 memory card slots 33 optional Tray 2 35 paper exit tray 33 paper tray (Tray 1) 33 PictBridge port 34 power supply port 36 print cartridge carrier 35 scanner glass 33 scanner unit 35 small media feeder 34 top cover 33 USB port 36 peer-to-peer method 30 Phone Book submenu 57 Phone Book, using 133 phone line busy 183 phone line error 183 Phone Number Search using when faxing 126 photo and color ink low 179 Photo Card Mode menu 45 photo cards, loading 78 Photo...
User's Guide
Page 197
... 70 remote fax error 184 removing print cartridges 142 removing printer from Tray 2 base 147 repeating an image 117 reports, fax activity 132 reverse page order 92 right cartridge missing 180 ring patterns, setting 135 Ringing and Answering submenu 57 RJ11 adapter, using 19 S safety information 2 Saved Images tab Open With section 67 Photo Prints section 67 Productivity Tools section 67 Scan button 65 Scan & Edit Text (OCR) button 65 Scan Mode menu 51 Scan to PDF button 65 scan troubleshooting cannot scan to...
... 70 remote fax error 184 removing print cartridges 142 removing printer from Tray 2 base 147 repeating an image 117 reports, fax activity 132 reverse page order 92 right cartridge missing 180 ring patterns, setting 135 Ringing and Answering submenu 57 RJ11 adapter, using 19 S safety information 2 Saved Images tab Open With section 67 Photo Prints section 67 Productivity Tools section 67 Scan button 65 Scan & Edit Text (OCR) button 65 Scan Mode menu 51 Scan to PDF button 65 scan troubleshooting cannot scan to...
User's Guide
Page 198
... 178 failed to connect 181 fax error 181 hardware error 1208 175 invalid paper type 175 left cartridge missing 179 no answer 182 out of memory 176 paper jam 175 paper load error 175 paper mismatch 176 paper or photo size error 175 paper out tray 1 176 paper out tray 2 176 paper tray removed 176 phone line busy 183 phone line error 183 photo and color ink low 179 photo ink low 179 printer carrier stall 179 rear cover open 175 remote fax error 184 right cartridge missing 180 scanner jam 175 unsupported fax mode 184 unsupported paper size 185 troubleshooting, fax...
... 178 failed to connect 181 fax error 181 hardware error 1208 175 invalid paper type 175 left cartridge missing 179 no answer 182 out of memory 176 paper jam 175 paper load error 175 paper mismatch 176 paper or photo size error 175 paper out tray 1 176 paper out tray 2 176 paper tray removed 176 phone line busy 183 phone line error 183 photo and color ink low 179 photo ink low 179 printer carrier stall 179 rear cover open 175 remote fax error 184 right cartridge missing 180 scanner jam 175 unsupported fax mode 184 unsupported paper size 185 troubleshooting, fax...


