
User's Guide
Page 2
... power supply and power supply cord. SAVE THESE INSTRUCTIONS. Important safety information Use only the power supply and power supply cord provided with the printer software. Lexmark is not responsible for the use of other than those described in the user documentation, to meet strict global safety standards with the use of.... Operating system notice All features and functions are operating system-dependent. This product is near the product and easily accessible. The safety features of specific Lexmark components.
... power supply and power supply cord. SAVE THESE INSTRUCTIONS. Important safety information Use only the power supply and power supply cord provided with the printer software. Lexmark is not responsible for the use of other than those described in the user documentation, to meet strict global safety standards with the use of.... Operating system notice All features and functions are operating system-dependent. This product is near the product and easily accessible. The safety features of specific Lexmark components.
User's Guide
Page 3
... Card menu ...21 Using the PictBridge menu ...22 Using the Settings menu ...23 Saving settings ...25 Learning about the software 27 Using the printer software...27 Using the Lexmark Imaging Studio...27 Using the Solution Center...28 Using Printing Preferences...30 Opening Printing Preferences ...30 Using the Printing Preferences tabs ...30 Using...
... Card menu ...21 Using the PictBridge menu ...22 Using the Settings menu ...23 Saving settings ...25 Learning about the software 27 Using the printer software...27 Using the Lexmark Imaging Studio...27 Using the Solution Center...28 Using Printing Preferences...30 Opening Printing Preferences ...30 Using the Printing Preferences tabs ...30 Using...
User's Guide
Page 5
..., or newspapers 66 Customizing scan settings using the computer 67 Faxing...68 Sending a fax using the software...68 Receiving a fax automatically...69 Maintaining the printer 70 Changing print cartridges...70 Removing a used print cartridge...70 Installing print cartridges...70 Achieving better print quality...72 Improving print quality ...72 Aligning print...the print cartridges...74 Cleaning the scanner glass...74 Ordering supplies...74 Ordering print cartridges...74 Ordering paper and other supplies ...75 Using genuine Lexmark print cartridges 75 Refilling a print cartridge...76 5
..., or newspapers 66 Customizing scan settings using the computer 67 Faxing...68 Sending a fax using the software...68 Receiving a fax automatically...69 Maintaining the printer 70 Changing print cartridges...70 Removing a used print cartridge...70 Installing print cartridges...70 Achieving better print quality...72 Improving print quality ...72 Aligning print...the print cartridges...74 Cleaning the scanner glass...74 Ordering supplies...74 Ordering print cartridges...74 Ordering paper and other supplies ...75 Using genuine Lexmark print cartridges 75 Refilling a print cartridge...76 5
User's Guide
Page 6
Recycling Lexmark products...76 Troubleshooting...77 Setup troubleshooting...77 Incorrect language appears on the display 77 Power button is not lit ...78 Software does not install ...78 ... or specialty media misfeeds...91 Printer does not feed paper, envelopes, or specialty media 91 Banner paper jams ...92 Memory card troubleshooting...92 Memory card cannot be inserted ...93 Nothing happens when memory card is inserted 93 Error messages...94 Alignment Error...94 Black Ink Low / Color Ink Low / Photo Ink Low...
Recycling Lexmark products...76 Troubleshooting...77 Setup troubleshooting...77 Incorrect language appears on the display 77 Power button is not lit ...78 Software does not install ...78 ... or specialty media misfeeds...91 Printer does not feed paper, envelopes, or specialty media 91 Banner paper jams ...92 Memory card troubleshooting...92 Memory card cannot be inserted ...93 Nothing happens when memory card is inserted 93 Error messages...94 Alignment Error...94 Black Ink Low / Color Ink Low / Photo Ink Low...

User's Guide
Page 9
... operating systems, see the Mac Help: An icon of your printer) • Maintaining the printer The installation screen appears. site at www.lexmark.com. using the When you install the printer software, the User's Guide printer and other information such as: will be installed. • Using...setting up hardware and software. Getting Started booklet Description Where to find this document in the printer box or on the 1 From the Finder desktop, double-click the Lexmark screen. 3500-4500 Series folder. User's Guide Description Where to find The Getting Started booklet...
... operating systems, see the Mac Help: An icon of your printer) • Maintaining the printer The installation screen appears. site at www.lexmark.com. using the When you install the printer software, the User's Guide printer and other information such as: will be installed. • Using...setting up hardware and software. Getting Started booklet Description Where to find this document in the printer box or on the 1 From the Finder desktop, double-click the Lexmark screen. 3500-4500 Series folder. User's Guide Description Where to find The Getting Started booklet...
User's Guide
Page 10
...the Customer Support link. E-mail support varies by country or region. Lexmark Solution Center Description Where to find The Lexmark Solution Center software is included on To access the Lexmark Solution Center: your printer. Select a country or region, and then select the Customer Support ... Πconnects to a computer. Visit our Web site at www.lexmark.com. Note: For additional information about contacting Lexmark, see the printed warranty that shipped with the other software, if your printer. 6 Complete the form, and then click Submit Request. 10 E-mail...
...the Customer Support link. E-mail support varies by country or region. Lexmark Solution Center Description Where to find The Lexmark Solution Center software is included on To access the Lexmark Solution Center: your printer. Select a country or region, and then select the Customer Support ... Πconnects to a computer. Visit our Web site at www.lexmark.com. Note: For additional information about contacting Lexmark, see the printed warranty that shipped with the other software, if your printer. 6 Complete the form, and then click Submit Request. 10 E-mail...
User's Guide
Page 11
...a limited warranty that we may serve you contact us so that this Limited Warranty included with this limited warranty, see the Statement of the printer), and have it ready when you faster: • Machine Type number • Serial number • Date purchased • Store where ... receipt and the back of country or region. materials and workmanship for a www.lexmark.com. original date of purchase. 2 Click Warranty Information. 3 From the Statement of Limited Warranty section, click Inkjet & All-In-One Printers. 4 Scroll through the Web page to find (rest of world) Limited Warranty...
...a limited warranty that we may serve you contact us so that this Limited Warranty included with this limited warranty, see the Statement of the printer), and have it ready when you faster: • Machine Type number • Serial number • Date purchased • Store where ... receipt and the back of country or region. materials and workmanship for a www.lexmark.com. original date of purchase. 2 Click Warranty Information. 3 From the Statement of Limited Warranty section, click Inkjet & All-In-One Printers. 4 Scroll through the Web page to find (rest of world) Limited Warranty...
User's Guide
Page 12
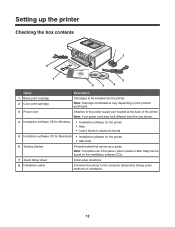
...combinations vary depending on the installation software CDs. 7 Quick Setup sheet Initial setup directions 8 Installation cable Connects the printer to the power supply port located at the back of installation. 12 Note: Your power cord may look different ...Installation software CD for Macintosh • Installation software for the printer • Mac Help 6 Getting Started Printed booklet that serves as a guide. Setting up the printer Checking the box contents Name Description 1 Black print cartridge 2 Color print cartridge Cartridges to be found on the product purchased. ...
...combinations vary depending on the installation software CDs. 7 Quick Setup sheet Initial setup directions 8 Installation cable Connects the printer to the power supply port located at the back of installation. 12 Note: Your power cord may look different ...Installation software CD for Macintosh • Installation software for the printer • Mac Help 6 Getting Started Printed booklet that serves as a guide. Setting up the printer Checking the box contents Name Description 1 Black print cartridge 2 Color print cartridge Cartridges to be found on the product purchased. ...
User's Guide
Page 13
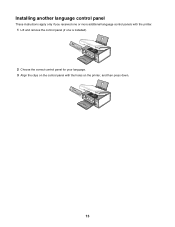
Installing another language control panel These instructions apply only if you received one or more additional language control panels with the printer. 1 Lift and remove the control panel (if one is installed). 2 Choose the correct control panel for your language. 3 Align the clips on the control panel with the holes on the printer, and then press down. 13
Installing another language control panel These instructions apply only if you received one or more additional language control panels with the printer. 1 Lift and remove the control panel (if one is installed). 2 Choose the correct control panel for your language. 3 Align the clips on the control panel with the holes on the printer, and then press down. 13
User's Guide
Page 14
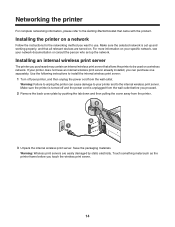
... internal wireless print server already installed, you touch the wireless print server. 14 Warning: Failure to your printer, and then unplug the power cord from the printer. 3 Unpack the internal wireless print server. Save the packaging materials. If your network documentation or consult ...the person who set up the network. Touch something metal such as the printer frame before you proceed. 2 Remove the back cover plate by static electricity. Use the following instructions to install the internal wireless ...
... internal wireless print server already installed, you touch the wireless print server. 14 Warning: Failure to your printer, and then unplug the power cord from the printer. 3 Unpack the internal wireless print server. Save the packaging materials. If your network documentation or consult ...the person who set up the network. Touch something metal such as the printer frame before you proceed. 2 Remove the back cover plate by static electricity. Use the following instructions to install the internal wireless ...
User's Guide
Page 15
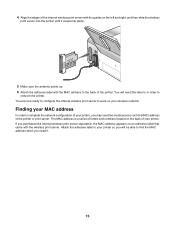
You will be able to find the MAC address when you may need the media access control (MAC) address of your printer, you need this later to in order to your wireless network. If you purchased the internal wireless print server separately, the MAC address appears on ...an adhesive label that came with the MAC address to complete the network configuration of your printer. 4 Align the edges of the internal wireless print server with the guides on the left and right, and then slide the wireless print server into...
You will be able to find the MAC address when you may need the media access control (MAC) address of your printer, you need this later to in order to your wireless network. If you purchased the internal wireless print server separately, the MAC address appears on ...an adhesive label that came with the MAC address to complete the network configuration of your printer. 4 Align the edges of the internal wireless print server with the guides on the left and right, and then slide the wireless print server into...
User's Guide
Page 16
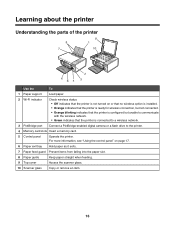
... wireless network. 3 PictBridge port Connect a PictBridge-enabled digital camera or a flash drive to the printer. 4 Memory card slots Insert a memory card. 5 Control panel Operate the printer. Learning about the printer Understanding the parts of the printer Use the To 1 Paper support Load paper. 2 Wi-Fi indicator Check wireless status: • ...Off indicates that the printer is not turned on page 17. 6 Paper exit tray Hold paper as it exits. 7 Paper feed guard Prevent items from falling into ...
... wireless network. 3 PictBridge port Connect a PictBridge-enabled digital camera or a flash drive to the printer. 4 Memory card slots Insert a memory card. 5 Control panel Operate the printer. Learning about the printer Understanding the parts of the printer Use the To 1 Paper support Load paper. 2 Wi-Fi indicator Check wireless status: • ...Off indicates that the printer is not turned on page 17. 6 Paper exit tray Hold paper as it exits. 7 Paper feed guard Prevent items from falling into ...
User's Guide
Page 17
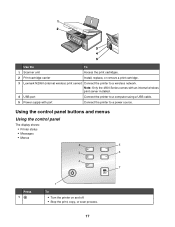
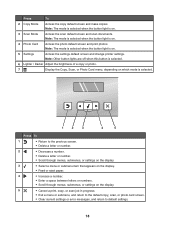
Using the control panel buttons and menus Using the control panel The display shows: • Printer status • Messages • Menus 2 5 3 6 4 7 Press 1 1 To • Turn the printer on and off. • Stop the print, copy, or scan process. 17 Use the To 1 Scanner ...unit Access the print cartridges. 2 Print cartridge carrier Install, replace, or remove a print cartridge. 3 Lexmark N2050 (internal wireless print server) Connect the printer to a power source. Note: Only the 4500 Series comes with an internal wireless print server installed. 4 USB port ...
Using the control panel buttons and menus Using the control panel The display shows: • Printer status • Messages • Menus 2 5 3 6 4 7 Press 1 1 To • Turn the printer on and off. • Stop the print, copy, or scan process. 17 Use the To 1 Scanner ...unit Access the print cartridges. 2 Print cartridge carrier Install, replace, or remove a print cartridge. 3 Lexmark N2050 (internal wireless print server) Connect the printer to a power source. Note: Only the 4500 Series comes with an internal wireless print server installed. 4 USB port ...
User's Guide
Page 18
... photo default screen and print photos. Note: The mode is selected when the button light is on . 5 Settings Access the settings default screen and change printer settings. Note: The mode is selected when the button light is selected. 1 2 3 4 5 Press To 1 • Return to the previous screen. • Delete a letter or number...
... photo default screen and print photos. Note: The mode is selected when the button light is on . 5 Settings Access the settings default screen and change printer settings. Note: The mode is selected when the button light is selected. 1 2 3 4 5 Press To 1 • Return to the previous screen. • Delete a letter or number...
User's Guide
Page 21
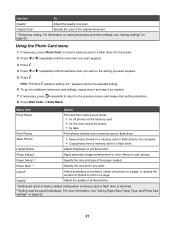
... photos • by date Print Photos Print photos directly from a memory card to a flash drive. Photo Effects1 Apply automatic image enhancement or color effects to factory default setting when a memory card or flash drive is removed. 2 Setting must be saved individually. Photo Size1, 2 Specify ...specify the number of printed photos. 1 Setting will return to your photos. An * appears next to the selected setting. 6 To go into the printer. 2 Press or repeatedly until the menu item you want appears. 3 Press . 4 Press or repeatedly until the submenu item you want or the setting...
... photos • by date Print Photos Print photos directly from a memory card to a flash drive. Photo Effects1 Apply automatic image enhancement or color effects to factory default setting when a memory card or flash drive is removed. 2 Setting must be saved individually. Photo Size1, 2 Specify ...specify the number of printed photos. 1 Setting will return to your photos. An * appears next to the selected setting. 6 To go into the printer. 2 Press or repeatedly until the menu item you want appears. 3 Press . 4 Press or repeatedly until the submenu item you want or the setting...
User's Guide
Page 22
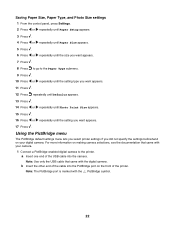
... Paper Size appears. 5 Press . 6 Press or repeatedly until the size you want appears. 7 Press . 8 Press to go to the printer. Using the PictBridge menu The PictBridge default settings menu lets you select printer settings if you want appears. 17 Press . Note: Use only the USB cable that came with the digital camera... your digital camera. For more information on making camera selections, see the documentation that came with the PictBridge symbol. 22 a Insert one end of the printer. b Insert the other end of the cable into the camera.
... Paper Size appears. 5 Press . 6 Press or repeatedly until the size you want appears. 7 Press . 8 Press to go to the printer. Using the PictBridge menu The PictBridge default settings menu lets you select printer settings if you want appears. 17 Press . Note: Use only the USB cable that came with the digital camera... your digital camera. For more information on making camera selections, see the documentation that came with the PictBridge symbol. 22 a Insert one end of the printer. b Insert the other end of the cable into the camera.
User's Guide
Page 24
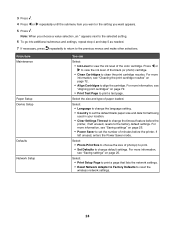
...default settings. 3 Press . 4 Press or repeatedly until the submenu item you want appears. 5 Press . Select the size and type of the color cartridge. For more information, see "Aligning print cartridges" on page 25. • Power Saver to set the default blank paper size and date ...and make other selections. For more information, see "Saving settings" on page 72. • Align Cartridges to change the timeout feature before the printer, if left unused, resets to clean the print cartridge nozzles. Note: When you want or the setting you choose a value selection, an *...
...default settings. 3 Press . 4 Press or repeatedly until the submenu item you want appears. 5 Press . Select the size and type of the color cartridge. For more information, see "Aligning print cartridges" on page 25. • Power Saver to set the default blank paper size and date ...and make other selections. For more information, see "Saving settings" on page 72. • Align Cartridges to change the timeout feature before the printer, if left unused, resets to clean the print cartridge nozzles. Note: When you want or the setting you choose a value selection, an *...
User's Guide
Page 25
... or flash drive is turned off the power but will return to the default setting. Note: The printer reverts to the default setting of a temporary setting after two minutes of inactivity or if the printer is removed. - Original Size - Repeat Image - Quality To change one or more temporary settings into new default...
... or flash drive is turned off the power but will return to the default setting. Note: The printer reverts to the default setting of a temporary setting after two minutes of inactivity or if the printer is removed. - Original Size - Repeat Image - Quality To change one or more temporary settings into new default...
User's Guide
Page 27
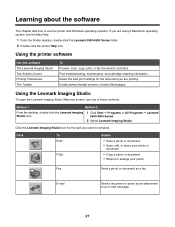
... information. Select the best print settings for the task you want to an e-mail message. 27 Using the Lexmark Imaging Studio To open the Lexmark Imaging Studio Welcome screen, use the printer with Windows operating systems. If you are printing. E-mail Send a document or photo as a fax. Click... Studio. Learning about the software This chapter tells how to use one of active Web pages. Using the printer software Use this software The Lexmark Imaging Studio The Solution Center Printing Preferences The Toolbar To Preview, scan, copy, print, or fax documents or photos. Click ...
... information. Select the best print settings for the task you want to an e-mail message. 27 Using the Lexmark Imaging Studio To open the Lexmark Imaging Studio Welcome screen, use the printer with Windows operating systems. If you are printing. E-mail Send a document or photo as a fax. Click... Studio. Learning about the software This chapter tells how to use one of active Web pages. Using the printer software Use this software The Lexmark Imaging Studio The Solution Center Printing Preferences The Toolbar To Preview, scan, copy, print, or fax documents or photos. Click ...
User's Guide
Page 28
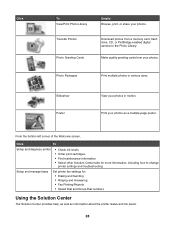
... and troubleshooting. Print your photos in various sizes. From the bottom left corner of the Welcome screen, Click To Setup and diagnose printer • Check ink levels. • Order print cartridges. • Find maintenance information. • Select other Solution Center tabs for : &#...The Solution Center provides help, as well as a multiple-page poster. Download photos from your photos. Setup and manage faxes Set printer fax settings for more information, including how to the Photo Library. Click To View/Print Photo Library Transfer Photos Photo Greeting Cards ...
... and troubleshooting. Print your photos in various sizes. From the bottom left corner of the Welcome screen, Click To Setup and diagnose printer • Check ink levels. • Order print cartridges. • Find maintenance information. • Select other Solution Center tabs for : &#...The Solution Center provides help, as well as a multiple-page poster. Download photos from your photos. Setup and manage faxes Set printer fax settings for more information, including how to the Photo Library. Click To View/Print Photo Library Transfer Photos Photo Greeting Cards ...


