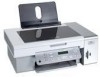

User's Guide
Page 2
... safety features of other than those described in the user documentation, to meet strict global safety standards with the printer software. Refer service or repairs, other replacement parts. Operating system notice All features and functions are operating system-dependent. Important... or make any electrical or cabling connections, such as the power supply cord or telephone, during a lightning storm. Lexmark is not responsible for the use of specific Lexmark components. Connect the power supply cord to a properly grounded electrical outlet that is designed, tested, and approved to...
... safety features of other than those described in the user documentation, to meet strict global safety standards with the printer software. Refer service or repairs, other replacement parts. Operating system notice All features and functions are operating system-dependent. Important... or make any electrical or cabling connections, such as the power supply cord or telephone, during a lightning storm. Lexmark is not responsible for the use of specific Lexmark components. Connect the power supply cord to a properly grounded electrical outlet that is designed, tested, and approved to...
User's Guide
Page 3
... the Photo Card menu ...21 Using the PictBridge menu ...22 Using the Settings menu ...23 Saving settings ...25 Learning about the software 27 Using the printer software...27 Using the Lexmark Imaging Studio...27 Using the Solution Center...28 Using Printing Preferences...30 Opening Printing Preferences ...30 Using the Printing Preferences tabs ...30...
... the Photo Card menu ...21 Using the PictBridge menu ...22 Using the Settings menu ...23 Saving settings ...25 Learning about the software 27 Using the printer software...27 Using the Lexmark Imaging Studio...27 Using the Solution Center...28 Using Printing Preferences...30 Opening Printing Preferences ...30 Using the Printing Preferences tabs ...30...
User's Guide
Page 5
...mailing 66 Removing wavy patterns from scanned photos, magazines, or newspapers 66 Customizing scan settings using the computer 67 Faxing...68 Sending a fax using the software...68 Receiving a fax automatically...69 Maintaining the printer 70 Changing print cartridges...70 Removing a used print cartridge...70 Installing print cartridges...70 Achieving better print... the print cartridges...74 Cleaning the scanner glass...74 Ordering supplies...74 Ordering print cartridges...74 Ordering paper and other supplies ...75 Using genuine Lexmark print cartridges 75 Refilling a print cartridge...76 5
...mailing 66 Removing wavy patterns from scanned photos, magazines, or newspapers 66 Customizing scan settings using the computer 67 Faxing...68 Sending a fax using the software...68 Receiving a fax automatically...69 Maintaining the printer 70 Changing print cartridges...70 Removing a used print cartridge...70 Installing print cartridges...70 Achieving better print... the print cartridges...74 Cleaning the scanner glass...74 Ordering supplies...74 Ordering print cartridges...74 Ordering paper and other supplies ...75 Using genuine Lexmark print cartridges 75 Refilling a print cartridge...76 5
User's Guide
Page 6
Recycling Lexmark products...76 Troubleshooting...77 Setup troubleshooting...77 Incorrect language appears on the display 77 Power button is not lit ...78 Software does not install ...78 Page does not print ...79 Cannot print from digital camera using PictBridge 80 Print troubleshooting...81 Partial 4 x 6 in. (10 x 15 cm) ... troubleshooting...92 Memory card cannot be inserted ...93 Nothing happens when memory card is inserted 93 Error messages...94 Alignment Error...94 Black Ink Low / Color Ink Low / Photo Ink Low 94 Cartridge Error (1102, 1203, 1204, or 120F 94 Clear Carrier Jam ...95 6
Recycling Lexmark products...76 Troubleshooting...77 Setup troubleshooting...77 Incorrect language appears on the display 77 Power button is not lit ...78 Software does not install ...78 Page does not print ...79 Cannot print from digital camera using PictBridge 80 Print troubleshooting...81 Partial 4 x 6 in. (10 x 15 cm) ... troubleshooting...92 Memory card cannot be inserted ...93 Nothing happens when memory card is inserted 93 Error messages...94 Alignment Error...94 Black Ink Low / Color Ink Low / Photo Ink Low 94 Cartridge Error (1102, 1203, 1204, or 120F 94 Clear Carrier Jam ...95 6
User's Guide
Page 7
... are not saved...99 Change time-out settings...99 Save settings for future jobs ...99 Resetting to factory default settings 99 Removing and reinstalling the software 100 Notices...101 Edition notice...101 Power consumption...103 Index...105 7
... are not saved...99 Change time-out settings...99 Save settings for future jobs ...99 Resetting to factory default settings 99 Removing and reinstalling the software 100 Notices...101 Edition notice...101 Power consumption...103 Index...105 7

User's Guide
Page 9
... User's Guide printer and other information such as: will be installed. • Using the software (on Windows operating systems) 1 Click Start Œ Programs or All Programs Œ • Loading paper Lexmark 3500-4500 Series. • Printing 2 Click User's Guide. • Working with printing, copying, ...8226; Connecting the printer to find You can find this document in the printer box or on the setting up hardware and software. site at www.lexmark.com. 9 Getting Started booklet Description Where to the User's Guide is the letter of the User's Guide appears on ...
... User's Guide printer and other information such as: will be installed. • Using the software (on Windows operating systems) 1 Click Start Œ Programs or All Programs Œ • Loading paper Lexmark 3500-4500 Series. • Printing 2 Click User's Guide. • Working with printing, copying, ...8226; Connecting the printer to find You can find this document in the printer box or on the setting up hardware and software. site at www.lexmark.com. 9 Getting Started booklet Description Where to the User's Guide is the letter of the User's Guide appears on ...
User's Guide
Page 10
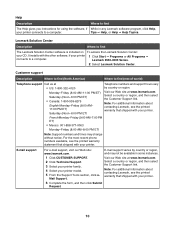
...4 Select your printer model. 5 From the Support Tools section, click e- Note: For additional information about contacting Lexmark, see the printed warranty that shipped with the other software, if your printer 1 Click Start ΠPrograms or All Programs Πconnects to a computer. French ... numbers and times may not be available in any Lexmark software program, click Help, your printer connects to a computer. Help Description Where to find The Lexmark Solution Center software is included on To access the Lexmark Solution Center: your CD. Select a country or region...
...4 Select your printer model. 5 From the Support Tools section, click e- Note: For additional information about contacting Lexmark, see the printed warranty that shipped with the other software, if your printer 1 Click Start ΠPrograms or All Programs Πconnects to a computer. French ... numbers and times may not be available in any Lexmark software program, click Help, your printer connects to a computer. Help Description Where to find The Lexmark Solution Center software is included on To access the Lexmark Solution Center: your CD. Select a country or region...
User's Guide
Page 12
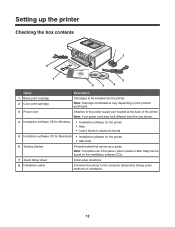
... (User's Guide or Mac Help) can be installed into the printer. Note: Cartridge combinations vary depending on the installation software CDs. 7 Quick Setup sheet Initial setup directions 8 Installation cable Connects the printer to the power supply port located at ... in electronic format 5 Installation software CD for Macintosh • Installation software for the printer • Mac Help 6 Getting Started Printed booklet that serves as a guide. Setting up the printer Checking the box contents Name Description 1 Black print cartridge 2 Color print cartridge Cartridges to be ...
... (User's Guide or Mac Help) can be installed into the printer. Note: Cartridge combinations vary depending on the installation software CDs. 7 Quick Setup sheet Initial setup directions 8 Installation cable Connects the printer to the power supply port located at ... in electronic format 5 Installation software CD for Macintosh • Installation software for the printer • Mac Help 6 Getting Started Printed booklet that serves as a guide. Setting up the printer Checking the box contents Name Description 1 Black print cartridge 2 Color print cartridge Cartridges to be ...
User's Guide
Page 27
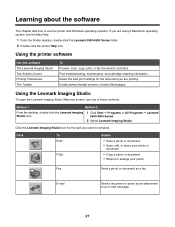
... Windows operating systems. If you are using a Macintosh operating system, see the Mac Help: 1 From the Finder desktop, double-click the Lexmark 3500-4500 Series folder. 2 Double-click the printer Help icon. E-mail Send a document or photo as a fax. Create printer-friendly...an attachment to an e-mail message. 27 Click the Lexmark Imaging Studio icon for the document you are printing. Learning about the software This chapter tells how to complete. Using the printer software Use this software The Lexmark Imaging Studio The Solution Center Printing Preferences The Toolbar To...
... Windows operating systems. If you are using a Macintosh operating system, see the Mac Help: 1 From the Finder desktop, double-click the Lexmark 3500-4500 Series folder. 2 Double-click the printer Help icon. E-mail Send a document or photo as a fax. Create printer-friendly...an attachment to an e-mail message. 27 Click the Lexmark Imaging Studio icon for the document you are printing. Learning about the software This chapter tells how to complete. Using the printer software Use this software The Lexmark Imaging Studio The Solution Center Printing Preferences The Toolbar To...
User's Guide
Page 30
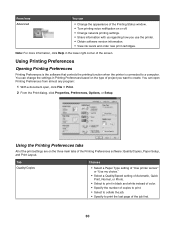
... Printing Preferences based on the type of the Printing Status window. • Turn printing voice notification on the three main tabs of the Printing Preferences software: Quality/Copies, Paper Setup, and Print Layout. You can open Printing Preferences from almost any program: 1 With a document open, click File &#...Select to print in the lower right corner of the job first. 30 Note: For more information, click Help in black and white instead of color. • Specify the number of copies to print. • Select to collate the job. • Specify to a computer. Using the ...
... Printing Preferences based on the type of the Printing Status window. • Turn printing voice notification on the three main tabs of the Printing Preferences software: Quality/Copies, Paper Setup, and Print Layout. You can open Printing Preferences from almost any program: 1 With a document open, click File &#...Select to print in the lower right corner of the job first. 30 Note: For more information, click Help in black and white instead of color. • Specify the number of copies to print. • Select to collate the job. • Specify to a computer. Using the ...
User's Guide
Page 31
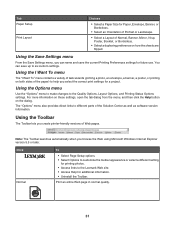
.... • Select a duplexing preference on how the sheets are flipped. Using the Options menu Use the "Options" menu to make changes to the Lexmark Web site. • Access Help for additional information. • Uninstall the Toolbar. Click Normal To • Select Page Setup options. • ...links to different parts of Web pages. Using the Toolbar The Toolbar lets you create printer-friendly versions of the Solution Center as well as software version information. Tab Paper Setup Print Layout Choices • Select a Paper Size for Paper, Envelope, Banner, or Borderless. • Select...
.... • Select a duplexing preference on how the sheets are flipped. Using the Options menu Use the "Options" menu to make changes to the Lexmark Web site. • Access Help for additional information. • Uninstall the Toolbar. Click Normal To • Select Page Setup options. • ...links to different parts of Web pages. Using the Toolbar The Toolbar lets you create printer-friendly versions of the Solution Center as well as software version information. Tab Paper Setup Print Layout Choices • Select a Paper Size for Paper, Envelope, Banner, or Borderless. • Select...
User's Guide
Page 32
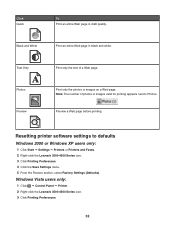
.... Note: The number of a Web page. Preview a Web page before printing. Resetting printer software settings to Photos. Windows Vista users only: 1 Click ΠControl Panel ΠPrinter. 2 Right-click the Lexmark 3500-4500 Series icon. 3 Click Printing Preferences. 32 Print only the photos or images on ...2000 or Windows XP users only: 1 Click Start ΠSettings ΠPrinters or Printers and Faxes. 2 Right-click the Lexmark 3500-4500 Series icon. 3 Click Printing Preferences. 4 Click the Save Settings menu. 5 From the Restore section, select Factory Settings (Defaults).
.... Note: The number of a Web page. Preview a Web page before printing. Resetting printer software settings to Photos. Windows Vista users only: 1 Click ΠControl Panel ΠPrinter. 2 Right-click the Lexmark 3500-4500 Series icon. 3 Click Printing Preferences. 32 Print only the photos or images on ...2000 or Windows XP users only: 1 Click Start ΠSettings ΠPrinters or Printers and Faxes. 2 Right-click the Lexmark 3500-4500 Series icon. 3 Click Printing Preferences. 4 Click the Save Settings menu. 5 From the Restore section, select Factory Settings (Defaults).
User's Guide
Page 41
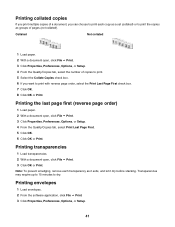
... last page first (reverse page order) 1 Load paper. 2 With a document open , click File ΠPrint. 3 Click OK or Print. Printing envelopes 1 Load envelopes. 2 From the software application, click File ΠPrint. 3 Click Properties, Preferences, Options, or Setup. 41 Note: To prevent smudging, remove each copy as a set (collated) or to print...
... last page first (reverse page order) 1 Load paper. 2 With a document open , click File ΠPrint. 3 Click OK or Print. Printing envelopes 1 Load envelopes. 2 From the software application, click File ΠPrint. 3 Click Properties, Preferences, Options, or Setup. 41 Note: To prevent smudging, remove each copy as a set (collated) or to print...
User's Guide
Page 42
..., select the envelope size loaded. 6 Select Portrait or Landscape orientation. Printing cards 1 Load greeting cards, index cards, or postcards. 2 From the software application, click File Œ Print. 3 Click Properties, Preferences, Options, or Setup. 4 Select a Quality/Speed setting. Notes: • Most ...envelopes use landscape orientation. • Make sure the same orientation is also selected in the software application. 7 Click OK. 8 Click OK. 9 Click OK or Print. 4 From the "I Want To" menu, select Print on one sheet 1 ...
..., select the envelope size loaded. 6 Select Portrait or Landscape orientation. Printing cards 1 Load greeting cards, index cards, or postcards. 2 From the software application, click File Œ Print. 3 Click Properties, Preferences, Options, or Setup. 4 Select a Quality/Speed setting. Notes: • Most ...envelopes use landscape orientation. • Make sure the same orientation is also selected in the software application. 7 Click OK. 8 Click OK. 9 Click OK or Print. 4 From the "I Want To" menu, select Print on one sheet 1 ...
User's Guide
Page 46
... images you want to the computer using the computer 1 Insert a memory card into the printer with the label facing the printer control panel. The Lexmark Imaging Studio software launches automatically on your transferred photos in the Photo Library. 46 Note: The printer recognizes one active media device at a time. Note: For a network...
... images you want to the computer using the computer 1 Insert a memory card into the printer with the label facing the printer control panel. The Lexmark Imaging Studio software launches automatically on your transferred photos in the Photo Library. 46 Note: The printer recognizes one active media device at a time. Note: For a network...
User's Guide
Page 47
...want . For more information, see "Inserting a flash drive" on your transferred photos in the Photo Library. 47 The Lexmark Imaging Studio software launches automatically on your computer using the Lexmark Imaging Studio. 3 If you are using Windows XP, a "What do ?" Note: Make sure all of the ... 1 Insert a CD into the computer or a flash drive into the printer with the label facing the printer control panel. The Lexmark Imaging Studio software launches automatically on page 45. screen appears. b Select the folder you want Windows to your computer. Click Transfer Photos to do ...
...want . For more information, see "Inserting a flash drive" on your transferred photos in the Photo Library. 47 The Lexmark Imaging Studio software launches automatically on your computer using the Lexmark Imaging Studio. 3 If you are using Windows XP, a "What do ?" Note: Make sure all of the ... 1 Insert a CD into the computer or a flash drive into the printer with the label facing the printer control panel. The Lexmark Imaging Studio software launches automatically on page 45. screen appears. b Select the folder you want Windows to your computer. Click Transfer Photos to do ...
User's Guide
Page 48
...screen appears. c Click OK. 9 If you want to assign a prefix to the default folder, click Next. 8 If you are using the Lexmark Imaging Studio. 3 If you want to save the photos in the Photo Library. Transferring photos from a CD or flash drive using Windows 2000: a... From the desktop, double-click the Lexmark Imaging Studio icon. The Lexmark Imaging Studio software launches automatically on your camera card appears. 4 Press . 5 Press or repeatedly until Save Photos appears. 6 Press . 7...
...screen appears. c Click OK. 9 If you want to assign a prefix to the default folder, click Next. 8 If you are using the Lexmark Imaging Studio. 3 If you want to save the photos in the Photo Library. Transferring photos from a CD or flash drive using Windows 2000: a... From the desktop, double-click the Lexmark Imaging Studio icon. The Lexmark Imaging Studio software launches automatically on your camera card appears. 4 Press . 5 Press or repeatedly until Save Photos appears. 6 Press . 7...
User's Guide
Page 63
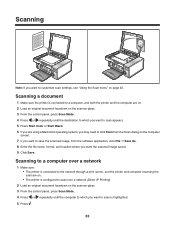
... the scanner glass. 3 From the control panel, press Scan Mode. 4 Press or repeatedly until the destination to which you want to scan appears. 5 Press Start Color or Start Black. 6 If you are on. • The printer is configured to scan over a network 1 Make sure: • The printer is highlighted. 5 Press...a print server, and the printer and computer receiving the scan are using a Macintosh operating system, you may need to click Scan from the software application, click File Œ Save As. 8 Enter the file name, format, and location where you want the scanned image saved. 9 Click Save.
... the scanner glass. 3 From the control panel, press Scan Mode. 4 Press or repeatedly until the destination to which you want to scan appears. 5 Press Start Color or Start Black. 6 If you are on. • The printer is configured to scan over a network 1 Make sure: • The printer is highlighted. 5 Press...a print server, and the printer and computer receiving the scan are using a Macintosh operating system, you may need to click Scan from the software application, click File Œ Save As. 8 Enter the file name, format, and location where you want the scanned image saved. 9 Click Save.
User's Guide
Page 64
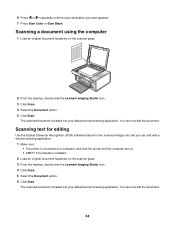
...document facedown on the scanner glass. 3 From the desktop, double-click the Lexmark Imaging Studio icon. 4 Click Scan. 5 Select the Document option. 6 Click Start. Scanning text for editing Use the Optical Character Recognition (OCR) software feature to a computer, and both the printer and the computer are on... the scanner glass. 2 From the desktop, double-click the Lexmark Imaging Studio icon. 3 Click Scan. 4 Select the Document option. 5 Click Start. The scanned document is loaded into text you want appears. 7 Press Start Color or Start Black. You can now edit the document. 64...
...document facedown on the scanner glass. 3 From the desktop, double-click the Lexmark Imaging Studio icon. 4 Click Scan. 5 Select the Document option. 6 Click Start. Scanning text for editing Use the Optical Character Recognition (OCR) software feature to a computer, and both the printer and the computer are on... the scanner glass. 2 From the desktop, double-click the Lexmark Imaging Studio icon. 3 Click Scan. 4 Select the Document option. 5 Click Start. The scanned document is loaded into text you want appears. 7 Press Start Color or Start Black. You can now edit the document. 64...

User's Guide
Page 68
... an original document facedown on . Note: A fax number can scan a document to the computer and then fax it to someone using the software You can include up to send with your fax, add these symbols 7 Enter the cover page information, and then click Next. 8 If there are ...turned on the scanner glass. 2 From the desktop, double-click the Lexmark Imaging Studio icon. 3 From the left pane of your fax: • Immediately-Select the Send now option. • At a scheduled time: a Select the "Delay ...
... an original document facedown on . Note: A fax number can scan a document to the computer and then fax it to someone using the software You can include up to send with your fax, add these symbols 7 Enter the cover page information, and then click Next. 8 If there are ...turned on the scanner glass. 2 From the desktop, double-click the Lexmark Imaging Studio icon. 3 From the left pane of your fax: • Immediately-Select the Send now option. • At a scheduled time: a Select the "Delay ...


