Lenovo IdeaCentre K330 Research
View Results Below
Free Lenovo IdeaCentre K330 manuals!
Problems with Lenovo IdeaCentre K330?
Ask a Question
Free Lenovo IdeaCentre K330 manuals!
Problems with Lenovo IdeaCentre K330?
Ask a Question
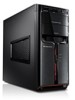
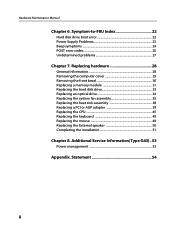
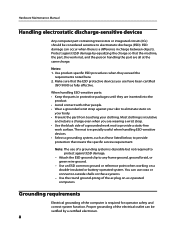
Related Manual Pages


Related Videos

Lenovo IdeaCentre K330 desktop tour
Duration: 2:07
Total Views: 28,500
Duration: 2:07
Total Views: 28,500
Lenovo IdeaCentre K330 Desktop Video Review
Duration: 7:00
Total Views: 24,176
Duration: 7:00
Total Views: 24,176
Lenovo IdeaCentre K330
Duration: 2:07
Total Views: 1,190
Duration: 2:07
Total Views: 1,190
Lenovo IdeaCentre K330 77272HJ Windows8 STRAT UP????????????
Duration: 1:20
Total Views: 76
Duration: 1:20
Total Views: 76
Similar Questions

How To Determine Power Supply For A Lenovo Ideacentre K330
(Posted by kaborjm115 9 years ago)


Ideacentre K330 - What Are The 2 Wires Coming From Bezel Fan Switch?
I upgraded my Lenovo K330 desktop to a 600W power supply to power a graphics card. The new PS came w...
I upgraded my Lenovo K330 desktop to a 600W power supply to power a graphics card. The new PS came w...
(Posted by Howard245 12 years ago)

User Maual Lenovo Ideacentre K330
Do you have a user maual for PC lenovo IdeaCentre K330 as a PDF File, maybe if it's possible in germ...
Do you have a user maual for PC lenovo IdeaCentre K330 as a PDF File, maybe if it's possible in germ...
(Posted by annegret 12 years ago)
Related Terms
The following terms were also used when searching for Lenovo IdeaCentre K330 Research:- ideacentre k330
- lenovo ideacentre k330
- lenovo ideacentre k330 i7
- ideacentre k330b bios
- lenovo ideacentre k330 i3
- lenovo ideacentre k330 hard drive
- lenovo ideacentre k330 graphics card
- lenovo ideacentre k330 drivers
- lenovo ideacentre k330 desktop reviews
- lenovo ideacentre k330 desktop review
- lenovo ideacentre k330 desktop pc
- lenovo ideacentre k330 desktop computer
- lenovo ideacentre k330 desktop
- lenovo ideacentre k330 bios update
- lenovo ideacentre k330 bios
- lenovo ideacentre k330 best buy
- lenovo ideacentre k330 7747
- lenovo ideacentre k330 7727
- lenovo ideacentre k330 11691au
- lenovo ideacentre k330 1169
- lenovo - ideacentre k330 desktop
- ideacentre k330b power upgrade
- ideacentre k330b power supply
- ideacentre k330b graphics card
- lenovo ideacentre k330b power upgrade
- lenovo ideacentre k330 psu
- - ideacentre k330 desktop
- lenovo ideacentre k330b power supply
- lenovo ideacentre k330b graphics card
- lenovo ideacentre k330b
- lenovo ideacentre k330a
- lenovo ideacentre k330-11691au
- lenovo ideacentre k330 system board
- lenovo ideacentre k330 specs
- lenovo ideacentre k330 specifications
- lenovo ideacentre k330 reviews
- lenovo ideacentre k330 review
- lenovo ideacentre k330 i7-2600
- lenovo ideacentre k330 price in india
- lenovo ideacentre k330 price
- lenovo ideacentre k330 power supply upgrade
- lenovo ideacentre k330 power supply
- lenovo ideacentre k330 parts
- lenovo ideacentre k330 motherboard specs
- lenovo ideacentre k330 motherboard manual
- lenovo ideacentre k330 motherboard
- lenovo ideacentre k330 memory
- lenovo ideacentre k330 manual
- ideacentre k330 desktop computer review
- ideacentre k330 i7
- ideacentre k330 i5
- ideacentre k330 i3
- ideacentre k330 hdmi
- ideacentre k330 hard drive
- ideacentre k330 graphics card
- ideacentre k330 drivers
- ideacentre k330 desktop reviews
- ideacentre k330 desktop review
- ideacentre k330 desktop pc
- ideacentre k330 desktop computer reviews
- ideacentre k330 i7-2600
- ideacentre k330 desktop computer
- ideacentre k330 desktop
- ideacentre k330 bios update
- ideacentre k330 bios
- ideacentre k330 best buy
- ideacentre k330 7747
- ideacentre k330 7727
- ideacentre k330 11691au
- ideacentre k330 1169
- ideacentre k330 - 77273hu
- ideacentre k330 price
- ideacentre k330a
- ideacentre k330-11691au
- ideacentre k330 system board
- ideacentre k330 support
- ideacentre k330 specs
- ideacentre k330 specifications
- ideacentre k330 reviews
- ideacentre k330 review
- ideacentre k330 rescue and recovery
- ideacentre k330 psu
- ideacentre k330 price in india
- ideacentre k330b
- ideacentre k330 power supply upgrade
- ideacentre k330 power supply
- ideacentre k330 parts
- ideacentre k330 network driver
- ideacentre k330 network adapter
- ideacentre k330 motherboard specs
- ideacentre k330 motherboard manual
- ideacentre k330 motherboard
- ideacentre k330 memory
- ideacentre k330 manual