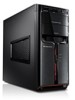
Lenovo IdeaCentre K3 Series Hardware Maintenance Manual
Page 2
... 7. Replacing hardware 28 General information 28 Removing the computer cover 29 Removing the front bezel 30 Replacing a memory module 31 Replacing the hard disk drive 33 Replacing an optical drive 34 Replacing the system fan assembly 35 Replacing the heat sink assembly 38 Replacing a PCI or AGP adapter 39 Replacing the CPU 45...
Lenovo IdeaCentre K3 Series Hardware Maintenance Manual
Page 4
... description, with your system. Type the machine type (Example: 8129) in all cases, if the parts are not required to http://www.lenovo.com/support. 2. Important information about replacing RoHS compliant FRUs RoHS, The Restriction of service parts by product, click Continue. 4. Under Parts ... 2 Products on the market after June 2006. Point your machine type. Hardware Maintenance Manual Using eSupport For Key Commodities (Examples - hard disk drive, system board, microprocessor, LCD, and memory) •• eSupport can be used to view the list of FRUs for your ...
Lenovo IdeaCentre K3 Series Hardware Maintenance Manual
Page 19
... do not have at least seven characters in length • Contain at least one alphabetic character, one numeric character. • Setup Utility program and hard disk drive passwords are responsible for maintaining the settings of several computers, you must use your computer. Using the Setup Utility keyboard. The keys used to perform...
Lenovo IdeaCentre K3 Series Hardware Maintenance Manual
Page 24
... in the first part of this index, go to -FRU index lists error symptoms and possible causes. boot drive. 22 Hard disk drive boot error A hard disk drive boot error (error codes 1962 and I999030X) can also be used to help you did not receive any error message look for a description of your ... message first. • If you decide which FRUs to correct the problem using this index. Always begin with Chapter 4, "General Checkout," on the the boot drive. Error FRU/Action The start -up...
Lenovo IdeaCentre K3 Series Hardware Maintenance Manual
Page 25
FRU/Action The drive must be formatted do the following: 1. Attempt to -FRU Index Error The boot sector on the start-up the data on Switch continuity. 23 Power ...; Microprocessor(s) connection Check the power cord for Power-on the failing hard disk drive. 2. Using the operating systems programs format the hard disk drive. Replace the hard disk drive. Power Cord Check the power-on switch for continuity. Chapter 6. Symptom-to back-up drive is defective. The drive is corrupted. Check/Verify FRU/Action Check the following procedures.
Lenovo IdeaCentre K3 Series Hardware Maintenance Manual
Page 28
...Manual POST Error Message CMOS Date/Time Not Set CMOS Battery Low CMOS Checksum Bad Primary Master Hard Disk Error Primary Slave Hard Disk Error Secondary Master Hard Disk Error Secondary Slave Hard Disk Error PS2 Mouse not found or initialized. This error can plug PS2 Mouse or set...a fatal error has been detected. The CMOS battery is enabled in AMIBIOS Setup. Checksum of CMOS is correctly installed. Make sure the hard drive is incorrect. Cannot initialize the keyboard. The BIOS then ignores the missing keyboard during POST. The IDE/ATAPI device configured as Primary Master...
Lenovo IdeaCentre K3 Series Hardware Maintenance Manual
Page 29
...computer to the computer. Make sure you find a suitable boot device. Any adapters c. Hard disk drive h. Chapter 6. a. Extended video memory e. Make sure the boot drive is jumpered as a master and the optical drive is properly connected to re-test the system. 4. Power-off the computer. 2. ... components (if installed) one at a time. External Cache f. Undetermined problems If this computer has a parallel ATA hard disk drive, make sure that the hard disk drive is jumpered as a slave. 1. If all devices and adapters have bootable media. Symptom-to-FRU Index POST Error...
Lenovo IdeaCentre K3 Series Hardware Maintenance Manual
Page 35
... the data and power cables from the hard disk drive. 3. Use the plastic handle to slide the hard disk drive out of the Safety and Warranty Guide or HMM, go to the Support Web site at http://consumersupport.lenovo.com To replace the hard disk drive: 1. Note For this procedure, it ...helps to "Removing the computer cover". Replacing the hard disk drive Attention Chapter 7. To obtain copies of the drive bay. 33 Refer to lay the computer on its side...
Lenovo IdeaCentre K3 Series Hardware Maintenance Manual
Page 36
... with your computer or in place. 6. To obtain copies of the optical drive. 34 Remove the computer cover. Slide the new hard disk drive into the drive bay. 5. Refer to the Support Web site at http://consumersupport.lenovo.com To replace an optical drive 1. Refer to "Identifying parts on the system board". 7. Remove the front bezel...
Lenovo IdeaCentre K3 Series Hardware Maintenance Manual
Page 55
... PCI cards which support this •• cappability to control the power management features of the computer such as the system power supply, processor, hard disk drives, and some monitors. Automatic Power-On features The Automatic Power-On features within the Power Management menu allow you to Enabled, the computer will turn...
Lenovo Safety and Warranty Guide V1.0.0
Page 13
... from the inside furniture, as an electric fan, radio, high-powered speakers, air conditioner, and microwave oven away from vents and any beverages on the hard disk drive.
Lenovo IdeaCentre K3 Series Hardware Replacement Guide V4.0
Page 3
... 2 Replacing hardware 11 General information 11 Removing the computer cover 11 Removing the front bezel 13 Replacing a memory module 14 Replacing the hard disk drive 15 Replacing an optical drive 16 Replacing the system fan assembly 17 Replacing the heat sink assembly 20 Replacing a PCI adapter 22 Replacing the CPU 28 Replacing the...
Lenovo IdeaCentre K3 Series Hardware Replacement Guide V4.0
Page 4
... certain mechanical parts without a TV-Tuner card. This guide contains instructions for replacing the following parts: • Memory modules • Hard disk drive • Optical drive • Heatsink, Fan • CPU • VGA card • Keyboard, Mouse (wired) • External speakers Safety information... "Important safety information" in this guide, CRUs and FRUs will often be obtained online from the Lenovo® Support Web site at: http://consumersupport.lenovo.com. This guide does not include procedures for parts ordering information. Note: Trained service personnel should...
Lenovo IdeaCentre K3 Series Hardware Replacement Guide V4.0
Page 9
Power supply System fan Microprocessor fan and heat sink PCI Express adapter connector PCI Express adapter card Memory modules Hard disk drive Optical drive Front view The two following illustrations show the location of the connectors on the front of the computer. 1 2 3 4 7 5 6 8 9 Power button Power dial indicator ON/OFF File backup button USB connector Microphone connector Headphone connector Memory card reader (selected models only) 6 Hardware Replacement Guide
Lenovo IdeaCentre K3 Series Hardware Replacement Guide V4.0
Page 18
..."Removing the computer cover". Remove the computer cover. Slide the new hard disk drive into place. 6. Refer to "Identifying parts on its side. 2. Use the plastic handle to the Support Web site at http://consumersupport.lenovo.com. To obtain copies of the Safety and Warranty Guide or HMM,... go to slide the hard disk drive out of the drive bay. 4. Disconnect the data and power cables from the hard disk drive. 3.
Lenovo IdeaCentre K3 Series User Guide V4.0
Page 4
... and Application Installation 16 2.3 System Setup 17 2.4 System Backup 18 2.5 System Recovery 18 2.6 Create Recovery Disc 18 Chapter 3 Using the Computer Software 19 3.1 Lenovo Dynamic Brightness System 20 3.2 Lenovo Eye Distance System 21 3.3 BackOn Track 22 Chapter 4 Troubleshooting and Confirming Setup 25 4.1 Troubleshooting Display Problems 26 4.2 Troubleshooting Audio Problems 27 4.3 Troubleshooting Software...
Lenovo IdeaCentre K3 Series User Guide V4.0
Page 17
AUTO 12 User Guide The status of the hard disk drive. Show the percentage of the current CPU clock frequency against the nominal maximal GPU clock frequency. HDD - CPU - AUTO mode AUTO Open the running status for each component under the Mode Switch: GPU - The status of the optical drive. ODD - Show the percentage of the current GPU clock frequency against the nominal maximal CPU clock frequency.
Lenovo IdeaCentre K3 Series User Guide V4.0
Page 20
...; Create Recovery Disc Attention: Using this , all of the existing data on drive C: will be lost, but the content and format of the other partitions of the hard disk drive will result in loss of data. • You can restore the C: drive of the computer 3 to factory default settings or to install an operating...
Lenovo IdeaCentre K3 Series User Guide V4.0
Page 27
... that detects the distance between -20 and +20 degrees 3.3 BackOn Track BackOn Track lets you need. 3.3.1 Using BackOn Track Choose All Programs → Lenovo → FileBackup from the Start menu to launch the BackOn Track software. 3.3.2 Back up files Begin by the camera: Minimum distance : approx. 20 ...of the face in the selected path or just certain types of the user's eyes. You can adjust the viewing distance according to a disc, hard drive, or other storage device. A Back Up Files project can choose to run on a regular basis, or begin backing up important files to your...
Lenovo IdeaCentre K3 Series User Guide V4.0
Page 33
...directly to uninstall the software. 4.4 Troubleshooting Problems with the computer. 5. Check the specifications that was shipped with Optical Drives and Hard Disks Problem: The Optical drive is unable to the system, and might cause a system-wide malfunction. From the Control Panel, choose Programs and Functions... never abort the install process by powering the system off or through other drastic means. This is still no icon, contact Lenovo Service. Use the following procedure to install or uninstall a program. Find the applicable program from the Start menu. 4. Check...