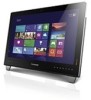
User Guide
Page 5
... TV Instructions (ATV model) (selected models only 33 Using the Rescue System 35 OneKey Recovery 36 Driver and Application Installation 37 Troubleshooting and Confirming Setup 39 Troubleshooting Display Problems 40 Troubleshooting Touch screen 41 Troubleshooting Audio Problems 41 Troubleshooting Software Problems 42 Troubleshooting Problems with Optical Drives and Hard Disks 43 Special considerations for troubleshooting Windows 44 Windows Help and Support 44 BIOS setup utility 45 Performing Daily Maintenance Tasks 46 Hardware Replacement Guide 47 Overview 48 Replacing hardware...
... TV Instructions (ATV model) (selected models only 33 Using the Rescue System 35 OneKey Recovery 36 Driver and Application Installation 37 Troubleshooting and Confirming Setup 39 Troubleshooting Display Problems 40 Troubleshooting Touch screen 41 Troubleshooting Audio Problems 41 Troubleshooting Software Problems 42 Troubleshooting Problems with Optical Drives and Hard Disks 43 Special considerations for troubleshooting Windows 44 Windows Help and Support 44 BIOS setup utility 45 Performing Daily Maintenance Tasks 46 Hardware Replacement Guide 47 Overview 48 Replacing hardware...

User Guide
Page 7
Blocked air vents can cause overheating. 12 34 5 6 7 8 9 10 11 12 13 14 Built-in microphone area Built-in IR Emitter (do not block) (selected models only) Bluetooth status indicator TV indicator Volume up Brightness up PC mode / HDMI-in / AV-in switch Camera Hard Disk Drive Indicator WIFI status indicator Volume down Brightness down Novo Vision button Monitor On/Off Attention: The effective range of the computer Attention: Be careful not to block any air vents on the computer. Front view of the Built-in IR Emitter is 10 feet (3m). 2 User Guide
Blocked air vents can cause overheating. 12 34 5 6 7 8 9 10 11 12 13 14 Built-in microphone area Built-in IR Emitter (do not block) (selected models only) Bluetooth status indicator TV indicator Volume up Brightness up PC mode / HDMI-in / AV-in switch Camera Hard Disk Drive Indicator WIFI status indicator Volume down Brightness down Novo Vision button Monitor On/Off Attention: The effective range of the computer Attention: Be careful not to block any air vents on the computer. Front view of the Built-in IR Emitter is 10 feet (3m). 2 User Guide

User Guide
Page 12
...programs using the optional TV tuner card. Use this connector to attach headphones to the HDMI connector on your video device. Use this section. Connects to your computer is equipped with a wireless keyboard or mouse, follow the installation instructions for those devices. Basic connector instructions Connector Microphone Headphone USB connector Ethernet connector HDMI connector (optional) TV-Tuner connector (optional) AV-in this connector to an Ethernet-type local area network. Connects to an external antenna to music or other sounds without disturbing anyone. User Guide...
...programs using the optional TV tuner card. Use this connector to attach headphones to the HDMI connector on your video device. Use this section. Connects to your computer is equipped with a wireless keyboard or mouse, follow the installation instructions for those devices. Basic connector instructions Connector Microphone Headphone USB connector Ethernet connector HDMI connector (optional) TV-Tuner connector (optional) AV-in this connector to an Ethernet-type local area network. Connects to an external antenna to music or other sounds without disturbing anyone. User Guide...
User Guide
Page 15
... end to other Windows compatible software, specially configured to the Ethernet connector on this model of the screen, then click Settings.) 2. To connect your computer to the network router or broadband modem. Tap or click Connect, then follow the steps on the manufacturer. Test the wireless network by country. Your computer is designed to support a wireless (selected models only) or wired network that connects your computer to access your country. Consult...
... end to other Windows compatible software, specially configured to the Ethernet connector on this model of the screen, then click Settings.) 2. To connect your computer to the network router or broadband modem. Tap or click Connect, then follow the steps on the manufacturer. Test the wireless network by country. Your computer is designed to support a wireless (selected models only) or wired network that connects your computer to access your country. Consult...
User Guide
Page 21
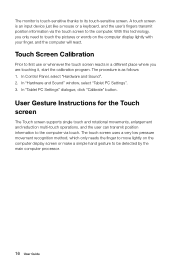
..., you are touching it, start the calibration program. In Control Panel, select "Hardware and Sound". 2. The monitor is touch-sensitive thanks to be detected by the main computer processor. 16 User Guide In "Tablet PC Settings" dialogue, click "Calibrate" button. The touch screen uses a very low pressure movement recognition method, which only needs the finger to move lightly on the computer display lightly with your finger, and...
..., you are touching it, start the calibration program. In Control Panel, select "Hardware and Sound". 2. The monitor is touch-sensitive thanks to be detected by the main computer processor. 16 User Guide In "Tablet PC Settings" dialogue, click "Calibrate" button. The touch screen uses a very low pressure movement recognition method, which only needs the finger to move lightly on the computer display lightly with your finger, and...
User Guide
Page 24
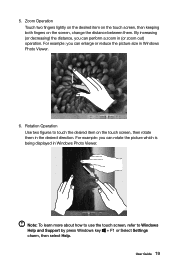
Rotation Operation Use two figures to Windows Help and Support by press Windows key + F1 or Select Settings charm, then select Help. For example: you can enlarge or reduce the picture size in (or zoom out) operation. 5. For example: you can perform a zoom in Windows Photo Viewer. 6. User Guide 19 Note: To learn more about how to use the touch screen, refer to touch...
Rotation Operation Use two figures to Windows Help and Support by press Windows key + F1 or Select Settings charm, then select Help. For example: you can enlarge or reduce the picture size in (or zoom out) operation. 5. For example: you can perform a zoom in Windows Photo Viewer. 6. User Guide 19 Note: To learn more about how to use the touch screen, refer to touch...
User Guide
Page 25
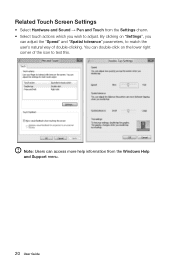
By clicking on "Settings", you wish to test this. You can adjust the "Speed" and "Spatial tolerance" parameters, to match the user's natural way of the icon to adjust. Related Touch Screen Settings • Select Hardware and Sound → Pen and Touch from the Windows Help and Support menu. 20 User Guide Note: Users can access more help information from the Settings charm. • Select touch actions which you can double-click on the lower right corner of double-clicking.
By clicking on "Settings", you wish to test this. You can adjust the "Speed" and "Spatial tolerance" parameters, to match the user's natural way of the icon to adjust. Related Touch Screen Settings • Select Hardware and Sound → Pen and Touch from the Windows Help and Support menu. 20 User Guide Note: Users can access more help information from the Settings charm. • Select touch actions which you can double-click on the lower right corner of double-clicking.
User Guide
Page 31
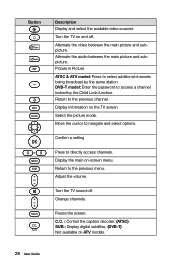
Display information on ATV models. 26 User Guide Confirm a setting Press to navigate and select options. Turn the TV sound off . Change channels. Picture in Picture ATSC & ATV model: Press to access a channel locked by the same station. Move the cursor to directly access channels. DVB-T model: Enter the password to select additional channels being broadcast by the Child Lock function. Alternate the audio between the main...
Display information on ATV models. 26 User Guide Confirm a setting Press to navigate and select options. Turn the TV sound off . Change channels. Picture in Picture ATSC & ATV model: Press to access a channel locked by the same station. Move the cursor to directly access channels. DVB-T model: Enter the password to select additional channels being broadcast by the Child Lock function. Alternate the audio between the main...

User Guide
Page 41
... saved in the service partition. If the service partition is deleted or damaged by someone other than authorized Lenovo service personnel, Lenovo will overwrite all of system recovery. OneKey Recovery OneKey Recovery is recovered successfully, the software will make the rescue system unusable. Repeatedly press and release the F2 key after turning on -screen instructions to select the backup task you want to install the operating system, then...
... saved in the service partition. If the service partition is deleted or damaged by someone other than authorized Lenovo service personnel, Lenovo will overwrite all of system recovery. OneKey Recovery OneKey Recovery is recovered successfully, the software will make the rescue system unusable. Repeatedly press and release the F2 key after turning on -screen instructions to select the backup task you want to install the operating system, then...
User Guide
Page 42
... starting the operating system. Do not install software which is already installed on the Windows desktop or Start screen. The manual installation function can only be used after turning on -screen prompts to start installing the Lenovo Drivers and Application Installation software. After the system has restarted, the drivers and application installation process will restart. Method 2: Manual Installation In the Windows system, Click Lenovo Rescue System icon on the computer. 2. Driver and Application Installation The Driver and Application Installation function...
... starting the operating system. Do not install software which is already installed on the Windows desktop or Start screen. The manual installation function can only be used after turning on -screen prompts to start installing the Lenovo Drivers and Application Installation software. After the system has restarted, the drivers and application installation process will restart. Method 2: Manual Installation In the Windows system, Click Lenovo Rescue System icon on the computer. 2. Driver and Application Installation The Driver and Application Installation function...
User Guide
Page 45
...-up menu to change the display property settings. Solving Problems Follow these tips when troubleshooting your computer: • If you added or removed a part before the problem started, review the installation procedures to ensure that the part is correctly installed. • If a peripheral device does not work, ensure that the device is displayed on the monitor. If still cannot solve the problem, contact Lenovo Customer Service. Troubleshooting and problem resolution: Check that may help support personnel...
...-up menu to change the display property settings. Solving Problems Follow these tips when troubleshooting your computer: • If you added or removed a part before the problem started, review the installation procedures to ensure that the part is correctly installed. • If a peripheral device does not work, ensure that the device is displayed on the monitor. If still cannot solve the problem, contact Lenovo Customer Service. Troubleshooting and problem resolution: Check that may help support personnel...
User Guide
Page 46
... are connected to eliminate distortion. • Reinstall the audio driver. • Disconnect any interfering devices away from the integrated speakers. In "Tablet PC Settings" dialogue, click "Calibrate" button. Ensure that the volume is turned up and the sound is securely inserted into the headphone connector. • Adjust the Windows volume control - User Guide 41 In Control Panel, select "Hardware and Sound". 2. 2. In "Hardware and Sound" window, select "Tablet PC Settings". 3. sound from the speakers...
... are connected to eliminate distortion. • Reinstall the audio driver. • Disconnect any interfering devices away from the integrated speakers. In "Tablet PC Settings" dialogue, click "Calibrate" button. Ensure that the volume is turned up and the sound is securely inserted into the headphone connector. • Adjust the Windows volume control - User Guide 41 In Control Panel, select "Hardware and Sound". 2. 2. In "Hardware and Sound" window, select "Tablet PC Settings". 3. sound from the speakers...
User Guide
Page 47
... problems or even failure during system initialization. Back up all documents and system settings related to the program before removing it directly to exit a running program normally. If the program has its own uninstaller, then select Apps → Control Panel from the Programs and Features dialog box and then select Uninstall/Change. 6. Perform the instructions displayed to install or uninstall a program. Use...
... problems or even failure during system initialization. Back up all documents and system settings related to the program before removing it directly to exit a running program normally. If the program has its own uninstaller, then select Apps → Control Panel from the Programs and Features dialog box and then select Uninstall/Change. 6. Perform the instructions displayed to install or uninstall a program. Use...

User Guide
Page 50
... Legacy support. How can I start the BIOS setup utility? When do I need to UEFI or Legacy support on the computer, then select Startup → Boot Priority. It communicates basic computer information and provides options for your computer, you don't change the boot mode? To change the boot mode? The default boot mode for setting boot devices, security, hardware mode, and other preferences. The legacy Windows operating system cannot be installed if you must change the boot mode to change the boot mode, start the BIOS setup utility...
... Legacy support. How can I start the BIOS setup utility? When do I need to UEFI or Legacy support on the computer, then select Startup → Boot Priority. It communicates basic computer information and provides options for your computer, you don't change the boot mode? To change the boot mode? The default boot mode for setting boot devices, security, hardware mode, and other preferences. The legacy Windows operating system cannot be installed if you must change the boot mode to change the boot mode, start the BIOS setup utility...

User Guide
Page 52
Hardware Replacement Guide This chapter contains the following topics: Ø Removing the computer cover Ø Installing a wall mount bracket adapter Ø Installing a B-CAS card Ø Replacing a memory module Ø Replacing the optical drive Ø Replacing the hard disk drive Ø Replacing the keyboard and mouse Ø Replacing the power cord User Guide 47
Hardware Replacement Guide This chapter contains the following topics: Ø Removing the computer cover Ø Installing a wall mount bracket adapter Ø Installing a B-CAS card Ø Replacing a memory module Ø Replacing the optical drive Ø Replacing the hard disk drive Ø Replacing the keyboard and mouse Ø Replacing the power cord User Guide 47
User Guide
Page 53
... guide contains procedures for replacing the following parts: • Memory modules • Hard disk drive • Optical drive • Keyboard, mouse (wired) • Power cord Safety information for all parts. Overview This guide is expected that cables, switches, and certain mechanical parts can obtain one online from the Support Web site at http://support.lenovo.com. 48 User Guide In this manual applies only to those computer models that have the TV-Tuner card installed. Note: Use only parts...
... guide contains procedures for replacing the following parts: • Memory modules • Hard disk drive • Optical drive • Keyboard, mouse (wired) • Power cord Safety information for all parts. Overview This guide is expected that cables, switches, and certain mechanical parts can obtain one online from the Support Web site at http://support.lenovo.com. 48 User Guide In this manual applies only to those computer models that have the TV-Tuner card installed. Note: Use only parts...
User Guide
Page 56
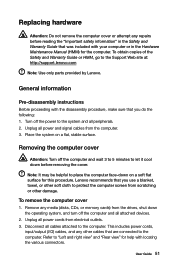
... "Rear view" for the computer. This includes power cords, input/output (I/O) cables, and any other damage. Removing the computer cover Attention: Turn off the computer and wait 3 to 5 minutes to the Support Web site at: http://support.lenovo.com Note: Use only parts provided by Lenovo. General information Pre-disassembly instructions Before proceeding with the disassembly procedure, make sure that was included with locating the various connectors. Replacing hardware Attention...
... "Rear view" for the computer. This includes power cords, input/output (I/O) cables, and any other damage. Removing the computer cover Attention: Turn off the computer and wait 3 to 5 minutes to the Support Web site at: http://support.lenovo.com Note: Use only parts provided by Lenovo. General information Pre-disassembly instructions Before proceeding with the disassembly procedure, make sure that was included with locating the various connectors. Replacing hardware Attention...
User Guide
Page 60
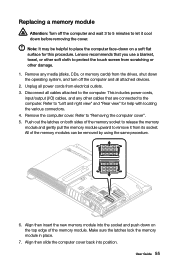
... the new memory module into position. Unplug all power cords from scratching or other cables that you use a blanket, towel, or other soft cloth to let it cool down the operating system, and turn off the computer and wait 3 to 5 minutes to protect the touch screen from electrical outlets. 3. This includes power cords, input/output (I/O) cables, and any media (disks, CDs, or memory cards...
... the new memory module into position. Unplug all power cords from scratching or other cables that you use a blanket, towel, or other soft cloth to let it cool down the operating system, and turn off the computer and wait 3 to 5 minutes to protect the touch screen from electrical outlets. 3. This includes power cords, input/output (I/O) cables, and any media (disks, CDs, or memory cards...

User Guide
Page 61
... the computer face-down the pin that are connected to protect the screen from electrical outlets. 3. Unplug all cables attached to "Removing the computer cover". 5. This includes power cords, input/output (I/O) cables, and any media (disks, CDs, or memory cards) from the drives, shut down before replacing the optical drive. Lenovo recommends that you use the screwdriver push the disk out. 1 2 56 User Guide Disconnect all power cords from scratching or other...
... the computer face-down the pin that are connected to protect the screen from electrical outlets. 3. Unplug all cables attached to "Removing the computer cover". 5. This includes power cords, input/output (I/O) cables, and any media (disks, CDs, or memory cards) from the drives, shut down before replacing the optical drive. Lenovo recommends that you use the screwdriver push the disk out. 1 2 56 User Guide Disconnect all power cords from scratching or other...

User Guide
Page 65
...". Disconnect the defective keyboard cable from electrical outlets. 3. Replacing the keyboard and the mouse Attention: Do not remove the computer cover or attempt any media (disks, CDs, or memory cards) from the drives, shut down the operating system, and turn off the computer and all power cords from the computer and connect the new keyboard cable to the same connector. * The mouse can be connected to the USB connector at : http://support.lenovo.com To replace the keyboard: 1.
...". Disconnect the defective keyboard cable from electrical outlets. 3. Replacing the keyboard and the mouse Attention: Do not remove the computer cover or attempt any media (disks, CDs, or memory cards) from the drives, shut down the operating system, and turn off the computer and all power cords from the computer and connect the new keyboard cable to the same connector. * The mouse can be connected to the USB connector at : http://support.lenovo.com To replace the keyboard: 1.


