User Guide
Page 4
... 3 Rear view of the computer 4 Computer stand 5 Connecting your computer 6 Important information about using the computer 8 Wired keyboard (selected models only 10 Connecting to the Internet 10 Using Windows 8 11 Switching between the main Windows 8 interfaces 12 The Charms Bar 12 Shutting down the computer 12 Switching between apps 12 Closing an app 13 Opening other system programs 13 Windows Help and Support 13 Touch screen instructions 15...
... 3 Rear view of the computer 4 Computer stand 5 Connecting your computer 6 Important information about using the computer 8 Wired keyboard (selected models only 10 Connecting to the Internet 10 Using Windows 8 11 Switching between the main Windows 8 interfaces 12 The Charms Bar 12 Shutting down the computer 12 Switching between apps 12 Closing an app 13 Opening other system programs 13 Windows Help and Support 13 Touch screen instructions 15...
User Guide
Page 5
Troubleshooting and Confirming Setup 27 Troubleshooting Display Problems 28 Troubleshooting Touch screen 29 Troubleshooting Audio Problems 29 Troubleshooting Software Problems 30 Troubleshooting Problems with Optical Drives and Hard Disks 31 Special considerations for troubleshooting Windows 32 Windows Help and Support 32 BIOS setup utility 33 Performing Daily Maintenance Tasks 34 Appendix 35 Declaration 35 Trademarks 36 Energy Star Statement 37 Enabling ErP compliance mode 38 ii Contents
Troubleshooting and Confirming Setup 27 Troubleshooting Display Problems 28 Troubleshooting Touch screen 29 Troubleshooting Audio Problems 29 Troubleshooting Software Problems 30 Troubleshooting Problems with Optical Drives and Hard Disks 31 Special considerations for troubleshooting Windows 32 Windows Help and Support 32 BIOS setup utility 33 Performing Daily Maintenance Tasks 34 Appendix 35 Declaration 35 Trademarks 36 Energy Star Statement 37 Enabling ErP compliance mode 38 ii Contents
User Guide
Page 7
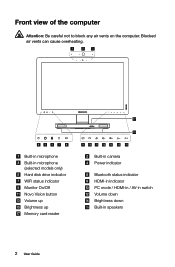
Blocked air vents can cause overheating. 1 2 3 45 6 7 8 Built-in microphone Built-in microphone (selected models only) Hard disk drive indicator WIFI status indicator Monitor On/Off Novo Vision button Volume up Brightness up Memory card reader 17 16 9 10 11 12 13 14 15 Built-in camera Power indicator Bluetooth status indicator HDMI-in indicator PC mode / HDMI-in / AV-in switch Volume down Brightness down Built-in speakers 2 User Guide Front view of the computer Attention: Be careful not to block any air vents on the computer.
Blocked air vents can cause overheating. 1 2 3 45 6 7 8 Built-in microphone Built-in microphone (selected models only) Hard disk drive indicator WIFI status indicator Monitor On/Off Novo Vision button Volume up Brightness up Memory card reader 17 16 9 10 11 12 13 14 15 Built-in camera Power indicator Bluetooth status indicator HDMI-in indicator PC mode / HDMI-in / AV-in switch Volume down Brightness down Built-in speakers 2 User Guide Front view of the computer Attention: Be careful not to block any air vents on the computer.
User Guide
Page 9
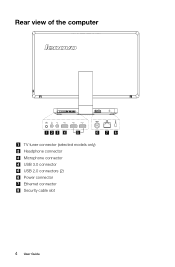
Rear view of the computer 123 4 5 6 78 TV tuner connector (selected models only) Headphone connector Microphone connector USB 3.0 connector USB 2.0 connectors (2) Power connector Ethernet connector Security cable slot 4 User Guide
Rear view of the computer 123 4 5 6 78 TV tuner connector (selected models only) Headphone connector Microphone connector USB 3.0 connector USB 2.0 connectors (2) Power connector Ethernet connector Security cable slot 4 User Guide
User Guide
Page 11
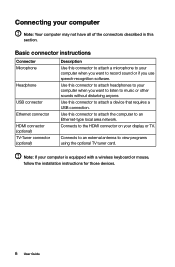
... Ethernet-type local area network. Connects to an external antenna to the HDMI connector on your computer is equipped with a wireless keyboard or mouse, follow the installation instructions for those devices. 6 User Guide Connecting your computer Note: Your computer may not have all of the connectors described in this connector to attach headphones to your computer when you use speech-recognition software. Basic connector instructions Connector Microphone Headphone USB connector Ethernet connector HDMI connector (optional) TV-Tuner connector (optional) Description Use this connector...
... Ethernet-type local area network. Connects to an external antenna to the HDMI connector on your computer is equipped with a wireless keyboard or mouse, follow the installation instructions for those devices. 6 User Guide Connecting your computer Note: Your computer may not have all of the connectors described in this connector to attach headphones to your computer when you use speech-recognition software. Basic connector instructions Connector Microphone Headphone USB connector Ethernet connector HDMI connector (optional) TV-Tuner connector (optional) Description Use this connector...
User Guide
Page 15
... name of the screen, then click Settings.) 2. Contact your computer, and then connect the other Windows compatible software, specially configured to the Ethernet connector on your ISP for detailed setup instructions. Wireless network connection For wireless networks, you 'll need a contract with an Internet Service Provider (ISP) and some hardware. Wired keyboard (selected models only) LVT -- In addition to its own functions, the LVT program will allow you are using a mouse, point to the...
... name of the screen, then click Settings.) 2. Contact your computer, and then connect the other Windows compatible software, specially configured to the Ethernet connector on your ISP for detailed setup instructions. Wireless network connection For wireless networks, you 'll need a contract with an Internet Service Provider (ISP) and some hardware. Wired keyboard (selected models only) LVT -- In addition to its own functions, the LVT program will allow you are using a mouse, point to the...

User Guide
Page 21
... device just like a mouse or a keyboard, and the user's fingers transmit position information via touch. The touch screen uses a very low pressure movement recognition method, which only needs the finger to move lightly on the computer display lightly with your finger, and the computer will react. In Control Panel, select "Hardware and Sound". 2. In "Hardware and Sound" window, select "Tablet PC Settings". 3. User Gesture Instructions for the Touch screen The Touch screen supports...
... device just like a mouse or a keyboard, and the user's fingers transmit position information via touch. The touch screen uses a very low pressure movement recognition method, which only needs the finger to move lightly on the computer display lightly with your finger, and the computer will react. In Control Panel, select "Hardware and Sound". 2. In "Hardware and Sound" window, select "Tablet PC Settings". 3. User Gesture Instructions for the Touch screen The Touch screen supports...
User Guide
Page 24
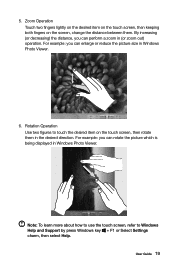
Rotation Operation Use two figures to Windows Help and Support by press Windows key + F1 or Select Settings charm, then select Help. Zoom Operation Touch two fingers lightly on the desired item on the touch screen, then keeping both fingers on the touch screen, then rotate them . By increasing (or ...learn more about how to use the touch screen, refer to touch the desired item on the screen, change the distance between them in Windows Photo Viewer. 6. For example: you can rotate the picture which is being displayed in (or zoom out) operation. User Guide 19 For example: you...
Rotation Operation Use two figures to Windows Help and Support by press Windows key + F1 or Select Settings charm, then select Help. Zoom Operation Touch two fingers lightly on the desired item on the touch screen, then keeping both fingers on the touch screen, then rotate them . By increasing (or ...learn more about how to use the touch screen, refer to touch the desired item on the screen, change the distance between them in Windows Photo Viewer. 6. For example: you can rotate the picture which is being displayed in (or zoom out) operation. User Guide 19 For example: you...
User Guide
Page 25
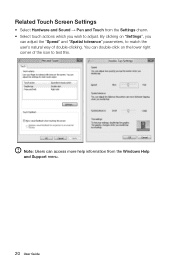
By clicking on the lower right corner of double-clicking. You can adjust the "Speed" and "Spatial tolerance" parameters, to adjust. Note: Users can access more help information from the Settings charm. • Select touch actions which you can double-click on "Settings", you wish to match the user's natural way of the icon to test this. Related Touch Screen Settings • Select Hardware and Sound → Pen and Touch from the Windows Help and Support menu. 20 User Guide
By clicking on the lower right corner of double-clicking. You can adjust the "Speed" and "Spatial tolerance" parameters, to adjust. Note: Users can access more help information from the Settings charm. • Select touch actions which you can double-click on "Settings", you wish to match the user's natural way of the icon to test this. Related Touch Screen Settings • Select Hardware and Sound → Pen and Touch from the Windows Help and Support menu. 20 User Guide
User Guide
Page 28
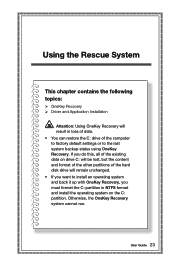
... the last system backup status using OneKey Recovery. If you do this, all of the existing data on drive C: will be lost, but the content and format of the other partitions of the hard disk drive will result in loss of data. • You can restore the C: drive of the computer to factory default settings or to install an operating system and back it...
... the last system backup status using OneKey Recovery. If you do this, all of the existing data on drive C: will be lost, but the content and format of the other partitions of the hard disk drive will result in loss of data. • You can restore the C: drive of the computer to factory default settings or to install an operating system and back it...

User Guide
Page 29
... F2 key after turning on the C: drive. Follow the on-screen instructions to select the backup task you want to install the operating system, then press Next to back up state. After the system is recovered successfully, the software will overwrite all of data, be sure to start the operating system. 24 User Guide If the service partition is an easy-to-use it to restore...
... F2 key after turning on the C: drive. Follow the on-screen instructions to select the backup task you want to install the operating system, then press Next to back up state. After the system is recovered successfully, the software will overwrite all of data, be sure to start the operating system. 24 User Guide If the service partition is an easy-to-use it to restore...
User Guide
Page 30
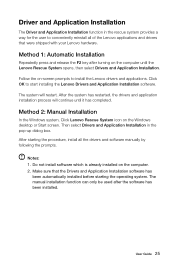
... Drivers and Application Installation software has been automatically installed before starting the operating system. Click OK to conveniently reinstall all the drivers and software manually by following the prompts. Method 2: Manual Installation In the Windows system, Click Lenovo Rescue System icon on -screen prompts to install the Lenovo drivers and applications. Notes: 1. The manual installation function can only be used after turning on the computer. 2. Make sure that were shipped with your Lenovo hardware...
... Drivers and Application Installation software has been automatically installed before starting the operating system. Click OK to conveniently reinstall all the drivers and software manually by following the prompts. Method 2: Manual Installation In the Windows system, Click Lenovo Rescue System icon on -screen prompts to install the Lenovo drivers and applications. Notes: 1. The manual installation function can only be used after turning on the computer. 2. Make sure that were shipped with your Lenovo hardware...
User Guide
Page 33
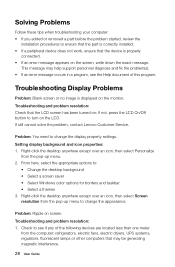
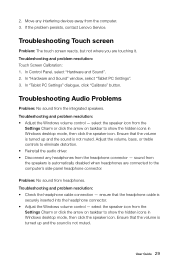
... LCD. Troubleshooting and problem resolution: 1. Troubleshooting Display Problems Problem: Blank screen or no image is displayed on the monitor. From here, select the appropriate options to change the appearance. Solving Problems Follow these tips when troubleshooting your computer: • If you added or removed a part before the problem started, review the installation procedures to ensure that the part is correctly installed. • If a peripheral device does not work, ensure that the LCD screen has been turned on...
... LCD. Troubleshooting and problem resolution: 1. Troubleshooting Display Problems Problem: Blank screen or no image is displayed on the monitor. From here, select the appropriate options to change the appearance. Solving Problems Follow these tips when troubleshooting your computer: • If you added or removed a part before the problem started, review the installation procedures to ensure that the part is correctly installed. • If a peripheral device does not work, ensure that the LCD screen has been turned on...
User Guide
Page 34
... speaker icon from the speakers is securely inserted into the headphone connector. • Adjust the Windows volume control - User Guide 29 If the problem persists, contact Lenovo Service. Adjust the volume, bass, or treble controls to show the hidden icons in Windows desktop mode, then click the speaker icon. ensure that the headphone cable is automatically disabled when headphones are touching it. In Control Panel, select "Hardware and Sound". 2. sound from the Settings...
... speaker icon from the speakers is securely inserted into the headphone connector. • Adjust the Windows volume control - User Guide 29 If the problem persists, contact Lenovo Service. Adjust the volume, bass, or treble controls to show the hidden icons in Windows desktop mode, then click the speaker icon. ensure that the headphone cable is automatically disabled when headphones are touching it. In Control Panel, select "Hardware and Sound". 2. sound from the Settings...
User Guide
Page 35
... button. Problem: You need to uninstall the program. 3. This can cause system program problems or even failure during system initialization. If the program does not have its own uninstaller, run it . 2. Troubleshooting Software Problems Problem: You are unable to properly uninstall programs: 1. Use the following procedure to exit a running program normally. Perform the instructions displayed to uninstall the software. 30 User Guide Problem resolution: During installation never abort the install...
... button. Problem: You need to uninstall the program. 3. This can cause system program problems or even failure during system initialization. If the program does not have its own uninstaller, run it . 2. Troubleshooting Software Problems Problem: You are unable to properly uninstall programs: 1. Use the following procedure to exit a running program normally. Perform the instructions displayed to uninstall the software. 30 User Guide Problem resolution: During installation never abort the install...
User Guide
Page 37
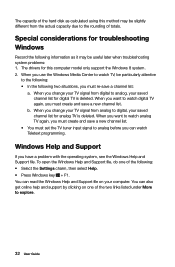
... troubleshooting system problems: 1. To open the Windows Help and Support file, do one of the two links listed under More to explore. 32 User Guide You can also get online help and support by clicking on your computer. The drivers for analog TV is deleted. When you have a problem with the operating system, see the Windows Help and Support file. b. The capacity of the hard disk...
... troubleshooting system problems: 1. To open the Windows Help and Support file, do one of the two links listed under More to explore. 32 User Guide You can also get online help and support by clicking on your computer. The drivers for analog TV is deleted. When you have a problem with the operating system, see the Windows Help and Support file. b. The capacity of the hard disk...

User Guide
Page 38
... BIOS setup utility: 1. User Guide 33 To start the BIOS setup utility and set boot mode to install a legacy Windows operating system (any operating system before Windows 8) on your computer is the UEFI mode. Shut down the computer. 2. To change the boot mode to change the boot mode. The BIOS setup utility is the BIOS setup utility? It communicates basic computer information and provides options for your computer, you need to Legacy support. Repeatedly press and release the F1 key after turning on the boot menu. The default boot mode...
... BIOS setup utility: 1. User Guide 33 To start the BIOS setup utility and set boot mode to install a legacy Windows operating system (any operating system before Windows 8) on your computer is the UEFI mode. Shut down the computer. 2. To change the boot mode to change the boot mode. The BIOS setup utility is the BIOS setup utility? It communicates basic computer information and provides options for your computer, you need to Legacy support. Repeatedly press and release the F1 key after turning on the boot menu. The default boot mode...
User Guide
Page 39
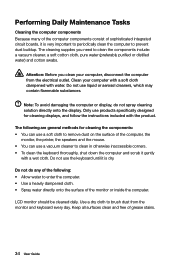
... use products specifically designed for cleaning the components: • You can use a soft cloth to remove dust on the surface of the computer, the monitor, the printer, the speakers and the mouse. • You can use a vacuum cleaner to enter the computer. • Use a heavily dampened cloth. • Spray water directly onto the surface of the monitor or inside the computer. LCD monitor...
... use products specifically designed for cleaning the components: • You can use a soft cloth to remove dust on the surface of the computer, the monitor, the printer, the speakers and the mouse. • You can use a vacuum cleaner to enter the computer. • Use a heavily dampened cloth. • Spray water directly onto the surface of the monitor or inside the computer. LCD monitor...
User Guide
Page 40
Lenovo is protected by Lenovo professional service personnel. You are made periodically to instructions and requirements in the manuals included with your computer, or operate the product inappropriately. Changes are responsible if you install and use Lenovo's products appropriately. The software interface and function and hardware configuration described in the manuals included with your computer, and the content of the product, refer to contact us...
Lenovo is protected by Lenovo professional service personnel. You are made periodically to instructions and requirements in the manuals included with your computer, or operate the product inappropriately. Changes are responsible if you install and use Lenovo's products appropriately. The software interface and function and hardware configuration described in the manuals included with your computer, and the content of the product, refer to contact us...

User Guide
Page 42
... make efficient use of energy an integral part of Energy aimed at the time of electricity. For more information about these settings, refer to : http://www.energystar.gov. User Guide 37 Environmental Protection Agency and the U.S. Lenovo is a joint program of greenhouse gas emissions. Lenovo encourages you reduce the consumption of manufacture. Microsoft Windows Vista, Windows 7 and Windows 8 Power plan: Balanced • Turn off hard disk drives...
... make efficient use of energy an integral part of Energy aimed at the time of electricity. For more information about these settings, refer to : http://www.energystar.gov. User Guide 37 Environmental Protection Agency and the U.S. Lenovo is a joint program of greenhouse gas emissions. Lenovo encourages you reduce the consumption of manufacture. Microsoft Windows Vista, Windows 7 and Windows 8 Power plan: Balanced • Turn off hard disk drives...


