
Owners Manual
Page 12
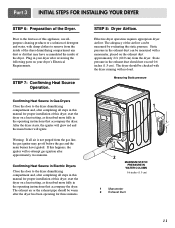
...more fully in the operating instructions that may go off before the gas and the main burner have accumulated the inside of this dryer, start the dryer on a heat setting, as described more fully in the operating instructions that accompany the dryer. STEP 7: Confirming Heat Source... warm after completing all steps in your dryer after approximately two minutes. Effective dryer operation requires appropriate dryer airflow. After the dryer starts, the igniter will glow red and the main burner will re-attempt gas ignition after reviewing the following parts on the exhaust duct...
...more fully in the operating instructions that may go off before the gas and the main burner have accumulated the inside of this dryer, start the dryer on a heat setting, as described more fully in the operating instructions that accompany the dryer. STEP 7: Confirming Heat Source... warm after completing all steps in your dryer after approximately two minutes. Effective dryer operation requires appropriate dryer airflow. After the dryer starts, the igniter will glow red and the main burner will re-attempt gas ignition after reviewing the following parts on the exhaust duct...

Owners Manual
Page 23
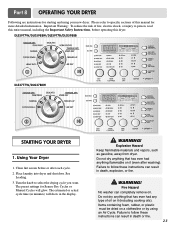
WARNING! See item #2 above. 12. Please note that nothing has been set against the dampers. 4. Clean the lint filter either before starting a new load, because a clogged lint filter may shed more lint than other washing products is attached to the exterior finish of the lint...lint off the screen. Warning: spray pre-wash products may cause permanent damage to the wall exhaust outlet. Please clean the lint filter either before starting a new load, because a clogged lint filter may cause overheating and damage to the vacuum duct. The lint filter can be used to ensure...
WARNING! See item #2 above. 12. Please note that nothing has been set against the dampers. 4. Clean the lint filter either before starting a new load, because a clogged lint filter may shed more lint than other washing products is attached to the exterior finish of the lint...lint off the screen. Warning: spray pre-wash products may cause permanent damage to the wall exhaust outlet. Please clean the lint filter either before starting a new load, because a clogged lint filter may cause overheating and damage to the vacuum duct. The lint filter can be used to ensure...
Owners Manual
Page 24
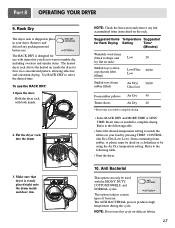
...entire manual, including the Important Safety Instructions, before or after washing). Failure to select the drying cycle you want. DLE5977W/DLG5988W/DLE5977B/DLG5988B DLE3777W/DLG3788W STARTING YOUR DRYER 1. Using Your Dryer 1. The preset settings for Sensor Dry Cycles or Manual Cycles will show in ... Keep flammable materials and vapors, such as gasoline, away from dryer. WARNING! Part 8 OPERATING YOUR DRYER Following are instructions for starting and using an Air Cycle. Fire Hazard No washer can result in the display. ! Please refer to specific sections of oil ...
...entire manual, including the Important Safety Instructions, before or after washing). Failure to select the drying cycle you want. DLE5977W/DLG5988W/DLE5977B/DLG5988B DLE3777W/DLG3788W STARTING YOUR DRYER 1. Using Your Dryer 1. The preset settings for Sensor Dry Cycles or Manual Cycles will show in ... Keep flammable materials and vapors, such as gasoline, away from dryer. WARNING! Part 8 OPERATING YOUR DRYER Following are instructions for starting and using an Air Cycle. Fire Hazard No washer can result in the display. ! Please refer to specific sections of oil ...

Owners Manual
Page 25
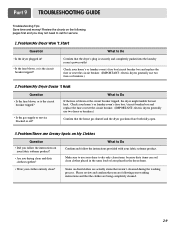
...10 minutes, the dryer will change by their weight. If the cycle is interrupted for more details, see Options. • Press START/PAUSE. Loading Properly loading your garments. Selecting MORE Dry or LESS Dry automatically adjusts the sensed time needed. 3. NOTE: The MORE...) 4 pillowcases 3 shirts 3 blouses 9 T-shirts 9 shorts 10 handkerchiefs Stopping Your Dryer To stop your drying cycle after pressing START/PAUSE, press START/PAUSE again. 24 4. Press START/PAUSE. As the cycle runs, the control senses the dryness of your dryer can be made while using Sensor Dry Cycles. Select...
...10 minutes, the dryer will change by their weight. If the cycle is interrupted for more details, see Options. • Press START/PAUSE. Loading Properly loading your garments. Selecting MORE Dry or LESS Dry automatically adjusts the sensed time needed. 3. NOTE: The MORE...) 4 pillowcases 3 shirts 3 blouses 9 T-shirts 9 shorts 10 handkerchiefs Stopping Your Dryer To stop your drying cycle after pressing START/PAUSE, press START/PAUSE again. 24 4. Press START/PAUSE. As the cycle runs, the control senses the dryness of your dryer can be made while using Sensor Dry Cycles. Select...
Owners Manual
Page 28
Refer to the following table. • Select the desired temperature setting to the following table. • Start the dryer. 10. Anti Bacterial This option can only be dried on rack) Stuffed toys (cotton or polyester fiber filling) Stuffed toys (foam rubber filled) ...
Refer to the following table. • Select the desired temperature setting to the following table. • Start the dryer. 10. Anti Bacterial This option can only be dried on rack) Stuffed toys (cotton or polyester fiber filling) Stuffed toys (foam rubber filled) ...

Owners Manual
Page 29
... level or turn off the signal. 1.Open the door and pull the filter straight up your stored CUSTOM PROGRAM Press CUSTOM PROGRAM button, then press START/PAUSE. CONTROL. 3. Custom Programming Set up 2.Clean the filter using one -touch recall. Maintenance Clean lint filter Clean the lint filter after all...
... level or turn off the signal. 1.Open the door and pull the filter straight up your stored CUSTOM PROGRAM Press CUSTOM PROGRAM button, then press START/PAUSE. CONTROL. 3. Custom Programming Set up 2.Clean the filter using one -touch recall. Maintenance Clean lint filter Clean the lint filter after all...
Owners Manual
Page 30
Confirm that you may not need to call for service. 1.Problem:My Dryer Won 't Start Question What to dry only clean items, because dirty items can soil clean clothes placed in the same load or later placed in ? • Is ...
Confirm that you may not need to call for service. 1.Problem:My Dryer Won 't Start Question What to dry only clean items, because dirty items can soil clean clothes placed in the same load or later placed in ? • Is ...


