
Owners Manual
Page 4
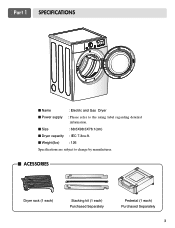
I Size : 68.6X98.3X76.1(cm) I Power supply : Please refer to change by manufacturer. Part 1 SPECIFICATIONS I Name : Electric and Gas Dryer I Dryer capacity : IEC 7.3cu.ft. I Weight(Ibs) : 126 Specifications are subject to the rating label regarding detailed information. I ACESSORIES Dryer rack (1 each) Stacking kit (1 each) Purchased Separately Pedestal (1 each) Purchased Separately 3
I Size : 68.6X98.3X76.1(cm) I Power supply : Please refer to change by manufacturer. Part 1 SPECIFICATIONS I Name : Electric and Gas Dryer I Dryer capacity : IEC 7.3cu.ft. I Weight(Ibs) : 126 Specifications are subject to the rating label regarding detailed information. I ACESSORIES Dryer rack (1 each) Stacking kit (1 each) Purchased Separately Pedestal (1 each) Purchased Separately 3

Owners Manual
Page 5
...LG dryer. You will repair or replace any of original purchase date is effective for only 90 days. Model No. Serial No. We recommend that you staple your safety, the recommendations in material or workmanship. ! For your sales slip or cancelled check here, because proof of its mechanical or electrical parts...service is available by contacting your appliance, follow basic precautions, including the following. Your dryer's model and serial numbers are defective in this manual, LG will need the complete model and serial numbers when requesting information. The warranty for ...
...LG dryer. You will repair or replace any of original purchase date is effective for only 90 days. Model No. Serial No. We recommend that you staple your safety, the recommendations in material or workmanship. ! For your sales slip or cancelled check here, because proof of its mechanical or electrical parts...service is available by contacting your appliance, follow basic precautions, including the following. Your dryer's model and serial numbers are defective in this manual, LG will need the complete model and serial numbers when requesting information. The warranty for ...
Owners Manual
Page 6
...least resistance for electric current. SAVE THESE INSTRUCTIONS GROUNDING INSTRUCTIONS This appliance must be connected to cooking oils in your dryer, please exercise care and follow basic safety precautions, including the following: 1) Read all local codes and ordinances. Check...and connected to dry articles containing foam rubber or similarly textured rubber-like materials. 10) Clean lint screen before using your dryer. Part 2 IMPORTANT WARRANTY AND SAFETY INSTRUCTIONS IMPORTANT SAFETY INSTRUCTIONS ! Close supervision of children is necessary when using the appliance. 4) ...
...least resistance for electric current. SAVE THESE INSTRUCTIONS GROUNDING INSTRUCTIONS This appliance must be connected to cooking oils in your dryer, please exercise care and follow basic safety precautions, including the following: 1) Read all local codes and ordinances. Check...and connected to dry articles containing foam rubber or similarly textured rubber-like materials. 10) Clean lint screen before using your dryer. Part 2 IMPORTANT WARRANTY AND SAFETY INSTRUCTIONS IMPORTANT SAFETY INSTRUCTIONS ! Close supervision of children is necessary when using the appliance. 4) ...
Owners Manual
Page 7
... any articles that has ever had any kind of oil on a clothesline or by properly venting the dryer to do so can cause minor exposure to such substances. Properly adjusted dryers will minimize combustion. Part 2 IMPORTANT WARRANTY AND SAFETY INSTRUCTIONS ! WHAT TO DO IF YOU SMELL GAS: • Do not... follow these instructions can completely remove oil. Follow the gas supplier's instructions carefully. • If you cannot reach your gas supplier from dryer. • Place dryer at least 18 inches above the floor for a garage installation. • Failure to the outdoors.
... any articles that has ever had any kind of oil on a clothesline or by properly venting the dryer to do so can cause minor exposure to such substances. Properly adjusted dryers will minimize combustion. Part 2 IMPORTANT WARRANTY AND SAFETY INSTRUCTIONS ! WHAT TO DO IF YOU SMELL GAS: • Do not... follow these instructions can completely remove oil. Follow the gas supplier's instructions carefully. • If you cannot reach your gas supplier from dryer. • Place dryer at least 18 inches above the floor for a garage installation. • Failure to the outdoors.
Owners Manual
Page 8
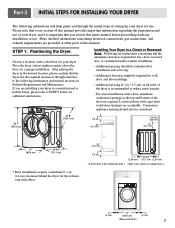
...Additional spacing should also be required for additional instructions. Part 3 INITIAL STEPS FOR INSTALLING YOUR DRYER The following information and manual sections on all sides of the dryer is important that the dryer has the required clearances through the initial steps of this...minimum 5 1/2 in. (14 cm) clearance behind the dryer for a garage installation. Choose a location with a solid floor for use of your dryer. Following are acceptable. Place the dryer at other parts of setting up your dryer for your dryer, and it is recommended to reduce noise transfer. •...
...Additional spacing should also be required for additional instructions. Part 3 INITIAL STEPS FOR INSTALLING YOUR DRYER The following information and manual sections on all sides of the dryer is important that the dryer has the required clearances through the initial steps of this...minimum 5 1/2 in. (14 cm) clearance behind the dryer for a garage installation. Choose a location with a solid floor for use of your dryer. Following are acceptable. Place the dryer at other parts of setting up your dryer for your dryer, and it is recommended to reduce noise transfer. •...
Owners Manual
Page 9
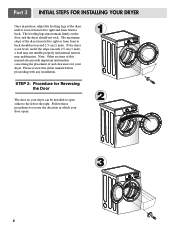
...right or from front to back. STEP 2: Procedure for your door opens: 1 2 3 8 The leveling legs must remain firmly on your dryer can be installed to open either to the left to right and from front to reverse the direction in position, adjust the leveling legs of...for Reversing the Door The door on the floor and the dryer should not exceed 2.5 cm (1 inch). Part 3 INITIAL STEPS FOR INSTALLING YOUR DRYER Once in which your dryer. Please review this manual also provide important information concerning the placement of the dryer until it is not level, and if the slope exceeds ...
...right or from front to back. STEP 2: Procedure for your door opens: 1 2 3 8 The leveling legs must remain firmly on your dryer can be installed to open either to the left to right and from front to reverse the direction in position, adjust the leveling legs of...for Reversing the Door The door on the floor and the dryer should not exceed 2.5 cm (1 inch). Part 3 INITIAL STEPS FOR INSTALLING YOUR DRYER Once in which your dryer. Please review this manual also provide important information concerning the placement of the dryer until it is not level, and if the slope exceeds ...
Owners Manual
Page 10
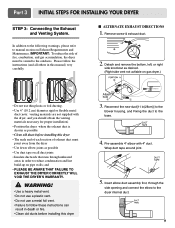
...vent not avilable on pipe walls; Insert elbow duct assembly first, through unheated areas in order to reduce condensation and lint build-up on gas dryer.) • Do not use a metal foil vent. • Failure to follow the instructions (and all others in (28cm)] to the...duct joints • Insulate ductwork that runs through the side opening and connect the elbow to manual section on Exhaust Requirements and Maintenance. Part 3 INITIAL STEPS FOR INSTALLING YOUR DRYER STEP 3: Connecting the Exhaust and Venting System. WARNING! • Use a heavy metal vent. • Do not use a plastic ...
...vent not avilable on pipe walls; Insert elbow duct assembly first, through unheated areas in order to reduce condensation and lint build-up on gas dryer.) • Do not use a metal foil vent. • Failure to follow the instructions (and all others in (28cm)] to the...duct joints • Insulate ductwork that runs through the side opening and connect the elbow to manual section on Exhaust Requirements and Maintenance. Part 3 INITIAL STEPS FOR INSTALLING YOUR DRYER STEP 3: Connecting the Exhaust and Venting System. WARNING! • Use a heavy metal vent. • Do not use a plastic ...
Owners Manual
Page 11
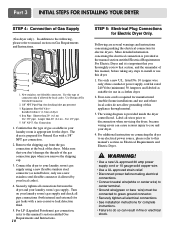
... steel connector (as suitable for Natural Gas with a non-corrosive leak detection fluid. 5. The dryer is appropriate for Electric Dryer Only. Connect the dryer to you remove the shipping cap. 3. Following are several warnings and instructions concerning making electrical connections... approved strain relief. • Disconnect power before taking any steps to install or use in a clothes dryer. 2. Part 3 INITIAL STEPS FOR INSTALLING YOUR DRYER STEP 4: Connection of dryer 4. Use Design AGA Certified Connector. 2. 1/8" NPT Pipe Plug (for manufactured (mobile) home installations and...
... steel connector (as suitable for Natural Gas with a non-corrosive leak detection fluid. 5. The dryer is appropriate for Electric Dryer Only. Connect the dryer to you remove the shipping cap. 3. Following are several warnings and instructions concerning making electrical connections... approved strain relief. • Disconnect power before taking any steps to install or use in a clothes dryer. 2. Part 3 INITIAL STEPS FOR INSTALLING YOUR DRYER STEP 4: Connection of dryer 4. Use Design AGA Certified Connector. 2. 1/8" NPT Pipe Plug (for manufactured (mobile) home installations and...
Owners Manual
Page 12
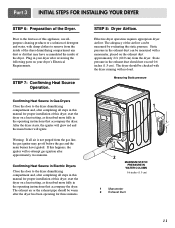
... the exhaust duct approximately 2 ft. (60.9 cm) from the dryer. The adequacy of the Dryer. Static pressure in your dryer's Electrical Requirements. Confirming Heat Source in Gas Dryers Close the door to the dryer drum/drying compartment and, after reviewing the following parts on a heat setting, as described more fully in the operating instructions that may...
... the exhaust duct approximately 2 ft. (60.9 cm) from the dryer. The adequacy of the Dryer. Static pressure in your dryer's Electrical Requirements. Confirming Heat Source in Gas Dryers Close the door to the dryer drum/drying compartment and, after reviewing the following parts on a heat setting, as described more fully in the operating instructions that may...
Owners Manual
Page 13
... Please be aware that venting materials are not supplied with the dryer. If you use a rigid or flexible metal pipe. 7) DO NOT connect the exhaust duct with the Manufactured Home Construction and Safety Standards Title 24 CFR, Part 32-80 or Standard CAN/CSA0Z240 MH and local codes and ordinances.... The opening for outside using the right side panel because of the burner housing. 6) The dryer exhaust duct must be affixed securely to the manufactured or ...
... Please be aware that venting materials are not supplied with the dryer. If you use a rigid or flexible metal pipe. 7) DO NOT connect the exhaust duct with the Manufactured Home Construction and Safety Standards Title 24 CFR, Part 32-80 or Standard CAN/CSA0Z240 MH and local codes and ordinances.... The opening for outside using the right side panel because of the burner housing. 6) The dryer exhaust duct must be affixed securely to the manufactured or ...
Owners Manual
Page 14
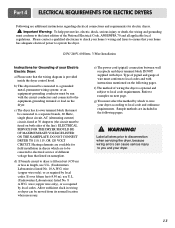
... shock, serious injury or death, the wiring and grounding must select the method by local codes. ELECTRICAL SERVICE FOR THE DRYER SHOULD BE OF MAXIMUM RATE VOLTAGE LISTED ON THE NAMEPLATE. wire (copper wire only), or as required by local codes.... conform to local code requirements. WARNING! Refer to operate the dryer. 120V/ 240V, 60 Hertz, 3-Wire Installation Instructions for Grounding of wiring the dryer is provided inside the dryer control hood. Part 4 ELECTRICAL REQUIREMENTS FOR ELECTRIC DRYERS Following are included in length, use U.L. (Underwriters Laboratories) listed...
... shock, serious injury or death, the wiring and grounding must select the method by local codes. ELECTRICAL SERVICE FOR THE DRYER SHOULD BE OF MAXIMUM RATE VOLTAGE LISTED ON THE NAMEPLATE. wire (copper wire only), or as required by local codes.... conform to local code requirements. WARNING! Refer to operate the dryer. 120V/ 240V, 60 Hertz, 3-Wire Installation Instructions for Grounding of wiring the dryer is provided inside the dryer control hood. Part 4 ELECTRICAL REQUIREMENTS FOR ELECTRIC DRYERS Following are included in length, use U.L. (Underwriters Laboratories) listed...
Owners Manual
Page 15
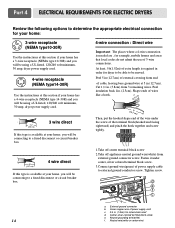
...fused disconnect or circuit 1" (2.5 cm) breaker 4-wire connection : Direct wire Important : The places where a 4-wire connection is needed are , for dryer to be able to be moved. Cut 11/2 in (12.7cm) of cable, leaving b(1a2r.7ecgm)round wire at 5(8i.n6 c(m1) ...you will be connecting box to external ground conductor screw. d e f a c b a. Neutral wire(white or center wire) Part 4 ELECTRICAL REQUIREMENTS FOR ELECTRIC DRYERS Review the following options to determine the appropriate electrical connection for your home: 3-wire receptacle (NEMA type10-30R) Use the instructions at...
...fused disconnect or circuit 1" (2.5 cm) breaker 4-wire connection : Direct wire Important : The places where a 4-wire connection is needed are , for dryer to be able to be moved. Cut 11/2 in (12.7cm) of cable, leaving b(1a2r.7ecgm)round wire at 5(8i.n6 c(m1) ...you will be connecting box to external ground conductor screw. d e f a c b a. Neutral wire(white or center wire) Part 4 ELECTRICAL REQUIREMENTS FOR ELECTRIC DRYERS Review the following options to determine the appropriate electrical connection for your home: 3-wire receptacle (NEMA type10-30R) Use the instructions at...
Owners Manual
Page 16
... of terminal block. 4. Make sure cover with screw. 3-wire connection : Direct wire Important : The places wherea 4-wire connection is required for dryer to be able to the center screw of the terminal block(hooked end facing rightward) and pinch the hook together and screw tightly. 1. Center ... 5ft(1.52m) of extra length is needed are mobile homes and areas that local codes do not admit the use of terminal block). c b d a e a. Part 4 ELECTRICAL REQUIREMENTS FOR ELECTRIC DRYERS 4. Put the hooked shaped ends of dryer rear panel. Neutral grounding wire (white) c.
... of terminal block. 4. Make sure cover with screw. 3-wire connection : Direct wire Important : The places wherea 4-wire connection is required for dryer to be able to the center screw of the terminal block(hooked end facing rightward) and pinch the hook together and screw tightly. 1. Center ... 5ft(1.52m) of extra length is needed are mobile homes and areas that local codes do not admit the use of terminal block). c b d a e a. Part 4 ELECTRICAL REQUIREMENTS FOR ELECTRIC DRYERS 4. Put the hooked shaped ends of dryer rear panel. Neutral grounding wire (white) c.

Owners Manual
Page 17
... the terminal block. Loosen or remove center terminal block screw. 2. c b d a e a. a d gf a. 3-wire receptacle (NEMA type 10-30R) b. 3-wire plug c. Neutral grounding wire (white) c. Part 4 ELECTRICAL REQUIREMENTS FOR ELECTRIC DRYERS Option 1: 3-Wire Connection with up turned ends e. 3/4 in . (1.9 cm) UL-listed strain relief 3. External ground connector b. Connect the other wires to the center...
... the terminal block. Loosen or remove center terminal block screw. 2. c b d a e a. a d gf a. 3-wire receptacle (NEMA type 10-30R) b. 3-wire plug c. Neutral grounding wire (white) c. Part 4 ELECTRICAL REQUIREMENTS FOR ELECTRIC DRYERS Option 1: 3-Wire Connection with up turned ends e. 3/4 in . (1.9 cm) UL-listed strain relief 3. External ground connector b. Connect the other wires to the center...

Owners Manual
Page 18
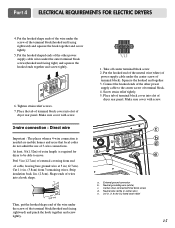
...block screw e. Insert tab of terminal block cover into slot of a 3 wire connection, or you are installing e your dryer in a mobile home, you must use of dryer rear panel. d • lf your local codes or ordinances do not allow the use a 4wire connection. Ground prong...ground wire (green or bare) of power supply cable to outer terminal block screws. Secure cover with a Power supply cord. Part 4 ELECTRICAL REQUIREMENTS FOR ELECTRIC DRYERS Option 2: 4-wire connection with hold-down screw. 17 Remove appliance neutral ground wire (white) from external ground connector screw....
...block screw e. Insert tab of terminal block cover into slot of a 3 wire connection, or you are installing e your dryer in a mobile home, you must use of dryer rear panel. d • lf your local codes or ordinances do not allow the use a 4wire connection. Ground prong...ground wire (green or bare) of power supply cable to outer terminal block screws. Secure cover with a Power supply cord. Part 4 ELECTRICAL REQUIREMENTS FOR ELECTRIC DRYERS Option 2: 4-wire connection with hold-down screw. 17 Remove appliance neutral ground wire (white) from external ground connector screw....
Owners Manual
Page 19
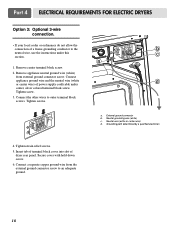
Part 4 ELECTRICAL REQUIREMENTS FOR ELECTRIC DRYERS Option 3: Optional 3-wire connection. • If your local codes or ordinances do not allow the connection of power supply cord/cable under this section. 1. ... b. Neutral grounding wire (white) c. Neutral wire (white or center wire) d. Secure cover with hold-down screw. 6. Insert tab of terminal block cover into slot of dryer rear panel. b c a d a. Tighten screw. 3. Remove center terminal block screw. 2. Grounding path determined by a qualified electrician 4. Remove appliance neutral ground wire (white) from the ...
Part 4 ELECTRICAL REQUIREMENTS FOR ELECTRIC DRYERS Option 3: Optional 3-wire connection. • If your local codes or ordinances do not allow the connection of power supply cord/cable under this section. 1. ... b. Neutral grounding wire (white) c. Neutral wire (white or center wire) d. Secure cover with hold-down screw. 6. Insert tab of terminal block cover into slot of dryer rear panel. b c a d a. Tighten screw. 3. Remove center terminal block screw. 2. Grounding path determined by a qualified electrician 4. Remove appliance neutral ground wire (white) from the ...
Owners Manual
Page 20
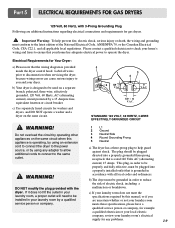
...with all applicable local regulations. This plug, in order to the same outlet. ! b) Your dryer is rated 120 Volts AC (alternating current) 15 Amps. WARNING! Part 5 ELECTRICAL REQUIREMENTS FOR GAS DRYERS 120 Volt, 60 Hertz, with 3-Prong Grounding Plug Following are uncertain whether or not your ... or your local electric company, review your laundry room by a 15 Ampere fuse, equivalent fusetron or circuit breaker. Electrical Requirements for Your Dryer: a) Please note that is designed to be grounded in order to be properly and fully effective, must conform to help prevent fire, ...
...with all applicable local regulations. This plug, in order to the same outlet. ! b) Your dryer is rated 120 Volts AC (alternating current) 15 Amps. WARNING! Part 5 ELECTRICAL REQUIREMENTS FOR GAS DRYERS 120 Volt, 60 Hertz, with 3-Prong Grounding Plug Following are uncertain whether or not your ... or your local electric company, review your laundry room by a 15 Ampere fuse, equivalent fusetron or circuit breaker. Electrical Requirements for Your Dryer: a) Please note that is designed to be grounded in order to be properly and fully effective, must conform to help prevent fire, ...
Owners Manual
Page 21
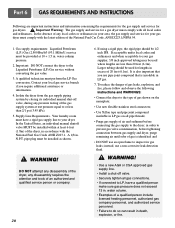
... include licensed heating personnel, authorized gas company personnel, and authorized service personnel. • Failure to inspect for lengths in . Contact your dryer. Your laundry room must perform the LP Gas conversion. In the United States, an individual manual shutoff valve MUST be used for gas leaks...disassembly requires the attention and tools of gas is also important that you require additional assistance or information. 4. Part 6 GAS REQUIREMENTS AND INSTRUCTIONS Following are less than 2/1 psi (3.45 kPa). 5. Important Warning: The gas supply and service for gas...
... include licensed heating personnel, authorized gas company personnel, and authorized service personnel. • Failure to inspect for lengths in . Contact your dryer. Your laundry room must perform the LP Gas conversion. In the United States, an individual manual shutoff valve MUST be used for gas leaks...disassembly requires the attention and tools of gas is also important that you require additional assistance or information. 4. Part 6 GAS REQUIREMENTS AND INSTRUCTIONS Following are less than 2/1 psi (3.45 kPa). 5. Important Warning: The gas supply and service for gas...
Owners Manual
Page 22
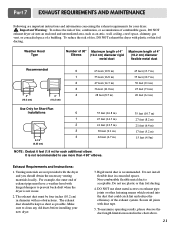
... materials are important instructions and information concerning the exhaust requirements for each additional elbow. Make sure to clean any old ducts before installing your dryer. ! The exhaust duct should obtain the necessary venting materials locally. Important Warning: To reduce the risk of fire, combustion, or accumulation... space of the exhaust system. To maximize operating results, please observe the duct length limitations noted in concealed spaces. Part 7 EXHAUST REQUIREMENTS AND MAINTENANCE Following are not provided with hinged dampers to prevent back-draft when the...
... materials are important instructions and information concerning the exhaust requirements for each additional elbow. Make sure to clean any old ducts before installing your dryer. ! The exhaust duct should obtain the necessary venting materials locally. Important Warning: To reduce the risk of fire, combustion, or accumulation... space of the exhaust system. To maximize operating results, please observe the duct length limitations noted in concealed spaces. Part 7 EXHAUST REQUIREMENTS AND MAINTENANCE Following are not provided with hinged dampers to prevent back-draft when the...

Owners Manual
Page 23
...lint screen with a clean towel, firmly replace the lint screen in your dryer. e) After drying the lint screen with the brush to become congested more quickly. Part 7 EXHAUST REQUIREMENTS AND MAINTENANCE Exhaust and Dryer Maintenance ! After one of the screen with your fingers. Wipe the ...exterior of the dryer as required, and always immediately wipe the exterior of the dryer in two pieces, one year of ...
...lint screen with a clean towel, firmly replace the lint screen in your dryer. e) After drying the lint screen with the brush to become congested more quickly. Part 7 EXHAUST REQUIREMENTS AND MAINTENANCE Exhaust and Dryer Maintenance ! After one of the screen with your fingers. Wipe the ...exterior of the dryer as required, and always immediately wipe the exterior of the dryer in two pieces, one year of ...


