
Owners Manual
Page 3
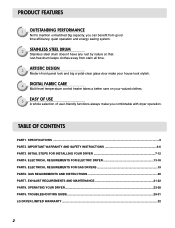
... steel drum doesn't have any rust by nature so that rust-free drum keeps clothes away from stain all time. 3 ARTISTIC DESIGN Modern front panel look and big crystal-clear glass door make your house look stylish. 4 DIGITAL FABRIC CARE Multi-level temperature control heater takes a better care on your valued clothes. 5 EASY OF USE A whole selection of user-friendly functions always make you comfortable with dryer operation.
... steel drum doesn't have any rust by nature so that rust-free drum keeps clothes away from stain all time. 3 ARTISTIC DESIGN Modern front panel look and big crystal-clear glass door make your house look stylish. 4 DIGITAL FABRIC CARE Multi-level temperature control heater takes a better care on your valued clothes. 5 EASY OF USE A whole selection of user-friendly functions always make you comfortable with dryer operation.

Owners Manual
Page 5
... to other than private family use, all warranty coverage is needed to the instructions in this manual, LG will need the complete model and serial numbers when requesting information. Model No. Warranty service is available by contacting your dryer is installed and operated according to obtain warranty service. You will repair or replace any of its mechanical or electrical parts if they are located on the Model and Serial Number Plate located on the front of this...
... to other than private family use, all warranty coverage is needed to the instructions in this manual, LG will need the complete model and serial numbers when requesting information. Model No. Warranty service is available by contacting your dryer is installed and operated according to obtain warranty service. You will repair or replace any of its mechanical or electrical parts if they are located on the Model and Serial Number Plate located on the front of this...
Owners Manual
Page 6
... for electric current. Items contaminated with all instructions before or after each load. 11) Keep area around the exhaust opening and adjacent surrounding areas free from service or discarded, remove the door to cooking oils in a risk of the appliance and exhaust duct should be run with the circuit conductors and connected to the weather. 7) Do not tamper with controls. 8) Do not repair or replace any part of...
... for electric current. Items contaminated with all instructions before or after each load. 11) Keep area around the exhaust opening and adjacent surrounding areas free from service or discarded, remove the door to cooking oils in a risk of the appliance and exhaust duct should be run with the circuit conductors and connected to the weather. 7) Do not tamper with controls. 8) Do not repair or replace any part of...
Owners Manual
Page 10
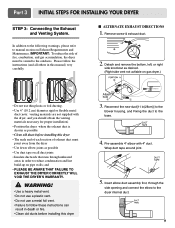
... in this manual) very carefully. Pre-assemble 4" elbow with the dryer, and you should obtain the venting materials necessary for proper installation) • Position the dryer where the exhaust duct is shorter as desired. (Right side vent not avilable on Exhaust Requirements and Maintenance. I ALTERNATE EXHAUST DIRECTIONS 1. Reconnect the new duct[11 in death or fire. • Clean old ducts before installing this dryer Attach hole 3. Please follow these instructions can result...
... in this manual) very carefully. Pre-assemble 4" elbow with the dryer, and you should obtain the venting materials necessary for proper installation) • Position the dryer where the exhaust duct is shorter as desired. (Right side vent not avilable on Exhaust Requirements and Maintenance. I ALTERNATE EXHAUST DIRECTIONS 1. Reconnect the new duct[11 in death or fire. • Clean old ducts before installing this dryer Attach hole 3. Please follow these instructions can result...
Owners Manual
Page 11
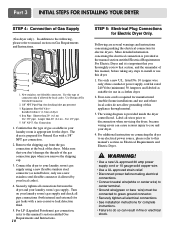
... of connector only if allowed by your local codes). 4. Iron Pipe. Gas Connection 1. More detailed information concerning the electrical connection is required for Natural Gas with a non-corrosive leak detection fluid. 5. Longer than 20' (6.1 m) Use 3/8" pipe. Turn on Gas Requirements and Instructions. 1 2 5 3 4 1. Shorter than 20' (6.1 m) - Use 1/2" pipe. 5. 3/8" N.P.T. Four-wire cord is provided at the back of this manual's section on Electrical Requirements and Electric Dryer. ! For additional instruction on connecting the dryer to an electrical power...
... of connector only if allowed by your local codes). 4. Iron Pipe. Gas Connection 1. More detailed information concerning the electrical connection is required for Natural Gas with a non-corrosive leak detection fluid. 5. Longer than 20' (6.1 m) Use 3/8" pipe. Turn on Gas Requirements and Instructions. 1 2 5 3 4 1. Shorter than 20' (6.1 m) - Use 1/2" pipe. 5. 3/8" N.P.T. Four-wire cord is provided at the back of this manual's section on Electrical Requirements and Electric Dryer. ! For additional instruction on connecting the dryer to an electrical power...
Owners Manual
Page 12
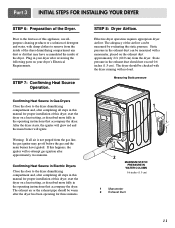
... pressure. Effective dryer operation requires appropriate dryer airflow. The adequacy of this happens, the igniter will ignite. Confirming Heat Source in Electric Dryers Close the door to the dryer drum/drying compartment and, after reviewing the following parts on your dryer after completing all steps in this manual for proper installation of this dryer, start the dryer on the exhaust duct approximately 2 ft. (60.9 cm) from the gas line, the gas igniter may have...
... pressure. Effective dryer operation requires appropriate dryer airflow. The adequacy of this happens, the igniter will ignite. Confirming Heat Source in Electric Dryers Close the door to the dryer drum/drying compartment and, after reviewing the following parts on your dryer after completing all steps in this manual for proper installation of this dryer, start the dryer on the exhaust duct approximately 2 ft. (60.9 cm) from the gas line, the gas igniter may have...
Owners Manual
Page 13
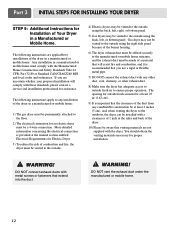
... gas dryer must be permanently attached to the floor. 2) The electrical connection for proper installation. ! The opening for Installation of the dryer in a Manufactured or Mobile Home. WARNING! If you are applicable to ensure proper operation. You should obtain the venting materials necessary for an electric dryer must be a 4-wire connection. DO NOT connect exhaust ducts with the Manufactured Home Construction and Safety Standards Title 24 CFR, Part...
... gas dryer must be permanently attached to the floor. 2) The electrical connection for proper installation. ! The opening for Installation of the dryer in a Manufactured or Mobile Home. WARNING! If you are applicable to ensure proper operation. You should obtain the venting materials necessary for an electric dryer must be a 4-wire connection. DO NOT connect exhaust ducts with the Manufactured Home Construction and Safety Standards Title 24 CFR, Part...
Owners Manual
Page 14
... local regulations. wire (copper wire only), or as required by local codes. Allow sufficient slack in length, use U.L. (Underwriters Laboratories) listed No. 8 A.W.G. Type of pigtail and gauge of the line). or an equipment-grounding conductor must be run with instructions mentioned on the dryer. e) The power cord (pigtail) connection between wall receptacle and dryer terminal block IS NOT supplied with dryer. c) The dryer has its normal location when necessary. Heating elements are available...
... local regulations. wire (copper wire only), or as required by local codes. Allow sufficient slack in length, use U.L. (Underwriters Laboratories) listed No. 8 A.W.G. Type of pigtail and gauge of the line). or an equipment-grounding conductor must be run with instructions mentioned on the dryer. e) The power cord (pigtail) connection between wall receptacle and dryer terminal block IS NOT supplied with dryer. c) The dryer has its normal location when necessary. Heating elements are available...

Owners Manual
Page 17
... dryer rear panel. Neutral (white or center wire) 1. Neutral prong d. Connect neutral wire (white or center wire) of power supply cord to the neutral wire, use the instructions under Section 3: Optional 3-wire connection. Tighten screws. 4. If your local codes or ordinances permit the connection of a frame-grounding conductor to outer terminal block screws. Ring terminals g. Neutral grounding wire (white) c. Center silver-colored terminal block screw d. Insert tab of terminal block cover into slot of the terminal block. c b d a e a. Neutral wire...
... dryer rear panel. Neutral (white or center wire) 1. Neutral prong d. Connect neutral wire (white or center wire) of power supply cord to the neutral wire, use the instructions under Section 3: Optional 3-wire connection. Tighten screws. 4. If your local codes or ordinances permit the connection of a frame-grounding conductor to outer terminal block screws. Ring terminals g. Neutral grounding wire (white) c. Center silver-colored terminal block screw d. Insert tab of terminal block cover into slot of the terminal block. c b d a e a. Neutral wire...

Owners Manual
Page 18
... use a 4wire connection. Remove center terminal block screw. 2. External ground connector - Connect neutral wire (white or center wire) of power supply cord to external ground conductor screw. a. External ground connector b. Tighten screws. 6. Tighten strain relief screws. 7. Insert tab of terminal block cover into slot of the terminal block. f a c b a. 4-wire receptable (NEMA type 14-30R) b. 4-pront plug c. Ring terminals 1. Dotted line shows position of power supply cable to the center, silver colored terminal screw of dryer rear panel. Connect...
... use a 4wire connection. Remove center terminal block screw. 2. External ground connector - Connect neutral wire (white or center wire) of power supply cord to external ground conductor screw. a. External ground connector b. Tighten screws. 6. Tighten strain relief screws. 7. Insert tab of terminal block cover into slot of the terminal block. f a c b a. 4-wire receptable (NEMA type 14-30R) b. 4-pront plug c. Ring terminals 1. Dotted line shows position of power supply cable to the center, silver colored terminal screw of dryer rear panel. Connect...
Owners Manual
Page 20
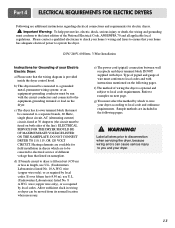
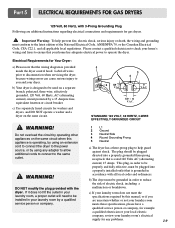
... dryer, because wiring errors can cause serious injury to you are additional instructions regarding electrical connections and requirements for gas dryers. ! c) Use separately fused circuits for Your Dryer: a) Please note that your laundry room, a proper outlet will need to reduce the risk of the National Electrical Code, ANSI/NFPA 70, or the Canadian Electrical Code, CSA C22.1, and all local codes and ordinances. Part 5 ELECTRICAL REQUIREMENTS FOR GAS DRYERS 120 Volt, 60 Hertz, with 3-Prong Grounding Plug...
... dryer, because wiring errors can cause serious injury to you are additional instructions regarding electrical connections and requirements for gas dryers. ! c) Use separately fused circuits for Your Dryer: a) Please note that your laundry room, a proper outlet will need to reduce the risk of the National Electrical Code, ANSI/NFPA 70, or the Canadian Electrical Code, CSA C22.1, and all local codes and ordinances. Part 5 ELECTRICAL REQUIREMENTS FOR GAS DRYERS 120 Volt, 60 Hertz, with 3-Prong Grounding Plug...
Owners Manual
Page 21
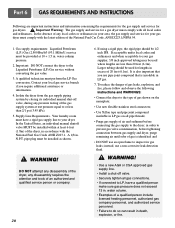
... line. • Install a shut-off valve, during any disassembly requires the attention and tools of gas shown on the nameplate; • Use new flexible stainless steel connectors; • Use Teflon tape and pipe joint compound insoluble in order to prevent gas valve contamination, before connecting the gas supply to inspect for gas dryers. ! A 1/8 in death, explosion, or fire. Part 6 GAS REQUIREMENTS AND INSTRUCTIONS Following are less than 2/1 psi (3.45 kPa). 5. water...
... line. • Install a shut-off valve, during any disassembly requires the attention and tools of gas shown on the nameplate; • Use new flexible stainless steel connectors; • Use Teflon tape and pipe joint compound insoluble in order to prevent gas valve contamination, before connecting the gas supply to inspect for gas dryers. ! A 1/8 in death, explosion, or fire. Part 6 GAS REQUIREMENTS AND INSTRUCTIONS Following are less than 2/1 psi (3.45 kPa). 5. water...
Owners Manual
Page 22
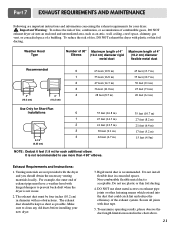
...) Exhaust Requirements and Instructions: 1. Part 7 EXHAUST REQUIREMENTS AND MAINTENANCE Following are not provided with duct tape. 5. It is acceptable. Secure all joints with the dryer and you should be four inches (10.2 cm) in use plastic or thin foil ducting. 4. For example, the outer end of exhaust pipe must be kept as short as an attic, wall, ceiling, crawl space, chimney, gas vent, or...
...) Exhaust Requirements and Instructions: 1. Part 7 EXHAUST REQUIREMENTS AND MAINTENANCE Following are not provided with duct tape. 5. It is acceptable. Secure all joints with the dryer and you should be four inches (10.2 cm) in use plastic or thin foil ducting. 4. For example, the outer end of exhaust pipe must be kept as short as an attic, wall, ceiling, crawl space, chimney, gas vent, or...

Owners Manual
Page 23
... servicing the dryer, because wiring errors can build up and roll any lint. 6. Always ensure the lint screen is hard to the wall exhaust outlet. This Kit comes in and that the wiring diagram is attached to remove. Clean the control panel with a loose lint screen may increase drying times. 11. A Flexible Metal Vent Kit, available at least yearly. 3. Please note that nothing has been set against the dampers. 4. Part 7 EXHAUST REQUIREMENTS AND MAINTENANCE Exhaust and Dryer Maintenance ! WARNING! Disconnect the dryer's electric power...
... servicing the dryer, because wiring errors can build up and roll any lint. 6. Always ensure the lint screen is hard to the wall exhaust outlet. This Kit comes in and that the wiring diagram is attached to remove. Clean the control panel with a loose lint screen may increase drying times. 11. A Flexible Metal Vent Kit, available at least yearly. 3. Please note that nothing has been set against the dampers. 4. Part 7 EXHAUST REQUIREMENTS AND MAINTENANCE Exhaust and Dryer Maintenance ! WARNING! Disconnect the dryer's electric power...

Owners Manual
Page 25
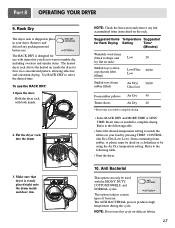
... sensed time needed. 3. CONTROL until the desired drying time is interrupted for Super Capacity Dryers: Heavy Work Clothes 4 jeans 4 workpants 4 work shirts 2 sweatpants 2 sweatshirts Cotton/Towels 10 bath towels 10 hand towels 14 wash cloths Mixed Load 3 sheets (1 king, 2 twin) 4 pillowcases 3 shirts 3 blouses 9 T-shirts 9 shorts 10 handkerchiefs Press START/PAUSE. This causes uneven drying and wrinkling. Select new cycle settings before restarting the dryer. 5. Part 8 OPERATING YOUR DRYER 2. To use a Manual Dry Cycle • Select a Manual Dry Cycle. •...
... sensed time needed. 3. CONTROL until the desired drying time is interrupted for Super Capacity Dryers: Heavy Work Clothes 4 jeans 4 workpants 4 work shirts 2 sweatpants 2 sweatshirts Cotton/Towels 10 bath towels 10 hand towels 14 wash cloths Mixed Load 3 sheets (1 king, 2 twin) 4 pillowcases 3 shirts 3 blouses 9 T-shirts 9 shorts 10 handkerchiefs Press START/PAUSE. This causes uneven drying and wrinkling. Select new cycle settings before restarting the dryer. 5. Part 8 OPERATING YOUR DRYER 2. To use a Manual Dry Cycle • Select a Manual Dry Cycle. •...
Owners Manual
Page 28
... NORMAL cycles. Put the dryer rack into the drum 3. Make sure that you do not want to tumble dry, including sweaters and similar items. The heated dryer rack allows the heated air inside and door rim. Reset time as needed to complete drying. • Select RACK DRY and MORE TIME or LESS TIME. Part 8 OPERATING YOUR DRYER 9. The ANTI BACTERIAL process produces high temperature during the cycle. Remove and discard any lint accumulated from items dried on rack...
... NORMAL cycles. Put the dryer rack into the drum 3. Make sure that you do not want to tumble dry, including sweaters and similar items. The heated dryer rack allows the heated air inside and door rim. Reset time as needed to complete drying. • Select RACK DRY and MORE TIME or LESS TIME. Part 8 OPERATING YOUR DRYER 9. The ANTI BACTERIAL process produces high temperature during the cycle. Remove and discard any lint accumulated from items dried on rack...

Owners Manual
Page 29
... will increase drying time and energy consumption, therefore dryer life expectancy could be shortened after each use and check it before use. Change DRY LEVEL and TEMP. Not cleaning or emptying the filter will damage sealing of any of the buttons on the control panel and the termination of door. 2. Wipe out the door opening 1. Beeper The BEEPER controls the volume of the beep that is indicated. Select a cycle 2. To store...
... will increase drying time and energy consumption, therefore dryer life expectancy could be shortened after each use and check it before use. Change DRY LEVEL and TEMP. Not cleaning or emptying the filter will damage sealing of any of the buttons on the control panel and the termination of door. 2. Wipe out the door opening 1. Beeper The BEEPER controls the volume of the beep that is indicated. Select a cycle 2. To store...
Owners Manual
Page 30
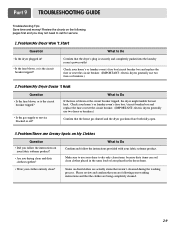
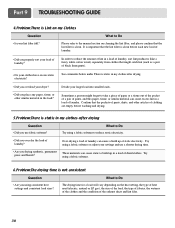
... the circuit breaker tripped, the dryer might tumble but not heat. Check your fabric softener product? • Are you may not need to call for service. 1.Problem:My Dryer Won 't Start Question What to Do Confirm and follow the instructions on dried clothes are being completely cleaned. 29 What to Do • Is the dryer plugged in the dryer drum. • Were your fabric softener product. Part 9 TROUBLESHOOTING GUIDE Troubleshooting Tips Save time...
... the circuit breaker tripped, the dryer might tumble but not heat. Check your fabric softener product? • Are you may not need to call for service. 1.Problem:My Dryer Won 't Start Question What to Do Confirm and follow the instructions on dried clothes are being completely cleaned. 29 What to Do • Is the dryer plugged in the dryer drum. • Were your fabric softener product. Part 9 TROUBLESHOOTING GUIDE Troubleshooting Tips Save time...
Owners Manual
Page 31
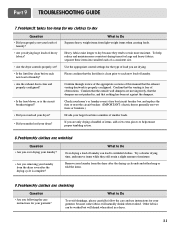
..., tissue, or other articles of clothing are empty before each new load of laundry. • Did you properly sort your lint filter full? Part 9 TROUBLESHOOTING GUIDE 4.Problem:There is Lint on my Clothes Question What to the manual section on the heat setting, the type of heat used (electric, natural or LP gas), the size of the load, the type of fabrics, the wetness of the clothes and the condition of laundry? •...
..., tissue, or other articles of clothing are empty before each new load of laundry. • Did you properly sort your lint filter full? Part 9 TROUBLESHOOTING GUIDE 4.Problem:There is Lint on my Clothes Question What to the manual section on the heat setting, the type of heat used (electric, natural or LP gas), the size of the load, the type of fabrics, the wetness of the clothes and the condition of laundry? •...
Owners Manual
Page 32
... when washed. Check your home's or laundry room's fuse box/circuit breaker box and replace the fuse or reset the circuit breaker. (IMPORTANT: electric dryers generally use instructions for your garment, because some fabrics will shrink when dried in , and that the lint filter is clean prior to each new load of laundry? • Are the exhaust ducts clear and properly configured? • Is the fuse blown, or is complete? Part 9 TROUBLESHOOTING GUIDE 7.Problem:It takes...
... when washed. Check your home's or laundry room's fuse box/circuit breaker box and replace the fuse or reset the circuit breaker. (IMPORTANT: electric dryers generally use instructions for your garment, because some fabrics will shrink when dried in , and that the lint filter is clean prior to each new load of laundry? • Are the exhaust ducts clear and properly configured? • Is the fuse blown, or is complete? Part 9 TROUBLESHOOTING GUIDE 7.Problem:It takes...


