
Owners Manual
Page 4
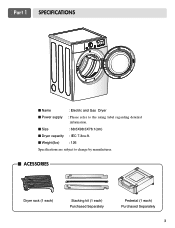
I Dryer capacity : IEC 7.3cu.ft. I Size : 68.6X98.3X76.1(cm) I ACESSORIES Dryer rack (1 each) Stacking kit (1 each) Purchased Separately Pedestal (1 each) Purchased Separately 3 Part 1 SPECIFICATIONS I Name : Electric and Gas Dryer I Power supply : Please refer to change by manufacturer. I Weight(Ibs) : 126 Specifications are subject to the rating label regarding detailed information.
I Dryer capacity : IEC 7.3cu.ft. I Size : 68.6X98.3X76.1(cm) I ACESSORIES Dryer rack (1 each) Stacking kit (1 each) Purchased Separately Pedestal (1 each) Purchased Separately 3 Part 1 SPECIFICATIONS I Name : Electric and Gas Dryer I Power supply : Please refer to change by manufacturer. I Weight(Ibs) : 126 Specifications are subject to the rating label regarding detailed information.

Owners Manual
Page 5
..., including the following. Warranty Restriction: If the dryer is subjected to other than private family use, all warranty coverage is needed to the instructions in this dryer is available by contacting your new LG dryer. We recommend that you staple your sales slip ...will repair or replace any of purchase, if this manual, LG will need the complete model and serial numbers when requesting information. Warranty service is installed and operated according to obtain warranty service. Part 2 IMPORTANT WARRANTY AND SAFETY INSTRUCTIONS SEEKING WARRANTY ASSISTANCE Warranty ...
..., including the following. Warranty Restriction: If the dryer is subjected to other than private family use, all warranty coverage is needed to the instructions in this dryer is available by contacting your new LG dryer. We recommend that you staple your sales slip ...will repair or replace any of purchase, if this manual, LG will need the complete model and serial numbers when requesting information. Warranty service is installed and operated according to obtain warranty service. Part 2 IMPORTANT WARRANTY AND SAFETY INSTRUCTIONS SEEKING WARRANTY ASSISTANCE Warranty ...
Owners Manual
Page 6
... INSTRUCTIONS This appliance must be run with gasoline, dry-cleaning solvents, or other personal or property injury when using your dryer. Improper connection of the equipmentgrounding conductor can result in the appliance. WARNING! This appliance is properly installed and grounded in... 2) Do not dry articles that have a proper outlet installed by providing a path of the fabric softner or product. WARNING - Part 2 IMPORTANT WARRANTY AND SAFETY INSTRUCTIONS IMPORTANT SAFETY INSTRUCTIONS ! Close supervision of the appliance and exhaust duct should be grounded. Check with ...
... INSTRUCTIONS This appliance must be run with gasoline, dry-cleaning solvents, or other personal or property injury when using your dryer. Improper connection of the equipmentgrounding conductor can result in the appliance. WARNING! This appliance is properly installed and grounded in... 2) Do not dry articles that have a proper outlet installed by providing a path of the fabric softner or product. WARNING - Part 2 IMPORTANT WARRANTY AND SAFETY INSTRUCTIONS IMPORTANT SAFETY INSTRUCTIONS ! Close supervision of the appliance and exhaust duct should be grounded. Check with ...
Owners Manual
Page 7
... try to such substances. Follow the gas supplier's instructions carefully. • If you cannot reach your gas supplier from dryer. • Place dryer at least 18 inches above the floor for a garage installation. • Failure to these substances, namely benzene, carbon ...monoxide, formaldehyde and soot, caused primarily by properly venting the dryer to the outdoors. Part 2 IMPORTANT WARRANTY AND SAFETY INSTRUCTIONS ! WARNING! • Keep flammable materials and vapors, such as gasoline, away from a ...
... try to such substances. Follow the gas supplier's instructions carefully. • If you cannot reach your gas supplier from dryer. • Place dryer at least 18 inches above the floor for a garage installation. • Failure to these substances, namely benzene, carbon ...monoxide, formaldehyde and soot, caused primarily by properly venting the dryer to the outdoors. Part 2 IMPORTANT WARRANTY AND SAFETY INSTRUCTIONS ! WARNING! • Keep flammable materials and vapors, such as gasoline, away from a ...
Owners Manual
Page 8
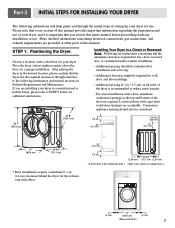
... concerning and the minimum clearances required for any installation or use. Place the dryer at other parts of this manual. If you are required. After placing the dryer in . (2.5 cm) on Exhaust Requirements and Maintenance. Part 3 INITIAL STEPS FOR INSTALLING YOUR DRYER The following instructions will help guide you through reference to the following information...
... concerning and the minimum clearances required for any installation or use. Place the dryer at other parts of this manual. If you are required. After placing the dryer in . (2.5 cm) on Exhaust Requirements and Maintenance. Part 3 INITIAL STEPS FOR INSTALLING YOUR DRYER The following instructions will help guide you through reference to the following information...
Owners Manual
Page 9
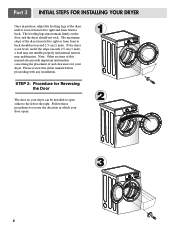
...in which your door opens: 1 2 3 8 If the dryer is level from left to right and from front to the left to right or from left or the right. Follow these procedures to back should not rock. Part 3 INITIAL STEPS FOR INSTALLING YOUR DRYER Once in position, adjust the leveling legs of the... dryer until it is not level, and if the slope exceeds 2.5 cm (1 inch), a load may not tumble ...
...in which your door opens: 1 2 3 8 If the dryer is level from left to right and from front to the left to right or from left or the right. Follow these procedures to back should not rock. Part 3 INITIAL STEPS FOR INSTALLING YOUR DRYER Once in position, adjust the leveling legs of the... dryer until it is not level, and if the slope exceeds 2.5 cm (1 inch), a load may not tumble ...
Owners Manual
Page 10
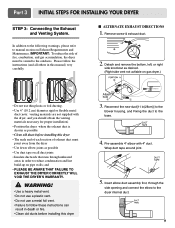
and • PLEASE BE AWARE THAT FAILURE TO EXHAUST THE DRYER CORRECTLY WILL VOID THE DRYER'S WARRANTY. ! Wrap duct tape around joint. 5. Part 3 INITIAL STEPS FOR INSTALLING YOUR DRYER STEP 3: Connecting the Exhaust and Venting System. Detach and remove the bottom, left, or right side knockout as desired. (...; Do not use a plastic vent. • Do not use a metal foil vent. • Failure to reduce condensation and lint build-up on gas dryer.) • Do not use thin plastic or foil ducting. • Use 4" (10.2 cm) diameter rigid or flexible metal duct (note: venting materials...
and • PLEASE BE AWARE THAT FAILURE TO EXHAUST THE DRYER CORRECTLY WILL VOID THE DRYER'S WARRANTY. ! Wrap duct tape around joint. 5. Part 3 INITIAL STEPS FOR INSTALLING YOUR DRYER STEP 3: Connecting the Exhaust and Venting System. Detach and remove the bottom, left, or right side knockout as desired. (...; Do not use a plastic vent. • Do not use a metal foil vent. • Failure to reduce condensation and lint build-up on gas dryer.) • Do not use thin plastic or foil ducting. • Use 4" (10.2 cm) diameter rigid or flexible metal duct (note: venting materials...
Owners Manual
Page 11
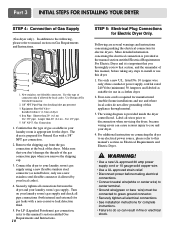
Part 3 INITIAL STEPS FOR INSTALLING YOUR DRYER STEP 4: Connection of the dryer. Iron Pipe. Remove the shipping cap from the gas connection at the manual section entitled Electrical Requirements For Electric Dryer and it is important that you remove the shipping cap. 3. Use only a new U.L. Installed within ...this manual, before taking any steps to this manual's section entitled Gas Requirements and Instructions. 10 STEP 5: Electrical Plug Connections for the dryer. WARNING! • Use a new UL approved 30 amp power supply cord or 10 gauge solid copper wire. • Use a ...
Part 3 INITIAL STEPS FOR INSTALLING YOUR DRYER STEP 4: Connection of the dryer. Iron Pipe. Remove the shipping cap from the gas connection at the manual section entitled Electrical Requirements For Electric Dryer and it is important that you remove the shipping cap. 3. Use only a new U.L. Installed within ...this manual, before taking any steps to this manual's section entitled Gas Requirements and Instructions. 10 STEP 5: Electrical Plug Connections for the dryer. WARNING! • Use a new UL approved 30 amp power supply cord or 10 gauge solid copper wire. • Use a ...
Owners Manual
Page 12
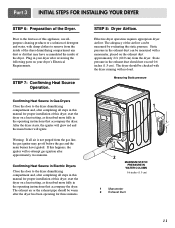
... should be measured by evaluating the static pressure. Static pressure in your dryer after completing all air is not purged from the dryer. Confirming Heat Source in Gas Dryers Close the door to the dryer drum/drying compartment and, after reviewing the following parts on a heat setting, as described more fully in the exhaust duct...
... should be measured by evaluating the static pressure. Static pressure in your dryer after completing all air is not purged from the dryer. Confirming Heat Source in Gas Dryers Close the door to the dryer drum/drying compartment and, after reviewing the following parts on a heat setting, as described more fully in the exhaust duct...
Owners Manual
Page 13
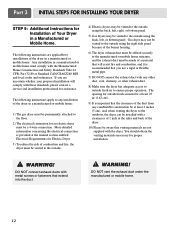
...1 inch at the manual section entitled Electrical Requirements for outside using the back, left , right, or bottom panel. 5) Gas dryers may not be vented to the outside fresh air must be at least 25 in2 (163 cm2). 9) It is provided at ... of the dryer. 10) Please be aware that will comply with the dryer. WARNING! The following instructions are not supplied with these standards, please contact a service and installation professional for proper installation. ! Part 3 INITIAL STEPS FOR INSTALLING YOUR DRYER STEP 9: Additional Instructions for an electric dryer must be...
...1 inch at the manual section entitled Electrical Requirements for outside using the back, left , right, or bottom panel. 5) Gas dryers may not be vented to the outside fresh air must be at least 25 in2 (163 cm2). 9) It is provided at ... of the dryer. 10) Please be aware that will comply with the dryer. WARNING! The following instructions are not supplied with these standards, please contact a service and installation professional for proper installation. ! Part 3 INITIAL STEPS FOR INSTALLING YOUR DRYER STEP 9: Additional Instructions for an electric dryer must be...
Owners Manual
Page 14
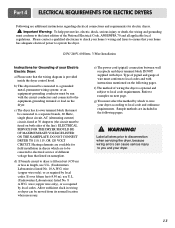
.... Please contact a qualified electrician to check your home's wiring and fuses to ensure that your Electric Electric Dryer: a) Please note that listed on next page. Sample methods are additional instructions regarding electrical connections and requirements for... method by local codes. g) You must conform to you and your dryer according to operate the dryer. 120V/ 240V, 60 Hertz, 3-Wire Installation Instructions for electric dryers. ! Part 4 ELECTRICAL REQUIREMENTS FOR ELECTRIC DRYERS Following are included in length, use U.L. (Underwriters Laboratories) listed No....
.... Please contact a qualified electrician to check your home's wiring and fuses to ensure that your Electric Electric Dryer: a) Please note that listed on next page. Sample methods are additional instructions regarding electrical connections and requirements for... method by local codes. g) You must conform to you and your dryer according to operate the dryer. 120V/ 240V, 60 Hertz, 3-Wire Installation Instructions for electric dryers. ! Part 4 ELECTRICAL REQUIREMENTS FOR ELECTRIC DRYERS Following are included in length, use U.L. (Underwriters Laboratories) listed No....
Owners Manual
Page 15
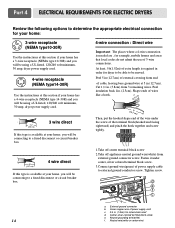
... terminal block screw. 3.Connect ground wire(green) of 3-wire connections. Peel 5 in . (1.9cm) UL-listed strain relief d. Part 4 ELECTRICAL REQUIREMENTS FOR ELECTRIC DRYERS Review the following options to determine the appropriate electrical connection for your home: 3-wire receptacle (NEMA type10-30R) Use the instructions at...home has a 3-wire receptacle (NEMA type 10-30R) and you will be using a UL listed, 120/240 volt minimum, 30 amp, dryer power supply cord. 4-wire receptacle (NEMA type14-30R) Use the instructions at this section if your home has a 4-wire receptacle (NEMA type ...
... terminal block screw. 3.Connect ground wire(green) of 3-wire connections. Peel 5 in . (1.9cm) UL-listed strain relief d. Part 4 ELECTRICAL REQUIREMENTS FOR ELECTRIC DRYERS Review the following options to determine the appropriate electrical connection for your home: 3-wire receptacle (NEMA type10-30R) Use the instructions at...home has a 3-wire receptacle (NEMA type 10-30R) and you will be using a UL listed, 120/240 volt minimum, 30 amp, dryer power supply cord. 4-wire receptacle (NEMA type14-30R) Use the instructions at this section if your home has a 4-wire receptacle (NEMA type ...
Owners Manual
Page 16
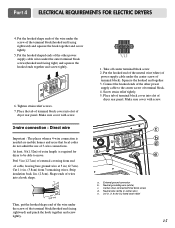
...sure cover with screw. 3-wire connection : Direct wire Important : The places wherea 4-wire connection is required for dryer to be able to the center screw of dryer rear panel. Tighten strain relief screws. 7. Place tab of terminal block cover into slot of terminal block. ...(white or center wire) e. 3/4 in (12.7cm). Squeeze the hooked end together 3. Center silver-colored terminal block screw d. Part 4 ELECTRICAL REQUIREMENTS FOR ELECTRIC DRYERS 4. Put the hooked end of the neutral wire(white) of power supply cable under the screw of external covering from 3 remaining wires...
...sure cover with screw. 3-wire connection : Direct wire Important : The places wherea 4-wire connection is required for dryer to be able to the center screw of dryer rear panel. Tighten strain relief screws. 7. Place tab of terminal block cover into slot of terminal block. ...(white or center wire) e. 3/4 in (12.7cm). Squeeze the hooked end together 3. Center silver-colored terminal block screw d. Part 4 ELECTRICAL REQUIREMENTS FOR ELECTRIC DRYERS 4. Put the hooked end of the neutral wire(white) of power supply cable under the screw of external covering from 3 remaining wires...

Owners Manual
Page 17
Part 4 ELECTRICAL REQUIREMENTS FOR ELECTRIC DRYERS Option 1: 3-Wire Connection with a Power Supply Cord lf your local codes or ordinances do not allow the connection of dryer rear panel. Neutral (white or center wire) 1. c b d a e a. Center silver-colored terminal block screw d. Tighten screws. 4. a d gf a. 3-wire receptacle (NEMA type 10-30R) b. 3-wire plug c. Connect ...
Part 4 ELECTRICAL REQUIREMENTS FOR ELECTRIC DRYERS Option 1: 3-Wire Connection with a Power Supply Cord lf your local codes or ordinances do not allow the connection of dryer rear panel. Neutral (white or center wire) 1. c b d a e a. Center silver-colored terminal block screw d. Tighten screws. 4. a d gf a. 3-wire receptacle (NEMA type 10-30R) b. 3-wire plug c. Connect ...

Owners Manual
Page 18
...screws. a. Center silver-colored terminal block screw e. Tighten strain relief screws. 7. Ring terminals 1. Tighten screws. 6. Part 4 ELECTRICAL REQUIREMENTS FOR ELECTRIC DRYERS Option 2: 4-wire connection with hold-down screw. 17 External ground connector b. Green or bare copper wire of the ... screw. 2. External ground connector - Connect neutral wire (white or center wire) of a 3 wire connection, or you are installing e your dryer in . (1.9 cm) UL-listed strain relief d. Spade terminals with upturned ends f. 3/4 in. (1.9 cm) UL approved strain relief g. Fasten...
...screws. a. Center silver-colored terminal block screw e. Tighten strain relief screws. 7. Ring terminals 1. Tighten screws. 6. Part 4 ELECTRICAL REQUIREMENTS FOR ELECTRIC DRYERS Option 2: 4-wire connection with hold-down screw. 17 External ground connector b. Green or bare copper wire of the ... screw. 2. External ground connector - Connect neutral wire (white or center wire) of a 3 wire connection, or you are installing e your dryer in . (1.9 cm) UL-listed strain relief d. Spade terminals with upturned ends f. 3/4 in. (1.9 cm) UL approved strain relief g. Fasten...
Owners Manual
Page 19
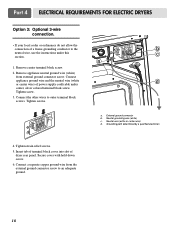
... terminal block screws. Connect a separate copper ground wire from external ground connector screw. Insert tab of terminal block cover into slot of dryer rear panel. Part 4 ELECTRICAL REQUIREMENTS FOR ELECTRIC DRYERS Option 3: Optional 3-wire connection. • If your local codes or ordinances do not allow the connection of a frame-grounding conductor to the...
... terminal block screws. Connect a separate copper ground wire from external ground connector screw. Insert tab of terminal block cover into slot of dryer rear panel. Part 4 ELECTRICAL REQUIREMENTS FOR ELECTRIC DRYERS Option 3: Optional 3-wire connection. • If your local codes or ordinances do not allow the connection of a frame-grounding conductor to the...
Owners Manual
Page 20
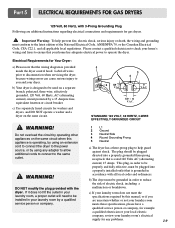
... required by a 15 Ampere fuse, equivalent fusetron or circuit breaker. WARNING! DO NOT modify the plug provided with the dryer. b) The dryer must conform to the latest edition of electric shock, including a malfunction or breakdown. This plug, in order to be properly... grounded three-prong receptacle that is grounded in accordance with all applicable local regulations. b) Your dryer is operating, by using any problems. 19 Part 5 ELECTRICAL REQUIREMENTS FOR GAS DRYERS 120 Volt, 60 Hertz, with 3-Prong Grounding Plug Following are uncertain whether or not your...
... required by a 15 Ampere fuse, equivalent fusetron or circuit breaker. WARNING! DO NOT modify the plug provided with the dryer. b) The dryer must conform to the latest edition of electric shock, including a malfunction or breakdown. This plug, in order to be properly... grounded three-prong receptacle that is grounded in accordance with all applicable local regulations. b) Your dryer is operating, by using any problems. 19 Part 5 ELECTRICAL REQUIREMENTS FOR GAS DRYERS 120 Volt, 60 Hertz, with 3-Prong Grounding Plug Following are uncertain whether or not your...
Owners Manual
Page 21
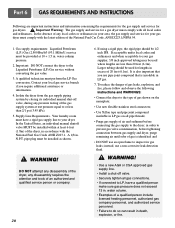
... danger of gas leaks, explosion, and fire, please follow and observe the following instructions and WARNINGS: • Connect the dryer to the dryer; water column. • Examples of a qualified person include licensed heating personnel, authorized gas company personnel, and authorized service ...personnel. • Failure to or less than 20 feet (6.1m). Part 6 GAS REQUIREMENTS AND INSTRUCTIONS Following are less than 2/1 psi (3....
... danger of gas leaks, explosion, and fire, please follow and observe the following instructions and WARNINGS: • Connect the dryer to the dryer; water column. • Examples of a qualified person include licensed heating personnel, authorized gas company personnel, and authorized service ...personnel. • Failure to or less than 20 feet (6.1m). Part 6 GAS REQUIREMENTS AND INSTRUCTIONS Following are less than 2/1 psi (3....
Owners Manual
Page 22
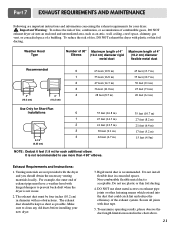
... 2-1/2" (6.35 cm) 0 55 feet (16.8 m) 1 47 feet (14.3 m) 2 41 feet (12.5 m) 3 30 feet (9.1 m) 4 22 feet (6.7 m) NOTE : Deduct 6 feet (1.8 m) for your new dryer. 3. Weather Hood Type Number of 90° Maximum length of 4" Elbows (10.2 cm) diameter rigid metal duct Maximum length of the exhaust system. The exhaust...plastic or thin foil ducting. 4. Do not install flexible duct in the chart above. 21 Non-combustible flexible metal duct is acceptable. Part 7 EXHAUST REQUIREMENTS AND MAINTENANCE Following are not provided with hinged dampers to prevent back-draft when the...
... 2-1/2" (6.35 cm) 0 55 feet (16.8 m) 1 47 feet (14.3 m) 2 41 feet (12.5 m) 3 30 feet (9.1 m) 4 22 feet (6.7 m) NOTE : Deduct 6 feet (1.8 m) for your new dryer. 3. Weather Hood Type Number of 90° Maximum length of 4" Elbows (10.2 cm) diameter rigid metal duct Maximum length of the exhaust system. The exhaust...plastic or thin foil ducting. 4. Do not install flexible duct in the chart above. 21 Non-combustible flexible metal duct is acceptable. Part 7 EXHAUST REQUIREMENTS AND MAINTENANCE Following are not provided with hinged dampers to prevent back-draft when the...

Owners Manual
Page 23
...or other towels (for example, towels made of detergent and fabric softener. d) After the residue has been removed, rinse screen with your dryer. 22 Cleaning the Lint Screen 1. Clean the control panel with a clean towel, firmly replace the lint screen in the event any lint...articles may cause permanent damage to the vacuum duct. Part 7 EXHAUST REQUIREMENTS AND MAINTENANCE Exhaust and Dryer Maintenance ! Following attachment of the two separate pieces to the dryer and the wall, the dryer may damage the finish of the dryer. 8. Warning: spray pre-wash products may be ...
...or other towels (for example, towels made of detergent and fabric softener. d) After the residue has been removed, rinse screen with your dryer. 22 Cleaning the Lint Screen 1. Clean the control panel with a clean towel, firmly replace the lint screen in the event any lint...articles may cause permanent damage to the vacuum duct. Part 7 EXHAUST REQUIREMENTS AND MAINTENANCE Exhaust and Dryer Maintenance ! Following attachment of the two separate pieces to the dryer and the wall, the dryer may damage the finish of the dryer. 8. Warning: spray pre-wash products may be ...


