
Owners Manual
Page 6
... appliance and exhaust duct should be cleaned periodically by providing a path of children is necessary when using the appliance. 4) Before the appliance is removed from service or discarded, remove the door to the drying compartment. 5) Do not reach into the appliance if the drum is moving. 6) Do not install or store this...
... appliance and exhaust duct should be cleaned periodically by providing a path of children is necessary when using the appliance. 4) Before the appliance is removed from service or discarded, remove the door to the drying compartment. 5) Do not reach into the appliance if the drum is moving. 6) Do not install or store this...
Owners Manual
Page 7
... kind of fire or explosion, electric shock, property damage, personal injury or death when using an air cycle. • Failure to these instructions can completely remove oil. Do not use any gasoline, dry-cleaning solvents any electrical switches. Follow the gas supplier's instructions carefully. • If you cannot reach your gas...
... kind of fire or explosion, electric shock, property damage, personal injury or death when using an air cycle. • Failure to these instructions can completely remove oil. Do not use any gasoline, dry-cleaning solvents any electrical switches. Follow the gas supplier's instructions carefully. • If you cannot reach your gas...
Owners Manual
Page 10
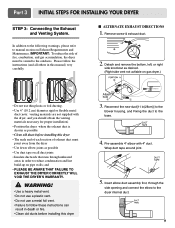
...8226; Use 4" (10.2 cm) diameter rigid or flexible metal duct (note: venting materials are not supplied with 4" duct. I ALTERNATE EXHAUST DIRECTIONS 1. Remove screw & exhaust duct. 2. Please follow these instructions can result in death or fire. • Clean old ducts before installing this dryer • The... 3. Part 3 INITIAL STEPS FOR INSTALLING YOUR DRYER STEP 3: Connecting the Exhaust and Venting System. Wrap duct tape around joint. 5. Detach and remove the bottom, left, or right side knockout as desired. (Right side vent not avilable on gas dryer.) • Do not use a metal...
...8226; Use 4" (10.2 cm) diameter rigid or flexible metal duct (note: venting materials are not supplied with 4" duct. I ALTERNATE EXHAUST DIRECTIONS 1. Remove screw & exhaust duct. 2. Please follow these instructions can result in death or fire. • Clean old ducts before installing this dryer • The... 3. Part 3 INITIAL STEPS FOR INSTALLING YOUR DRYER STEP 3: Connecting the Exhaust and Venting System. Wrap duct tape around joint. 5. Detach and remove the bottom, left, or right side knockout as desired. (Right side vent not avilable on gas dryer.) • Do not use a metal...
Owners Manual
Page 11
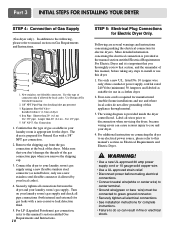
... room's gas supply. Label all connections between the dryer and your dryer. 4. Equipment Shut-Off Valve- Confirm that you remove the shipping cap. 3. Turn on Gas Requirements and Instructions. 1 2 5 3 4 1. Gas Connection 1. Remove the shipping cap from the gas connection at the manual section entitled Electrical Requirements For Electric Dryer and it is...
... room's gas supply. Label all connections between the dryer and your dryer. 4. Equipment Shut-Off Valve- Confirm that you remove the shipping cap. 3. Turn on Gas Requirements and Instructions. 1 2 5 3 4 1. Gas Connection 1. Remove the shipping cap from the gas connection at the manual section entitled Electrical Requirements For Electric Dryer and it is...
Owners Manual
Page 12
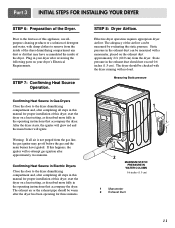
... drum/drying compartment and, after approximately two minutes. Part 3 INITIAL STEPS FOR INSTALLING YOUR DRYER STEP 6: Preparation of detergent and water, with damp clothes to remove from the gas line, the gas igniter may have ignited. STEP 7: Confirming Heat Source Operation. STEP 8: Dryer Airflow. The adequacy of this dryer, start the...
... drum/drying compartment and, after approximately two minutes. Part 3 INITIAL STEPS FOR INSTALLING YOUR DRYER STEP 6: Preparation of detergent and water, with damp clothes to remove from the gas line, the gas igniter may have ignited. STEP 7: Confirming Heat Source Operation. STEP 8: Dryer Airflow. The adequacy of this dryer, start the...

Owners Manual
Page 17
... outer terminal block screws. a d gf a. 3-wire receptacle (NEMA type 10-30R) b. 3-wire plug c. Tighten screw. External ground connector b. Neutral (white or center wire) 1. Loosen or remove center terminal block screw. 2. Neutral prong d.
... outer terminal block screws. a d gf a. 3-wire receptacle (NEMA type 10-30R) b. 3-wire plug c. Tighten screw. External ground connector b. Neutral (white or center wire) 1. Loosen or remove center terminal block screw. 2. Neutral prong d.

Owners Manual
Page 18
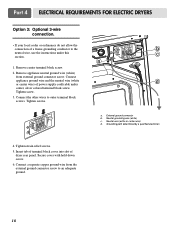
Ground prong d. Ring terminals 1. Remove center terminal block screw. 2. Fasten it under the center, silver colored terminal block screw. a. Center silver-colored terminal block screw e. Spade terminals with ...Part 4 ELECTRICAL REQUIREMENTS FOR ELECTRIC DRYERS Option 2: 4-wire connection with a Power supply cord. Tighten screws. 6. f a c b a. 4-wire receptable (NEMA type 14-30R) b. 4-pront plug c. Neutral Prong e. Remove appliance neutral ground wire (white) from external ground connector screw. b c a a. External ground connector - White wire of harness 3.
Ground prong d. Ring terminals 1. Remove center terminal block screw. 2. Fasten it under the center, silver colored terminal block screw. a. Center silver-colored terminal block screw e. Spade terminals with ...Part 4 ELECTRICAL REQUIREMENTS FOR ELECTRIC DRYERS Option 2: 4-wire connection with a Power supply cord. Tighten screws. 6. f a c b a. 4-wire receptable (NEMA type 14-30R) b. 4-pront plug c. Neutral Prong e. Remove appliance neutral ground wire (white) from external ground connector screw. b c a a. External ground connector - White wire of harness 3.
Owners Manual
Page 19
... ground wire (white) from the external ground connector screw to an adequate ground. 18 Tighten screws. External ground connector b. Remove center terminal block screw. 2. Connect the other wires to outer terminal block screws. Neutral grounding wire (white) c. Tighten strain relief screws. 5. Insert tab of terminal ...
... ground wire (white) from the external ground connector screw to an adequate ground. 18 Tighten screws. External ground connector b. Remove center terminal block screw. 2. Connect the other wires to outer terminal block screws. Neutral grounding wire (white) c. Tighten strain relief screws. 5. Insert tab of terminal ...

Owners Manual
Page 23
...11. Always make sure the lint filter is clean before starting a new load, because a clogged lint filter may cause overheating and damage to remove. WARNING! Check the weather hoods frequently to any detergent, bleach, or other is hard to the dryer and articles being dried. 4. A ...errors can be returned to its final position, after drying these products may shed more frequently. Some articles may cause permanent damage to remove the buildup of the screen with your dryer. 22 Cleaning the Lint Screen 1. Clean the control panel with a clean towel, firmly ...
...11. Always make sure the lint filter is clean before starting a new load, because a clogged lint filter may cause overheating and damage to remove. WARNING! Check the weather hoods frequently to any detergent, bleach, or other is hard to the dryer and articles being dried. 4. A ...errors can be returned to its final position, after drying these products may shed more frequently. Some articles may cause permanent damage to remove the buildup of the screen with your dryer. 22 Cleaning the Lint Screen 1. Clean the control panel with a clean towel, firmly ...
Owners Manual
Page 24
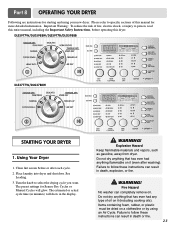
... (including cooking oils). Part 8 OPERATING YOUR DRYER Following are instructions for starting and using an Air Cycle. Please refer to follow these instructions can completely remove oil. DLE5977W/DLG5988W/DLE5977B/DLG5988B DLE3777W/DLG3788W STARTING YOUR DRYER 1. Explosion Hazard Keep flammable materials and vapors, such as gasoline, away from dryer. Place laundry into...
... (including cooking oils). Part 8 OPERATING YOUR DRYER Following are instructions for starting and using an Air Cycle. Please refer to follow these instructions can completely remove oil. DLE5977W/DLG5988W/DLE5977B/DLG5988B DLE3777W/DLG3788W STARTING YOUR DRYER 1. Explosion Hazard Keep flammable materials and vapors, such as gasoline, away from dryer. Place laundry into...
Owners Manual
Page 26
... in a suitcase or items wrinkled from being left in the cycle by pressing MORE TIME or LESS TIME. • Speed Dry Use this cycle to remove wrinkles from changing them. Each cycle dries certain fabrics at the recommended temperature. You can change the actual time in the dryer too long. •...
... in a suitcase or items wrinkled from being left in the cycle by pressing MORE TIME or LESS TIME. • Speed Dry Use this cycle to remove wrinkles from changing them. Each cycle dries certain fabrics at the recommended temperature. You can change the actual time in the dryer too long. •...

Owners Manual
Page 27
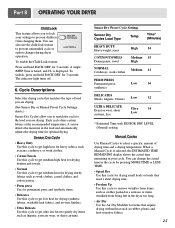
...NOTE: If you that may need ironing. Cycles Load Type Default Time* (Minutes) SPEED DRY SMALL LOADS High 25 FRESHEN UP Remove Wrinkles AIR DRY Medium 20 High Air Dry 30 8. CONTROL until the desired temperature setting glows. WRINKLE CARE WRINKLE CARE prevents wrinkles... that form when you want to remove lightweight items in a mixed load to prevent overdrying or remove partially dry items that your cycles by hand periodically during the cycle. • Dry item completely....
...NOTE: If you that may need ironing. Cycles Load Type Default Time* (Minutes) SPEED DRY SMALL LOADS High 25 FRESHEN UP Remove Wrinkles AIR DRY Medium 20 High Air Dry 30 8. CONTROL until the desired temperature setting glows. WRINKLE CARE WRINKLE CARE prevents wrinkles... that form when you want to remove lightweight items in a mixed load to prevent overdrying or remove partially dry items that your cycles by hand periodically during the cycle. • Dry item completely....
Owners Manual
Page 28
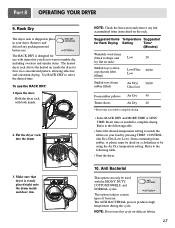
...match the fabrics in your dryer. Rack Dry The dryer rack is evenly placed right onto the drum inside the dryer to complete drying. Remove and discard any lint accumulated from items dried on delicate fabrics. 27 Hold the dryer rack with the HEAVY DUTY, COTTON/TOWELS, and ...not use with items that dryer is shipped in place in a concentrated pattern, allowing effective and consistent drying. NOTE: Check the lint screen and remove any packing material before use the RACK DRY: 1.Open the door. The ANTI BACTERIAL process produces high temperature during the cycle. Use RACK DRY ...
...match the fabrics in your dryer. Rack Dry The dryer rack is evenly placed right onto the drum inside the dryer to complete drying. Remove and discard any lint accumulated from items dried on delicate fabrics. 27 Hold the dryer rack with the HEAVY DUTY, COTTON/TOWELS, and ...not use with items that dryer is shipped in place in a concentrated pattern, allowing effective and consistent drying. NOTE: Check the lint screen and remove any packing material before use the RACK DRY: 1.Open the door. The ANTI BACTERIAL process produces high temperature during the cycle. Use RACK DRY ...
Owners Manual
Page 32
...My clothes are shrinking Question • Are you following the care instructions for your larger load into smaller loads of a consistent size. Remove your laundry from the dryer after the drying cycle is free of obstructions. What to wrinkled clothes. Confirm through review of the appropriate ... freely, that the dampers are wrinkled Question • Are you over drying your laundry? • Are you removing your dryer? Try a shorter drying time, and remove items while they tend to help reduce and maintain more moisture. Use the appropriate control settings for the type of...
...My clothes are shrinking Question • Are you following the care instructions for your larger load into smaller loads of a consistent size. Remove your laundry from the dryer after the drying cycle is free of obstructions. What to wrinkled clothes. Confirm through review of the appropriate ... freely, that the dampers are wrinkled Question • Are you over drying your laundry? • Are you removing your dryer? Try a shorter drying time, and remove items while they tend to help reduce and maintain more moisture. Use the appropriate control settings for the type of...


