
Owners Manual
Page 7
... away from a neighbor's phone. California safe drinking water and toxic enforcement act This act requires the governor of California to publish a list of substances known to the state to cause cancer, birth defects or other flammable vapors or liquids in the area surrounding this manual and ... plastic or similar materials should be minimized further by properly venting the dryer to follow all occupants. • Immediately call the fire department. ! Part 2 IMPORTANT WARRANTY AND SAFETY INSTRUCTIONS ! WHAT TO DO IF YOU SMELL GAS: • Do not try to do so can completely remove oil...
... away from a neighbor's phone. California safe drinking water and toxic enforcement act This act requires the governor of California to publish a list of substances known to the state to cause cancer, birth defects or other flammable vapors or liquids in the area surrounding this manual and ... plastic or similar materials should be minimized further by properly venting the dryer to follow all occupants. • Immediately call the fire department. ! Part 2 IMPORTANT WARRANTY AND SAFETY INSTRUCTIONS ! WHAT TO DO IF YOU SMELL GAS: • Do not try to do so can completely remove oil...
Owners Manual
Page 11
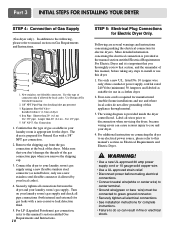
...Electric Dryer and it is appropriate for Electric Dryer Only. Securely tighten all pipe connections (both internal and external) for electric dryers. listed No. 10 (copper wire only) three conductor power supply cord kit rated 240 Volts (minimum) 30 Amperes and labeled as noted...on your laundry room's gas supply and check all connections between the dryer and your dryer. 4. The dryer is provided inside the dryer control hood. Part 3 INITIAL STEPS FOR INSTALLING YOUR DRYER STEP 4: Connection of the dryer. Installed within 6' (1.8 m) of gas available in a clothes dryer. 2....
...Electric Dryer and it is appropriate for Electric Dryer Only. Securely tighten all pipe connections (both internal and external) for electric dryers. listed No. 10 (copper wire only) three conductor power supply cord kit rated 240 Volts (minimum) 30 Amperes and labeled as noted...on your laundry room's gas supply and check all connections between the dryer and your dryer. 4. The dryer is provided inside the dryer control hood. Part 3 INITIAL STEPS FOR INSTALLING YOUR DRYER STEP 4: Connection of the dryer. Installed within 6' (1.8 m) of gas available in a clothes dryer. 2....
Owners Manual
Page 14
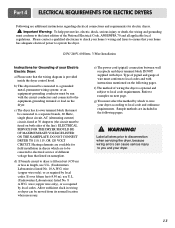
... 60 Hertz, 3-Wire Installation Instructions for electric dryers. ! ELECTRICAL SERVICE FOR THE DRYER SHOULD BE OF MAXIMUM RATE VOLTAGE LISTED ON THE NAMEPLATE. Part 4 ELECTRICAL REQUIREMENTS FOR ELECTRIC DRYERS Following are included in the following pages. Label all applicable local regulations. Please contact a...fused at 30 Amperes (the circuit must conform to examples on nameplate. If over fifteen feet (4.50 m), use U.L. (Underwriters Laboratories) listed No. 10 A.W.G. wire (copper wire only), or as required by which are to be moved from its own terminal block that the...
... 60 Hertz, 3-Wire Installation Instructions for electric dryers. ! ELECTRICAL SERVICE FOR THE DRYER SHOULD BE OF MAXIMUM RATE VOLTAGE LISTED ON THE NAMEPLATE. Part 4 ELECTRICAL REQUIREMENTS FOR ELECTRIC DRYERS Following are included in the following pages. Label all applicable local regulations. Please contact a...fused at 30 Amperes (the circuit must conform to examples on nameplate. If over fifteen feet (4.50 m), use U.L. (Underwriters Laboratories) listed No. 10 A.W.G. wire (copper wire only), or as required by which are to be moved from its own terminal block that the...
Owners Manual
Page 15
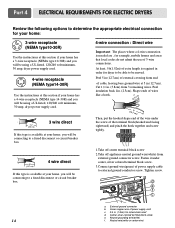
... d. you will be connecting box to external ground conductor screw. Fasten it under the screw of 3-wire connections. External ground connector b. Part 4 ELECTRICAL REQUIREMENTS FOR ELECTRIC DRYERS Review the following options to determine the appropriate electrical connection for your home: 3-wire receptacle (NEMA type10-...30R) Use the instructions at this section if your home has a 3-wire receptacle (NEMA type 10-30R) and you will be using a UL listed, 120/240 volt minimum, 30 amp, dryer power supply cord. 4-wire receptacle (NEMA type14-30R) Use the instructions at this section if your ...
... d. you will be connecting box to external ground conductor screw. Fasten it under the screw of 3-wire connections. External ground connector b. Part 4 ELECTRICAL REQUIREMENTS FOR ELECTRIC DRYERS Review the following options to determine the appropriate electrical connection for your home: 3-wire receptacle (NEMA type10-...30R) Use the instructions at this section if your home has a 3-wire receptacle (NEMA type 10-30R) and you will be using a UL listed, 120/240 volt minimum, 30 amp, dryer power supply cord. 4-wire receptacle (NEMA type14-30R) Use the instructions at this section if your ...
Owners Manual
Page 16
...Put the hooked end of the neutral wire(white) of power supply cable under the screw of dryer rear panel. Peel 5 in . (1.9 cm) UL-listed strain relief 15 c b d a e a. Tighten strain relief screws. 7. At least, 5ft(1.52m) of extra length is needed are mobile homes and...screw of terminal block). Neutral grounding wire (white) c. Neutral wire (white or center wire) e. 3/4 in (12.7cm) of 3-wire connections. Part 4 ELECTRICAL REQUIREMENTS FOR ELECTRIC DRYERS 4. Put the hooked shape ends of the wire under the center screw of terminal block. 4. Shape ends of ...
...Put the hooked end of the neutral wire(white) of power supply cable under the screw of dryer rear panel. Peel 5 in . (1.9 cm) UL-listed strain relief 15 c b d a e a. Tighten strain relief screws. 7. At least, 5ft(1.52m) of extra length is needed are mobile homes and...screw of terminal block). Neutral grounding wire (white) c. Neutral wire (white or center wire) e. 3/4 in (12.7cm) of 3-wire connections. Part 4 ELECTRICAL REQUIREMENTS FOR ELECTRIC DRYERS 4. Put the hooked shape ends of the wire under the center screw of terminal block. 4. Shape ends of ...

Owners Manual
Page 17
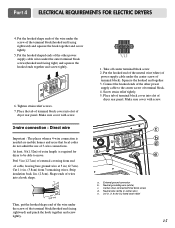
...-down screw. 16 Insert tab of terminal block cover into slot of the terminal block. Secure cover with up turned ends e. 3/4 in . (1.9 cm) UL-listed strain relief 3. Part 4 ELECTRICAL REQUIREMENTS FOR ELECTRIC DRYERS Option 1: 3-Wire Connection with a Power Supply Cord lf your local codes or ordinances do not allow the connection of...
...-down screw. 16 Insert tab of terminal block cover into slot of the terminal block. Secure cover with up turned ends e. 3/4 in . (1.9 cm) UL-listed strain relief 3. Part 4 ELECTRICAL REQUIREMENTS FOR ELECTRIC DRYERS Option 1: 3-Wire Connection with a Power Supply Cord lf your local codes or ordinances do not allow the connection of...

Owners Manual
Page 18
..., silver colored terminal screw of a 3 wire connection, or you are installing e your local codes or ordinances do not allow the use of the terminal block. Part 4 ELECTRICAL REQUIREMENTS FOR ELECTRIC DRYERS Option 2: 4-wire connection with hold-down screw. 17 Neutral Prong e. Ring terminals 1. b c a a. Green or bare copper wire of ...terminal block screws. Neutral wire (white) 5. Connect the other wires to external ground conductor screw. Spade terminals with upturned ends f. 3/4 in . (1.9 cm) UL-listed strain relief d. Remove center terminal block screw. 2.
..., silver colored terminal screw of a 3 wire connection, or you are installing e your local codes or ordinances do not allow the use of the terminal block. Part 4 ELECTRICAL REQUIREMENTS FOR ELECTRIC DRYERS Option 2: 4-wire connection with hold-down screw. 17 Neutral Prong e. Ring terminals 1. b c a a. Green or bare copper wire of ...terminal block screws. Neutral wire (white) 5. Connect the other wires to external ground conductor screw. Spade terminals with upturned ends f. 3/4 in . (1.9 cm) UL-listed strain relief d. Remove center terminal block screw. 2.


