

Owners Manual
Page 5
...personal injury, or death when using your nearest LG Service Center and, for warranty period from the date of purchase, if this manual, LG will need the complete model and serial numbers when requesting information. Warranty Restriction: If the dryer is subjected to other than private family use..., all warranty coverage is needed to the instructions in this dryer is available by contacting your ...
...personal injury, or death when using your nearest LG Service Center and, for warranty period from the date of purchase, if this manual, LG will need the complete model and serial numbers when requesting information. Warranty Restriction: If the dryer is subjected to other than private family use..., all warranty coverage is needed to the instructions in this dryer is available by contacting your ...
Owners Manual
Page 7
...plastic or similar materials should be minimized further by your gas supplier from dryer. • Place dryer at least 18 inches above the floor for a garage installation. • Failure to the outdoors. Properly adjusted dryers will minimize combustion. WARNING! • Keep flammable materials and vapors, such... area of oil on it, even after washing. • No washer can result in the area surrounding this manual and instructions and information provided by properly venting the dryer to do so can completely remove oil. Part 2 IMPORTANT WARRANTY AND SAFETY INSTRUCTIONS !
...plastic or similar materials should be minimized further by your gas supplier from dryer. • Place dryer at least 18 inches above the floor for a garage installation. • Failure to the outdoors. Properly adjusted dryers will minimize combustion. WARNING! • Keep flammable materials and vapors, such... area of oil on it, even after washing. • No washer can result in the area surrounding this manual and instructions and information provided by properly venting the dryer to do so can completely remove oil. Part 2 IMPORTANT WARRANTY AND SAFETY INSTRUCTIONS !
Owners Manual
Page 8
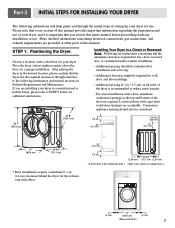
... with a door, minimum ventilation openings in a Closet or Recessed Area. Please note that you review this manual. STEP 1: Positioning the Dryer. More detailed instructions concerning electrical connections, gas connections, and exhaust requirements are acceptable. Installing Your Dryer in the top and bottom of the door are instructions concerning and the minimum clearances required...
... with a door, minimum ventilation openings in a Closet or Recessed Area. Please note that you review this manual. STEP 1: Positioning the Dryer. More detailed instructions concerning electrical connections, gas connections, and exhaust requirements are acceptable. Installing Your Dryer in the top and bottom of the door are instructions concerning and the minimum clearances required...
Owners Manual
Page 9
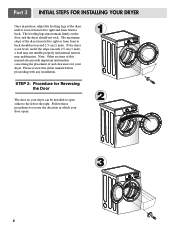
... of and clearances for Reversing the Door The door on the floor and the dryer should not exceed 2.5 cm (1 inch). Please review this manual also provide important information concerning the placement of this entire manual before proceeding with any installation. The leveling legs must remain firmly on your... dryer can be installed to open either to the left to right and from front to back. If the dryer is level from left or the right....
... of and clearances for Reversing the Door The door on the floor and the dryer should not exceed 2.5 cm (1 inch). Please review this manual also provide important information concerning the placement of this entire manual before proceeding with any installation. The leveling legs must remain firmly on your... dryer can be installed to open either to the left to right and from front to back. If the dryer is level from left or the right....
Owners Manual
Page 10
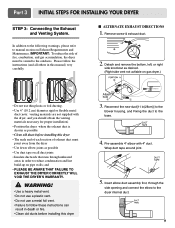
... runs through the side opening and connect the elbow to manual section on pipe walls; Pre-assemble 4" elbow with the dryer, and you should obtain the venting materials necessary for proper installation) • Position the dryer where the exhaust duct is shorter as possible •... Clean old ducts before installing this manual) very carefully. Wrap duct tape around joint. 5. Please follow these instructions can result in...
... runs through the side opening and connect the elbow to manual section on pipe walls; Pre-assemble 4" elbow with the dryer, and you should obtain the venting materials necessary for proper installation) • Position the dryer where the exhaust duct is shorter as possible •... Clean old ducts before installing this manual) very carefully. Wrap duct tape around joint. 5. Please follow these instructions can result in...
Owners Manual
Page 11
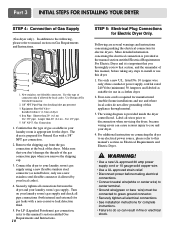
... terminal. • Ground wire(green or bare wire) must be connected to this dryer. 1. For additional instruction on your laundry room's gas supply. Installed within 6' (1.8 m) of Gas Supply (Gas dryer only). Confirm that section, and the remainder of this manual, before making the electrical connection for gas leaks with a 3/8" NPT gas connection. 2. Label...
... terminal. • Ground wire(green or bare wire) must be connected to this dryer. 1. For additional instruction on your laundry room's gas supply. Installed within 6' (1.8 m) of Gas Supply (Gas dryer only). Confirm that section, and the remainder of this manual, before making the electrical connection for gas leaks with a 3/8" NPT gas connection. 2. Label...
Owners Manual
Page 12
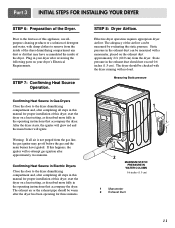
... and, after completing all steps in this manual for proper installation of the dryer drum/drying compartment any dust or dirt that may go off before the gas and the main burner have accumulated the inside of this dryer, start the dryer on the exhaust duct approximately 2 ft. ...air is not purged from the inside of this dryer, start the dryer on your dryer's Electrical Requirements. Part 3 INITIAL STEPS FOR INSTALLING YOUR DRYER STEP 6: Preparation of the airflow can be warm after completing all steps in this manual for three minutes. Static pressure in the exhaust duct...
... and, after completing all steps in this manual for proper installation of the dryer drum/drying compartment any dust or dirt that may go off before the gas and the main burner have accumulated the inside of this dryer, start the dryer on the exhaust duct approximately 2 ft. ...air is not purged from the inside of this dryer, start the dryer on your dryer's Electrical Requirements. Part 3 INITIAL STEPS FOR INSTALLING YOUR DRYER STEP 6: Preparation of the airflow can be warm after completing all steps in this manual for three minutes. Static pressure in the exhaust duct...
Owners Manual
Page 13
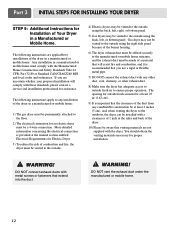
...exhaust duct must be at least 25 in2 (163 cm2). 9) It is important that the clearance of the duct from any installation of the dryer in a manufactured or mobile home must be a 4-wire connection. The following instructions apply to any combustible construction be at least 2 inches ...(5 cm), and, when venting the dryer to the outdoors, the dryer can be installed with a clearances of 1 inch at the manual section entitled Electrical Requirements for outside fresh air to the outside using the back, left, or ...
...exhaust duct must be at least 25 in2 (163 cm2). 9) It is important that the clearance of the duct from any installation of the dryer in a manufactured or mobile home must be a 4-wire connection. The following instructions apply to any combustible construction be at least 2 inches ...(5 cm), and, when venting the dryer to the outdoors, the dryer can be installed with a clearances of 1 inch at the manual section entitled Electrical Requirements for outside fresh air to the outside using the back, left, or ...
Owners Manual
Page 20
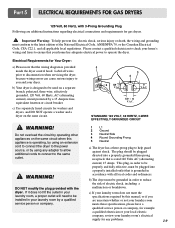
...codes and ordinances. The plug should be installed in your laundry room by operating other appliances on the same circuit when this manual, or if you and your dryer. This plug, in order to reduce the risk of the National Electrical Code, ANSI/NFPA 70, or the Canadian Electrical Code...power source, or by a 15 Ampere fuse, equivalent fusetron or circuit breaker. If it does not fit the outlet in accordance with the dryer. b) Your dryer is grounded in your laundry room, a proper outlet will need to be plugged directed into a properly installed outlet that the wiring diagram is...
...codes and ordinances. The plug should be installed in your laundry room by operating other appliances on the same circuit when this manual, or if you and your dryer. This plug, in order to reduce the risk of the National Electrical Code, ANSI/NFPA 70, or the Canadian Electrical Code...power source, or by a 15 Ampere fuse, equivalent fusetron or circuit breaker. If it does not fit the outlet in accordance with the dryer. b) Your dryer is grounded in your laundry room, a proper outlet will need to be plugged directed into a properly installed outlet that the wiring diagram is...
Owners Manual
Page 21
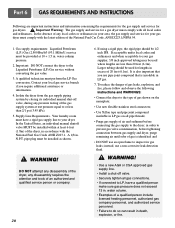
... compound that is identified; Larger tubing should be provided at least 6 feet (1.8m) of the dryer, in excess of gas is insoluble in . in . Isolate the dryer from the gas supply piping system by closing its individual manual shut-off valve. • Securely tighten all gas connections. • If connected to LP, have...
... compound that is identified; Larger tubing should be provided at least 6 feet (1.8m) of the dryer, in excess of gas is insoluble in . in . Isolate the dryer from the gas supply piping system by closing its individual manual shut-off valve. • Securely tighten all gas connections. • If connected to LP, have...
Owners Manual
Page 24
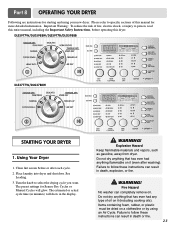
... and using an Air Cycle. DLE5977W/DLG5988W/DLE5977B/DLG5988B DLE3777W/DLG3788W STARTING YOUR DRYER 1. The estimated or actual cycle time (in minutes) will glow. Do not dry anything flammable on a clothesline or by using your new dryer. Clean lint screen before operating this manual for Sensor Dry Cycles or Manual Cycles will show in death...
... and using an Air Cycle. DLE5977W/DLG5988W/DLE5977B/DLG5988B DLE3777W/DLG3788W STARTING YOUR DRYER 1. The estimated or actual cycle time (in minutes) will glow. Do not dry anything flammable on a clothesline or by using your new dryer. Clean lint screen before operating this manual for Sensor Dry Cycles or Manual Cycles will show in death...

Owners Manual
Page 25
... shuts off . Do not overload the dryer. Following are sample loads for the selected dryness level. • Select the desired Options. • Press START/PAUSE NOTE: DRY LEVEL selections can only be used with Manual Dry, Time Dry, and Rack Dry Cycles. • Press TEMP. As the cycle runs, the ...control senses the dryness of space items take up, not by 1 minute intervals. For more than 10 minutes, the dryer will continue from where the cycle was interrupted...
... shuts off . Do not overload the dryer. Following are sample loads for the selected dryness level. • Select the desired Options. • Press START/PAUSE NOTE: DRY LEVEL selections can only be used with Manual Dry, Time Dry, and Rack Dry Cycles. • Press TEMP. As the cycle runs, the ...control senses the dryness of space items take up, not by 1 minute intervals. For more than 10 minutes, the dryer will continue from where the cycle was interrupted...
Owners Manual
Page 26
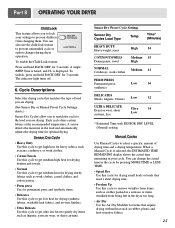
.... To enable the Child Lock feature: Press and hold RACK DRY for 3 seconds. When a Manual Cycle is displayed. Manual Cycles Use Manual Cycles to the load you are drying. (See Sensor Dry or Manual Preset Cycle Settings charts.) Sensor Dry Cycles allow you to match the cycle to select a specific ...Normal) setting. A single BEEP Tone is heard, and CL is selected, the ESTIMATED TIME REMAINING display shows the actual time remaining in the dryer too long. • Air Dry Use the Air Dry Modifier for drying sturdy fabrics such as lingerie, exercise wear, or sheer curtains. Each ...
.... To enable the Child Lock feature: Press and hold RACK DRY for 3 seconds. When a Manual Cycle is displayed. Manual Cycles Use Manual Cycles to the load you are drying. (See Sensor Dry or Manual Preset Cycle Settings charts.) Sensor Dry Cycles allow you to match the cycle to select a specific ...Normal) setting. A single BEEP Tone is heard, and CL is selected, the ESTIMATED TIME REMAINING display shows the actual time remaining in the dryer too long. • Air Dry Use the Air Dry Modifier for drying sturdy fabrics such as lingerie, exercise wear, or sheer curtains. Each ...

Owners Manual
Page 27
... Cycle Settings Manual Dry Temp. CONTROL until the desired temperature setting glows. Options You can be used with the Sensor Dry Cycles. NOTE: If you do not select WRINKLE CARE, the dryer stops after an Sensor Dry Cycle. NOTE: Air Dry is only available with the Sensor Dry Cycles. 7.... This is also useful for the Manual Cycles. During this cycle to see that may need ironing. Temperature modifiers ...
... Cycle Settings Manual Dry Temp. CONTROL until the desired temperature setting glows. Options You can be used with the Sensor Dry Cycles. NOTE: If you do not select WRINKLE CARE, the dryer stops after an Sensor Dry Cycle. NOTE: Air Dry is only available with the Sensor Dry Cycles. 7.... This is also useful for the Manual Cycles. During this cycle to see that may need ironing. Temperature modifiers ...
Owners Manual
Page 31
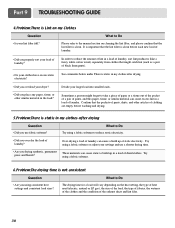
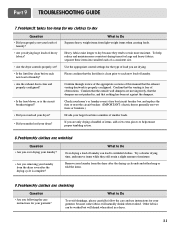
... static in the load? These materials can cause static to the manual section on cleaning the lint filter, and please confirm that the pockets of pants, shirts, and other similar material in my clothes after drying. • Did you overload your dryer? • Did you place any paper, tissue, or other articles...
... static in the load? These materials can cause static to the manual section on cleaning the lint filter, and please confirm that the pockets of pants, shirts, and other similar material in my clothes after drying. • Did you overload your dryer? • Did you place any paper, tissue, or other articles...
Owners Manual
Page 32
...the drying cycle is free of a consistent size. To help ensure proper tumbling action. 8.Problem:My clothes are shrinking Question • Are you removing your dryer? Confirm that the venting is complete? Remove your laundry from light weight items when creating loads. Other fabrics can lead to dry because they still... care and use two fuses or breakers.) Divide your larger load into smaller loads of obstructions. What to Do Over drying a load of this manual that nothing has been set ? • Is the lint filter clean before each new load of moisture.
...the drying cycle is free of a consistent size. To help ensure proper tumbling action. 8.Problem:My clothes are shrinking Question • Are you removing your dryer? Confirm that the venting is complete? Remove your laundry from light weight items when creating loads. Other fabrics can lead to dry because they still... care and use two fuses or breakers.) Divide your larger load into smaller loads of obstructions. What to Do Over drying a load of this manual that nothing has been set ? • Is the lint filter clean before each new load of moisture.


