
Owner's Manual (English)
Page 2
... the product's enclosure that the cable ground shall be connected to Article 820-40 of important operating and maintenance (servicing) instructions in particular, specifies that may cause harmful interference to radio or television reception, which the receiver is no guarantee that to which can radiate radio frequency energy and, if not installed and used in accordance with the limits...
... the product's enclosure that the cable ground shall be connected to Article 820-40 of important operating and maintenance (servicing) instructions in particular, specifies that may cause harmful interference to radio or television reception, which the receiver is no guarantee that to which can radiate radio frequency energy and, if not installed and used in accordance with the limits...
Owner's Manual (English)
Page 5
...13 Vesa Wall Mounting 14 Desktop Pedestal Installation 15 Antenna or Cable Connection 16 TM CableCARD 17 EXTERNAL EQUIPMENT SETUP HD Receiver Setup 22 DVD Setup 25 VCR Setup 27 Other A/V Source Setup 29 PC Setup 30 Audio Out Setup 35 WATCHING TV / CHANNEL CONTROL Remote Control Functions 36 Turning on TV 38 Channel Selection 39 Volume Adjustment 39 On-Screen Menus Selection 40 Channel Setup -Auto Scan ( EZ Scan 41 - EZ Picture - Adaptive Picture Mode (APM 96 - Add / Delete Channel ( Manual Scan) . . . . 42 - EZ Picture - Color Tone - Preset 97 Manual Picture Adjustment...
...13 Vesa Wall Mounting 14 Desktop Pedestal Installation 15 Antenna or Cable Connection 16 TM CableCARD 17 EXTERNAL EQUIPMENT SETUP HD Receiver Setup 22 DVD Setup 25 VCR Setup 27 Other A/V Source Setup 29 PC Setup 30 Audio Out Setup 35 WATCHING TV / CHANNEL CONTROL Remote Control Functions 36 Turning on TV 38 Channel Selection 39 Volume Adjustment 39 On-Screen Menus Selection 40 Channel Setup -Auto Scan ( EZ Scan 41 - EZ Picture - Adaptive Picture Mode (APM 96 - Add / Delete Channel ( Manual Scan) . . . . 42 - EZ Picture - Color Tone - Preset 97 Manual Picture Adjustment...
Owner's Manual (English)
Page 6
... 104 Low-Power Picture Mode 105 Programming the Remote Control 137 IR Codes 141 External Control through RS-232C 143 SOUND & LANGUAGE CONTROL Auto Volume Leveler ( EZ SoundRite 106 Preset Sound Settings( EZ Sound 107 Sound Setting Adjustment - Advanced - Sound Improvement Technology 111 Stereo / SAP Broadcast Setup 112 TV Speakers On/ Off Setup 113 Audio Language 114 On-Screen Menus Lanaguage Selection 115 Caption / Text 116 Caption Option 118 TIME SETTING Clock Setting 119 Auto On/ Off Timer Setting 121 Sleep Timer Setting 122 Auto Shut-off Setting 123 PARENTAL CONTROL...
... 104 Low-Power Picture Mode 105 Programming the Remote Control 137 IR Codes 141 External Control through RS-232C 143 SOUND & LANGUAGE CONTROL Auto Volume Leveler ( EZ SoundRite 106 Preset Sound Settings( EZ Sound 107 Sound Setting Adjustment - Advanced - Sound Improvement Technology 111 Stereo / SAP Broadcast Setup 112 TV Speakers On/ Off Setup 113 Audio Language 114 On-Screen Menus Lanaguage Selection 115 Caption / Text 116 Caption Option 118 TIME SETTING Clock Setting 119 Auto On/ Off Timer Setting 121 Sleep Timer Setting 122 Auto Shut-off Setting 123 PARENTAL CONTROL...

Owner's Manual (English)
Page 7
.... With HDMI CEC support of LG's audio/video device connected to store and access TV programs - and/or one remote control. R DIGITAL CABLE COMPATIBILITY This digital television is used under license from Gemstar-TV Guide International, Inc. functioning like a VCR, but with one cable and produces the highest quality digital images and sound. "Dolby "and the double-D symbol are registered marks of its affiliates. High-definition television. LG's own special digital image generator, consisting of digital television, HDTV formats include...
.... With HDMI CEC support of LG's audio/video device connected to store and access TV programs - and/or one remote control. R DIGITAL CABLE COMPATIBILITY This digital television is used under license from Gemstar-TV Guide International, Inc. functioning like a VCR, but with one cable and produces the highest quality digital images and sound. "Dolby "and the double-D symbol are registered marks of its affiliates. High-definition television. LG's own special digital image generator, consisting of digital television, HDTV formats include...
Owner's Manual (English)
Page 12
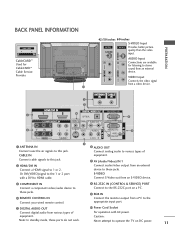
...-the air signals to this jack. COMPONENT IN Connect a component video/audio device to various types of equipment. Note: In standby mode, these ports do not work. S-VIDEO Connect S-Video out from a video device. REMOTE CONTROL IN Connect your wired remote control. AUDIO OUT Connect analog audio to these jacks. AV (Audio/Video) IN 1 Connect audio/video output from an external device to stereo sound from an external device. S-VIDEO VIDEO L/MONO AUDIO R VIDEO L/MONO AUDIO R S-VIDEO AUDIO Input Connections are available for CableCARD™ Cable Service Provider...
...-the air signals to this jack. COMPONENT IN Connect a component video/audio device to various types of equipment. Note: In standby mode, these ports do not work. S-VIDEO Connect S-Video out from a video device. REMOTE CONTROL IN Connect your wired remote control. AUDIO OUT Connect analog audio to these jacks. AV (Audio/Video) IN 1 Connect audio/video output from an external device to stereo sound from an external device. S-VIDEO VIDEO L/MONO AUDIO R VIDEO L/MONO AUDIO R S-VIDEO AUDIO Input Connections are available for CableCARD™ Cable Service Provider...
Owner's Manual (English)
Page 23
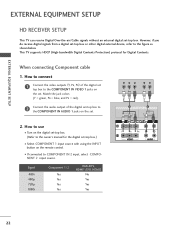
... receive digital signals from a digital set . How to use I Turn on the digital set -top box.) I If connected to the owner's manual for Digital Contents. I Select COMPONENT 1 input source with using the INPUT button on the remote control. Signal 480i 480p 720p 1080i Component 1/2 Yes Yes Yes Yes RGB-DTV, HDMI1/DVI, HDMI2 No Yes Yes Yes 22 How to connect 1 Connect the video outputs (Y, PB, PR) of the digital set-top box to the COMPONENT IN AUDIO 1 jacks on the set -top box or other digital external...
... receive digital signals from a digital set . How to use I Turn on the digital set -top box.) I If connected to the owner's manual for Digital Contents. I Select COMPONENT 1 input source with using the INPUT button on the remote control. Signal 480i 480p 720p 1080i Component 1/2 Yes Yes Yes Yes RGB-DTV, HDMI1/DVI, HDMI2 No Yes Yes Yes 22 How to connect 1 Connect the video outputs (Y, PB, PR) of the digital set-top box to the COMPONENT IN AUDIO 1 jacks on the set -top box or other digital external...
Owner's Manual (English)
Page 24
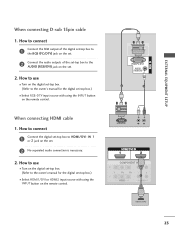
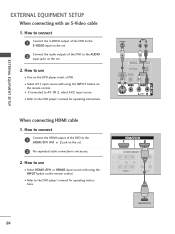
... owner's manual for the digital set-top box.) I Select HDMI1/DVI or HDMI2 input source with using the INPUT button on the set -top box to HDMI/DVI IN 1 or 2 jack on the remote control. When connecting D-sub 15pin cable 1. How to use I Turn on the digital set-top box. (Refer to the owner's manual for the digital set-top box.) I Select RGB-DTV input source with using the INPUT button on the set -top box to the AUDIO (RGB/DVI) jack on the remote control. RGB OUTPUT L R L R AUDIO HDMI-DTV OUTPUT 23 EXTERNAL EQUIPMENT SETUP How to connect 1 Connect...
... owner's manual for the digital set-top box.) I Select HDMI1/DVI or HDMI2 input source with using the INPUT button on the set -top box to HDMI/DVI IN 1 or 2 jack on the remote control. When connecting D-sub 15pin cable 1. How to use I Turn on the digital set-top box. (Refer to the owner's manual for the digital set-top box.) I Select RGB-DTV input source with using the INPUT button on the set -top box to the AUDIO (RGB/DVI) jack on the remote control. RGB OUTPUT L R L R AUDIO HDMI-DTV OUTPUT 23 EXTERNAL EQUIPMENT SETUP How to connect 1 Connect...
Owner's Manual (English)
Page 25
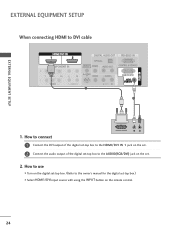
How to use I Select HDMI1/DVI input source with using the INPUT button on the set -top box. (Refer to the AUDIO(RGB/DVI) jack on the remote control. 24 How to connect DVI-DTV OUTPUT L R 1 Connect the DVI output of the digital set-top box to the HDMI/DVI IN 1 jack on the set. 2 Connect the audio output of the digital set-top box to the owner's manual for the digital set-top box.) I Turn on the digital set . 2. EXTERNAL EQUIPMENT SETUP When connecting HDMI to DVI cable EXTERNAL EQUIPMENT SETUP AUDIO 1.
How to use I Select HDMI1/DVI input source with using the INPUT button on the set -top box. (Refer to the AUDIO(RGB/DVI) jack on the remote control. 24 How to connect DVI-DTV OUTPUT L R 1 Connect the DVI output of the digital set-top box to the HDMI/DVI IN 1 jack on the set. 2 Connect the audio output of the digital set-top box to the owner's manual for the digital set-top box.) I Turn on the digital set . 2. EXTERNAL EQUIPMENT SETUP When connecting HDMI to DVI cable EXTERNAL EQUIPMENT SETUP AUDIO 1.
Owner's Manual (English)
Page 26
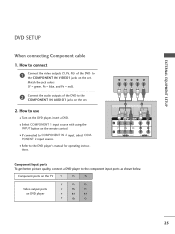
... Y PB PR Video output ports on the remote control. How to COMPONENT IN 2 input, select COM- AUDIO EXTERNAL EQUIPMENT SETUP DVD SETUP When connecting Component cable 1. How to connect 1 Connect the video outputs (Y, PB, PR) of the DVD to the COMPONENT IN VIDEO1 jacks on the set . Match the jack colors (Y = green, PB = blue, and PR = red). 2 Connect the audio outputs of the DVD to the COMPONENT IN AUDIO1 jacks on the set . 2. I Refer to the component input ports as shown below. I Select COMPONENT 1 input source with using the INPUT button on DVD player Y PB...
... Y PB PR Video output ports on the remote control. How to COMPONENT IN 2 input, select COM- AUDIO EXTERNAL EQUIPMENT SETUP DVD SETUP When connecting Component cable 1. How to connect 1 Connect the video outputs (Y, PB, PR) of the DVD to the COMPONENT IN VIDEO1 jacks on the set . Match the jack colors (Y = green, PB = blue, and PR = red). 2 Connect the audio outputs of the DVD to the COMPONENT IN AUDIO1 jacks on the set . 2. I Refer to the component input ports as shown below. I Select COMPONENT 1 input source with using the INPUT button on DVD player Y PB...
Owner's Manual (English)
Page 27
EXTERNAL EQUIPMENT SETUP EXTERNAL EQUIPMENT SETUP When connecting with using the INPUT button on the remote control. I Refer to the DVD player's manual for operating instructions. 26 S-VIDEO AUDIO L R L R AUDIO HDMI-DVD OUTPUT I Select A V 1 input source with using the INPUT button on the set . 2 No separated audio connection is necessary. 2. How to use I If connected to the AUDIO input jacks on the remote control. When connecting HDMI cable 1. How to connect 1 Connect the HDMI output of the DVD to AV IN 2, select A V 2 input source. I Select HDMI1/DVI ...
EXTERNAL EQUIPMENT SETUP EXTERNAL EQUIPMENT SETUP When connecting with using the INPUT button on the remote control. I Refer to the DVD player's manual for operating instructions. 26 S-VIDEO AUDIO L R L R AUDIO HDMI-DVD OUTPUT I Select A V 1 input source with using the INPUT button on the set . 2 No separated audio connection is necessary. 2. How to use I If connected to the AUDIO input jacks on the remote control. When connecting HDMI cable 1. How to connect 1 Connect the HDMI output of the DVD to AV IN 2, select A V 2 input source. I Select HDMI1/DVI ...
Owner's Manual (English)
Page 33
... HDMI/DVI Input, output TV SET Resolution (480p, 720p, 1080i) and TV SET Display fit EIA/CEA-861-B Specification to adjust the screen Position of the TV SET and contact a PC graphics card service center. The synchronization input form for a long period of time. When Source Devices connected with HDMI/DVI Input, the output PC Resolution(VGA, SVGA, XGA), Position and Size may not work if a HDMI to the Cable or if there is a poor cable connection, "No signal...
... HDMI/DVI Input, output TV SET Resolution (480p, 720p, 1080i) and TV SET Display fit EIA/CEA-861-B Specification to adjust the screen Position of the TV SET and contact a PC graphics card service center. The synchronization input form for a long period of time. When Source Devices connected with HDMI/DVI Input, the output PC Resolution(VGA, SVGA, XGA), Position and Size may not work if a HDMI to the Cable or if there is a poor cable connection, "No signal...
Owner's Manual (English)
Page 36
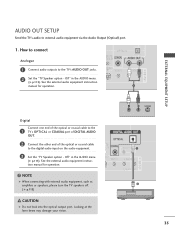
... external audio equipment instruction manual for operation. EXTERNAL EQUIPMENT SETUP Digital Connect one end of the optical or coaxial cable to the 1 TV's OPTICAL or COAXIAL port of DIGITAL AUDIO OUT. 2 Connect the other end of the optical or coaxial cable to the TV's AUDIO OUT jacks. 2 Set the "TV Speaker option - NOTE When connecting with external audio equipment, such as amplifers or speakers, please turn the TV speakers off. ( p.113) CAUTION Do not look into the optical output port. AUDIO OUT SETUP...
... external audio equipment instruction manual for operation. EXTERNAL EQUIPMENT SETUP Digital Connect one end of the optical or coaxial cable to the 1 TV's OPTICAL or COAXIAL port of DIGITAL AUDIO OUT. 2 Connect the other end of the optical or coaxial cable to the TV's AUDIO OUT jacks. 2 Set the "TV Speaker option - NOTE When connecting with external audio equipment, such as amplifers or speakers, please turn the TV speakers off. ( p.113) CAUTION Do not look into the optical output port. AUDIO OUT SETUP...
Owner's Manual (English)
Page 42
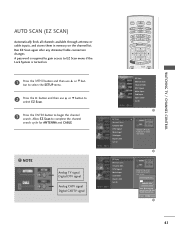
... Scan menu if the Lock System is turned on the channel list. NOTE Analog TV signal Digital DTV signal Analog CATV signal Digital CADTV signal LIVE TV INPUT MODE DAY - ANTENNA Ch.20 3channel(s) found Press to complete the channel search cycle for ANTENNA and CABLE. ! Allow EZ Scan to stop the current scan and start CABLE channel scan. DAY + SIMPLINK EZ Scan Manual Scan Channel Edit DTV Signal Main Input Sub Input Input Label Set ID EZ Scan Manual Scan Channel Edit DTV Signal Main Input Sub Input Input Label Set ID G Selection...
... Scan menu if the Lock System is turned on the channel list. NOTE Analog TV signal Digital DTV signal Analog CATV signal Digital CADTV signal LIVE TV INPUT MODE DAY - ANTENNA Ch.20 3channel(s) found Press to complete the channel search cycle for ANTENNA and CABLE. ! Allow EZ Scan to stop the current scan and start CABLE channel scan. DAY + SIMPLINK EZ Scan Manual Scan Channel Edit DTV Signal Main Input Sub Input Input Label Set ID EZ Scan Manual Scan Channel Edit DTV Signal Main Input Sub Input Input Label Set ID G Selection...
Owner's Manual (English)
Page 55
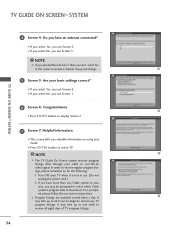
I If you select Yes, you see Screen 5. Turn OFF your basic settings correct? If so prompted, please follow the on using your cable or over-the-air video signal. I If you select No, you see Screen 5. If you have an antenna connected? Program listings are updated several times a day. NOTE If you selected No in Screen 3 then you must select Yes in this screen to receive a channel lineup and listings. 5 Screen 5: Are your TV...
I If you select Yes, you see Screen 5. Turn OFF your basic settings correct? If so prompted, please follow the on using your cable or over-the-air video signal. I If you select No, you see Screen 5. If you have an antenna connected? Program listings are updated several times a day. NOTE If you selected No in Screen 3 then you must select Yes in this screen to receive a channel lineup and listings. 5 Screen 5: Are your TV...
Owner's Manual (English)
Page 67
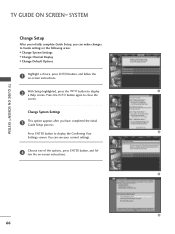
Press the INFO button again to display the Confirming Your Settings screen. Press ENTER button to close the screen. You can make changes to Guide settings in the following areas: I Change System Settings I Change Channel Display I Change Default Options 1 Highlight a choice, press ENTER button, and follow the on -screen instructions. 2 With Setup highlighted, press the INFO button to display a Help screen. Change System Settings 3 This option appears after you can see your current settings. 4 Choose one of the options...
Press the INFO button again to display the Confirming Your Settings screen. Press ENTER button to close the screen. You can make changes to Guide settings in the following areas: I Change System Settings I Change Channel Display I Change Default Options 1 Highlight a choice, press ENTER button, and follow the on -screen instructions. 2 With Setup highlighted, press the INFO button to display a Help screen. Change System Settings 3 This option appears after you can see your current settings. 4 Choose one of the options...
Owner's Manual (English)
Page 125
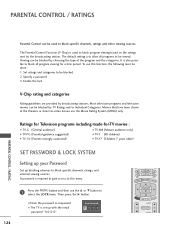
...) I Enter the password as requested. Most television programs and television movies can be blocked by TV Rating and/or Individual Categories. DAY + 1 Press the MENU button and then use the D or E button to -video movies use this menu. SIMPLINK I TV-Y7 (Children 7 years older) PARENTAL CONTROL / RATING SET PASSWORD & LOCK SYSTEM Setting up your Password Set up with the initial password "0-0-0-0". 124 It is to block specific channels, ratings, and external viewing sources. Movies...
...) I Enter the password as requested. Most television programs and television movies can be blocked by TV Rating and/or Individual Categories. DAY + 1 Press the MENU button and then use the D or E button to -video movies use this menu. SIMPLINK I TV-Y7 (Children 7 years older) PARENTAL CONTROL / RATING SET PASSWORD & LOCK SYSTEM Setting up your Password Set up with the initial password "0-0-0-0". 124 It is to block specific channels, ratings, and external viewing sources. Movies...
Owner's Manual (English)
Page 126
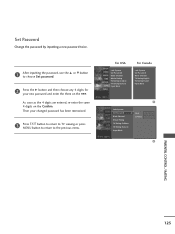
... Channel TV Rating-English TV Rating-French Input Block Lock System Set Password G Block Channel Movie Rating TV Rating-Children TV Rating-General Input Block New Confirm PARENTAL CONTROL / RATING 125 Set Password Change the password by inputting a new password twice. 1 After inputting the password, use the D or E button to choose Set password. 2 Press the G button and then choose any 4 digits for your changed password has been memorized. 3 Press EXIT button to return to TV viewing or press MENU button...
... Channel TV Rating-English TV Rating-French Input Block Lock System Set Password G Block Channel Movie Rating TV Rating-Children TV Rating-General Input Block New Confirm PARENTAL CONTROL / RATING 125 Set Password Change the password by inputting a new password twice. 1 After inputting the password, use the D or E button to choose Set password. 2 Press the G button and then choose any 4 digits for your changed password has been memorized. 3 Press EXIT button to return to TV viewing or press MENU button...
Owner's Manual (English)
Page 133
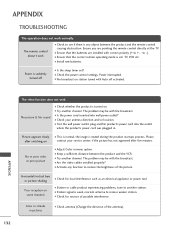
... antenna (Change the direction of the picture. I Check for sources of possible interference. The remote control doesn't work normally. I Check to -). I Test the wall power outlet, plug another channel. I Try another product's power cord into wall power outlet? APPENDIX TROUBLESHOOTING The operation does not work I Is the power cord inserted into the outlet where the product's power cord was plugged in pictures I Activate any object between the product and the VCR. Horizontal/vertical bars or picture...
... antenna (Change the direction of the picture. I Check for sources of possible interference. The remote control doesn't work normally. I Check to -). I Test the wall power outlet, plug another channel. I Try another product's power cord into wall power outlet? APPENDIX TROUBLESHOOTING The operation does not work I Is the power cord inserted into the outlet where the product's power cord was plugged in pictures I Activate any object between the product and the VCR. Horizontal/vertical bars or picture...
Owner's Manual (English)
Page 138
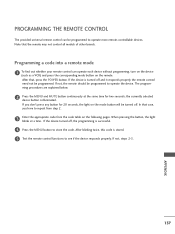
... same time for 20 seconds, the light on the remote. PROGRAMMING THE REMOTE CONTROL The provided universal remote control can operate each device without programming, turn on the device (such as a VCR) and press the corresponding mode button on the mode button will be turned off. Note that the remote may not control all models of other brands. APPENDIX 137 the currently selected device button is successful. 4 Press the MENU button to store the code. If...
... same time for 20 seconds, the light on the remote. PROGRAMMING THE REMOTE CONTROL The provided universal remote control can operate each device without programming, turn on the device (such as a VCR) and press the corresponding mode button on the mode button will be turned off. Note that the remote may not control all models of other brands. APPENDIX 137 the currently selected device button is successful. 4 Press the MENU button to store the code. If...
Owner's Manual (English)
Page 151
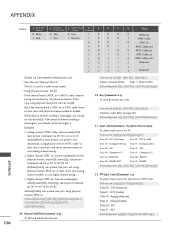
... analog channel tuning. 2. Example) 1. Digital channel: ATSC air, channel number(don't know physical channel, major(30), minor(3)), sub picture Command: ma 00 xx 00 1E 00 03 A2 attribute(0xA2): sub picture, two part, not using physical channel, NTSC cable 'xx' data: don't care major and minor channel number in case digital channel tuning. 3. Transmission [m][c][ ][Set ID][ ][Data][Cr]s Data Key code: Refer to page 142. PIP Input Select(Command: x y) To adjust input...
... analog channel tuning. 2. Example) 1. Digital channel: ATSC air, channel number(don't know physical channel, major(30), minor(3)), sub picture Command: ma 00 xx 00 1E 00 03 A2 attribute(0xA2): sub picture, two part, not using physical channel, NTSC cable 'xx' data: don't care major and minor channel number in case digital channel tuning. 3. Transmission [m][c][ ][Set ID][ ][Data][Cr]s Data Key code: Refer to page 142. PIP Input Select(Command: x y) To adjust input...


