Specification (English)
Page 2
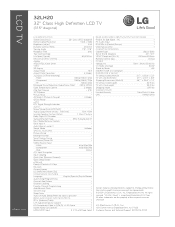
... TV with Deep Color) REAR AUDIO/VIDEO INPUTS/OUTPUTS (CONTINUED) RGB In (D-Sub 15pin) - LCD TV 32LH20 32" Class High Definition LCD TV (31.5" diagonal) LGusa.com LCD SPECIFICATION Screen Size (Class) 32" Class (31...LG Electronics U.S.A., Inc., Englewood Cliffs, NJ. HDMI 1080p/1080i/720p - Component 1080p/1080i/720p - PC 1 PC Audio Input 1 RS-232c In (Control/Service) 1 USB (Service only) 1 CABINET/ACCESSORIES Cabinet Color Glossy Black Swivel Stand (degrees) 20º / 20º VESA® Compliant (W x H) 2 00mmx100mm Remote Control...
... TV with Deep Color) REAR AUDIO/VIDEO INPUTS/OUTPUTS (CONTINUED) RGB In (D-Sub 15pin) - LCD TV 32LH20 32" Class High Definition LCD TV (31.5" diagonal) LGusa.com LCD SPECIFICATION Screen Size (Class) 32" Class (31...LG Electronics U.S.A., Inc., Englewood Cliffs, NJ. HDMI 1080p/1080i/720p - Component 1080p/1080i/720p - PC 1 PC Audio Input 1 RS-232c In (Control/Service) 1 USB (Service only) 1 CABINET/ACCESSORIES Cabinet Color Glossy Black Swivel Stand (degrees) 20º / 20º VESA® Compliant (W x H) 2 00mmx100mm Remote Control...
Owner's Manual (English)
Page 6
... used on a stand 30 Antenna or Cable Connection 31 EXTERNAL EQUIPMENT SETUP HD Receiver Setup 32 DVD Setup 35 VCR Setup 37 Other A/V Source Setup 39 Audio out Connection 40 PC Setup 41 WATCHING TV / CHANNEL CONTROL Remote Control Functions 48 Turning On TV 50 Channel Selection 50 Volume Adjustment 50 Initial Setting 51 On-Screen...
... used on a stand 30 Antenna or Cable Connection 31 EXTERNAL EQUIPMENT SETUP HD Receiver Setup 32 DVD Setup 35 VCR Setup 37 Other A/V Source Setup 39 Audio out Connection 40 PC Setup 41 WATCHING TV / CHANNEL CONTROL Remote Control Functions 48 Turning On TV 50 Channel Selection 50 Volume Adjustment 50 Initial Setting 51 On-Screen...
Owner's Manual (English)
Page 9
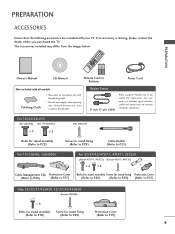
... LIST 0 9 VOL MUTE FLASHBK MENU Q.MENU ENTER RETURN FAMVARK CH P A G E 1.5V 1.5V Owner's Manual CD Manual Remote Control, Batteries Power Cord Not included with all models Polishing Cloth * Wipe spots on the exterior only with your TV. For 19/22/26LU55 (For 26LU55) (For 19/22LU55) x 3 x 2 (For 26LU55) Bolts for stand assembly (Refer... to P.19) 9 Excessive pressure may differ from the images be7 l8o5 w6 3. If an accessory is missing, please contact the dealer where you purchased the TV.
... LIST 0 9 VOL MUTE FLASHBK MENU Q.MENU ENTER RETURN FAMVARK CH P A G E 1.5V 1.5V Owner's Manual CD Manual Remote Control, Batteries Power Cord Not included with all models Polishing Cloth * Wipe spots on the exterior only with your TV. For 19/22/26LU55 (For 26LU55) (For 19/22LU55) x 3 x 2 (For 26LU55) Bolts for stand assembly (Refer... to P.19) 9 Excessive pressure may differ from the images be7 l8o5 w6 3. If an accessory is missing, please contact the dealer where you purchased the TV.

Owner's Manual (English)
Page 10
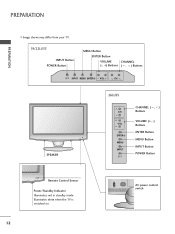
PREPARATION PREPARATION FRONT PANEL INFORMATION I Image shown may differ from your TV. 19/22/26LH20, 22LH200C INPUT Button POWER Button MENU Button ENTER Button VOLUME CHANNEL (-, +) Buttons (E,D) Buttons INPUT MENU ENTER VOL CH 32/37/42LH20, 32/37/42/47LH30 SPEAKER Remote Control Sensor, Power/Standby Indicator Illuminates red in the OPTION menu. G p.78...
PREPARATION PREPARATION FRONT PANEL INFORMATION I Image shown may differ from your TV. 19/22/26LH20, 22LH200C INPUT Button POWER Button MENU Button ENTER Button VOLUME CHANNEL (-, +) Buttons (E,D) Buttons INPUT MENU ENTER VOL CH 32/37/42LH20, 32/37/42/47LH30 SPEAKER Remote Control Sensor, Power/Standby Indicator Illuminates red in the OPTION menu. G p.78...

Owner's Manual (English)
Page 11
CH CHANNEL ( , ) Buttons VOL ENTER MENU INPUT VOLUME (+, -) Buttons ENTER Button MENU Button INPUT Button Remote Control Sensor POWER Button 11 PREPARATION 32/37/42/47LF11, 47LF21, 32CL20 SPEAKER Power/Standby Indicator Illuminates red in standby mode. Illuminates blue when the set is switched on.
CH CHANNEL ( , ) Buttons VOL ENTER MENU INPUT VOLUME (+, -) Buttons ENTER Button MENU Button INPUT Button Remote Control Sensor POWER Button 11 PREPARATION 32/37/42/47LF11, 47LF21, 32CL20 SPEAKER Power/Standby Indicator Illuminates red in standby mode. Illuminates blue when the set is switched on.
Owner's Manual (English)
Page 12
Illuminates white when the TV is switched on. 12 ❖x AC power control ❖❋❋ switch PREPARATION PREPARATION I Image shown may differ from your TV. 19/22LU55 INPUT Button POWER Button MENU Button ENTER Button VOLUME CHANNEL (-, +) Buttons ( , ) Buttons INPUT MENU ENTER VOL CH SPEAKER 26LU55 CH VOL ENTER MENU INPUT CHANNEL ( , ) Buttons VOLUME (+, -) Buttons ENTER Button MENU Button INPUT Button POWER Button Remote Control Sensor Power/Standby Indicator Illuminates red in standby mode.
Illuminates white when the TV is switched on. 12 ❖x AC power control ❖❋❋ switch PREPARATION PREPARATION I Image shown may differ from your TV. 19/22LU55 INPUT Button POWER Button MENU Button ENTER Button VOLUME CHANNEL (-, +) Buttons ( , ) Buttons INPUT MENU ENTER VOL CH SPEAKER 26LU55 CH VOL ENTER MENU INPUT CHANNEL ( , ) Buttons VOLUME (+, -) Buttons ENTER Button MENU Button INPUT Button POWER Button Remote Control Sensor Power/Standby Indicator Illuminates red in standby mode.
Owner's Manual (English)
Page 32
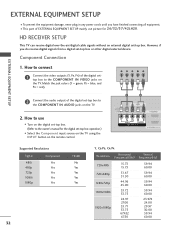
I This part of EXTERNAL EQUIPMENT SETUP mainly use I Turn on the TV. 2. However, if you have finished connecting all equipment. How to the COMPONENT IN VIDEO jacks on the remote control. 1 2 USB IN SERVICE ONLY AV IN VIDEO AUDIO L(MONO) R 2 VIDEO L R AUDIO 1 COMPONENT IN /DVI IN Supported Resolutions Signal Component 480i Yes ... Yes 32 Y, CB/PB, CR/PR Resolution Horizontal Vertical Frequency(KHz) Frequency(Hz) 720x480i 720x480p 1280x720p 1920x1080i 1920x1080p 15.73 15.73 31.47 31.50 44.96 45.00 33.72 33.75 26.97 27.00 33.71 33.75 67.432 67.50 59.94 60.00...
I This part of EXTERNAL EQUIPMENT SETUP mainly use I Turn on the TV. 2. However, if you have finished connecting all equipment. How to the COMPONENT IN VIDEO jacks on the remote control. 1 2 USB IN SERVICE ONLY AV IN VIDEO AUDIO L(MONO) R 2 VIDEO L R AUDIO 1 COMPONENT IN /DVI IN Supported Resolutions Signal Component 480i Yes ... Yes 32 Y, CB/PB, CR/PR Resolution Horizontal Vertical Frequency(KHz) Frequency(Hz) 720x480i 720x480p 1280x720p 1920x1080i 1920x1080p 15.73 15.73 31.47 31.50 44.96 45.00 33.72 33.75 26.97 27.00 33.71 33.75 67.432 67.50 59.94 60.00...
Owner's Manual (English)
Page 33
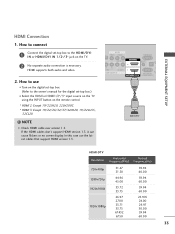
...1.3. How to the HDMI/DVI I Select the HDMI or HDMI1/2*/3* input source on the TV using the INPUT button on the TV. 2 No separate audio connection is necessary. HDMI supports both audio and video. 2. AV... RS-232C IN AC /DVI IN (CONTROL&SERVICE) 1 HDMI OUTPUT HDMI-DTV Resolution Horizontal Vertical Frequency(KHz) Frequency(Hz) 720x480p 1280x720p 1920x1080i 1920x1080p 31.47 31.50 44.96 45.00 33.72 ...the digital set -top box.) I N or HDMI/DVI IN 1/2*/ 3* jack on the remote control. * HDMI 2: Except 19/22LH20, 22LH200C * HDMI 3: Except 19/22/26/32/37/42LH20, 19/22LU55, 32CL20...
...1.3. How to the HDMI/DVI I Select the HDMI or HDMI1/2*/3* input source on the TV using the INPUT button on the TV. 2 No separate audio connection is necessary. HDMI supports both audio and video. 2. AV... RS-232C IN AC /DVI IN (CONTROL&SERVICE) 1 HDMI OUTPUT HDMI-DTV Resolution Horizontal Vertical Frequency(KHz) Frequency(Hz) 720x480p 1280x720p 1920x1080i 1920x1080p 31.47 31.50 44.96 45.00 33.72 ...the digital set -top box.) I N or HDMI/DVI IN 1/2*/ 3* jack on the remote control. * HDMI 2: Except 19/22LH20, 22LH200C * HDMI 3: Except 19/22/26/32/37/42LH20, 19/22LU55, 32CL20...
Owner's Manual (English)
Page 34
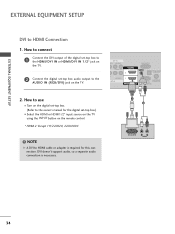
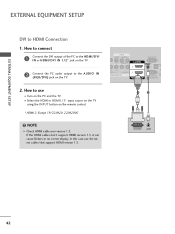
... to HDMI Connection 1. How to use I Turn on the digital set -top box.) I Select the HDMI or HDMI1/2* input source on the TV using the INPUT button on the remote control. * HDMI 2: Except 19/22LH20, 22LH200C ! EXTERNAL EQUIPMENT SETUP EXTERNAL EQUIPMENT SETUP DVI to the owner's manual for this connection. How to connect...
... to HDMI Connection 1. How to use I Turn on the digital set -top box.) I Select the HDMI or HDMI1/2* input source on the TV using the INPUT button on the remote control. * HDMI 2: Except 19/22LH20, 22LH200C ! EXTERNAL EQUIPMENT SETUP EXTERNAL EQUIPMENT SETUP DVI to the owner's manual for this connection. How to connect...
Owner's Manual (English)
Page 35
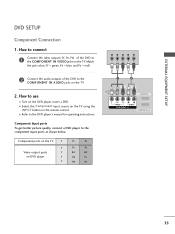
...to use I Refer to the COMPONENT IN VIDEO jacks on the TV. 2. Component ports on the TV Y Y Video output ports Y on the remote control. Match the jack colors (Y = green, PB = blue, and PR = red). I Select the Component input source on the TV using the INPUT button on DVD player Y Y PB PR PB...ports as shown below. Component Input ports To get better picture quality, connect a DVD player to the COMPONENT IN AUDIO jacks on the TV. EXTERNAL EQUIPMENT SETUP DVD SETUP Component Connection 1. Y PB PR L R 2 Connect the audio outputs of the DVD to the DVD player's...
...to use I Refer to the COMPONENT IN VIDEO jacks on the TV. 2. Component ports on the TV Y Y Video output ports Y on the remote control. Match the jack colors (Y = green, PB = blue, and PR = red). I Select the Component input source on the TV using the INPUT button on DVD player Y Y PB PR PB...ports as shown below. Component Input ports To get better picture quality, connect a DVD player to the COMPONENT IN AUDIO jacks on the TV. EXTERNAL EQUIPMENT SETUP DVD SETUP Component Connection 1. Y PB PR L R 2 Connect the audio outputs of the DVD to the DVD player's...
Owner's Manual (English)
Page 36
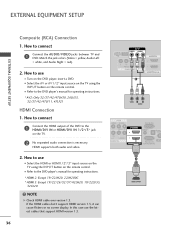
...AV1/2* input source on the TV using the INPUT button on the TV. 2 No separated audio connection is necessary. EXTERNAL EQUIPMENT SETUP EXTERNAL EQUIPMENT SETUP Composite (RCA) Connection 1. I Refer to the HDMI/DVI IN or HDMI/DVI IN 1/2*/ 3* jack on the remote control. How to connect 1 Connect ...HDMI Connection 1. NOTE G Check HDMI cable over version 1.3. How to connect 1 Connect the AUDIO/VIDEO jacks between TV and DVD. In this case use I Turn on the remote control. How to the DVD player's manual for operating instructions. * HDMI 2: Except 19/22LH20, 22LH200C * HDMI ...
...AV1/2* input source on the TV using the INPUT button on the TV. 2 No separated audio connection is necessary. EXTERNAL EQUIPMENT SETUP EXTERNAL EQUIPMENT SETUP Composite (RCA) Connection 1. I Refer to the HDMI/DVI IN or HDMI/DVI IN 1/2*/ 3* jack on the remote control. How to connect 1 Connect ...HDMI Connection 1. NOTE G Check HDMI cable over version 1.3. How to connect 1 Connect the AUDIO/VIDEO jacks between TV and DVD. In this case use I Turn on the remote control. How to the DVD player's manual for operating instructions. * HDMI 2: Except 19/22LH20, 22LH200C * HDMI ...
Owner's Manual (English)
Page 38
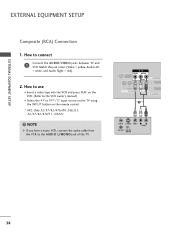
..., and Audio Right = red). 2. NOTE G If you have a mono VCR, connect the audio cable from the VCR to connect 1 Connect the AUDIO/VIDEO jacks between TV and VCR. EXTERNAL EQUIPMENT SETUP EXTERNAL EQUIPMENT SETUP Composite (RCA) Connection 1. How to the AUDIO L/MONO jack of the... TV. How to use I Insert a video tape into the VCR and press PLAY on the VCR. (Refer to the VCR owner's manual.) I Select the A V or AV1/2* input source on the TV using the INPUT button on the remote control. * AV2: Only 32/37/42/47LH30, 26LU55...
..., and Audio Right = red). 2. NOTE G If you have a mono VCR, connect the audio cable from the VCR to connect 1 Connect the AUDIO/VIDEO jacks between TV and VCR. EXTERNAL EQUIPMENT SETUP EXTERNAL EQUIPMENT SETUP Composite (RCA) Connection 1. How to the AUDIO L/MONO jack of the... TV. How to use I Insert a video tape into the VCR and press PLAY on the VCR. (Refer to the VCR owner's manual.) I Select the A V or AV1/2* input source on the TV using the INPUT button on the remote control. * AV2: Only 32/37/42/47LH30, 26LU55...
Owner's Manual (English)
Page 39
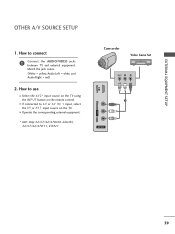
... R IN 3 Camcorder Video Game Set VIDEO L R 1 AV IN 2 39 I Select the A V 2* input source on the TV using the INPUT button on the TV. How to A V or AV IN 1 input, select the A V or A V 1 input source on the remote control. Match the jack colors. (Video = yellow, Audio Left = white, and Audio Right = red) 2. How to connect...
... R IN 3 Camcorder Video Game Set VIDEO L R 1 AV IN 2 39 I Select the A V 2* input source on the TV using the INPUT button on the TV. How to A V or AV IN 1 input, select the A V or A V 1 input source on the remote control. Match the jack colors. (Video = yellow, Audio Left = white, and Audio Right = red) 2. How to connect...
Owner's Manual (English)
Page 41
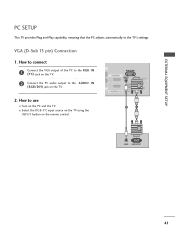
I Turn on the PC and the TV. VGA (D-Sub 15 pin) Connection 1. How to use I Select the RGB-PC input source on the TV using the INPUT button on the remote control. How to connect 1 Connect the VGA output of the PC to the RGB IN (P C) jack on the TV. 2 Connect the PC audio output to... the TV's settings. EXTERNAL EQUIPMENT SETUP PC SETUP This TV provides Plug and Play capability, meaning...
I Turn on the PC and the TV. VGA (D-Sub 15 pin) Connection 1. How to use I Select the RGB-PC input source on the TV using the INPUT button on the remote control. How to connect 1 Connect the VGA output of the PC to the RGB IN (P C) jack on the TV. 2 Connect the PC audio output to... the TV's settings. EXTERNAL EQUIPMENT SETUP PC SETUP This TV provides Plug and Play capability, meaning...
Owner's Manual (English)
Page 42
...the PC to the HDMI/DVI I N or HDMI/DVI IN 1/2* jack on the TV. 2 Connect the PC audio output to the AUDIO IN (RGB/DVI) jack on the remote control. * HDMI 2: Except 19/22LH20, 22LH200C ! I Turn on the PC and the TV. AV IN VIDEO AUDIO L(MONO) R 2 DEO L R AUDIO 1 OMPONENT IN RGB... IN (PC) AUDIO IN (RGB/DVI) OPTI AU RS-232C IN ACNA /DVI IN (CONTROL&SERVICE) 1 2 DVI OUTPUT AUDIO 42...
...the PC to the HDMI/DVI I N or HDMI/DVI IN 1/2* jack on the TV. 2 Connect the PC audio output to the AUDIO IN (RGB/DVI) jack on the remote control. * HDMI 2: Except 19/22LH20, 22LH200C ! I Turn on the PC and the TV. AV IN VIDEO AUDIO L(MONO) R 2 DEO L R AUDIO 1 OMPONENT IN RGB... IN (PC) AUDIO IN (RGB/DVI) OPTI AU RS-232C IN ACNA /DVI IN (CONTROL&SERVICE) 1 2 DVI OUTPUT AUDIO 42...

Owner's Manual (English)
Page 48
... preset Video and Audio modes. INFO Displays channel information at the screen. Also switches the TV on the TV. SIMPLINK Control buttons Controls the SIMPLINK compatible devices. WATCHING TV / CHANNEL CONTROL WATCHING TV / CHANNEL CONTROL REMOTE CONTROL FUNCTIONS When using the remote control, aim it at the remote control sensor on from standby. G p.53 SIMPLINK See a list of AV devices connected to the next...
... preset Video and Audio modes. INFO Displays channel information at the screen. Also switches the TV on the TV. SIMPLINK Control buttons Controls the SIMPLINK compatible devices. WATCHING TV / CHANNEL CONTROL WATCHING TV / CHANNEL CONTROL REMOTE CONTROL FUNCTIONS When using the remote control, aim it at the remote control sensor on from standby. G p.53 SIMPLINK See a list of AV devices connected to the next...
Owner's Manual (English)
Page 50
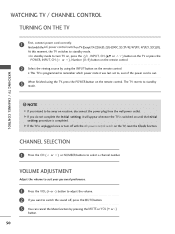
...the TV, press the POWER button on the remote control. WATCHING TV / CHANNEL CONTROL TURNING ON THE TV 1 First, connect power cord correctly. I This TV is programmed to remember which power state it will appear whenever the TV is out. 3 When finished using the INPUT button on the remote control. The TV reverts...away on until the Initial setting procedure is unplugged once or turn TV on, press the , INPUT, CH (DE or ) button on the TV or press the POWER, INPUT, CH ( or ), Number (0~9) button on the remote control. 2 Select the viewing source by pressing the MUTE or VOL...
...the TV, press the POWER button on the remote control. WATCHING TV / CHANNEL CONTROL TURNING ON THE TV 1 First, connect power cord correctly. I This TV is programmed to remember which power state it will appear whenever the TV is out. 3 When finished using the INPUT button on the remote control. The TV reverts...away on until the Initial setting procedure is unplugged once or turn TV on, press the , INPUT, CH (DE or ) button on the TV or press the POWER, INPUT, CH ( or ), Number (0~9) button on the remote control. 2 Select the viewing source by pressing the MUTE or VOL...
Owner's Manual (English)
Page 63
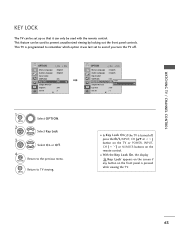
... set up so that it can be used to prevent unauthorized viewing by locking out the front panel controls. RETURN Return to the previous menu. Select Key Lock. 3 ENTER Select O n or O f f. 4 Return to TV viewing. MENU I With the Key Lock On, the display ' ! OPTION Move Enter Menu Language Audio Language Input Label... Caption Set ID E : English : English : On : On Off On : Off : 1 1 MENU 2 ENTER Select OPTION. Key Lock' appears on the screen if any button on the remote control. This TV is turned off . This feature can only be used with the...
... set up so that it can be used to prevent unauthorized viewing by locking out the front panel controls. RETURN Return to the previous menu. Select Key Lock. 3 ENTER Select O n or O f f. 4 Return to TV viewing. MENU I With the Key Lock On, the display ' ! OPTION Move Enter Menu Language Audio Language Input Label... Caption Set ID E : English : English : On : On Off On : Off : 1 1 MENU 2 ENTER Select OPTION. Key Lock' appears on the screen if any button on the remote control. This TV is turned off . This feature can only be used with the...
Owner's Manual (English)
Page 64
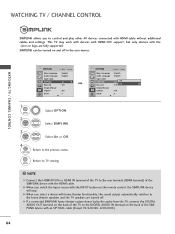
... Return to the previous menu. SIMPLINK can be turned on the remote control, the SIMPLINK device will stop. WATCHING TV / CHANNEL CONTROL SIMPLINK allows you to control and play the audio from the TV, connect the DIGITAL AUDIO OUT terminal on the back of the TV to the DIGITAL AUDIO IN terminal on the back of the...
... Return to the previous menu. SIMPLINK can be turned on the remote control, the SIMPLINK device will stop. WATCHING TV / CHANNEL CONTROL SIMPLINK allows you to control and play the audio from the TV, connect the DIGITAL AUDIO OUT terminal on the back of the TV to the DIGITAL AUDIO IN terminal on the back of the...
Owner's Manual (English)
Page 108
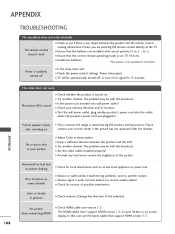
... no screen display. I Test the wall power outlet, plug another station. I Ensure that the batteries are pointing the remote control directly at the TV. Please after five minutes. No or poor color or poor picture I TV will be with correct polarity (+ to -). I Is the power cord inserted into the outlet where the product's power...
... no screen display. I Test the wall power outlet, plug another station. I Ensure that the batteries are pointing the remote control directly at the TV. Please after five minutes. No or poor color or poor picture I TV will be with correct polarity (+ to -). I Is the power cord inserted into the outlet where the product's power...


