Specification (English)
Page 1
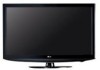
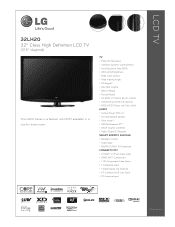
TV • 720p HD Resolution • 30,000:1 Dynamic Contrast Ratio • 6ms Response Time (GTG) • 450 cd/m2 Brightness • Wide Color Gamut • ...; Connectivity • 1 HD Component Video Inputs • 1 Composite Input • 1 Digital Audio Out (Optical) • PC Connectivity (D-sub 15pin) • RF Antenna Input LGusa.com LCD TV 32LH20 32" Class High Definition LCD TV (31.5" diagonal) The LH20 Series is a feature rich HDTV available in a size for every room.
TV • 720p HD Resolution • 30,000:1 Dynamic Contrast Ratio • 6ms Response Time (GTG) • 450 cd/m2 Brightness • Wide Color Gamut • ...; Connectivity • 1 HD Component Video Inputs • 1 Composite Input • 1 Digital Audio Out (Optical) • PC Connectivity (D-sub 15pin) • RF Antenna Input LGusa.com LCD TV 32LH20 32" Class High Definition LCD TV (31.5" diagonal) The LH20 Series is a feature rich HDTV available in a size for every room.
Specification (English)
Page 2
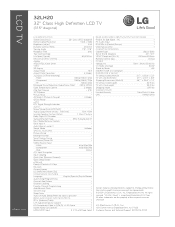
LCD TV 32LH20 32" Class High Definition LCD TV (31.5" diagonal) LGusa.com LCD SPECIFICATION Screen Size (Class) 32" Class (31.5" diagonal) Native Display Resolution 1366 x 768p Brightness (cd/m2) 450 Dynamic Contrast Ratio 30,000:1 ...(Previous Channel) • Quick Setup Guide • e-Manual • Parental Control w/V-Chip • Key Lock • Closed Caption • LG SIMPLINK (HDMI CEC) • CONVENIENCE FEATURES Language English/Spanish/French/Korean Auto Tuning/Programming • Channel Add/Delete • Channel Labeling •...
LCD TV 32LH20 32" Class High Definition LCD TV (31.5" diagonal) LGusa.com LCD SPECIFICATION Screen Size (Class) 32" Class (31.5" diagonal) Native Display Resolution 1366 x 768p Brightness (cd/m2) 450 Dynamic Contrast Ratio 30,000:1 ...(Previous Channel) • Quick Setup Guide • e-Manual • Parental Control w/V-Chip • Key Lock • Closed Caption • LG SIMPLINK (HDMI CEC) • CONVENIENCE FEATURES Language English/Spanish/French/Korean Auto Tuning/Programming • Channel Add/Delete • Channel Labeling •...

Owner's Manual (English)
Page 1
... quality for ENERGY STAR in the "factory default (Home Use)" setting. The model and serial number of the TV is located on the back and one side of the TV. Model: Serial: This product qualifies for ENERGY STAR. 1-800-243-0000 USA, Consumer User 1-888-865-3026... USA, Commercial User 1-888-542-2623 CANADA LG Customer Information Center P/NO : SAC33601901 (0905-REV04) www.lgusa.com / www.lg.ca / www.lgcommercial.com LCD TV OWNER'S MANUAL 19LH20 22LH20 26LH20 32LH20 37LH20 42LH20 22LH200C 32LH30 37LH30 42LH30 47LH30 32LF11 37LF11 42LF11 47LF11 19LU55 22LU55 ...
... quality for ENERGY STAR in the "factory default (Home Use)" setting. The model and serial number of the TV is located on the back and one side of the TV. Model: Serial: This product qualifies for ENERGY STAR. 1-800-243-0000 USA, Consumer User 1-888-865-3026... USA, Commercial User 1-888-542-2623 CANADA LG Customer Information Center P/NO : SAC33601901 (0905-REV04) www.lgusa.com / www.lg.ca / www.lgcommercial.com LCD TV OWNER'S MANUAL 19LH20 22LH20 26LH20 32LH20 37LH20 42LH20 22LH200C 32LH30 37LH30 42LH30 47LH30 32LF11 37LF11 42LF11 47LF11 19LU55 22LU55 ...

Owner's Manual (English)
Page 2
... within an equilateral triangle is encouraged to try to correct the interference by turning the equipment off and on a circuit different from LG Electronics. The lightning flash with the instructions, may be determined by one or more of important operating and maintenance (servicing) instructions ...equipment to an outlet on , the user is intended to alert the user to radio communications. Consult the dealer or an experienced radio/TV technician for a Class B digital device, pursuant to operate the equipment. REFER TO QUALIFIED SERVICE PERSONNEL. However, there is connected. -...
... within an equilateral triangle is encouraged to try to correct the interference by turning the equipment off and on a circuit different from LG Electronics. The lightning flash with the instructions, may be determined by one or more of important operating and maintenance (servicing) instructions ...equipment to an outlet on , the user is intended to alert the user to radio communications. Consult the dealer or an experienced radio/TV technician for a Class B digital device, pursuant to operate the equipment. REFER TO QUALIFIED SERVICE PERSONNEL. However, there is connected. -...
Owner's Manual (English)
Page 4
... and has no additional outlets or branch circuits. Pay particular attention to prevent possible electric shock (i.e. on the wall, make the TV with something. 14 CAUTION concerning the Power Cord: It is the disconnecting device. If grounding methods are dangerous. Short-circuit Breaker ...'s manual to be placed upon . SAFETY INSTRUCTIONS 11 Never touch this product to rain, moisture or other liquids. When mounting a TV on shelves above the unit). 17 GROUNDING Ensure that appliances be certain. Check the specification page of these conditions could result in a...
... and has no additional outlets or branch circuits. Pay particular attention to prevent possible electric shock (i.e. on the wall, make the TV with something. 14 CAUTION concerning the Power Cord: It is the disconnecting device. If grounding methods are dangerous. Short-circuit Breaker ...'s manual to be placed upon . SAFETY INSTRUCTIONS 11 Never touch this product to rain, moisture or other liquids. When mounting a TV on shelves above the unit). 17 GROUNDING Ensure that appliances be certain. Check the specification page of these conditions could result in a...
Owner's Manual (English)
Page 5
... to the touch, there may occur. Do not cover the product with cloth or other odors coming from direct sunlight. 27 For LCD TV If the TV feels cold to the National Electrical Code, ANSI/NFPA 70 Ground Clamp Antenna Lead in . tortion effects on it for the grounding ...electrode. ON DISPOSAL (Only Hg lamp used LCD TV) The fluorescent lamp used in accordance to grounding electrodes and requirements for long periods of antenna discharge unit, connection to the regulations of mercury...
... to the touch, there may occur. Do not cover the product with cloth or other odors coming from direct sunlight. 27 For LCD TV If the TV feels cold to the National Electrical Code, ANSI/NFPA 70 Ground Clamp Antenna Lead in . tortion effects on it for the grounding ...electrode. ON DISPOSAL (Only Hg lamp used LCD TV) The fluorescent lamp used in accordance to grounding electrodes and requirements for long periods of antenna discharge unit, connection to the regulations of mercury...
Owner's Manual (English)
Page 6
... 28 Swivel Stand 28 Positioning your Display 28 Attaching the TV to a Desk 29 Kensington Security System 29 Securing the TV to the wall to prevent falling when the TV is used on a stand 30 Antenna or Cable Connection 31 EXTERNAL EQUIPMENT SETUP HD Receiver Setup 32 DVD Setup 35 ...VCR Setup 37 Other A/V Source Setup 39 Audio out Connection 40 PC Setup 41 WATCHING TV / CHANNEL CONTROL Remote Control Functions 48 Turning On TV 50 Channel Selection 50 Volume Adjustment 50 ...
... 28 Swivel Stand 28 Positioning your Display 28 Attaching the TV to a Desk 29 Kensington Security System 29 Securing the TV to the wall to prevent falling when the TV is used on a stand 30 Antenna or Cable Connection 31 EXTERNAL EQUIPMENT SETUP HD Receiver Setup 32 DVD Setup 35 ...VCR Setup 37 Other A/V Source Setup 39 Audio out Connection 40 PC Setup 41 WATCHING TV / CHANNEL CONTROL Remote Control Functions 48 Turning On TV 50 Channel Selection 50 Volume Adjustment 50 ...
Owner's Manual (English)
Page 7
... Captions 90 - Caption Option 92 TIME SETTING Clock Setting - Digital Broadcasting System Captions 91 - User Mode 83 Balance 84 TV Speakers On/Off Setup 85 Audio Reset 86 Stereo/SAP Broadcasts Setup 87 Audio Language 88 On-Screen Menus Language Selection 89 Caption...On/Off Time Setting 95 Sleep Timer Setting 96 PARENTAL CONTROL / RATINGS Set Password & Lock System 97 Channel Blocking 100 Movie & TV Rating 101 Downloadable Rating 106 External Input Blocking 107 APPENDIX Troubleshooting 108 Maintenance 110 Product Specifications 111 IR Codes 115 External Control Through ...
... Captions 90 - Caption Option 92 TIME SETTING Clock Setting - Digital Broadcasting System Captions 91 - User Mode 83 Balance 84 TV Speakers On/Off Setup 85 Audio Reset 86 Stereo/SAP Broadcasts Setup 87 Audio Language 88 On-Screen Menus Language Selection 89 Caption...On/Off Time Setting 95 Sleep Timer Setting 96 PARENTAL CONTROL / RATINGS Set Password & Lock System 97 Channel Blocking 100 Movie & TV Rating 101 Downloadable Rating 106 External Input Blocking 107 APPENDIX Troubleshooting 108 Maintenance 110 Product Specifications 111 IR Codes 115 External Control Through ...

Owner's Manual (English)
Page 8
...symbol are trademarks or registered trademarks of roughly a million or more hours for professional certification by the user to experience the best their LG HDTV has to turn the entire front bezel into Cinema, Sports, and game Mode according to the video and audio content. A ... be accessible by the Imaging Science Foundation. HDMI, the HDMI logo and High-Definition Multimedia Interface are trademarks of your TV screen for a prolonged period (2 or more hours for LCD, 1 or more pixels, 16:9 aspect-ratio screens, and AC3 digital audio. IMPORTANT INFORMATION TO PREVENT "IMAGE BURN ...
...symbol are trademarks or registered trademarks of roughly a million or more hours for professional certification by the user to experience the best their LG HDTV has to turn the entire front bezel into Cinema, Sports, and game Mode according to the video and audio content. A ... be accessible by the Imaging Science Foundation. HDMI, the HDMI logo and High-Definition Multimedia Interface are trademarks of your TV screen for a prolonged period (2 or more hours for LCD, 1 or more pixels, 16:9 aspect-ratio screens, and AC3 digital audio. IMPORTANT INFORMATION TO PREVENT "IMAGE BURN ...
Owner's Manual (English)
Page 9
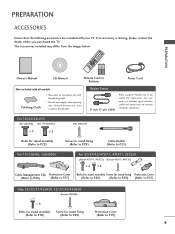
... to P.18) (Refer to P.29) Protection Cover (Refer to maintain standards compliance. If an accessory is missing, please contact the dealer where you purchased the TV. Option Extras D-sub 15 pin Cable When using the VGA (D-sub 15 pin cable) PC connection, the user must use shielded signal interface cables with... when removing stain. Excessive pressure may differ from the images be7 l8o5 w6 3. PREPARATION PREPARATION ACCESSORIES Ensure that the following accessories are included with your TV.
... to P.18) (Refer to P.29) Protection Cover (Refer to maintain standards compliance. If an accessory is missing, please contact the dealer where you purchased the TV. Option Extras D-sub 15 pin Cable When using the VGA (D-sub 15 pin cable) PC connection, the user must use shielded signal interface cables with... when removing stain. Excessive pressure may differ from the images be7 l8o5 w6 3. PREPARATION PREPARATION ACCESSORIES Ensure that the following accessories are included with your TV.

Owner's Manual (English)
Page 10
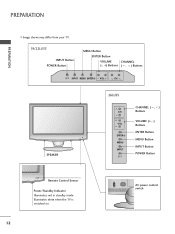
...ENTER Button MENU Button INPUT Button POWER Button ON OFF AC power control switch (Except 19/22LH20, 22LH200C) 10 Illuminates blue when the TV is switched on. (Can be adjusted Power Indicator in standby mode. PREPARATION PREPARATION FRONT PANEL INFORMATION I Image shown may differ from your... TV. 19/22/26LH20, 22LH200C INPUT Button POWER Button MENU Button ENTER Button VOLUME CHANNEL (-, +) Buttons (E,D) Buttons INPUT MENU ENTER VOL CH...
...ENTER Button MENU Button INPUT Button POWER Button ON OFF AC power control switch (Except 19/22LH20, 22LH200C) 10 Illuminates blue when the TV is switched on. (Can be adjusted Power Indicator in standby mode. PREPARATION PREPARATION FRONT PANEL INFORMATION I Image shown may differ from your... TV. 19/22/26LH20, 22LH200C INPUT Button POWER Button MENU Button ENTER Button VOLUME CHANNEL (-, +) Buttons (E,D) Buttons INPUT MENU ENTER VOL CH...
Owner's Manual (English)
Page 12
PREPARATION PREPARATION I Image shown may differ from your TV. 19/22LU55 INPUT Button POWER Button MENU Button ENTER Button VOLUME CHANNEL (-, +) Buttons ( , ) Buttons INPUT MENU ENTER VOL CH SPEAKER 26LU55 CH VOL ENTER MENU INPUT CHANNEL ( , ) Buttons VOLUME (+, -) Buttons ENTER Button MENU Button INPUT Button POWER Button Remote Control Sensor Power/Standby Indicator Illuminates red in standby mode. Illuminates white when the TV is switched on. 12 ❖x AC power control ❖❋❋ switch
PREPARATION PREPARATION I Image shown may differ from your TV. 19/22LU55 INPUT Button POWER Button MENU Button ENTER Button VOLUME CHANNEL (-, +) Buttons ( , ) Buttons INPUT MENU ENTER VOL CH SPEAKER 26LU55 CH VOL ENTER MENU INPUT CHANNEL ( , ) Buttons VOLUME (+, -) Buttons ENTER Button MENU Button INPUT Button POWER Button Remote Control Sensor Power/Standby Indicator Illuminates red in standby mode. Illuminates white when the TV is switched on. 12 ❖x AC power control ❖❋❋ switch

Owner's Manual (English)
Page 15
Accepts DVI video using an adapter or HDMI to operate the TV on DC power. 15 Uses a D-sub 15 pin cable (VGA cable). Caution: Never attempt to DVI cable (not included). 4 RGB IN (PC) Analog PC Connection. ...
Accepts DVI video using an adapter or HDMI to operate the TV on DC power. 15 Uses a D-sub 15 pin cable (VGA cable). Caution: Never attempt to DVI cable (not included). 4 RGB IN (PC) Analog PC Connection. ...

Owner's Manual (English)
Page 16
INSTALLATION 1 Carefully place the TV screen side down on a cushioned surface to protect the screen from your TV. PREPARATION PREPARATION STAND INSTRUCTIONS (For 19/22LH20, 22LH200C) I Image shown may differ from damage. 2 Assemble the TV as shown until you hear it click. 16
INSTALLATION 1 Carefully place the TV screen side down on a cushioned surface to protect the screen from your TV. PREPARATION PREPARATION STAND INSTRUCTIONS (For 19/22LH20, 22LH200C) I Image shown may differ from damage. 2 Assemble the TV as shown until you hear it click. 16
Owner's Manual (English)
Page 17
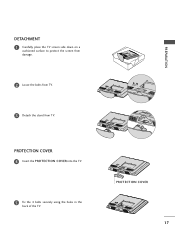
PROTECTION COVER 4 Insert the PROTECTION COVER into the TV. 5 Fix the 4 bolts securely using the holes in the back of the TV. PROTECTION COVER 17 PREPARATION DETACHMENT 1 Carefully place the TV screen side down on a cushioned surface to protect the screen from damage. 2 Loose the bolts from TV. 3 Detach the stand from TV.
PROTECTION COVER 4 Insert the PROTECTION COVER into the TV. 5 Fix the 4 bolts securely using the holes in the back of the TV. PROTECTION COVER 17 PREPARATION DETACHMENT 1 Carefully place the TV screen side down on a cushioned surface to protect the screen from damage. 2 Loose the bolts from TV. 3 Detach the stand from TV.

Owner's Manual (English)
Page 18
NOTE G When assembling the desk type stand, make sure the bolt is fully tightened (If not tightened fully, the TV can tilt forward after the product installation). Do not over tighten. 18 PREPARATION PREPARATION STAND INSTRUCTIONS (For 26/32/37/42LH20, 32/37/42/47LH30) I Image shown may differ from damage. 2 Assemble the TV as shown. 3 Fix the 4 bolts securely using the holes in the back of the TV. ! INSTALLATION 1 Carefully place the TV screen side down on a cushioned surface to protect the screen from your TV.
NOTE G When assembling the desk type stand, make sure the bolt is fully tightened (If not tightened fully, the TV can tilt forward after the product installation). Do not over tighten. 18 PREPARATION PREPARATION STAND INSTRUCTIONS (For 26/32/37/42LH20, 32/37/42/47LH30) I Image shown may differ from damage. 2 Assemble the TV as shown. 3 Fix the 4 bolts securely using the holes in the back of the TV. ! INSTALLATION 1 Carefully place the TV screen side down on a cushioned surface to protect the screen from your TV.

Owner's Manual (English)
Page 19
PROTECTION COVER After removing the stand, install the included protection cover over the hole for the stand. PREPARATION DETACHMENT 1 Carefully place the TV screen side down on a cushioned surface to protect the screen from damage. 2 Loose the bolts from TV. 3 Detach the stand from TV. Press the PROTECTION COVER into the TV until you hear it click. 19
PROTECTION COVER After removing the stand, install the included protection cover over the hole for the stand. PREPARATION DETACHMENT 1 Carefully place the TV screen side down on a cushioned surface to protect the screen from damage. 2 Loose the bolts from TV. 3 Detach the stand from TV. Press the PROTECTION COVER into the TV until you hear it click. 19

Owner's Manual (English)
Page 20
... 4 bolts securely using the 4 screws supplied. 3 Assemble the TV as shown. INSTALLATION (For 32/37/42LF11, 32CL20) 1 If your TV. And carefully place the TV screen side down on a cushioned surface to protect the screen from your TV has a protection tape attached, remove the tape. NOTE G When... assembling the desk type stand, make sure the screws are fully tightened (If not tightened fully, the TV can tilt forward after the product installation). PREPARATION PREPARATION STAND INSTRUCTIONS (For 32/37/42/47LF11, 47LF21, 32CL20) I Image shown may differ from...
... 4 bolts securely using the 4 screws supplied. 3 Assemble the TV as shown. INSTALLATION (For 32/37/42LF11, 32CL20) 1 If your TV. And carefully place the TV screen side down on a cushioned surface to protect the screen from your TV has a protection tape attached, remove the tape. NOTE G When... assembling the desk type stand, make sure the screws are fully tightened (If not tightened fully, the TV can tilt forward after the product installation). PREPARATION PREPARATION STAND INSTRUCTIONS (For 32/37/42/47LF11, 47LF21, 32CL20) I Image shown may differ from...

Owner's Manual (English)
Page 21
Press the PROTECTION COVER into the TV until you hear it click. 21 PROTECTION COVER After removing the stand, install the included protection cover over the hole for the stand. PREPARATION DETACHMENT 1 Carefully place the TV screen side down on a cushioned surface to protect the screen from damage. 2 Loose the bolts from TV. 3 Detach the stand from TV.
Press the PROTECTION COVER into the TV until you hear it click. 21 PROTECTION COVER After removing the stand, install the included protection cover over the hole for the stand. PREPARATION DETACHMENT 1 Carefully place the TV screen side down on a cushioned surface to protect the screen from damage. 2 Loose the bolts from TV. 3 Detach the stand from TV.

Owner's Manual (English)
Page 22
NOTE G When assembling the desk type stand, make sure the bolt is fully tightened (If not tightened fully, the TV can tilt forward after the product installation). PREPARATION PREPARATION STAND INSTRUCTIONS (For 19/22/26LU55) I Image shown may differ from damage. 2 Fix the bolts securely using the holes. ! Do not over tighten. 19" 22" 19/22LU55 19" 22" 26LU55 26" 22 INSTALLATION 1 Carefully place the TV screen side down on a cushioned surface to protect the screen from your TV.
NOTE G When assembling the desk type stand, make sure the bolt is fully tightened (If not tightened fully, the TV can tilt forward after the product installation). PREPARATION PREPARATION STAND INSTRUCTIONS (For 19/22/26LU55) I Image shown may differ from damage. 2 Fix the bolts securely using the holes. ! Do not over tighten. 19" 22" 19/22LU55 19" 22" 26LU55 26" 22 INSTALLATION 1 Carefully place the TV screen side down on a cushioned surface to protect the screen from your TV.


