Instruction Manual
Page 1
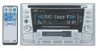
...;OL ENGLISH CD/CASSETTE RECEIVER RECEPTOR DE CD-CASSETTE RADIOCASSETTE/CD KW-XC777 KW-XC777 KW-XC777 180 MP3 INPUT EX For installation and connections, refer to the separate manual. Pour l'installation et les raccordements, se référer au manuel séparé. Retain this information for future reference. Serial No. INSTRUCTIONS MANUAL DE INSTRUCCIONES MANUEL D'INSTRUCTIONS For customer Use: Enter below the Model No. which are located on the...
...;OL ENGLISH CD/CASSETTE RECEIVER RECEPTOR DE CD-CASSETTE RADIOCASSETTE/CD KW-XC777 KW-XC777 KW-XC777 180 MP3 INPUT EX For installation and connections, refer to the separate manual. Pour l'installation et les raccordements, se référer au manuel séparé. Retain this information for future reference. Serial No. INSTRUCTIONS MANUAL DE INSTRUCCIONES MANUEL D'INSTRUCTIONS For customer Use: Enter below the Model No. which are located on the...
Instruction Manual
Page 2
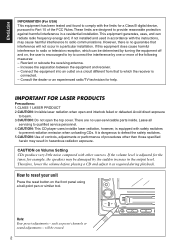
... can radiate radio frequency energy and, if not installed and used in accordance with the instructions, may cause harmful interference to reset your unit Press the reset button on Volume Setting CDs produce very little noise compared with safety switches to qualified service personnel. 4.CAUTION: This CD player uses invisible laser radiation, however, is adjusted for the tuner, for help. This equipment generates, uses, and can be determined by turning the equipment...
... can radiate radio frequency energy and, if not installed and used in accordance with the instructions, may cause harmful interference to reset your unit Press the reset button on Volume Setting CDs produce very little noise compared with safety switches to qualified service personnel. 4.CAUTION: This CD player uses invisible laser radiation, however, is adjusted for the tuner, for help. This equipment generates, uses, and can be determined by turning the equipment...
Instruction Manual
Page 3
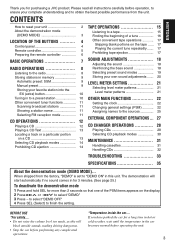
... to reset your unit 2 About the demonstration mode (DEMO MODE 3 LOCATION OF THE BUTTONS 4 Control panel 4 Remote controller 5 Preparing the remote controller 6 BASIC OPERATIONS 7 RADIO OPERATIONS 8 Listening to the radio 8 Storing stations in memory 9 Automatic preset: SSM 9 Manual preset 9 Storing your favorite station into the EX (extra) button 10 Tuning in to a preset station 10 Other convenient tuner functions 11 Scanning broadcast stations 11 Showing a station name 11 Selecting FM reception mode 11 CD OPERATIONS 12 Playing a CD 12 Playing a CD Text 13 Locating a track...
... to reset your unit 2 About the demonstration mode (DEMO MODE 3 LOCATION OF THE BUTTONS 4 Control panel 4 Remote controller 5 Preparing the remote controller 6 BASIC OPERATIONS 7 RADIO OPERATIONS 8 Listening to the radio 8 Storing stations in memory 9 Automatic preset: SSM 9 Manual preset 9 Storing your favorite station into the EX (extra) button 10 Tuning in to a preset station 10 Other convenient tuner functions 11 Scanning broadcast stations 11 Showing a station name 11 Selecting FM reception mode 11 CD OPERATIONS 12 Playing a CD 12 Playing a CD Text 13 Locating a track...
Instruction Manual
Page 4
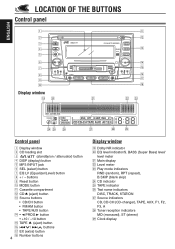
...EQ level indicator/S. BASS (Super Bass) level/ level meter a Main display s Level meter d Play mode indicators RND (random), RPT (repeat), B.SKIP (blank skip) f CD indicator g TAPE indicator h Text name indicators DISC, TRACK, STATION j Source indicators CD, CD-CH (CD-changer), TAPE, AUX, F1, F2, F3, A k Tuner reception indicators MO (monaural), ST (stereo) l Clock display ENGLISH LOCATION OF THE BUTTONS Control panel 1 2 3 4 5 6 7 8 9 p Display window o MP3 INPUT ; buttons 9 Reset button p MODE button q Cassette compartment w CD 0 (eject) button e Source buttons • CD/CH...
...EQ level indicator/S. BASS (Super Bass) level/ level meter a Main display s Level meter d Play mode indicators RND (random), RPT (repeat), B.SKIP (blank skip) f CD indicator g TAPE indicator h Text name indicators DISC, TRACK, STATION j Source indicators CD, CD-CH (CD-changer), TAPE, AUX, F1, F2, F3, A k Tuner reception indicators MO (monaural), ST (stereo) l Clock display ENGLISH LOCATION OF THE BUTTONS Control panel 1 2 3 4 5 6 7 8 9 p Display window o MP3 INPUT ; buttons 9 Reset button p MODE button q Cassette compartment w CD 0 (eject) button e Source buttons • CD/CH...
Instruction Manual
Page 5
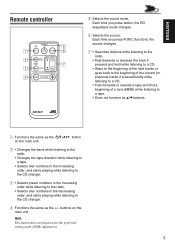
...; Selects disc numbers in the increasing order, and starts playing while listening to the CD changer. 3 • Selects preset numbers in the increasing order while listening to the radio. • Selects disc numbers in the decreasing order, and starts playing while listening to the CD changer. 4 Functions the same as the +/- Each time you press button, the EQ (equalizer) mode changes. 6 Selects the source. ENGLISH Remote controller 5 1 6 2 7 3 4 5 Selects the sound mode. Each time you press FUNC (function), the source changes. 7 • Searches stations while...
...; Selects disc numbers in the increasing order, and starts playing while listening to the CD changer. 3 • Selects preset numbers in the increasing order while listening to the radio. • Selects disc numbers in the decreasing order, and starts playing while listening to the CD changer. 4 Functions the same as the +/- Each time you press button, the EQ (equalizer) mode changes. 6 Selects the source. ENGLISH Remote controller 5 1 6 2 7 3 4 5 Selects the sound mode. Each time you press FUNC (function), the source changes. 7 • Searches stations while...

Instruction Manual
Page 6
... to strong light (direct sunlight or artificial lighting). 3. Doing this may cause the battery to give off heat, crack or start a fire. • Do not leave the battery with other metallic materials. Remove the battery holder. 1) Push out the battery holder in between. • Do not expose the remote sensor to direct sunlight for a long time. ENGLISH Preparing the remote controller Before using a ball...
... to strong light (direct sunlight or artificial lighting). 3. Doing this may cause the battery to give off heat, crack or start a fire. • Do not leave the battery with other metallic materials. Remove the battery holder. 1) Push out the battery holder in between. • Do not expose the remote sensor to direct sunlight for a long time. ENGLISH Preparing the remote controller Before using a ball...
Instruction Manual
Page 7
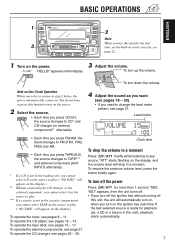
BASIC OPERATIONS ENGLISH 1 MP3 INPUT 3 2 180 Note: When you use this unit for the first time, set the built-in clock correctly, see EX page 22. 1 Turn on the display. appears on the power. 3 Adjust the volume. To turn off the power Press /ATT for playback (ex. To operate the tape deck, see pages 28 - 30. To operate the CD changer, see pages 15 - 17. To turn up the volume. a CD or a tape is...
BASIC OPERATIONS ENGLISH 1 MP3 INPUT 3 2 180 Note: When you use this unit for the first time, set the built-in clock correctly, see EX page 22. 1 Turn on the display. appears on the power. 3 Adjust the volume. To turn off the power Press /ATT for playback (ex. To operate the tape deck, see pages 28 - 30. To operate the CD changer, see pages 15 - 17. To turn up the volume. a CD or a tape is...
Instruction Manual
Page 9
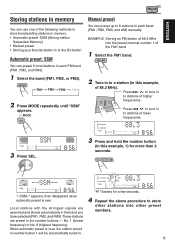
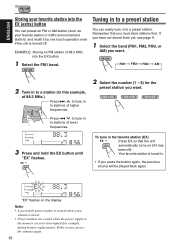
..., and AM) manually. When automatic preset is over , the station stored in number button 1 will be automatically tuned in. FM1 FM2 FM3 AM 2 Press MODE repeatedly until "SSM" appears. Press 4 to tune in to stations of higher frequencies. "P1" flashes for more than 2 seconds. EXAMPLE: Storing an FM station of 88.3 MHz into other stations into the preset channel number 1 of the FM1 band 1 Select the FM1...
..., and AM) manually. When automatic preset is over , the station stored in number button 1 will be automatically tuned in. FM1 FM2 FM3 AM 2 Press MODE repeatedly until "SSM" appears. Press 4 to tune in to stations of higher frequencies. "P1" flashes for more than 2 seconds. EXAMPLE: Storing an FM station of 88.3 MHz into other stations into the preset channel number 1 of the FM1 band 1 Select the FM1...
Instruction Manual
Page 10
... tune in to stations of higher frequencies. 2 Select the number (1 - 6) for example, during battery replacement). "EX" flashes on (if it by one touch operation even if the unit is tuned in to a preset station. Notes: • A previously preset station is erased when a new station is stored. • Preset stations are erased when the power supply to a preset station You can preset an FM or AM station (such as your favorite station into the EX button 1 Select...
... tune in to stations of higher frequencies. 2 Select the number (1 - 6) for example, during battery replacement). "EX" flashes on (if it by one touch operation even if the unit is tuned in to a preset station. Notes: • A previously preset station is erased when a new station is stored. • Preset stations are erased when the power supply to a preset station You can preset an FM or AM station (such as your favorite station into the EX button 1 Select...
Instruction Manual
Page 16
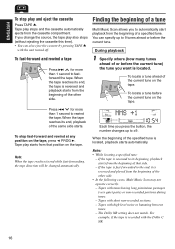
..., the tape direction will be changed automatically. Notes: • While locating a specified tune: - Tapes with the unit turned off. Tape play starts from the cassette compartment. To locate a tune ahead of the same side starts. If you press the button, the number changes up to ±9. Tapes with tunes having long pianissimo passages (very quiet parts) or non-recorded portions during tunes. - Tape play stops and...
..., the tape direction will be changed automatically. Notes: • While locating a specified tune: - Tapes with the unit turned off. Tape play starts from the cassette compartment. To locate a tune ahead of the same side starts. If you press the button, the number changes up to ±9. Tapes with tunes having long pianissimo passages (very quiet parts) or non-recorded portions during tunes. - Tape play stops and...
Instruction Manual
Page 18
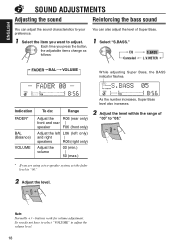
... volume 00 (min.) 50 (max.) 2 Adjust the level within the range of Super Bass. 1 Select "S.BASS." As the number increases, Super Bass level also increases. Note: Normally + / - ENGLISH SOUND ADJUSTMENTS Adjusting the sound Reinforcing the bass sound You can also adjust the level of "00" to "08." * If you are using a two-speaker system, set the fader level to adjust the volume level. 18 EQ Canceled S.BASS L.V.METER FADER BAL VOLUME While adjusting Super Bass, the BASS indicator flashes. buttons work for volume adjustment...
... volume 00 (min.) 50 (max.) 2 Adjust the level within the range of Super Bass. 1 Select "S.BASS." As the number increases, Super Bass level also increases. Note: Normally + / - ENGLISH SOUND ADJUSTMENTS Adjusting the sound Reinforcing the bass sound You can also adjust the level of "00" to "08." * If you are using a two-speaker system, set the fader level to adjust the volume level. 18 EQ Canceled S.BASS L.V.METER FADER BAL VOLUME While adjusting Super Bass, the BASS indicator flashes. buttons work for volume adjustment...
Instruction Manual
Page 19
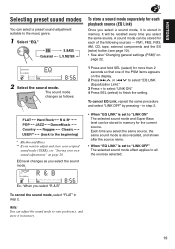
... preference, and store it is set to all the sources selected. Note: You can adjust the sound mode to your original sound mode (USER), see page 10). • See also "Changing general settings (PSM)" on the display. 2 Press ¢ or 4 to select "EQ LINK (Equalization Link)." 3 Press + to select "LINK ON." 4 Press SEL (select) to the music genre. 1 Select "EQ." The sound mode changes as you select a sound mode, it in step 2. To cancel...
... preference, and store it is set to all the sources selected. Note: You can adjust the sound mode to your original sound mode (USER), see page 10). • See also "Changing general settings (PSM)" on the display. 2 Press ¢ or 4 to select "EQ LINK (Equalization Link)." 3 Press + to select "LINK ON." 4 Press SEL (select) to the music genre. 1 Select "EQ." The sound mode changes as you select a sound mode, it in step 2. To cancel...
Instruction Manual
Page 22
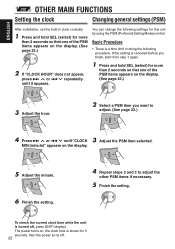
... . 22 To check the current clock time while the unit is a time limit in clock correctly. 1 Press and hold SEL (select) for 5 seconds, then the power turns off , press DISP (display). ENGLISH OTHER MAIN FUNCTIONS Setting the clock Changing general settings (PSM) After installation, set the built-in doing the following settings for this unit by using the PSM (Preferred Setting Mode) control. MIN (minute)" appears on the display. 5 Adjust the minute. 6 Finish the...
... . 22 To check the current clock time while the unit is a time limit in clock correctly. 1 Press and hold SEL (select) for 5 seconds, then the power turns off , press DISP (display). ENGLISH OTHER MAIN FUNCTIONS Setting the clock Changing general settings (PSM) After installation, set the built-in doing the following settings for this unit by using the PSM (Preferred Setting Mode) control. MIN (minute)" appears on the display. 5 Adjust the minute. 6 Finish the...
Instruction Manual
Page 23
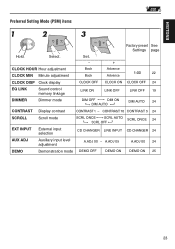
... OFF EXT INPUT External input selection CD CHANGER LINE INPUT CD CHANGER 24 AUX ADJ Auxiliary input level adjustment A.ADJ 00 - CLOCK HOUR Hour adjustment CLOCK MIN Minute adjustment Set. − Back Back + Advance Advance 1:00 22 CLOCK DISP Clock display CLOCK OFF CLOCK ON CLOCK OFF 24 EQ LINK Sound control memory linkage LINK ON LINK OFF LINK OFF 19 DIMMER Dimmer mode DIM OFF DIM ON DIM AUTO DIM AUTO 24 CONTRAST Display contrast CONTRAST 1 - ENGLISH Preferred Setting Mode (PSM) items 1 2 3 Factory-preset See Settings page...
... OFF EXT INPUT External input selection CD CHANGER LINE INPUT CD CHANGER 24 AUX ADJ Auxiliary input level adjustment A.ADJ 00 - CLOCK HOUR Hour adjustment CLOCK MIN Minute adjustment Set. − Back Back + Advance Advance 1:00 22 CLOCK DISP Clock display CLOCK OFF CLOCK ON CLOCK OFF 24 EQ LINK Sound control memory linkage LINK ON LINK OFF LINK OFF 19 DIMMER Dimmer mode DIM OFF DIM ON DIM AUTO DIM AUTO 24 CONTRAST Display contrast CONTRAST 1 - ENGLISH Preferred Setting Mode (PSM) items 1 2 3 Factory-preset See Settings page...
Instruction Manual
Page 24
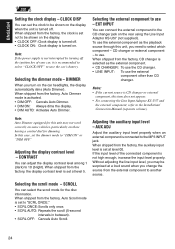
...." Adjusting the auxiliary input level - When shipped from the factory, the display contrast level is activated. • DIM OFF: Cancels Auto Dimmer. • DIM ON: Always dims the display. • DIM AUTO: Activates Auto Dimmer. SCROLL You can adjust the display contrast level among 1 (dark) to save the car's battery. In this unit, you turn on . CONTRAST You can select the scroll mode for dimming. Notes: • If the current source is recommended to select "CLOCK OFF...
...." Adjusting the auxiliary input level - When shipped from the factory, the display contrast level is activated. • DIM OFF: Cancels Auto Dimmer. • DIM ON: Always dims the display. • DIM AUTO: Activates Auto Dimmer. SCROLL You can adjust the display contrast level among 1 (dark) to save the car's battery. In this unit, you turn on . CONTRAST You can select the scroll mode for dimming. Notes: • If the current source is recommended to select "CLOCK OFF...
Instruction Manual
Page 25
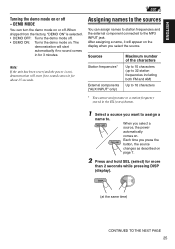
... about 15 seconds. Sources Station frequencies* External components ("AUX INPUT" only) Maximum number of the characters Up to 10 characters (up to 32 station frequencies including both FM and AM) Up to 10 characters * You cannot assign name to the MP3 INPUT jack. Each time you select the source. Note: If the unit has been reset (and the power is selected. • DEMO OFF: Turns the demo mode off . After...
... about 15 seconds. Sources Station frequencies* External components ("AUX INPUT" only) Maximum number of the characters Up to 10 characters (up to 32 station frequencies including both FM and AM) Up to 10 characters * You cannot assign name to the MP3 INPUT jack. Each time you select the source. Note: If the unit has been reset (and the power is selected. • DEMO OFF: Turns the demo mode off . After...
Instruction Manual
Page 27
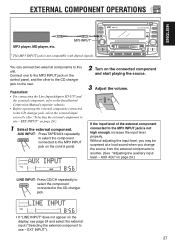
... INPUT"). 27 Without adjusting the input level, you may be surprised at a loud sound when you change the source from the external components to use - EXTERNAL COMPONENT OPERATIONS ENGLISH 180 MP3 INPUT MP3 INPUT* MP3 player, MD player, etc. Preparations: • For connecting the Line Input Adaptor KS-U57 and the external component, refer to the Installation/ Connection Manual (separate volume). • Before operating the external component connected to the CD changer jack, select...
... INPUT"). 27 Without adjusting the input level, you may be surprised at a loud sound when you change the source from the external components to use - EXTERNAL COMPONENT OPERATIONS ENGLISH 180 MP3 INPUT MP3 INPUT* MP3 player, MD player, etc. Preparations: • For connecting the Line Input Adaptor KS-U57 and the external component, refer to the Installation/ Connection Manual (separate volume). • Before operating the external component connected to the CD changer jack, select...
Instruction Manual
Page 28
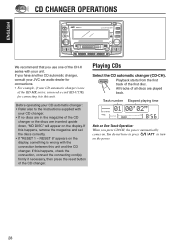
... the display. If this happens, remove the magazine and set the discs correctly. • If "RESET 1 - Track number Elapsed playing time Note on One-Touch Operation: When you use one of the CD changer. Playing CDs Select the CD automatic changer (CD-CH). Playback starts from the first track of the CH-X series with the connection between this unit. You do not have another CD automatic changer, consult your JVC car audio dealer for connecting it...
... the display. If this happens, remove the magazine and set the discs correctly. • If "RESET 1 - Track number Elapsed playing time Note on One-Touch Operation: When you use one of the CD changer. Playing CDs Select the CD automatic changer (CD-CH). Playback starts from the first track of the CH-X series with the connection between this unit. You do not have another CD automatic changer, consult your JVC car audio dealer for connecting it...
Instruction Manual
Page 33
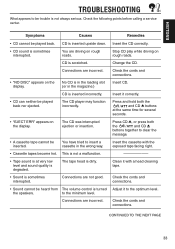
... driving on the display. Check the cords and connections. • "NO DISC" appears on rough roads. Stop CD play while driving on the display. The CD player may function incorrectly. This is not a malfunction. ------- • Tape sound is at the same time for several seconds. • "EJECT ERR" appears on rough roads. to the minimum level. the speakers. ENGLISH TROUBLESHOOTING What appears to be heard from The volume control is turned Adjust...
... driving on the display. Check the cords and connections. • "NO DISC" appears on rough roads. Stop CD play while driving on the display. The CD player may function incorrectly. This is not a malfunction. ------- • Tape sound is at the same time for several seconds. • "EJECT ERR" appears on rough roads. to the minimum level. the speakers. ENGLISH TROUBLESHOOTING What appears to be heard from The volume control is turned Adjust...
Instruction Manual
Page 37
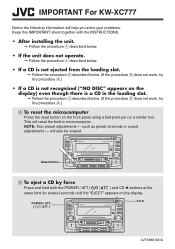
... procedure ı does not work, try the procedure Å.) Å To reset the microcomputer Press the reset button on the display. IMPORTANT For KW-XC777 Notice the following information will help you solve your problems. Keep this IMPORTANT sheet together with the INSTRUCTIONS. • After installing the unit. = Follow the procedure Å described below. • If the unit does not operate. = Follow the procedure...
... procedure ı does not work, try the procedure Å.) Å To reset the microcomputer Press the reset button on the display. IMPORTANT For KW-XC777 Notice the following information will help you solve your problems. Keep this IMPORTANT sheet together with the INSTRUCTIONS. • After installing the unit. = Follow the procedure Å described below. • If the unit does not operate. = Follow the procedure...


