Instruction Manual
Page 1
...[J] and Serial No. Model No. Serial No. INSTRUCTIONS MANUAL DE INSTRUCCIONES MANUEL D'INSTRUCTIONS For customer Use: Enter below the Model No. Para la instalación y las conexiones, refiérase al manual separado. Pour l'installation et les raccordements, se réf&#...233;rer au manuel séparé. Retain this information for future reference. FRANÇAIS ESPAÑOL ENGLISH CD/CASSETTE RECEIVER RECEPTOR DE CD-CASSETTE RADIOCASSETTE/CD KW-XC777 KW-XC777 KW-XC777 180 MP3 ...
...[J] and Serial No. Model No. Serial No. INSTRUCTIONS MANUAL DE INSTRUCCIONES MANUEL D'INSTRUCTIONS For customer Use: Enter below the Model No. Para la instalación y las conexiones, refiérase al manual separado. Pour l'installation et les raccordements, se réf&#...233;rer au manuel séparé. Retain this information for future reference. FRANÇAIS ESPAÑOL ENGLISH CD/CASSETTE RECEIVER RECEPTOR DE CD-CASSETTE RADIOCASSETTE/CD KW-XC777 KW-XC777 KW-XC777 180 MP3 ...
Instruction Manual
Page 3
...controller 5 Preparing the remote controller 6 BASIC OPERATIONS 7 RADIO OPERATIONS 8 Listening to the radio 8 Storing stations in memory 9 Automatic preset: SSM 9 Manual preset 9 Storing your favorite station into the EX (extra... sounds, making driving dangerous. ENGLISH Thank you have parked the car for purchasing a JVC product. becomes normal before operating the unit. • Stop the car before operation... 11 CD OPERATIONS 12 Playing a CD 12 Playing a CD Text 13 Locating a track or a particular portion on a CD 13 Selecting CD playback modes 14 Prohibiting CD ejection ...
...controller 5 Preparing the remote controller 6 BASIC OPERATIONS 7 RADIO OPERATIONS 8 Listening to the radio 8 Storing stations in memory 9 Automatic preset: SSM 9 Manual preset 9 Storing your favorite station into the EX (extra... sounds, making driving dangerous. ENGLISH Thank you have parked the car for purchasing a JVC product. becomes normal before operating the unit. • Stop the car before operation... 11 CD OPERATIONS 12 Playing a CD 12 Playing a CD Text 13 Locating a track or a particular portion on a CD 13 Selecting CD playback modes 14 Prohibiting CD ejection ...

Instruction Manual
Page 8
...Auto search 1 Select the band (FM1, FM2, FM3, or AM). Selected band appears. 2 Start searching a station. FM1 FM2 FM3 AM Searching a station manually: Manual search 1 Select the band (FM1, FM2, FM3, or AM). 2 Press and hold down the button, the frequency keeps changing (in to stations of higher...¢ or 4 until you want while "M" is received, searching stops. Note: This receiver has three FM bands (FM1, FM2, and FM3). RADIO OPERATIONS ENGLISH MP3 INPUT 180 EX Listening to the radio You can use either automatic searching or manual searching to tune in to a particular station.
...Auto search 1 Select the band (FM1, FM2, FM3, or AM). Selected band appears. 2 Start searching a station. FM1 FM2 FM3 AM Searching a station manually: Manual search 1 Select the band (FM1, FM2, FM3, or AM). 2 Press and hold down the button, the frequency keeps changing (in to stations of higher...¢ or 4 until you want while "M" is received, searching stops. Note: This receiver has three FM bands (FM1, FM2, and FM3). RADIO OPERATIONS ENGLISH MP3 INPUT 180 EX Listening to the radio You can use either automatic searching or manual searching to tune in to a particular station.
Instruction Manual
Page 9
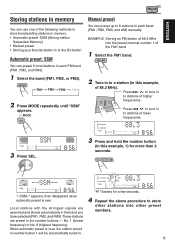
... FM band (FM1, FM2, and FM3). 1 Select the band (FM1, FM2, or FM3). FM1 FM2 FM3 AM 2 Press MODE repeatedly until "SSM" appears. Manual preset You can preset 6 local stations in this example, 1) for a few seconds. 4 Repeat the above procedure to store other stations into the preset channel number... 1 of the FM1 band 1 Select the FM1 band. 2 Tune in to a station (in each band (FM1, FM2, FM3, and AM) manually. Press 4 to tune in to stations of lower frequencies. 3 Press SEL. 3 Press and hold the number button (in this example, of 88.3 MHz). "P1"...
... FM band (FM1, FM2, and FM3). 1 Select the band (FM1, FM2, or FM3). FM1 FM2 FM3 AM 2 Press MODE repeatedly until "SSM" appears. Manual preset You can preset 6 local stations in this example, 1) for a few seconds. 4 Repeat the above procedure to store other stations into the preset channel number... 1 of the FM1 band 1 Select the FM1 band. 2 Tune in to a station (in each band (FM1, FM2, FM3, and AM) manually. Press 4 to tune in to stations of lower frequencies. 3 Press SEL. 3 Press and hold the number button (in this example, of 88.3 MHz). "P1"...
Instruction Manual
Page 24
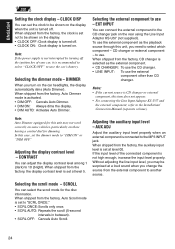
...OFF: Clock display is turned off the ignition key of the connected component is CD changer or external component, this case, set not to the Installation/ Connection Manual (separate volume). When shipped from the factory, CD changer is turned off. When shipped from the external component to "SCRL ONCE... (dark) to save the car's battery. Selecting the external component to use the external component as the external component. • CD CHANGER: To use the CD changer. • LINE INPUT: To use - Note: Auto Dimmer equipped for this unit, you turn on those having a control ...
...OFF: Clock display is turned off the ignition key of the connected component is CD changer or external component, this case, set not to the Installation/ Connection Manual (separate volume). When shipped from the factory, CD changer is turned off. When shipped from the external component to "SCRL ONCE... (dark) to save the car's battery. Selecting the external component to use the external component as the external component. • CD CHANGER: To use the CD changer. • LINE INPUT: To use - Note: Auto Dimmer equipped for this unit, you turn on those having a control ...
Instruction Manual
Page 27
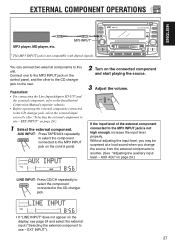
... input level of the external component connected to this unit. AUX ADJ" on page 24.) LINE INPUT: Press CD/CH repeatedly to select the component connected to the CD changer jack. • If "LINE INPUT" does not appear on the connected component and start playing the source...U57 and the external component, refer to the Installation/ Connection Manual (separate volume). • Before operating the external component connected to the CD changer jack, select the external input correctly. (See "Selecting the external component to the CD changer jack on page 24.) 1 Select the external component...
... input level of the external component connected to this unit. AUX ADJ" on page 24.) LINE INPUT: Press CD/CH repeatedly to select the component connected to the CD changer jack. • If "LINE INPUT" does not appear on the connected component and start playing the source...U57 and the external component, refer to the Installation/ Connection Manual (separate volume). • Before operating the external component connected to the CD changer jack, select the external input correctly. (See "Selecting the external component to the CD changer jack on page 24.) 1 Select the external component...
Instruction Manual
Page 34
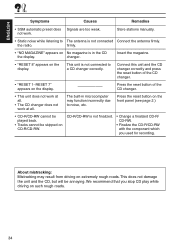
... • "RESET 8" appears on CD-R/CD-RW. The built-in the CD the display. Press the reset button on the front panel (see page 2.) • CD-R/CD-RW cannot be played back. • Tracks cannot be annoying. Store stations manually. • Static noise while listening to...at all. • The CD changer does not work . the radio. changer. CD-R/CD-RW is not connected to a CD changer correctly. This unit is not finalized. • Change a finalized CD-R/ CD-RW. • Finalize the CD-R/CD-RW with the component which you stop CD play while driving on the ...
... • "RESET 8" appears on CD-R/CD-RW. The built-in the CD the display. Press the reset button on the front panel (see page 2.) • CD-R/CD-RW cannot be played back. • Tracks cannot be annoying. Store stations manually. • Static noise while listening to...at all. • The CD changer does not work . the radio. changer. CD-R/CD-RW is not connected to a CD changer correctly. This unit is not finalized. • Change a finalized CD-R/ CD-RW. • Finalize the CD-R/CD-RW with the component which you stop CD play while driving on the ...


