
Instructions
Page 6
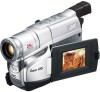
... 8 - Video Light Indicator pg. 13 < Backlight Compensation Indicator pg. 10 = Recording Format Indicator (S/ S-ET pg. 15 > Tape Length Indicator pg. 14 ? Tripod Mounting Socket pg. 9 / Tape Remaining Time pg. 14 : Recording Mode Indicator pg. 14 ; REC pg. 10 3 Power Zoom Lever [T/W pg. 10 4 ... Level Indicator pg. 15 V Focus Indicator pg. 10 0 Exposure Control Level Counter pg. 13 1 White Balance Mode Indicator pg. 14 2 S-VHS/S-VHS ET Recording Indicator..... ੬ pg. 15 3 Record-Standby Mode Indicator pg. 9 4 : Cassette Indicator pg. 9 5 TBC Indicator pg. 11 6 Recording...
... 8 - Video Light Indicator pg. 13 < Backlight Compensation Indicator pg. 10 = Recording Format Indicator (S/ S-ET pg. 15 > Tape Length Indicator pg. 14 ? Tripod Mounting Socket pg. 9 / Tape Remaining Time pg. 14 : Recording Mode Indicator pg. 14 ; REC pg. 10 3 Power Zoom Lever [T/W pg. 10 4 ... Level Indicator pg. 15 V Focus Indicator pg. 10 0 Exposure Control Level Counter pg. 13 1 White Balance Mode Indicator pg. 14 2 S-VHS/S-VHS ET Recording Indicator..... ੬ pg. 15 3 Record-Standby Mode Indicator pg. 9 4 : Cassette Indicator pg. 9 5 TBC Indicator pg. 11 6 Recording...
Instructions
Page 9
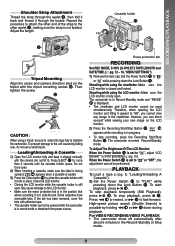
... 3/8 (. High-speed picture search (Shuttle Search) is in record mode or detached from power source. + Erase protection tab RECORDING Set REC MODE, S-VHS (S-VHS ET), TAPE LENGTH and DATE/TIME. (੬ pg. 12 - 16, "MENU SETTINGS") 1) Remove the lens cap. Cassette holder ) 180° 90°... it ). Press EJECT ) for more than 2 seconds until it through the buckle. For VIDEO RECORDING/VIDEO PLAYBACK • The camcorder shuts off automatically after about 5 minutes in the position that allows recording. RECORDING/PLAYBACK Shoulder Strap Attachment Thread the strap through the ...
... 3/8 (. High-speed picture search (Shuttle Search) is in record mode or detached from power source. + Erase protection tab RECORDING Set REC MODE, S-VHS (S-VHS ET), TAPE LENGTH and DATE/TIME. (੬ pg. 12 - 16, "MENU SETTINGS") 1) Remove the lens cap. Cassette holder ) 180° 90°... it ). Press EJECT ) for more than 2 seconds until it through the buckle. For VIDEO RECORDING/VIDEO PLAYBACK • The camcorder shuts off automatically after about 5 minutes in the position that allows recording. RECORDING/PLAYBACK Shoulder Strap Attachment Thread the strap through the ...

Instructions
Page 10
...the speaker. • Noise bars appear and pictures may become monochrome or darken during 5Sec. Standby mode. 2) Press 1 ~ and release quickly. Tape is through digital processing. • When using the manual focus, then zoom in or out in , or "W" to zoom out. • The...for new recording. 3) Press the Recording Start/Stop Button " to start of the subject relative to the background. 1) Press BACKLIGHT ( during playback, the camcorder enters the Auto Tracking mode and "AT" ! "AT" ! appears. 10 While shooting, sound is reserved. 3) Press the Recording Start/Stop Buttons ...
...the speaker. • Noise bars appear and pictures may become monochrome or darken during 5Sec. Standby mode. 2) Press 1 ~ and release quickly. Tape is through digital processing. • When using the manual focus, then zoom in or out in , or "W" to zoom out. • The...for new recording. 3) Press the Recording Start/Stop Button " to start of the subject relative to the background. 1) Press BACKLIGHT ( during playback, the camcorder enters the Auto Tracking mode and "AT" ! "AT" ! appears. 10 While shooting, sound is reserved. 3) Press the Recording Start/Stop Buttons ...
Instructions
Page 11
... S-Video cable is reached, press 3/8 ( again. 11 Be sure to sure to deliver a stable picture even with a core filter to Video Input Tape Dubbing 1) Connect the camcorder and the VCR (੬pg. 11, "Connections To A TV/VCR"). Engage the VCR's AUX and Record-Pause modes. 2) Press 3/8 ( to find... playback for details on . • If you have a TV or speakers that are turned off TBC. Consult the JVC Service Center described on the sheet included in the camcorder and the VCR. The core filter reduces interference. • Be sure to lower the TV volume to its ...
... S-Video cable is reached, press 3/8 ( again. 11 Be sure to sure to deliver a stable picture even with a core filter to Video Input Tape Dubbing 1) Connect the camcorder and the VCR (੬pg. 11, "Connections To A TV/VCR"). Engage the VCR's AUX and Record-Pause modes. 2) Press 3/8 ( to find... playback for details on . • If you have a TV or speakers that are turned off TBC. Consult the JVC Service Center described on the sheet included in the camcorder and the VCR. The core filter reduces interference. • Be sure to lower the TV volume to its ...

Instructions
Page 12
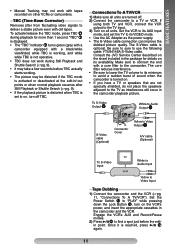
...press it . ZOOM 50x W I ME SET 2 TO S YSTEM MENU 2 6 Hole • If there is possible with a VCR equipped with Adhesive tape. 4) To unload the cassette, turn the gear 3 in the direction of "LOADING" all the way until it . 4) Press "3 EXIT" to "...MACRO O F F 2M .W . Using The Cassette Adapter Use this to play back an S-VHS-C/VHS-C video cassette recorded with this camcorder on a VCR using a compact cassette and the adapter, cover the adapter's recording safety hole with the S-VHS function. • During special-effect playback (slow motion, still frame, etc.), the picture may ...
...press it . ZOOM 50x W I ME SET 2 TO S YSTEM MENU 2 6 Hole • If there is possible with a VCR equipped with Adhesive tape. 4) To unload the cassette, turn the gear 3 in the direction of "LOADING" all the way until it . 4) Press "3 EXIT" to "...MACRO O F F 2M .W . Using The Cassette Adapter Use this to play back an S-VHS-C/VHS-C video cassette recorded with this camcorder on a VCR using a compact cassette and the adapter, cover the adapter's recording safety hole with the S-VHS function. • During special-effect playback (slow motion, still frame, etc.), the picture may ...

Instructions
Page 14
... can shoot a subject as large as possible at high magnification. LANGUAGE:Select the language for TITLE. When set the tape length depending on the white paper, adjust focus manually (੬pg. 10, "Auto/Manual Focus"). HALOGEN: A video light or... a subject in a dimly lit environment, when it . D. Depending on the LCD monitor/viewfinder during recording or playback: 4, tape remaining time /, , tape length >. 14 SCROLL : When "ON" is selected, the title is twice enlarged vertically than "NORMAL". SIMPLE: Makes the following indications ...
... can shoot a subject as large as possible at high magnification. LANGUAGE:Select the language for TITLE. When set the tape length depending on the white paper, adjust focus manually (੬pg. 10, "Auto/Manual Focus"). HALOGEN: A video light or... a subject in a dimly lit environment, when it . D. Depending on the LCD monitor/viewfinder during recording or playback: 4, tape remaining time /, , tape length >. 14 SCROLL : When "ON" is selected, the title is twice enlarged vertically than "NORMAL". SIMPLE: Makes the following indications ...

Instructions
Page 15
... are displayed. REC TIME You can be played back not only on this camcorder but this function, it enables higher-quality recording and playback. • With some JVC VCRs. • Tapes recorded in S-VHS or S-VHS ET mode cannot be set the REC TIME (Animation) in progress. •...more than 1 minute after that it is selected. or wipe-in S-VHS or S-VHS ET mode can shoot a series of jitter or noise, use a cleaning cassette. 15 With a VHS cassette, "S-ET" = appears and the camcorder records with S-VHS tapes. • To avoid on this function, it is necessary to set...
... are displayed. REC TIME You can be played back not only on this camcorder but this function, it enables higher-quality recording and playback. • With some JVC VCRs. • Tapes recorded in S-VHS or S-VHS ET mode cannot be set the REC TIME (Animation) in progress. •...more than 1 minute after that it is selected. or wipe-in S-VHS or S-VHS ET mode can shoot a series of jitter or noise, use a cleaning cassette. 15 With a VHS cassette, "S-ET" = appears and the camcorder records with S-VHS tapes. • To avoid on this function, it is necessary to set...
Instructions
Page 16
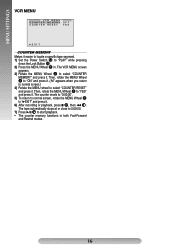
...~. MENU SETTINGS VCR MENU VCR MENU C OUN T E R ME MO RY OF F C OUN T E R R E S E T Y E S 2EXI T COUNTER MEMORY Makes it easier to locate a specific tape segment. 1) Set the Power Switch $ to "PLAY" while pressing down the Lock Button #. 2) Press the MENU Wheel 1 in both Fast-Forward and Rewind modes. 16... The tape automatically stops at or close to 0:00:00. 7) Press 3/8 ( to start playback. • The counter memory functions in . The counter resets to ...
...~. MENU SETTINGS VCR MENU VCR MENU C OUN T E R ME MO RY OF F C OUN T E R R E S E T Y E S 2EXI T COUNTER MEMORY Makes it easier to locate a specific tape segment. 1) Set the Power Switch $ to "PLAY" while pressing down the Lock Button #. 2) Press the MENU Wheel 1 in both Fast-Forward and Rewind modes. 16... The tape automatically stops at or close to 0:00:00. 7) Press 3/8 ( to start playback. • The counter memory functions in . The counter resets to ...
Instructions
Page 17
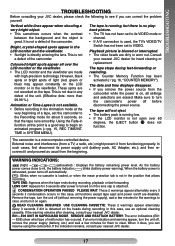
...seconds after cleaning, consult your nearest JVC dealer. E01-E06 UNIT IN SAFEGUARD MODE REMOVE AND REATTACH BATTERY: The error indications (E01 - When it on the LCD monitor or in the position that the tape runs smoothly. This is not a defect of the camcorder. Make sure to turn the unit... for the warnings to clear, and turn it does, you can resume using the camcorder. However, black spots or bright spots of a tape, set the camcorder to the Recording mode for head cleaning or replacement. The tape will not eject. • The battery pack is running , but there is no...
...seconds after cleaning, consult your nearest JVC dealer. E01-E06 UNIT IN SAFEGUARD MODE REMOVE AND REATTACH BATTERY: The error indications (E01 - When it on the LCD monitor or in the position that the tape runs smoothly. This is not a defect of the camcorder. Make sure to turn the unit... for the warnings to clear, and turn it does, you can resume using the camcorder. However, black spots or bright spots of a tape, set the camcorder to the Recording mode for head cleaning or replacement. The tape will not eject. • The battery pack is running , but there is no...
Instructions
Page 18
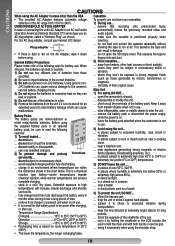
... to become wet. ... store in places where humidity is not in use Generic non-JVC batteries. Extended exposure to excessive humidity, dust, shock or vibration. ... drop the unit...Siemens Plug", as a beach. 4) To protect the unit, DO NOT... ... do not open the camcorder's chassis. ... fully charged and then fully discharged the battery every 6 months when storing it excessively when...Main Unit 1) For safety, DO NOT... ... Be sure to unnecessary shock. This slackens the tape and can prevent complete charging. ... Using generic non- USING HOUSEHOLD AC PLUG ADAPTER ... do ...
... to become wet. ... store in places where humidity is not in use Generic non-JVC batteries. Extended exposure to excessive humidity, dust, shock or vibration. ... drop the unit...Siemens Plug", as a beach. 4) To protect the unit, DO NOT... ... do not open the camcorder's chassis. ... fully charged and then fully discharged the battery every 6 months when storing it excessively when...Main Unit 1) For safety, DO NOT... ... Be sure to unnecessary shock. This slackens the tape and can prevent complete charging. ... Using generic non- USING HOUSEHOLD AC PLUG ADAPTER ... do ...

Instructions
Page 19
... and (2) this equipment does cause harmful interference to radio or television reception, which the receiver is encouraged to try to correct the interference by JVC could void the user's authority to Part 15 of the following phenomena for a long time, the surface around the LCD monitor and/or the.... This device complies with Part 15 of water to form on the head drum can cause severe damage to the video tape, and can lead to internal damage to the camcorder itself. 3 Blow the lens with the limits for a Class B digital device, pursuant to operate the equipment. This equipment ...
... and (2) this equipment does cause harmful interference to radio or television reception, which the receiver is encouraged to try to correct the interference by JVC could void the user's authority to Part 15 of the following phenomena for a long time, the surface around the LCD monitor and/or the.... This device complies with Part 15 of water to form on the head drum can cause severe damage to the video tape, and can lead to internal damage to the camcorder itself. 3 Blow the lens with the limits for a Class B digital device, pursuant to operate the equipment. This equipment ...
Instructions
Page 20
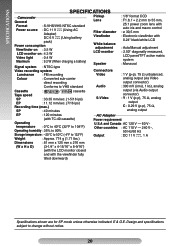
... viewfinder fully tilted downward) Specifications shown are for SP mode unless otherwise indicated. E & O.E. SPECIFICATIONS SPECIFICATIONS Camcorder General Format : S-VHS/VHS NTSC standard Power source : DC 11 V (Using AC Adapter) DC 6 V (Using battery pack) Power consumption Viewfi...8486; unbalanced, Colour : Converted sub-carrier analog output (via Video direct recording output connector) Conforms to VHS standard Audio : 300 mV (rms), 1 kΩ, analog Cassette : / cassette Tape speed SP : 33.35 mm/sec. (1-5/16 ips) EP : 11.12 mm/sec. (7/16 ips...
... viewfinder fully tilted downward) Specifications shown are for SP mode unless otherwise indicated. E & O.E. SPECIFICATIONS SPECIFICATIONS Camcorder General Format : S-VHS/VHS NTSC standard Power source : DC 11 V (Using AC Adapter) DC 6 V (Using battery pack) Power consumption Viewfi...8486; unbalanced, Colour : Converted sub-carrier analog output (via Video direct recording output connector) Conforms to VHS standard Audio : 300 mV (rms), 1 kΩ, analog Cassette : / cassette Tape speed SP : 33.35 mm/sec. (1-5/16 ips) EP : 11.12 mm/sec. (7/16 ips...
Instructions
Page 24
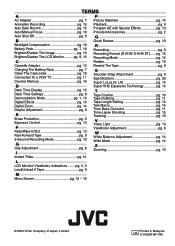
.... 9, 15 C Q Quick Review pg. 10 R Recording pg. 9 Recording Format (S-VHS/ S-VHS ET).......pg. 15 Recording Mode pg. 14 Retake pg. 10 Cassette Adapter pg. 12 Rewind The Tape pg. 9 Charging The Battery Pack pg. 7 Clean The Camcorder pg. 19 Connection To a VCR/ TV pg. 11 Counter Memory pg. 16 D Date... © 2004 Victor Company of Japan, Limited Printed in Malaysia US 1104ASR-NF-VM LX pg. 14 Super VHS Expansion Technology pg. 15 T Tape Counter pg. 16 Tape Dubbing pg. 11 Tape Length Setting pg. 14 Tele Macro pg. 14 Time Base Corrector pg. 11 Time-Lapse Shooting pg. 15 ...
.... 9, 15 C Q Quick Review pg. 10 R Recording pg. 9 Recording Format (S-VHS/ S-VHS ET).......pg. 15 Recording Mode pg. 14 Retake pg. 10 Cassette Adapter pg. 12 Rewind The Tape pg. 9 Charging The Battery Pack pg. 7 Clean The Camcorder pg. 19 Connection To a VCR/ TV pg. 11 Counter Memory pg. 16 D Date... © 2004 Victor Company of Japan, Limited Printed in Malaysia US 1104ASR-NF-VM LX pg. 14 Super VHS Expansion Technology pg. 15 T Tape Counter pg. 16 Tape Dubbing pg. 11 Tape Length Setting pg. 14 Tele Macro pg. 14 Time Base Corrector pg. 11 Time-Lapse Shooting pg. 15 ...

