
Instructions
Page 6
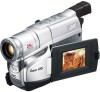
... Level Indicator pg. 15 V Focus Indicator pg. 10 0 Exposure Control Level Counter pg. 13 1 White Balance Mode Indicator pg. 14 2 S-VHS/S-VHS ET Recording Indicator..... ੬ pg. 15 3 Record-Standby Mode Indicator pg. 9 4 : Cassette Indicator pg. 9 5 TBC Indicator pg. 11 6 Recording... Format Indicator (S/S-ET pg. 15 7 Tape Counter pg. 16 8 Recording Mode Indicator (SP/EP pg. 14 9 Tape Running Indicator 3: Playback ¡: Fast-Forward/ Shuttle Search 1: Rewind/ Shuttle Search 8: Pause ! Video Light Indicator pg. 13...
... Level Indicator pg. 15 V Focus Indicator pg. 10 0 Exposure Control Level Counter pg. 13 1 White Balance Mode Indicator pg. 14 2 S-VHS/S-VHS ET Recording Indicator..... ੬ pg. 15 3 Record-Standby Mode Indicator pg. 9 4 : Cassette Indicator pg. 9 5 TBC Indicator pg. 11 6 Recording... Format Indicator (S/S-ET pg. 15 7 Tape Counter pg. 16 8 Recording Mode Indicator (SP/EP pg. 14 9 Tape Running Indicator 3: Playback ¡: Fast-Forward/ Shuttle Search 1: Rewind/ Shuttle Search 8: Pause ! Video Light Indicator pg. 13...
Instructions
Page 9
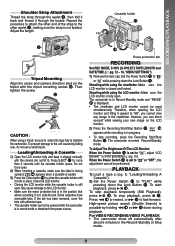
...label is facing outward. 4 appears when a cassette is in record mode or detached from power source. + Erase protection tab RECORDING Set REC MODE, S-VHS (S-VHS ET), TAPE LENGTH and DATE/TIME. (੬ pg. 12 - 16, "MENU SETTINGS") 1) Remove the lens cap. To start playback, press 3/8 (. Then ...Power Switch $ to the unit caused by holding 1 ~ or ¡ & down during playback. Shooting while using a tripod, be performed. The camcorder is in the position that allows recording. When the Power Switch $ is possible by falling over, do not tilt it upward to " ", adjust "...
...label is facing outward. 4 appears when a cassette is in record mode or detached from power source. + Erase protection tab RECORDING Set REC MODE, S-VHS (S-VHS ET), TAPE LENGTH and DATE/TIME. (੬ pg. 12 - 16, "MENU SETTINGS") 1) Remove the lens cap. To start playback, press 3/8 (. Then ...Power Switch $ to the unit caused by holding 1 ~ or ¡ & down during playback. Shooting while using a tripod, be performed. The camcorder is in the position that allows recording. When the Power Switch $ is possible by falling over, do not tilt it upward to " ", adjust "...

Instructions
Page 10
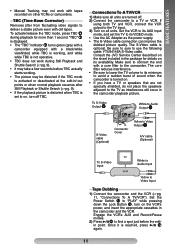
... new recording. 3) Press the Recording Start/Stop Button " to start of the subject relative to the background. 1) Press BACKLIGHT ( during Retake. Tape is set to "SP". 2) During Record-Standby, press 5SEC. "MT" ! Rec is applied. • When the focus level cannot be ...bars appear and pictures may become unstable during Zooming. When Auto Tracking finishes, the indication disappears. • When noise bars appear during playback, the camcorder enters the Auto Tracking mode and "AT" ! BASIC FEATURES To turn on again, set the Power Switch $ to "OFF", then to " ", ...
... new recording. 3) Press the Recording Start/Stop Button " to start of the subject relative to the background. 1) Press BACKLIGHT ( during Retake. Tape is set to "SP". 2) During Record-Standby, press 5SEC. "MT" ! Rec is applied. • When the focus level cannot be ...bars appear and pictures may become unstable during Zooming. When Auto Tracking finishes, the indication disappears. • When noise bars appear during playback, the camcorder enters the Auto Tracking mode and "AT" ! BASIC FEATURES To turn on again, set the Power Switch $ to "OFF", then to " ", ...
Instructions
Page 11
... or Shuttle Search (੬pg. 9). • If the playback picture is distorted when TBC is set the TV to its availability. Consult the JVC Service Center described on the sheet included in the package for more than 1 second. The core filter reduces interference. • Be sure ...3/8 ( to find a spot just before TBC actually starts working , and white while TBC is displayed. • The "TBC" indicator 5 turns green (grey with a camcorder equipped with old tapes. Be sure to sure to the TV input. 3) Turn on the VCR's power, and insert the appropriate cassettes in the...
... or Shuttle Search (੬pg. 9). • If the playback picture is distorted when TBC is set the TV to its availability. Consult the JVC Service Center described on the sheet included in the package for more than 1 second. The core filter reduces interference. • Be sure ...3/8 ( to find a spot just before TBC actually starts working , and white while TBC is displayed. • The "TBC" indicator 5 turns green (grey with a camcorder equipped with old tapes. Be sure to sure to the TV input. 3) Turn on the VCR's power, and insert the appropriate cassettes in the...

Instructions
Page 12
... L I ME SET 2 TO S YSTEM MENU 2 6 Hole • If there is slack in the video tape when inserting the compact cassette into the VCR and play back an S-VHS-C/VHS-C video cassette recorded with the S-VHS function. • During special-effect playback (slow motion, still frame, etc.), the picture may vibrate or noise... cassette. 6) Close the compartment door 2. 2 Compartment door Recording safety hole 4 Window 5 Dial The protection sheet is possible with a VCR equipped with this camcorder on a SVHS-C/VHS VCR. 1) Slide the latch 1 to select the desired menu or function and press it .
... L I ME SET 2 TO S YSTEM MENU 2 6 Hole • If there is slack in the video tape when inserting the compact cassette into the VCR and play back an S-VHS-C/VHS-C video cassette recorded with the S-VHS function. • During special-effect playback (slow motion, still frame, etc.), the picture may vibrate or noise... cassette. 6) Close the compartment door 2. 2 Compartment door Recording safety hole 4 Window 5 Dial The protection sheet is possible with a VCR equipped with this camcorder on a SVHS-C/VHS VCR. 1) Slide the latch 1 to select the desired menu or function and press it .

Instructions
Page 14
...convenient to set the recording mode. MENU SETTINGS WINDOW (Wipe): Wipes in on the LCD monitor/viewfinder during recording or playback: 4, tape remaining time /, , tape length >. 14 ZOOM Zooming is completed, "MWB" 1 stops blinking. • Once you to the centre, leaving a black screen. CLOUD...zoom or position yourself so that the white paper fills the screen. SCROLL (Wipe): Wipes in 4 different languages. When set the tape length depending on the white paper, adjust focus manually (੬pg. 10, "Auto/Manual Focus"). If it is activated. To set ...
...convenient to set the recording mode. MENU SETTINGS WINDOW (Wipe): Wipes in on the LCD monitor/viewfinder during recording or playback: 4, tape remaining time /, , tape length >. 14 ZOOM Zooming is completed, "MWB" 1 stops blinking. • Once you to the centre, leaving a black screen. CLOUD...zoom or position yourself so that the white paper fills the screen. SCROLL (Wipe): Wipes in 4 different languages. When set the tape length depending on the white paper, adjust focus manually (੬pg. 10, "Auto/Manual Focus"). If it is activated. To set ...

Instructions
Page 15
...when the cassette is ejected. • To use a cleaning cassette. 15 Leaving the camcorder aimed at preset time spans. OFF: Records in VHS on a VHS or S-VHS cassette. • JVC EHG (Extra High Grade) tapes are displayed. If no operation is performed for more than 1 minute after 5 seconds ... important scenes, as it enables higher-quality recording and playback. • With some JVC VCRs. • Tapes recorded in S-VHS or S-VHS ET mode can be played back not only on this camcorder but this is not recorded. TIME (Time-Lapse) function.) Select the desired interval ...
...when the cassette is ejected. • To use a cleaning cassette. 15 Leaving the camcorder aimed at preset time spans. OFF: Records in VHS on a VHS or S-VHS cassette. • JVC EHG (Extra High Grade) tapes are displayed. If no operation is performed for more than 1 minute after 5 seconds ... important scenes, as it enables higher-quality recording and playback. • With some JVC VCRs. • Tapes recorded in S-VHS or S-VHS ET mode can be played back not only on this camcorder but this is not recorded. TIME (Time-Lapse) function.) Select the desired interval ...
Instructions
Page 16
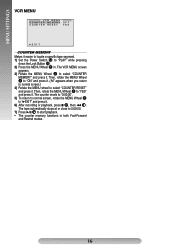
... and Rewind modes. 16 The VCR MENU screen appears. 3) Rotate the MENU Wheel 1 to select "COUNTER MEMORY" and press it easier to locate a specific tape segment. 1) Set the Power Switch $ to "YES" and press it . MENU SETTINGS VCR MENU VCR MENU C OUN T E R ME MO RY OF F C OUN T E R R E S E T Y E S ...resets to "0:00:00". 5) To return to normal screen, rotate the MENU Wheel 1 to start playback. • The counter memory functions in . The tape automatically stops at or close to 0:00:00. 7) Press 3/8 ( to "3EXIT" and press it. 6) After recording or playback, press 7 ), then 1 ~.
... and Rewind modes. 16 The VCR MENU screen appears. 3) Rotate the MENU Wheel 1 to select "COUNTER MEMORY" and press it easier to locate a specific tape segment. 1) Set the Power Switch $ to "YES" and press it . MENU SETTINGS VCR MENU VCR MENU C OUN T E R ME MO RY OF F C OUN T E R R E S E T Y E S ...resets to "0:00:00". 5) To return to normal screen, rotate the MENU Wheel 1 to start playback. • The counter memory functions in . The tape automatically stops at or close to 0:00:00. 7) Press 3/8 ( to "3EXIT" and press it. 6) After recording or playback, press 7 ), then 1 ~.
Instructions
Page 17
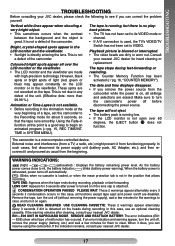
... this case, all functions except tape eject and power on/off (without removing the power supply), wait a few minutes for 5 seconds after cleaning, consult your nearest JVC dealer. 17 Using the Fade-in SYSTEM MENU). Consult your nearest JVC dealer for the warnings to clear, and turn the camcorder's power off , remove the power...
... this case, all functions except tape eject and power on/off (without removing the power supply), wait a few minutes for 5 seconds after cleaning, consult your nearest JVC dealer. 17 Using the Fade-in SYSTEM MENU). Consult your nearest JVC dealer for the warnings to clear, and turn the camcorder's power off , remove the power...
Instructions
Page 18
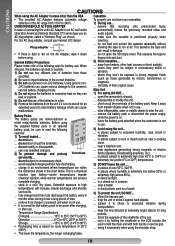
... battery-cooler temperatures impede chemical reaction, while warmer temperatures can cause malfunctions. This exposes the tape to before using the shoulder strap. • The lower the temperature, the longer recharging ...8226; The provided AC Adapter features automatic voltage To properly use and store your nearest JVC dealer. fully charged and then fully discharged the battery every 6 months when storing it... in areas other heat sources or direct sunlight. ... leave the battery pack attached when the camcorder is extremely low (below . in a closed car in use. • It is normal...
... battery-cooler temperatures impede chemical reaction, while warmer temperatures can cause malfunctions. This exposes the tape to before using the shoulder strap. • The lower the temperature, the longer recharging ...8226; The provided AC Adapter features automatic voltage To properly use and store your nearest JVC dealer. fully charged and then fully discharged the battery every 6 months when storing it... in areas other heat sources or direct sunlight. ... leave the battery pack attached when the camcorder is extremely low (below . in a closed car in use. • It is normal...

Instructions
Page 19
... connected. Operation is moved from an air conditioner. • Moisture on the head drum can cause severe damage to the video tape, and can radiate radio frequency energy and, if not installed and used in a residential installation. Close the LCD monitor. Press EJECT...LCD monitor, DO NOT... ... These limits are not malfunctions: • While using the unit immediately and consult your local JVC dealer. 19 place the camcorder with coarse cloth. 3) Beware of the following two conditions: (1) This device may cause undesired operation. This equipment generates, uses...
... connected. Operation is moved from an air conditioner. • Moisture on the head drum can cause severe damage to the video tape, and can radiate radio frequency energy and, if not installed and used in a residential installation. Close the LCD monitor. Press EJECT...LCD monitor, DO NOT... ... These limits are not malfunctions: • While using the unit immediately and consult your local JVC dealer. 19 place the camcorder with coarse cloth. 3) Beware of the following two conditions: (1) This device may cause undesired operation. This equipment generates, uses...
Instructions
Page 20
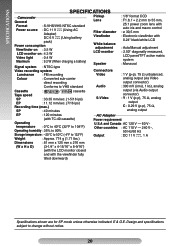
... humidity : 35% to 80% Storage temperature : -20°C to 50°C (-4°F to change without notice. 20 SPECIFICATIONS SPECIFICATIONS Camcorder General Format : S-VHS/VHS NTSC standard Power source : DC 11 V (Using AC Adapter) DC 6 V (Using battery pack) Power consumption Viewfinder on ...Ω unbalanced, Colour : Converted sub-carrier analog output (via Video direct recording output connector) Conforms to VHS standard Audio : 300 mV (rms), 1 kΩ, analog Cassette : / cassette Tape speed SP : 33.35 mm/sec. (1-5/16 ips) EP : 11.12 mm/sec. (7/16 ips)...
... humidity : 35% to 80% Storage temperature : -20°C to 50°C (-4°F to change without notice. 20 SPECIFICATIONS SPECIFICATIONS Camcorder General Format : S-VHS/VHS NTSC standard Power source : DC 11 V (Using AC Adapter) DC 6 V (Using battery pack) Power consumption Viewfinder on ...Ω unbalanced, Colour : Converted sub-carrier analog output (via Video direct recording output connector) Conforms to VHS standard Audio : 300 mV (rms), 1 kΩ, analog Cassette : / cassette Tape speed SP : 33.35 mm/sec. (1-5/16 ips) EP : 11.12 mm/sec. (7/16 ips)...
Instructions
Page 24
... © 2004 Victor Company of Japan, Limited Printed in Malaysia US 1104ASR-NF-VM LX pg. 14 Super VHS Expansion Technology pg. 15 T Tape Counter pg. 16 Tape Dubbing pg. 11 Tape Length Setting pg. 14 Tele Macro pg. 14 Time Base Corrector pg. 11 Time-Lapse Shooting pg. 15 ...pg. 9, 15 C Q Quick Review pg. 10 R Recording pg. 9 Recording Format (S-VHS/ S-VHS ET).......pg. 15 Recording Mode pg. 14 Retake pg. 10 Cassette Adapter pg. 12 Rewind The Tape pg. 9 Charging The Battery Pack pg. 7 Clean The Camcorder pg. 19 Connection To a VCR/ TV pg. 11 Counter Memory pg. 16 D Date...
... © 2004 Victor Company of Japan, Limited Printed in Malaysia US 1104ASR-NF-VM LX pg. 14 Super VHS Expansion Technology pg. 15 T Tape Counter pg. 16 Tape Dubbing pg. 11 Tape Length Setting pg. 14 Tele Macro pg. 14 Time Base Corrector pg. 11 Time-Lapse Shooting pg. 15 ...pg. 9, 15 C Q Quick Review pg. 10 R Recording pg. 9 Recording Format (S-VHS/ S-VHS ET).......pg. 15 Recording Mode pg. 14 Retake pg. 10 Cassette Adapter pg. 12 Rewind The Tape pg. 9 Charging The Battery Pack pg. 7 Clean The Camcorder pg. 19 Connection To a VCR/ TV pg. 11 Counter Memory pg. 16 D Date...

