JVC DX97US - GRDX97 MiniDV Digital Camcorder Support and Manuals
Get Help and Manuals for this JVC item
Most Recent JVC DX97US Questions

Removing The Cassette Tape
i have lost the battery but still have a tape in my video camera - how do I get the cassette out
i have lost the battery but still have a tape in my video camera - how do I get the cassette out
(Posted by j9lane 10 years ago)
Popular JVC DX97US Manual Pages
Instruction Manual - Page 3

...installed in a malfunction. There is designed to be exposed to environmental considerations. Connecting cables (Audio/Video, S-Video, etc.) to the camcorder and leaving it has sufficient space on all sides to constitute a risk of mercury. REFER SERVICING TO QUALIFIED SERVICE PERSONNEL. CAUTIONS: ● This camcorder... environmental problems must be placed on Replaceable lithium ...
Instruction Manual - Page 7
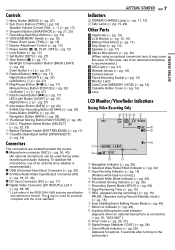
... while tape is
recommended.) V USB (Universal Serial Bus) Connector (੬ pg. 39) W S-Video/Audio/Video Input/Output Connector [AV]
(੬ pg. 18, 37, 42) X DC Input Connector [DC] (੬ pg. 11) Y Digital Video Connector [DV IN/OUT] (i.Link*)
(੬ pg. 38, 39)
* i.Link refers to the IEEE1394-1995 industry specification
and extensions thereof. Playback...
Instruction Manual - Page 9

...) e USB Cable f Core Filter [large] (for USB Cable ੬ pg. 10 for
attachment) g Core Filter [small] (for Audio Extension Cable
੬ pg. 10 for attachment) h CD-ROM i Remote Control Unit RM-V720U j Lithium Battery CR2025* (for remote control unit) k Memory Card 8 MB (GR-DX97 only) (Already
inserted in the Remote Control Unit
at time of the camcorder, provided cables...
Instruction Manual - Page 10

...
How To Attach The Lens Cap
To protect the lens, attach the provided lens cap to the camcorder. NOTE:
To confirm the lens cap is on both ends of cable between the cable plug and the core filter.
To MIC Audio extension cable
(provided)
Core filter
Stereo microphone
How To Attach The Core Filter (for USB Cable and Audio Extension Cable)
Attach the core...
Instruction Manual - Page 15

....
180˚
VIDEO/MEMORY
VIDEO RECORDING & PLAYBACK
1 Remove the lens cap. (੬ pg. 10) 2 Open the LCD monitor fully. 3 Set the VIDEO/MEMORY Switch to "VIDEO". 4 Set the Power Switch to "Recording From The Middle Of A Tape" (੬ pg. 17).
● To turn the camcorder on again, push back and pull out the viewfinder again...
Instruction Manual - Page 18

... VCR's instruction manual.
4 Turn on the camcorder, the VCR and the TV. 5 Set the VCR to its VIDEO mode.
6 Start playback on the switch.
4 Press MENU. If not, go to S-VIDEO IN (Connect when your TV/VCR has S-VIDEO IN and A/V input connectors. ATTENTION:
During Shuttle Search, parts of a tape to avoid time code interruption. (੬...
Instruction Manual - Page 21

...
75 160 320
DIGITAL STILL CAMERA (D.S.C.) RECORDING & PLAYBACK
VIDEO/MEMORY
1 Remove the lens cap. 2 Open the LCD monitor fully. (੬ pg. 15) 3 Set the VIDEO/MEMORY Switch to "MEMORY". 4 Set the Power Switch to stop if the battery runs out of your camcorder as a Digital Still Camera for the next shot is
being taken. ●...
Instruction Manual - Page 32

.... ● When shooting a scene with a high-contrast background. * The following functions or settings cannot be difficult to focus on the shooting condition. Although the recorded image is recommended.
The manual
focus indicator appears.
3 Press or to bring the camcorder into focus. Manual focus is recommended in situations listed below. ● When two subjects overlap...
Instruction Manual - Page 37

... time code Set "ON SCREEN" to "OFF", "LCD" or "LCD/TV". (੬ pg. 27, 31)
To use this camcorder as a recorder
1 Following the illustrations, connect the camcorder and
the VCR's output connectors.
2 Set "REC MODE" to "SP" or "LP". (੬ pg. 27, 28) 3 Set the camcorder's Power Switch to "PLAY". 4 Set "S/AV INPUT" to start dubbing.
S/AV/Editing cable (provided)
To AV...
Instruction Manual - Page 42

... IN connector.
2 Insert a recorded tape into the camcorder. 3 Set the VIDEO/MEMORY Switch to "VIDEO". 4 Set the Power Switch to the VCR's instructions.
However, it is necessary to AUDIO L IN
* Connect when your TV/VCR has an S-VIDEO IN connector. S/AV/Editing cable (provided)
To AV mark
12
Editing extension cable (optional)**
34
AB To Remote PAUSE or...
Instruction Manual - Page 45

...set "GAIN UP" to the Manual mode. HIf you want the lighting to look more natural, set to "SAVE". The camcorder...JVC dealer. HSet "DATE/TIME" to "OFF". TROUBLESHOOTING EN 45
Video and D.S.C.
and then re-connect it and proceed as usual from functioning properly. Playback
The tape is moving, but is not set to the Auto mode. (੬ pg. 32) ● The lens... has AV input ...
Instruction Manual - Page 46

...service life, images on again, then operate it. This is tilted upward 180 degrees, open the
monitor fully. (੬ pg. 15)
An error...camcorder is connected via the DV connector, the camcorder does not operate.
● The DV cable was plugged/unplugged with "DIS" activated (੬ pg. 27, 28) this case the camcorder... EN TROUBLESHOOTING
Other problems
The POWER/CHARGE lamp on the camcorder does ...
Instruction Manual - Page 47

TROUBLESHOOTING EN 47
A.
Warning Indications
Displays the battery remaining power.
DUB ERROR! When the battery power is exhausted, power turns off
automatically. Remaining power level
High
Exhausted
As the battery power comes close to nil, the battery
indicator blinks.
Instruction Manual - Page 49

...
service life.
...
Before
using the supplied battery
pack or an optional battery
pack, be subject to unnecessary shock or
vibration. ... This is not
in use. ● Avoid using the unit ... Extended exposure to run at all.
Cassettes
To properly use and store your nearest JVC dealer. make sure the cassette bears the Mini DV...
Instruction Manual - Page 51

... (12-BIT), 48 kHz 2-channel (16-BIT) Cassette Mini DV cassette Tape speed SP: 18.8 mm/s, LP: 12.5 mm/s Maximum recording time (using 80 min. Design and specifications subject to change without battery, cassette, memory card, lens cap and grip strap) Approx. 510 g (1.2 lbs) (incl.
REFERENCES Camcorder
For General
Power supply DC 11 V (Using AC Adapter...
JVC DX97US Reviews
We have not received any reviews for JVC yet.