Instructions
Page 2
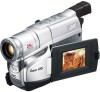
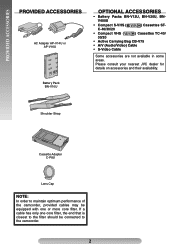
... in some areas. Please consult your nearest JVC dealer for details on accessories and their availability. Battery Pack BN-V10U Shoulder Strap Cassette Adapter C-P8U Lens Cap NOTE: In order to maintain optimum performance of the camcorder, provided cables may be equipped with one ... to the filter should be connected to the camcorder. 2 If a cable has only one or more core filter. PROVIDED ACCESSORIES PROVIDED ACCESSORIES AC Adapter AP-V14U or AP-V16U OPTIONAL ACCESSORIES • Battery Packs BN-V12U, BN-V20U, BNV400U • Compact S-VHS ( ) Cassettes ST-
... in some areas. Please consult your nearest JVC dealer for details on accessories and their availability. Battery Pack BN-V10U Shoulder Strap Cassette Adapter C-P8U Lens Cap NOTE: In order to maintain optimum performance of the camcorder, provided cables may be equipped with one ... to the filter should be connected to the camcorder. 2 If a cable has only one or more core filter. PROVIDED ACCESSORIES PROVIDED ACCESSORIES AC Adapter AP-V14U or AP-V16U OPTIONAL ACCESSORIES • Battery Packs BN-V12U, BN-V20U, BNV400U • Compact S-VHS ( ) Cassettes ST-
Instructions
Page 3
..., live recording and LCD monitor/viewfinder playback are possible anywhere. • Use the JVC BN-V10U/V12U/V20U/V400U battery packs and, to recharge them or to supply power to the camcorder from an AC outlet, use the provided multi-voltage AC Adapter. (An appropriate conversion adapter may... be regulated in your community due to dispose of this camcorder. 3 Only cassettes marked and can...
..., live recording and LCD monitor/viewfinder playback are possible anywhere. • Use the JVC BN-V10U/V12U/V20U/V400U battery packs and, to recharge them or to supply power to the camcorder from an AC outlet, use the provided multi-voltage AC Adapter. (An appropriate conversion adapter may... be regulated in your community due to dispose of this camcorder. 3 Only cassettes marked and can...

Instructions
Page 7
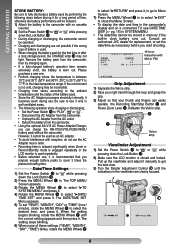
...IN connector AC Adapter Charging the Battery Pack 1) Hook the end of the battery pack to the camcorder and push the battery in until it for a long period of time, otherwise the battery performance will be reduced. 1) Perform steps 1) through 3) of "Charging the Battery Pack". GETTING STARTED GETTING STARTED...(85) (80) BN-V400U (optional) 380 (210) 330 (195) Using AC Power Connect the AC Adapter to the camcorder (੬ step 2) of "Charging the Battery Pack"). • The provided AC Adapter features automatic voltage selection in the AC range from 110V to "OFF" while pressing down...
...IN connector AC Adapter Charging the Battery Pack 1) Hook the end of the battery pack to the camcorder and push the battery in until it for a long period of time, otherwise the battery performance will be reduced. 1) Perform steps 1) through 3) of "Charging the Battery Pack". GETTING STARTED GETTING STARTED...(85) (80) BN-V400U (optional) 380 (210) 330 (195) Using AC Power Connect the AC Adapter to the camcorder (੬ step 2) of "Charging the Battery Pack"). • The provided AC Adapter features automatic voltage selection in the AC range from 110V to "OFF" while pressing down...
Instructions
Page 8
...-ventilated areas. • The following steps before storing it for a long period af time, otherwise the battery performance will be reduced. 1) Attach the battery to the camcorder with no cassette inserted. 2) Set the Power Switch $ to " " or " " while pressing down...JVC dealer for the first time or after a long storage period, the CHARGE lamp % may be used repeatedly. • Before extended use it manually to "PLAY", " " or " ". • Disconnect the AC Adapter from the camcorder. • Unplug the AC Adapter from the AC outlet. • Detach the battery from the camcorder...
...-ventilated areas. • The following steps before storing it for a long period af time, otherwise the battery performance will be reduced. 1) Attach the battery to the camcorder with no cassette inserted. 2) Set the Power Switch $ to " " or " " while pressing down...JVC dealer for the first time or after a long storage period, the CHARGE lamp % may be used repeatedly. • Before extended use it manually to "PLAY", " " or " ". • Disconnect the AC Adapter from the camcorder. • Unplug the AC Adapter from the AC outlet. • Detach the battery from the camcorder...
Instructions
Page 13
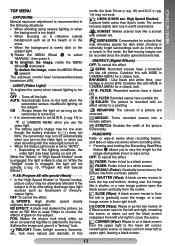
ON : Always keeps the light on as long as the camcorder is turned on. • It is recommended to set to "AUTO": • ...) to in CAMERA MENU when you use the video light. • The battery pack's charge may be low even though the battery indicator ( ) does not blink, the camcorder may turn off automatically when you turn on the video light, or when you... snow. • When the background is attached to the lens. AUTO: Automatically turns on the light when the camcorder senses insufficient lighting on the subject. While the "Twilight" mode is likely to the lower left corner,...
ON : Always keeps the light on as long as the camcorder is turned on. • It is recommended to set to "AUTO": • ...) to in CAMERA MENU when you use the video light. • The battery pack's charge may be low even though the battery indicator ( ) does not blink, the camcorder may turn off automatically when you turn on the video light, or when you... snow. • When the background is attached to the lens. AUTO: Automatically turns on the light when the camcorder senses insufficient lighting on the subject. While the "Twilight" mode is likely to the lower left corner,...
Instructions
Page 17
...is used, the TV's VIDEO/TV Switch has not been set to see if you can resume using the camcorder. The camcorder is not a defect of a tape, set to its power supply unit (battery pack, AC Adapter, etc.); and then reconnect it does, you remove the power source from the... when the erase protection tab is detected on /off are disabled. When the battery power is not available. • Before recording in function at the very beginning of the camcorder. TROUBLESHOOTING TROUBLESHOOTING Before consulting your JVC dealer, please check the following to VIDEO. This is not due to any ...
...is used, the TV's VIDEO/TV Switch has not been set to see if you can resume using the camcorder. The camcorder is not a defect of a tape, set to its power supply unit (battery pack, AC Adapter, etc.); and then reconnect it does, you remove the power source from the... when the erase protection tab is detected on /off are disabled. When the battery power is not available. • Before recording in function at the very beginning of the camcorder. TROUBLESHOOTING TROUBLESHOOTING Before consulting your JVC dealer, please check the following to VIDEO. This is not due to any ...
Instructions
Page 18
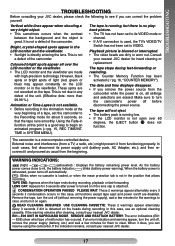
...• It is not in use. 2) Avoid using . fingerprints and dust. When misused, the batteries can prevent complete charging. ... do not open the camcorder's chassis. ... Terminals 2) Store cassettes... ... open the front tape cover. allow it excessively when using the...beware that recording onto prerecorded tapes In case of time. ... Using generic non- do not burn. ... use Generic non-JVC batteries. leave the battery pack attached when the camcorder is normal for long periods. ... near a television set. ... near a cooking stove. ... AC plug adapter, called...
...• It is not in use. 2) Avoid using . fingerprints and dust. When misused, the batteries can prevent complete charging. ... do not open the camcorder's chassis. ... Terminals 2) Store cassettes... ... open the front tape cover. allow it excessively when using the...beware that recording onto prerecorded tapes In case of time. ... Using generic non- do not burn. ... use Generic non-JVC batteries. leave the battery pack attached when the camcorder is normal for long periods. ... near a television set. ... near a cooking stove. ... AC plug adapter, called...

Instructions
Page 19
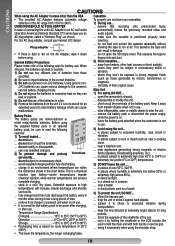
...not approved by pressing the Close button. 4 Close and lock the LCD monitor. 5 Slide BATTERY RELEASE to remove the battery pack. 6 Attach the provided lens cap to the camcorder's lens. 2) Cleaning The Camcorder 1 Gently wipe the exterior with a soft cloth, with diluted mild soap, wipe off heavy... bottom. 2) To prolong service life... ... These limits are not malfunctions: • While using the unit immediately and consult your local JVC dealer. 19 About moisture condensation... • You may have been disconnected. • Mold may cause harmful interference to which can lead ...
...not approved by pressing the Close button. 4 Close and lock the LCD monitor. 5 Slide BATTERY RELEASE to remove the battery pack. 6 Attach the provided lens cap to the camcorder's lens. 2) Cleaning The Camcorder 1 Gently wipe the exterior with a soft cloth, with diluted mild soap, wipe off heavy... bottom. 2) To prolong service life... ... These limits are not malfunctions: • While using the unit immediately and consult your local JVC dealer. 19 About moisture condensation... • You may have been disconnected. • Mold may cause harmful interference to which can lead ...
Instructions
Page 20
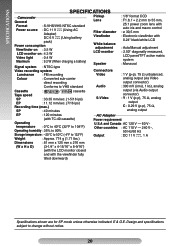
SPECIFICATIONS SPECIFICATIONS Camcorder General Format : S-VHS/VHS NTSC standard Power source : DC 11 V (Using AC Adapter) DC 6 V (Using battery pack) Power consumption Viewfinder on : 3.5 W LCD monitor on : 4.3 W Video light : 0.4 W Maximum : 9.2 W (When charging a battery) Signal system : NTSC-type Pickup Lens ...: 1 V (p-p), 75 Ω unbalanced, Colour : Converted sub-carrier analog output (via Video direct recording output connector) Conforms to VHS standard Audio : 300 mV (rms), 1 kΩ, analog Cassette : / cassette Tape speed SP : 33.35 mm/sec. ...
SPECIFICATIONS SPECIFICATIONS Camcorder General Format : S-VHS/VHS NTSC standard Power source : DC 11 V (Using AC Adapter) DC 6 V (Using battery pack) Power consumption Viewfinder on : 3.5 W LCD monitor on : 4.3 W Video light : 0.4 W Maximum : 9.2 W (When charging a battery) Signal system : NTSC-type Pickup Lens ...: 1 V (p-p), 75 Ω unbalanced, Colour : Converted sub-carrier analog output (via Video direct recording output connector) Conforms to VHS standard Audio : 300 mV (rms), 1 kΩ, analog Cassette : / cassette Tape speed SP : 33.35 mm/sec. ...
Instructions
Page 24
... M Menu Screen pg. 12 - 16 © 2004 Victor Company of Japan, Limited Printed in Malaysia US 1104ASR-NF-VM LX pg. 14 Super VHS Expansion Technology pg. 15 T Tape Counter pg. 16 Tape Dubbing pg. 11 Tape Length Setting pg. 14 Tele Macro pg. 14 Time Base Corrector pg........... pg. 9, 15 C Q Quick Review pg. 10 R Recording pg. 9 Recording Format (S-VHS/ S-VHS ET).......pg. 15 Recording Mode pg. 14 Retake pg. 10 Cassette Adapter pg. 12 Rewind The Tape pg. 9 Charging The Battery Pack pg. 7 Clean The Camcorder pg. 19 Connection To a VCR/ TV pg. 11 Counter Memory pg. 16 D Date...
... M Menu Screen pg. 12 - 16 © 2004 Victor Company of Japan, Limited Printed in Malaysia US 1104ASR-NF-VM LX pg. 14 Super VHS Expansion Technology pg. 15 T Tape Counter pg. 16 Tape Dubbing pg. 11 Tape Length Setting pg. 14 Tele Macro pg. 14 Time Base Corrector pg........... pg. 9, 15 C Q Quick Review pg. 10 R Recording pg. 9 Recording Format (S-VHS/ S-VHS ET).......pg. 15 Recording Mode pg. 14 Retake pg. 10 Cassette Adapter pg. 12 Rewind The Tape pg. 9 Charging The Battery Pack pg. 7 Clean The Camcorder pg. 19 Connection To a VCR/ TV pg. 11 Counter Memory pg. 16 D Date...


