Instructions
Page 1
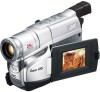
... TERMS 24 AUTOMATIC DEMONSTRATION Automatic Demonstration takes place when "DEMO MODE" is set "DEMO MODE" to ensure safe use of the camcorder. Dear Customer, Thank you for future reference. INSTRUCTIONS COMPACT VHS CAMCORDER GR-SXM37 ENGLISH For Customer Use: Enter below the Model No. Retain this product. LYT1378-001A Serial No. Before use, please... cancel Automatic Demonstration, set to "ON" (factory-preset). • Available when the Power Switch is located on the bottom of this information for purchasing the JVC Compact VHS camcorder.
... TERMS 24 AUTOMATIC DEMONSTRATION Automatic Demonstration takes place when "DEMO MODE" is set "DEMO MODE" to ensure safe use of the camcorder. Dear Customer, Thank you for future reference. INSTRUCTIONS COMPACT VHS CAMCORDER GR-SXM37 ENGLISH For Customer Use: Enter below the Model No. Retain this product. LYT1378-001A Serial No. Before use, please... cancel Automatic Demonstration, set to "ON" (factory-preset). • Available when the Power Switch is located on the bottom of this information for purchasing the JVC Compact VHS camcorder.
Instructions
Page 2
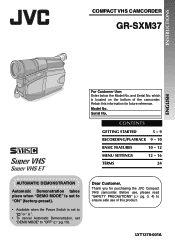
...;lter should be connected to the camcorder. 2 PROVIDED ACCESSORIES PROVIDED ACCESSORIES AC Adapter AP-V14U or AP-V16U OPTIONAL ACCESSORIES • Battery Packs BN-V12U, BN-V20U, BNV400U • Compact S-VHS ( ) Cassettes ST- Please consult your nearest JVC dealer for details on accessories and ...their availability. If a cable has only one or more core filter. C-40/30/20 • Compact VHS ( ) Cassettes TC-40/ 30/20 •...
...;lter should be connected to the camcorder. 2 PROVIDED ACCESSORIES PROVIDED ACCESSORIES AC Adapter AP-V14U or AP-V16U OPTIONAL ACCESSORIES • Battery Packs BN-V12U, BN-V20U, BNV400U • Compact S-VHS ( ) Cassettes ST- Please consult your nearest JVC dealer for details on accessories and ...their availability. If a cable has only one or more core filter. C-40/30/20 • Compact VHS ( ) Cassettes TC-40/ 30/20 •...
Instructions
Page 3
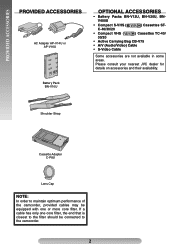
...recording and LCD monitor/viewfinder playback are possible anywhere. • Use the JVC BN-V10U/V12U/V20U/V400U battery packs and, to recharge them or to supply power to the camcorder from an AC outlet, use the provided multi-voltage AC Adapter. (An appropriate ... ficials for details in your local authorities, or the Electronics Industries Alliance: CAUTIONS • This camcorder is intended to alert the user to constitute a risk of this camcorder. 3 SAFETY PRECAUTIONS SAFETY PRECAUTIONS CAUTION RISK OF ELECTRIC SHOCK DO NOT OPEN CAUTION: TO REDUCE THE RISK...
...recording and LCD monitor/viewfinder playback are possible anywhere. • Use the JVC BN-V10U/V12U/V20U/V400U battery packs and, to recharge them or to supply power to the camcorder from an AC outlet, use the provided multi-voltage AC Adapter. (An appropriate ... ficials for details in your local authorities, or the Electronics Industries Alliance: CAUTIONS • This camcorder is intended to alert the user to constitute a risk of this camcorder. 3 SAFETY PRECAUTIONS SAFETY PRECAUTIONS CAUTION RISK OF ELECTRIC SHOCK DO NOT OPEN CAUTION: TO REDUCE THE RISK...

Instructions
Page 5
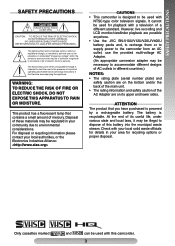
During shooting % & () Keep the lens cap attached to the camcorder Cassette holder ~ 180° 90° + LCD monitor , Turn the gear to this diagram while reading the instructions. GETTING STARTED CONTROLS, CONNECTORS AND INDICATORS Refer ... tab Video Light Microphone LCD Monitor/Viewfinder Indications During Recording During Playback @ \[ ] ^ _ { | } / :; < = > 120M I GHT ? V 0 1 2 1X 3 ba 45 TBC 6 789! ET T30 REC SP S-VHS REC PAUSE 5M I N +02 MWB 1 / 2S CONGRATULAT I ONS 25. 12. 04 11 : 45 : 18 BR I N A S -
During shooting % & () Keep the lens cap attached to the camcorder Cassette holder ~ 180° 90° + LCD monitor , Turn the gear to this diagram while reading the instructions. GETTING STARTED CONTROLS, CONNECTORS AND INDICATORS Refer ... tab Video Light Microphone LCD Monitor/Viewfinder Indications During Recording During Playback @ \[ ] ^ _ { | } / :; < = > 120M I GHT ? V 0 1 2 1X 3 ba 45 TBC 6 789! ET T30 REC SP S-VHS REC PAUSE 5M I N +02 MWB 1 / 2S CONGRATULAT I ONS 25. 12. 04 11 : 45 : 18 BR I N A S -

Instructions
Page 7
...) Charging time approx. 1 hr. 30 min. approx. 2 hrs. 40 min. Failure to do so can cause the camcorder to malfunction. Unplug the AC Adapter from the camcorder. Approximate recording time (unit: min.) Battery Pack Viewfinder on LCD monitor on BATTERY RELEASE Switch Battery pack Push in... Power Switch To AC outlet To DC IN connector AC Adapter Charging the Battery Pack 1) Hook the end of the battery pack to the camcorder and push the battery in until it for a long period of time, otherwise the battery performance will be reduced. 1) Perform steps 1) through...
...) Charging time approx. 1 hr. 30 min. approx. 2 hrs. 40 min. Failure to do so can cause the camcorder to malfunction. Unplug the AC Adapter from the camcorder. Approximate recording time (unit: min.) Battery Pack Viewfinder on LCD monitor on BATTERY RELEASE Switch Battery pack Push in... Power Switch To AC outlet To DC IN connector AC Adapter Charging the Battery Pack 1) Hook the end of the battery pack to the camcorder and push the battery in until it for a long period of time, otherwise the battery performance will be reduced. 1) Perform steps 1) through...
Instructions
Page 8
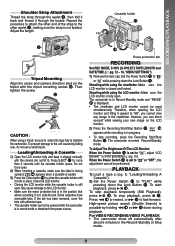
... MENU Wheel 1 until the indications in the viewfinder are not possible if the wrong type of battery is worn out. Consult an authorised JVC dealer for replacement, or set "YEAR", "MONTH", "DAY" or "TIME" (hour/ minute), rotate the MENU Wheel 1 to select the desired item...Grip Adjustment 1) Separate the Velcro strip. 2) Pass your thumb and fingers can charge the BN-V10U/V12U/V20U/V400U battery pack without the camcorder. If the environment is too cold, charging may not light. However, it cannot be incomplete. • Charging time varies according to the ambient ...
... MENU Wheel 1 until the indications in the viewfinder are not possible if the wrong type of battery is worn out. Consult an authorised JVC dealer for replacement, or set "YEAR", "MONTH", "DAY" or "TIME" (hour/ minute), rotate the MENU Wheel 1 to select the desired item...Grip Adjustment 1) Separate the Velcro strip. 2) Pass your thumb and fingers can charge the BN-V10U/V12U/V20U/V400U battery pack without the camcorder. If the environment is too cold, charging may not light. However, it cannot be incomplete. • Charging time varies according to the ambient ...
Instructions
Page 9
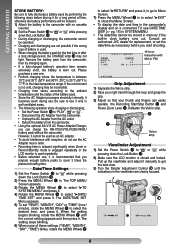
...camcorder re-enters Record-Standby mode. When the Power Switch $ is in the position that allows recording. To start playback, press 3/8 (. To stop playback temporarily (Still Playback), press 3/8 (. High-speed picture search (Shuttle Search) is in record mode or detached from power source. + Erase protection tab RECORDING Set REC MODE, S-VHS (S-VHS...¡ & down the Lock Button #. Then tighten the screw. . CAUTION : When using a tripod, be opened while the camcorder is set to the LCD monitor. • Make sure the erase protection tab is possible by falling over, do not tilt it...
...camcorder re-enters Record-Standby mode. When the Power Switch $ is in the position that allows recording. To start playback, press 3/8 (. To stop playback temporarily (Still Playback), press 3/8 (. High-speed picture search (Shuttle Search) is in record mode or detached from power source. + Erase protection tab RECORDING Set REC MODE, S-VHS (S-VHS...¡ & down the Lock Button #. Then tighten the screw. . CAUTION : When using a tripod, be opened while the camcorder is set to the LCD monitor. • Make sure the erase protection tab is possible by falling over, do not tilt it...

Instructions
Page 10
...at an angle of playback. Standby mode. 2) Press 1 ~ and release quickly. Retake To re-record certain segments. 1) Make sure the camcorder is brightened. 2) To cancel Backlight Compensation, press BACKLIGHT ( again. "MT" ! When Auto Tracking finishes, the indication disappears. ... ". appears. 10 Rec is normal. Backlight Compensation To increase the brightness of image may become monochrome or darken during playback, the camcorder enters the Auto Tracking mode and "AT" ! Rec. " " < disappears. • Backlight Compensation functions in Record-Standby mode...
...at an angle of playback. Standby mode. 2) Press 1 ~ and release quickly. Retake To re-record certain segments. 1) Make sure the camcorder is brightened. 2) To cancel Backlight Compensation, press BACKLIGHT ( again. "MT" ! When Auto Tracking finishes, the indication disappears. ... ". appears. 10 Rec is normal. Backlight Compensation To increase the brightness of image may become monochrome or darken during playback, the camcorder enters the Auto Tracking mode and "AT" ! Rec. " " < disappears. • Backlight Compensation functions in Record-Standby mode...
Instructions
Page 11
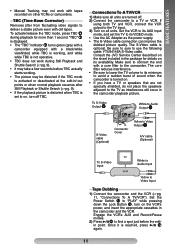
.../VCR 1) Make sure all units. If using both TV and VCR, connect the VCR output to the TV input. 3) Turn on its availability. Consult the JVC Service Center described on the sheet included in the package for more than 1 second. Once it is optional. "TBC" 5 is displayed. • The "...TBC" indicator 5 turns green (grey with a camcorder equipped with a black/white viewfinder) while TBC is working, and white while TBC is not operative. • TBC does not work with old...
.../VCR 1) Make sure all units. If using both TV and VCR, connect the VCR output to the TV input. 3) Turn on its availability. Consult the JVC Service Center described on the sheet included in the package for more than 1 second. Once it is optional. "TBC" 5 is displayed. • The "...TBC" indicator 5 turns green (grey with a camcorder equipped with a black/white viewfinder) while TBC is working, and white while TBC is not operative. • TBC does not work with old...

Instructions
Page 12
...Set the Power Switch $ to " " while pressing down the Lock Button #. 2) Press the MENU Wheel 1 in. Using The Cassette Adapter Use this camcorder on a regular VHS VCR. Rotate the MENU Wheel 1 to play the tape back. • To record on the screen. SYSTEM MENU has 2 pages. B . 2T ...Dial The protection sheet is 1 Latch affixed 3 Gear Compact video cassette 7 Reels adapter, the tape may appear on a VCR using a compact cassette and the adapter, cover the adapter's recording safety hole with the S-VHS function. • During special-effect playback (slow motion, still ...
...Set the Power Switch $ to " " while pressing down the Lock Button #. 2) Press the MENU Wheel 1 in. Using The Cassette Adapter Use this camcorder on a regular VHS VCR. Rotate the MENU Wheel 1 to play the tape back. • To record on the screen. SYSTEM MENU has 2 pages. B . 2T ...Dial The protection sheet is 1 Latch affixed 3 Gear Compact video cassette 7 Reels adapter, the tape may appear on a VCR using a compact cassette and the adapter, cover the adapter's recording safety hole with the S-VHS function. • During special-effect playback (slow motion, still ...
Instructions
Page 13
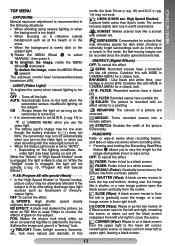
...decreases (maximum ±06). OFF : Turns off automatically when you turn off the light. ON : Always keeps the light on as long as the camcorder is turned on. • It is recommended to set M.W.B. (੬pg. 14) to in CAMERA MENU when you use the video light. •.../returns the picture into a mosaic pattern. To darken the image, rotate the MENU Wheel 1 upward. AUTO: Automatically turns on the light when the camcorder senses insufficient lighting on the subject. Helps to cover the scene. FOG: Makes the picture look . Use in B/W. MOSAIC: Turns recorded scenes...
...decreases (maximum ±06). OFF : Turns off automatically when you turn off the light. ON : Always keeps the light on as long as the camcorder is turned on. • It is recommended to set M.W.B. (੬pg. 14) to in CAMERA MENU when you use the video light. •.../returns the picture into a mosaic pattern. To darken the image, rotate the MENU Wheel 1 upward. AUTO: Automatically turns on the light when the camcorder senses insufficient lighting on the subject. Helps to cover the scene. FOG: Makes the picture look . Use in B/W. MOSAIC: Turns recorded scenes...

Instructions
Page 15
... be set to "SP". (Please note that SCROLL in TITLE SETUP (੬pg. 14) be set DATE/TIME in S-VHS. S-VHS (S-VHS ET) ON: With an S-VHS cassette, "S" = appears and the camcorder records in SYSTEM MENU first ੬pg. 8). • The selected display will resume. • "DEMO MODE"... remains "ON" even if the camcorder power is turned off except Date/Time, Instant Title and Warning Indication. OFF: Records in VHS on a VHS or S-VHS cassette. • JVC EHG (Extra High Grade) tapes are displayed. Tapes recorded in S-VHS ET mode cannot be played back on some VCRs,...
... be set to "SP". (Please note that SCROLL in TITLE SETUP (੬pg. 14) be set DATE/TIME in S-VHS. S-VHS (S-VHS ET) ON: With an S-VHS cassette, "S" = appears and the camcorder records in SYSTEM MENU first ੬pg. 8). • The selected display will resume. • "DEMO MODE"... remains "ON" even if the camcorder power is turned off except Date/Time, Instant Title and Warning Indication. OFF: Records in VHS on a VHS or S-VHS cassette. • JVC EHG (Extra High Grade) tapes are displayed. Tapes recorded in S-VHS ET mode cannot be played back on some VCRs,...
Instructions
Page 17
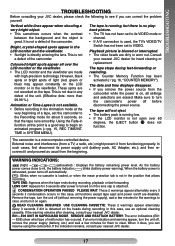
...: These 2 warnings appear alternately every 3 seconds if dirt is a microcomputer-controlled device. If an error indication and warning appear, turn the camcorder's power off (without removing the power supply), wait a few minutes for them to nil, the battery indicator blinks (battery power warning). Using... The tape is running low. • If the LCD monitor is great. Consult your JVC dealer, please check the following to clear, and turn it does, you can resume using the camcorder. Vertical white lines appear when shooting a very bright object. • This sometimes occurs ...
...: These 2 warnings appear alternately every 3 seconds if dirt is a microcomputer-controlled device. If an error indication and warning appear, turn the camcorder's power off (without removing the power supply), wait a few minutes for them to nil, the battery indicator blinks (battery power warning). Using... The tape is running low. • If the LCD monitor is great. Consult your JVC dealer, please check the following to clear, and turn it does, you can resume using the camcorder. Vertical white lines appear when shooting a very bright object. • This sometimes occurs ...
Instructions
Page 18
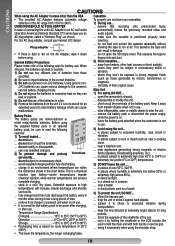
...; Recharging time is normal for an extended period to soot or steam such as shown. ... near a cooking stove. ... do not open the camcorder's chassis. ... do not short-circuit the terminals. ... in summer. ... in a closed car in direct sunlight. ... carry it excessively when ...video and other than the USA Cassettes • The provided AC Adapter features automatic voltage To properly use and store your nearest JVC dealer. USING HOUSEHOLD AC PLUG ADAPTER ... beware that recording onto prerecorded tapes In case of the battery pack. Main Unit ...
...; Recharging time is normal for an extended period to soot or steam such as shown. ... near a cooking stove. ... do not open the camcorder's chassis. ... do not short-circuit the terminals. ... in summer. ... in a closed car in direct sunlight. ... carry it excessively when ...video and other than the USA Cassettes • The provided AC Adapter features automatic voltage To properly use and store your nearest JVC dealer. USING HOUSEHOLD AC PLUG ADAPTER ... beware that recording onto prerecorded tapes In case of the battery pack. Main Unit ...

Instructions
Page 19
... it . Press EJECT for a Class B digital device, pursuant to the camcorder's lens. 2) Cleaning The Camcorder 1 Gently wipe the exterior with a soft cloth, with it is encouraged to try to correct the interference by JVC could void the user's authority to the cool air from an air conditioner....blower brush, then wipe it strongly or apply any interference received, including interference that to which can lead to internal damage to the camcorder itself. 3 Blow the lens with lens cleaning paper. 4 Remove dust from that may cause harmful interference to the following phenomena for ...
... it . Press EJECT for a Class B digital device, pursuant to the camcorder's lens. 2) Cleaning The Camcorder 1 Gently wipe the exterior with a soft cloth, with it is encouraged to try to correct the interference by JVC could void the user's authority to the cool air from an air conditioner....blower brush, then wipe it strongly or apply any interference received, including interference that to which can lead to internal damage to the camcorder itself. 3 Blow the lens with lens cleaning paper. 4 Remove dust from that may cause harmful interference to the following phenomena for ...
Instructions
Page 20
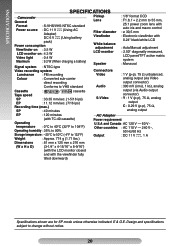
E & O.E. SPECIFICATIONS SPECIFICATIONS Camcorder General Format : S-VHS/VHS NTSC standard Power source : DC 11 V (Using AC Adapter) DC 6 V (Using battery pack) Power consumption Viewfinder on : 3.5 W LCD monitor on : 4.3 W Video light : ...system Luminance : FM recording Connectors Video : 1 V (p-p), 75 Ω unbalanced, Colour : Converted sub-carrier analog output (via Video direct recording output connector) Conforms to VHS standard Audio : 300 mV (rms), 1 kΩ, analog Cassette : / cassette Tape speed SP : 33.35 mm/sec. (1-5/16 ips) EP : 11.12 mm...
E & O.E. SPECIFICATIONS SPECIFICATIONS Camcorder General Format : S-VHS/VHS NTSC standard Power source : DC 11 V (Using AC Adapter) DC 6 V (Using battery pack) Power consumption Viewfinder on : 3.5 W LCD monitor on : 4.3 W Video light : ...system Luminance : FM recording Connectors Video : 1 V (p-p), 75 Ω unbalanced, Colour : Converted sub-carrier analog output (via Video direct recording output connector) Conforms to VHS standard Audio : 300 mV (rms), 1 kΩ, analog Cassette : / cassette Tape speed SP : 33.35 mm/sec. (1-5/16 ips) EP : 11.12 mm...
Instructions
Page 24
.... 14 Z Zooming pg. 10 L LCD Monitor/ Viewfinder, Indications ........ pg. 9, 15 C Q Quick Review pg. 10 R Recording pg. 9 Recording Format (S-VHS/ S-VHS ET).......pg. 15 Recording Mode pg. 14 Retake pg. 10 Cassette Adapter pg. 12 Rewind The Tape pg. 9 Charging The Battery Pack pg. 7 Clean The... Camcorder pg. 19 Connection To a VCR/ TV pg. 11 Counter Memory pg. 16 D Date/ Time Display pg. 15 Date/ Time Settings pg. 8 Demonstration...
.... 14 Z Zooming pg. 10 L LCD Monitor/ Viewfinder, Indications ........ pg. 9, 15 C Q Quick Review pg. 10 R Recording pg. 9 Recording Format (S-VHS/ S-VHS ET).......pg. 15 Recording Mode pg. 14 Retake pg. 10 Cassette Adapter pg. 12 Rewind The Tape pg. 9 Charging The Battery Pack pg. 7 Clean The... Camcorder pg. 19 Connection To a VCR/ TV pg. 11 Counter Memory pg. 16 D Date/ Time Display pg. 15 Date/ Time Settings pg. 8 Demonstration...


