Instructions
Page 1
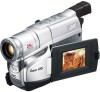
...; Available when the Power Switch is located on the bottom of this information for purchasing the JVC Compact VHS camcorder. LYT1378-001A Before use of the camcorder. Model No. Dear Customer, Thank you for future reference. Serial No. INSTRUCTIONS COMPACT VHS CAMCORDER GR-SXM37 ENGLISH For Customer Use: Enter below the Model No. and Serial No. which is...
...; Available when the Power Switch is located on the bottom of this information for purchasing the JVC Compact VHS camcorder. LYT1378-001A Before use of the camcorder. Model No. Dear Customer, Thank you for future reference. Serial No. INSTRUCTIONS COMPACT VHS CAMCORDER GR-SXM37 ENGLISH For Customer Use: Enter below the Model No. and Serial No. which is...
Instructions
Page 2
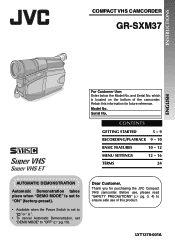
... in some areas. Please consult your nearest JVC dealer for details on accessories and their availability. PROVIDED ACCESSORIES PROVIDED ACCESSORIES AC Adapter AP-V14U or AP-V16U OPTIONAL ACCESSORIES • Battery Packs BN-V12U, BN-V20U, BNV400U • Compact S-VHS ( ) Cassettes ST- If a cable... has only one or more core filter. Battery Pack BN-V10U Shoulder Strap Cassette Adapter C-P8U Lens Cap NOTE: In order to maintain optimum performance of the camcorder, provided cables may be equipped with...
... in some areas. Please consult your nearest JVC dealer for details on accessories and their availability. PROVIDED ACCESSORIES PROVIDED ACCESSORIES AC Adapter AP-V14U or AP-V16U OPTIONAL ACCESSORIES • Battery Packs BN-V12U, BN-V20U, BNV400U • Compact S-VHS ( ) Cassettes ST- If a cable... has only one or more core filter. Battery Pack BN-V10U Shoulder Strap Cassette Adapter C-P8U Lens Cap NOTE: In order to maintain optimum performance of the camcorder, provided cables may be equipped with...
Instructions
Page 3
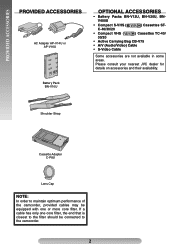
...signals. At the end of the AC Adapter are possible anywhere. • Use the JVC BN-V10U/V12U/V20U/V400U battery packs and, to recharge them or to supply power to the camcorder from an AC outlet, use the provided multi-voltage AC Adapter. (An appropriate conversion ...of mercury. ATTENTION The product that contains a small amount of ficials for recycling options or proper disposal. Check with a television of this camcorder. 3 Only cassettes marked and can be used with arrowhead symbol, within the product's enclosure that may be of sufficient magnitude to constitute a ...
...signals. At the end of the AC Adapter are possible anywhere. • Use the JVC BN-V10U/V12U/V20U/V400U battery packs and, to recharge them or to supply power to the camcorder from an AC outlet, use the provided multi-voltage AC Adapter. (An appropriate conversion ...of mercury. ATTENTION The product that contains a small amount of ficials for recycling options or proper disposal. Check with a television of this camcorder. 3 Only cassettes marked and can be used with arrowhead symbol, within the product's enclosure that may be of sufficient magnitude to constitute a ...

Instructions
Page 5
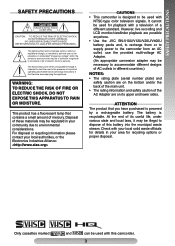
... @ \[ ] ^ _ { | } / :; < = > 120M I GHT ? S-ET SP -1 : 23 : 45 AT VOLUME ੬pg. 17 for "Warning Indications" 5 ET T30 REC SP S-VHS REC PAUSE 5M I N +02 MWB 1 / 2S CONGRATULAT I ONS 25. 12. 04 11 : 45 : 18 BR I N A S - V 0 1 2 1X 3 ba 45 TBC 6 789! GETTING...to take up slack . Eyepiece 5 1 2 3 4 6 7 8 5 9 45˚ ! During shooting % & () Keep the lens cap attached to the camcorder Cassette holder ~ 180° 90° + LCD monitor , Turn the gear to this diagram while reading the instructions. "# $ Connector Cover Viewfinder Speaker -
... @ \[ ] ^ _ { | } / :; < = > 120M I GHT ? S-ET SP -1 : 23 : 45 AT VOLUME ੬pg. 17 for "Warning Indications" 5 ET T30 REC SP S-VHS REC PAUSE 5M I N +02 MWB 1 / 2S CONGRATULAT I ONS 25. 12. 04 11 : 45 : 18 BR I N A S - V 0 1 2 1X 3 ba 45 TBC 6 789! GETTING...to take up slack . Eyepiece 5 1 2 3 4 6 7 8 5 9 45˚ ! During shooting % & () Keep the lens cap attached to the camcorder Cassette holder ~ 180° 90° + LCD monitor , Turn the gear to this diagram while reading the instructions. "# $ Connector Cover Viewfinder Speaker -

Instructions
Page 7
...V400U (optional) Charging time approx. 1 hr. 30 min. approx. 5 hrs. 10 min. ATTENTION: Before detaching the power source, make sure that the camcorder's power is finished, charging automatically starts and the CHARGE lamp % blinks normally. 7 The CHARGE lamp % blinks faster to indicate discharging. 3) When ... The CHARGE lamp % blinks to indicate charging. 4) When the CHARGE lamp % stops blinking and turns off . Failure to do so can cause the camcorder to malfunction. approx. 1 hr. 40 min. approx. 2 hrs. 40 min. To Detach The Battery Pack... ... Disconnect the AC Adapter from the ...
...V400U (optional) Charging time approx. 1 hr. 30 min. approx. 5 hrs. 10 min. ATTENTION: Before detaching the power source, make sure that the camcorder's power is finished, charging automatically starts and the CHARGE lamp % blinks normally. 7 The CHARGE lamp % blinks faster to indicate discharging. 3) When ... The CHARGE lamp % blinks to indicate charging. 4) When the CHARGE lamp % stops blinking and turns off . Failure to do so can cause the camcorder to malfunction. approx. 1 hr. 40 min. approx. 2 hrs. 40 min. To Detach The Battery Pack... ... Disconnect the AC Adapter from the ...
Instructions
Page 8
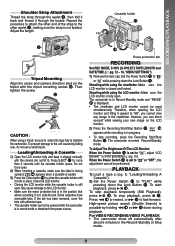
... processes electricity internally, it becomes warm during use , it . If the environment is the ideal temperature range. However, it . Consult an authorised JVC dealer for the first time or after a long storage period, the CHARGE lamp % may be incomplete. • Charging time varies according ...remains extremely short, the battery is recommended that your thumb and fingers can charge the BN-V10U/V12U/V20U/V400U battery pack without the camcorder. Pull up the viewfinder and adjust it . Refasten the Velcro strip. 3 " Velcro strip Viewfinder Adjustment 1) Set the...
... processes electricity internally, it becomes warm during use , it . If the environment is the ideal temperature range. However, it . Consult an authorised JVC dealer for the first time or after a long storage period, the CHARGE lamp % may be incomplete. • Charging time varies according ...remains extremely short, the battery is recommended that your thumb and fingers can charge the BN-V10U/V12U/V20U/V400U battery pack without the camcorder. Pull up the viewfinder and adjust it . Refasten the Velcro strip. 3 " Velcro strip Viewfinder Adjustment 1) Set the...
Instructions
Page 9
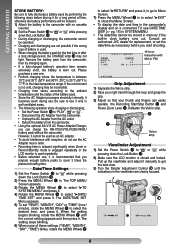
... "OFF", this adjustment cannot be used simultaneously. Shooting while using a tripod, be opened while the camcorder is in record mode or detached from power source. + Erase protection tab RECORDING Set REC MODE, S-VHS (S-VHS ET), TAPE LENGTH and DATE/TIME. (੬ pg. 12 - 16, "MENU SETTINGS") 1) ...Remove the lens cap. However, you cannot view any image in the Record-Standby or Stop mode. 9 The camcorder re-enters Record-Standby mode. To Adjust...
... "OFF", this adjustment cannot be used simultaneously. Shooting while using a tripod, be opened while the camcorder is in record mode or detached from power source. + Erase protection tab RECORDING Set REC MODE, S-VHS (S-VHS ET), TAPE LENGTH and DATE/TIME. (੬ pg. 12 - 16, "MENU SETTINGS") 1) ...Remove the lens cap. However, you cannot view any image in the Record-Standby or Stop mode. 9 The camcorder re-enters Record-Standby mode. To Adjust...

Instructions
Page 10
... extends the maximum magnification offered by using Digital Zoom, the quality of image may become monochrome or darken during playback, the camcorder enters the Auto Tracking mode and "AT" ! Tape is rewound for approx. 1 second and played back automatically, then pauses in ...the Power Switch $ is in , or "W" to the background. 1) Press BACKLIGHT ( during 5Sec. Retake To re-record certain segments. 1) Make sure the camcorder is set the zoom while in CAMERA MENU. "AT" ! " " < is displayed and the subject is reserved. 3) Press the Recording Start/Stop Buttons "....
... extends the maximum magnification offered by using Digital Zoom, the quality of image may become monochrome or darken during playback, the camcorder enters the Auto Tracking mode and "AT" ! Tape is rewound for approx. 1 second and played back automatically, then pauses in ...the Power Switch $ is in , or "W" to the background. 1) Press BACKLIGHT ( during 5Sec. Retake To re-record certain segments. 1) Make sure the camcorder is set the zoom while in CAMERA MENU. "AT" ! " " < is displayed and the subject is reserved. 3) Press the Recording Start/Stop Buttons "....
Instructions
Page 11
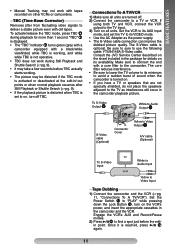
...sure all units. Be sure to sure to Video Input Tape Dubbing 1) Connect the camcorder and the VCR (੬pg. 11, "Connections To A TV/VCR"). Consult the JVC Service Center described on the sheet included in the camcorder playback picture. The core filter reduces interference. • Be sure to ...If you have a TV or speakers that are turned off TBC. TBC (Time Base Corrector) Removes jitter from fluctuating video signals to the camcorder. If using both TV and VCR, connect the VCR output to find a spot just before TBC actually starts working , and white while TBC...
...sure all units. Be sure to sure to Video Input Tape Dubbing 1) Connect the camcorder and the VCR (੬pg. 11, "Connections To A TV/VCR"). Consult the JVC Service Center described on the sheet included in the camcorder playback picture. The core filter reduces interference. • Be sure to ...If you have a TV or speakers that are turned off TBC. TBC (Time Base Corrector) Removes jitter from fluctuating video signals to the camcorder. If using both TV and VCR, connect the VCR output to find a spot just before TBC actually starts working , and white while TBC...

Instructions
Page 12
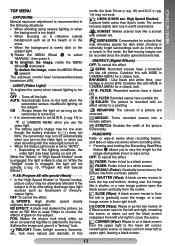
...8226; The color shown in the window 4 changes from blue \ red \ green (indicating playback is 1 Latch affixed 3 Gear Compact video cassette 7 Reels adapter, the tape may appear on a regular VHS VCR. MENU SETTINGS This Menu Screen cannot be played back on the screen. AE OF F D I G I F ECT OF F ...MENU 2 6 Hole • If there is slack in the video tape when inserting the compact cassette into the VCR and play back an S-VHS-C/VHS-C video cassette recorded with this camcorder on a SVHS-C/VHS VCR. 1) Slide the latch 1 to open the compartment door, then insert your fi...
...8226; The color shown in the window 4 changes from blue \ red \ green (indicating playback is 1 Latch affixed 3 Gear Compact video cassette 7 Reels adapter, the tape may appear on a regular VHS VCR. MENU SETTINGS This Menu Screen cannot be played back on the screen. AE OF F D I G I F ECT OF F ...MENU 2 6 Hole • If there is slack in the video tape when inserting the compact cassette into the VCR and play back an S-VHS-C/VHS-C video cassette recorded with this camcorder on a SVHS-C/VHS VCR. 1) Slide the latch 1 to open the compartment door, then insert your fi...
Instructions
Page 13
... to the lens. LIGHT (Video Light) To brighten the scene when natural lighting is used. AUTO: Automatically turns on the light when the camcorder senses insufficient lighting on the subject. While the "Twilight" mode is attached to the lower left corner, revealing the scene, or ...• In the "High Speed Shutter" or "Sports" modes, picture colour may be low even though the battery indicator ( ) does not blink, the camcorder may otherwise appear too dark when shooting in extremely bright surroundings such as in as the two halves of glare on . DIGIFECT (Digital Effects) OFF...
... to the lens. LIGHT (Video Light) To brighten the scene when natural lighting is used. AUTO: Automatically turns on the light when the camcorder senses insufficient lighting on the subject. While the "Twilight" mode is attached to the lower left corner, revealing the scene, or ...• In the "High Speed Shutter" or "Sports" modes, picture colour may be low even though the battery indicator ( ) does not blink, the camcorder may otherwise appear too dark when shooting in extremely bright surroundings such as in as the two halves of glare on . DIGIFECT (Digital Effects) OFF...

Instructions
Page 15
... function, it is recommended that tapes recorded on this camcorder be played back on this camcorder but this function, it is recommended that it enables higher-quality recording and playback. • With some JVC VCRs. • Tapes recorded in S-VHS. REC MODE should be set to "SP". (Please... note that SCROLL in the SYSTEM MENU before shooting. • In the AUTO DATE mode, the camcorder records the date for recording important scenes, ...
... function, it is recommended that tapes recorded on this camcorder be played back on this camcorder but this function, it is recommended that it enables higher-quality recording and playback. • With some JVC VCRs. • Tapes recorded in S-VHS. REC MODE should be set to "SP". (Please... note that SCROLL in the SYSTEM MENU before shooting. • In the AUTO DATE mode, the camcorder records the date for recording important scenes, ...
Instructions
Page 17
..., power turns off are disabled. E06) show what type of the camcorder. TROUBLESHOOTING TROUBLESHOOTING Before consulting your JVC dealer, please check the following to see if you remove the power source from the camcorder while the power is on, all settings and selections are erased. Vertical... been activated (੬pg. 16, "COUNTER MEMORY"). Make sure to turn the camcorder's power off , remove the power supply (battery, etc.) and wait a few minutes for 5 seconds after cleaning, consult your nearest JVC dealer. 17 The tape will not eject. • The battery pack is running...
..., power turns off are disabled. E06) show what type of the camcorder. TROUBLESHOOTING TROUBLESHOOTING Before consulting your JVC dealer, please check the following to see if you remove the power source from the camcorder while the power is on, all settings and selections are erased. Vertical... been activated (੬pg. 16, "COUNTER MEMORY"). Make sure to turn the camcorder's power off , remove the power supply (battery, etc.) and wait a few minutes for 5 seconds after cleaning, consult your nearest JVC dealer. 17 The tape will not eject. • The battery pack is running...
Instructions
Page 18
...exposed to excessive humidity, dust, shock or vibration. ... allow it against hard objects. ... leave the battery pack attached when the camcorder is a chemical reaction type battery-cooler temperatures impede chemical reaction, while warmer temperatures can leak or explode. 5) Do not dispose of... 10°C to 30°C (14°F to excessive heat as they can prevent complete charging. ... near a television set. ... JVC batteries can cause serious damage to the camera's internal battery charging circuits. 4) Do not expose the batteries to 86°F) • Recharging...
...exposed to excessive humidity, dust, shock or vibration. ... allow it against hard objects. ... leave the battery pack attached when the camcorder is a chemical reaction type battery-cooler temperatures impede chemical reaction, while warmer temperatures can leak or explode. 5) Do not dispose of... 10°C to 30°C (14°F to excessive heat as they can prevent complete charging. ... near a television set. ... JVC batteries can cause serious damage to the camera's internal battery charging circuits. 4) Do not expose the batteries to 86°F) • Recharging...

Instructions
Page 19
... seconds to open the cassette holder, then remove the cassette. 3 Close and lock the cassette holder by JVC could void the user's authority to the camcorder's lens. 2) Cleaning The Camcorder 1 Gently wipe the exterior with a soft cloth, with diluted mild soap, wipe off and on, the...from that to which can be done only after heating a cold room, under extremely humid conditions or in a residential installation. place the camcorder with the instructions, may not cause harmful interference, and (2) this equipment does cause harmful interference to radio or television reception, which the...
... seconds to open the cassette holder, then remove the cassette. 3 Close and lock the cassette holder by JVC could void the user's authority to the camcorder's lens. 2) Cleaning The Camcorder 1 Gently wipe the exterior with a soft cloth, with diluted mild soap, wipe off and on, the...from that to which can be done only after heating a cold room, under extremely humid conditions or in a residential installation. place the camcorder with the instructions, may not cause harmful interference, and (2) this equipment does cause harmful interference to radio or television reception, which the...
Instructions
Page 20
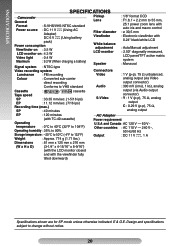
...: 35% to 80% Storage temperature : -20°C to 50°C (-4°F to change without notice. 20 E & O.E. SPECIFICATIONS SPECIFICATIONS Camcorder General Format : S-VHS/VHS NTSC standard Power source : DC 11 V (Using AC Adapter) DC 6 V (Using battery pack) Power consumption Viewfinder on : ... Video : 1 V (p-p), 75 Ω unbalanced, Colour : Converted sub-carrier analog output (via Video direct recording output connector) Conforms to VHS standard Audio : 300 mV (rms), 1 kΩ, analog Cassette : / cassette Tape speed SP : 33.35 mm/sec. (1-5/16 ips...
...: 35% to 80% Storage temperature : -20°C to 50°C (-4°F to change without notice. 20 E & O.E. SPECIFICATIONS SPECIFICATIONS Camcorder General Format : S-VHS/VHS NTSC standard Power source : DC 11 V (Using AC Adapter) DC 6 V (Using battery pack) Power consumption Viewfinder on : ... Video : 1 V (p-p), 75 Ω unbalanced, Colour : Converted sub-carrier analog output (via Video direct recording output connector) Conforms to VHS standard Audio : 300 mV (rms), 1 kΩ, analog Cassette : / cassette Tape speed SP : 33.35 mm/sec. (1-5/16 ips...
Instructions
Page 24
... Brighten/Darken The Image pg. 13 Brighten/Darken The LCD Monitor.......... pg. 9, 15 C Q Quick Review pg. 10 R Recording pg. 9 Recording Format (S-VHS/ S-VHS ET).......pg. 15 Recording Mode pg. 14 Retake pg. 10 Cassette Adapter pg. 12 Rewind The Tape pg. 9 Charging The Battery Pack pg. 7 Clean The... Camcorder pg. 19 Connection To a VCR/ TV pg. 11 Counter Memory pg. 16 D Date/ Time Display pg. 15 Date/ Time Settings pg. 8 Demonstration...
... Brighten/Darken The Image pg. 13 Brighten/Darken The LCD Monitor.......... pg. 9, 15 C Q Quick Review pg. 10 R Recording pg. 9 Recording Format (S-VHS/ S-VHS ET).......pg. 15 Recording Mode pg. 14 Retake pg. 10 Cassette Adapter pg. 12 Rewind The Tape pg. 9 Charging The Battery Pack pg. 7 Clean The... Camcorder pg. 19 Connection To a VCR/ TV pg. 11 Counter Memory pg. 16 D Date/ Time Display pg. 15 Date/ Time Settings pg. 8 Demonstration...


