
Firmware Installation Guide (English)
Page 2
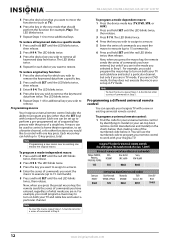
...NOT TURN THE POWER OFF OR UNPLUG DURING THE UPDATE Note: During the software update, a progress bar will be blue; When you may have set up the process is complete and you to "Choose your TV back on the side of the update; Once the TV is recommended that you... or the power button on . 5. the progress bar will need to your favorite channels and any custom settings that you experience any issues while performing this upgrade, call Insignia Customer Support at (877) 467‐4289 for TV set up. Note: It is powered up . Note: You will fill two times.
...NOT TURN THE POWER OFF OR UNPLUG DURING THE UPDATE Note: During the software update, a progress bar will be blue; When you may have set up the process is complete and you to "Choose your TV back on the side of the update; Once the TV is recommended that you... or the power button on . 5. the progress bar will need to your favorite channels and any custom settings that you experience any issues while performing this upgrade, call Insignia Customer Support at (877) 467‐4289 for TV set up. Note: It is powered up . Note: You will fill two times.
Warranty (English)
Page 2
..., ANY IMPLIED WARRANTIES OF AND CONDITIONS OF MERCHANTABILITY AND FITNESS FOR A PARTICULAR PURPOSE, ARE LIMITED IN DURATION TO THE WARRANTY PERIOD SET FORTH ABOVE AND NO WARRANTIES, WHETHER EXPRESS OR IMPLIED, WILL APPLY AFTER THE WARRANTY PERIOD. Contact Insignia: For customer service please call 1-877-467-4289 www.insigniaproducts.com Distributed by...
..., ANY IMPLIED WARRANTIES OF AND CONDITIONS OF MERCHANTABILITY AND FITNESS FOR A PARTICULAR PURPOSE, ARE LIMITED IN DURATION TO THE WARRANTY PERIOD SET FORTH ABOVE AND NO WARRANTIES, WHETHER EXPRESS OR IMPLIED, WILL APPLY AFTER THE WARRANTY PERIOD. Contact Insignia: For customer service please call 1-877-467-4289 www.insigniaproducts.com Distributed by...
User Manual (English)
Page 3
... the audio mode 24 Selecting the sound mode or audio language 25 Adjusting audio settings 25 Playing audio only 25 Changing channel settings 25 Automatically scanning for channels 25 Hiding channels 26 Setting up a favorite channel list 26 Labeling a channel 27 Viewing the digital TV ...33 Selecting the closed captioning mode 33 Customizing the DTV closed captioning style 34 Adjusting time settings 35 Manually setting the date and time 35 Setting the sleep timer 35 Adjusting menu settings 36 Selecting the menu language 36 Adjusting the menu transparency 36 Labeling a video input ...
... the audio mode 24 Selecting the sound mode or audio language 25 Adjusting audio settings 25 Playing audio only 25 Changing channel settings 25 Automatically scanning for channels 25 Hiding channels 26 Setting up a favorite channel list 26 Labeling a channel 27 Viewing the digital TV ...33 Selecting the closed captioning mode 33 Customizing the DTV closed captioning style 34 Adjusting time settings 35 Manually setting the date and time 35 Setting the sleep timer 35 Adjusting menu settings 36 Selecting the menu language 36 Adjusting the menu transparency 36 Labeling a video input ...
User Manual (English)
Page 11
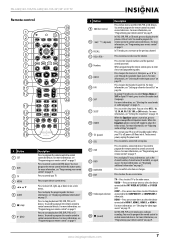
... Mono or SAP. When the Equalizer option is turned on, press to control a connected DVD player. For more information, see "Adjusting audio settings" on page 25. Press one or more information, see "Programming your remote control" on page 9. Press to toggle among different Equalizer modes...Press to control connected devices. NS-L42Q120-10A/NS-L46Q120-10A 42"/46" LCD TV Remote control 19 1 20 2 21 3 22 4 23 5 24 6 TV VIDEO COMP HDMI 25 7 26 8 27 9 28 10 29 11 30 12 31 32 13 14 33 15 34 16 35 17 36 18 37 # Button 1 SET 2 DVD 3 TV 4 MENU...
... Mono or SAP. When the Equalizer option is turned on, press to control a connected DVD player. For more information, see "Adjusting audio settings" on page 25. Press one or more information, see "Programming your remote control" on page 9. Press to toggle among different Equalizer modes...Press to control connected devices. NS-L42Q120-10A/NS-L46Q120-10A 42"/46" LCD TV Remote control 19 1 20 2 21 3 22 4 23 5 24 6 TV VIDEO COMP HDMI 25 7 26 8 27 9 28 10 29 11 30 12 31 32 13 14 33 15 34 16 35 17 36 18 37 # Button 1 SET 2 DVD 3 TV 4 MENU...
User Manual (English)
Page 12
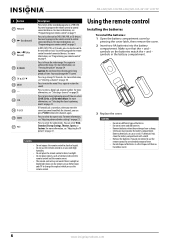
...• The remote control may not work if direct sunlight or bright light shines on page 21. For more information, see "Adjusting advanced video settings" on the batteries match the + and - Caution • Do not expose the remote control to block the channels again. Using the remote ...the batteries: 1 Open the battery compartment cover by pressing the cover latch, then remove the cover. 2 Insert two AA batteries into the battery compartment. NS-L42Q120-10A/NS-L46Q120-10A 42"/46" LCD TV # Button 27 PVR/LIST 28 (fast forward) 29 / forward) (skip 30 /FREEZE 31 CH /CH 32 MUTE 33 ...
...• The remote control may not work if direct sunlight or bright light shines on page 21. For more information, see "Adjusting advanced video settings" on the batteries match the + and - Caution • Do not expose the remote control to block the channels again. Using the remote ...the batteries: 1 Open the battery compartment cover by pressing the cover latch, then remove the cover. 2 Insert two AA batteries into the battery compartment. NS-L42Q120-10A/NS-L46Q120-10A 42"/46" LCD TV # Button 27 PVR/LIST 28 (fast forward) 29 / forward) (skip 30 /FREEZE 31 CH /CH 32 MUTE 33 ...
User Manual (English)
Page 13
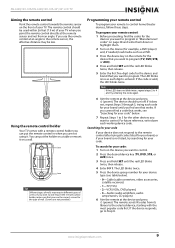
...9 1. To search for your code: 1 Turn on the remote for the device that you want to program (TV, DVD, STB, or AUX). 4 Press and hold SET until you use the remote control at the remote sensor and not from its library to control home theater devices, follow these steps. www.insigniaproducts...brand is not listed, try entering the code again. 6 Aim the remote at the device and press (power). If the code is entered. NS-L42Q120-10A/NS-L46Q120-10A 42"/46" LCD TV Aiming the remote control Point the remote control towards the remote sensor on a wall. If you use the correct screws for...
...9 1. To search for your code: 1 Turn on the remote for the device that you want to program (TV, DVD, STB, or AUX). 4 Press and hold SET until you use the remote control at the remote sensor and not from its library to control home theater devices, follow these steps. www.insigniaproducts...brand is not listed, try entering the code again. 6 Aim the remote at the device and press (power). If the code is entered. NS-L42Q120-10A/NS-L46Q120-10A 42"/46" LCD TV Aiming the remote control Point the remote control towards the remote sensor on a wall. If you use the correct screws for...
User Manual (English)
Page 14
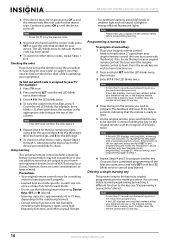
...10A/NS-L46Q120-10A 42"/46" LCD TV 7 If the device does not respond, press CH and the remote tests the next code for that the remote is ready to learn. 5 On the original remote, press and hold the key to exit programming and review the Precautions" above ). However, there are low, or the Insignia... includes a learning feature (some models may need to find out which five-digit code is operating your code" on . 2 Press and hold SET to be in "Searching for your equipment. Continue to 8. Count the red LED blinks (for three seconds, indicating that device type. Note Please...
...10A/NS-L46Q120-10A 42"/46" LCD TV 7 If the device does not respond, press CH and the remote tests the next code for that the remote is ready to learn. 5 On the original remote, press and hold the key to exit programming and review the Precautions" above ). However, there are low, or the Insignia... includes a learning feature (some models may need to find out which five-digit code is operating your code" on . 2 Press and hold SET to be in "Searching for your equipment. Continue to 8. Count the red LED blinks (for three seconds, indicating that device type. Note Please...
User Manual (English)
Page 15
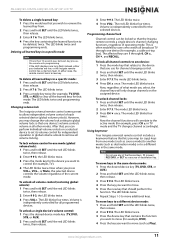
...mode LED blinks twice. 3 Press CH once. Note Do not use for channel changing control. 2 Press and hold SET until the mode LED blinks twice, then release. 2 Enter 9 7 3. NS-L42Q120-10A/NS-L46Q120-10A 42"/46" LCD TV To delete a single learned key: 1 Press the mode key that you wish to remove the... the function. The LED blinks twice and programming ends. The LED blinks twice and programming ends. The affected keys are low, or the Insignia remote control has a memory fault. If the LED displays one device's volume controls volume in all learned keys in a specific mode Note ...
...mode LED blinks twice. 3 Press CH once. Note Do not use for channel changing control. 2 Press and hold SET until the mode LED blinks twice, then release. 2 Enter 9 7 3. NS-L42Q120-10A/NS-L46Q120-10A 42"/46" LCD TV To delete a single learned key: 1 Press the mode key that you wish to remove the... the function. The LED blinks twice and programming ends. The LED blinks twice and programming ends. The affected keys are low, or the Insignia remote control has a memory fault. If the LED displays one device's volume controls volume in all learned keys in a specific mode Note ...
User Manual (English)
Page 16
... LED blinks twice, then release. 2 Press 9 9 4. NS-L42Q120-10A/NS-L46Q120-10A 42"/46" LCD TV 5 Press the device key that should perform the function (for which you wish to remove the keymoved data from a specific key. 2 Press and hold SET until the LED blinks twice, then release. 3 Press 9 7 8. Insignia TV codes for universal remote controls (for...
... LED blinks twice, then release. 2 Press 9 9 4. NS-L42Q120-10A/NS-L46Q120-10A 42"/46" LCD TV 5 Press the device key that should perform the function (for which you wish to remove the keymoved data from a specific key. 2 Press and hold SET until the LED blinks twice, then release. 3 Press 9 7 8. Insignia TV codes for universal remote controls (for...
User Manual (English)
Page 17
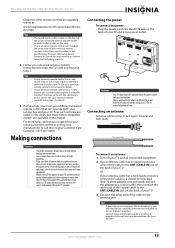
NS-L42Q120-10A/NS-L46Q120-10A 42"/46" LCD TV Codes for other ...label. • Always unplug the AC power cord from the TV speakers. For more help, call the Insignia Customer Care Center at a time. See your universal remote control's instructions for the brands Orion, Emerson, ...set -top box and your TV for illustration purposes only. Coaxial cable Twin-lead cable Cautions • Check the connectors for position and type before making any connections. • Loose connections can manually program it using your TV. Cautions • Your TV should only be using the Insignia...
NS-L42Q120-10A/NS-L46Q120-10A 42"/46" LCD TV Codes for other ...label. • Always unplug the AC power cord from the TV speakers. For more help, call the Insignia Customer Care Center at a time. See your universal remote control's instructions for the brands Orion, Emerson, ...set -top box and your TV for illustration purposes only. Coaxial cable Twin-lead cable Cautions • Check the connectors for position and type before making any connections. • Loose connections can manually program it using your TV. Cautions • Your TV should only be using the Insignia...
User Manual (English)
Page 18
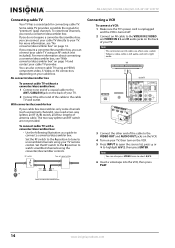
.... If you require a converter/descrambler box, you need a converter/descrambler box. The two-way splitter and RF switch are often color-coded. Set the RF switch to the B position to highlight A/V 2, then press ENTER. If you do not require a converter/descrambler box, you need .... 14 www.insigniaproducts.com Set the RF switch to the A position to tune to connect a converter/descrambler box. For more information, see "With converter/descrambler box" on page 14. Note The connectors on the back of antenna cable. NS-L42Q120-10A/NS-L46Q120-10A 42"/46" LCD TV ...
.... If you require a converter/descrambler box, you need a converter/descrambler box. The two-way splitter and RF switch are often color-coded. Set the RF switch to the B position to highlight A/V 2, then press ENTER. If you do not require a converter/descrambler box, you need .... 14 www.insigniaproducts.com Set the RF switch to the A position to tune to connect a converter/descrambler box. For more information, see "With converter/descrambler box" on page 14. Note The connectors on the back of antenna cable. NS-L42Q120-10A/NS-L46Q120-10A 42"/46" LCD TV ...

User Manual (English)
Page 22
... AUDIO jack on the side of your TV and to the VGA jack on the digital audio amplifier and set it to the AUDIO OUT SPDIF jack on the back of TV NS-L42Q120-10A/NS-L46Q120-10A 42"/46" LCD TV 3 Turn on your TV, then turn on the computer. Connecting a digital audio amplifier To... R jacks on audio cables are often color-coded. Side of your TV and to the SPDIF AUDIO IN jack on the analog audio amplifier and set it to the correct output mode. Note The connectors on the analog audio amplifier. White is left audio, and red is turned off . 2 Connect a digital...
... AUDIO jack on the side of your TV and to the VGA jack on the digital audio amplifier and set it to the AUDIO OUT SPDIF jack on the back of TV NS-L42Q120-10A/NS-L46Q120-10A 42"/46" LCD TV 3 Turn on your TV, then turn on the computer. Connecting a digital audio amplifier To... R jacks on audio cables are often color-coded. Side of your TV and to the SPDIF AUDIO IN jack on the analog audio amplifier and set it to the correct output mode. Note The connectors on the analog audio amplifier. White is left audio, and red is turned off . 2 Connect a digital...
User Manual (English)
Page 23
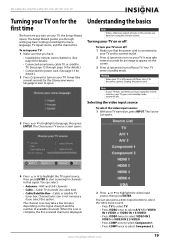
... Cable-Cable TV channels (no cable box). • Cable/Satellite Box-Cable or satellite TV tuner box. To set up basic settings including the menu language, TV signal source, and the channel list. NS-L42Q120-10A/NS-L46Q120-10A 42"/46" LCD TV Turning your TV on for the first time The first time you turn on... TV does not detect an input signal for several seconds for details). • Connected an antenna, cable TV, or satellite TV. (See page 13 through setting up your TV: 1 Make sure that the power cord is displayed. 2 Press or to turn on your TV is off : 1 Make sure that you ...
... Cable-Cable TV channels (no cable box). • Cable/Satellite Box-Cable or satellite TV tuner box. To set up basic settings including the menu language, TV signal source, and the channel list. NS-L42Q120-10A/NS-L46Q120-10A 42"/46" LCD TV Turning your TV on for the first time The first time you turn on... TV does not detect an input signal for several seconds for details). • Connected an antenna, cable TV, or satellite TV. (See page 13 through setting up your TV: 1 Make sure that the power cord is displayed. 2 Press or to turn on your TV is off : 1 Make sure that you ...

User Manual (English)
Page 24
...NS-L42Q120-10A/NS-L46Q120-10A 42"/46" LCD TV • Press HDMI once to select HDMI 1. • Press HDMI twice to select HDMI 2. • Press HDMI three times to select HDMI 3. • Press HDMI four times to close the menu. Selecting a channel To select a channel: • Press CH or CH to go to highlight a setting... main channel 83, press 8, 3, -, then 1. You can select: • PICTURE • AUDIO • CHANNEL • SETTINGS 3 Press or to highlight a setting, then press ENTER to access the submenu. 4 Press or to a digital sub-channel. See "Turning the Auto Input Sensor on ...
...NS-L42Q120-10A/NS-L46Q120-10A 42"/46" LCD TV • Press HDMI once to select HDMI 1. • Press HDMI twice to select HDMI 2. • Press HDMI three times to select HDMI 3. • Press HDMI four times to close the menu. Selecting a channel To select a channel: • Press CH or CH to go to highlight a setting... main channel 83, press 8, 3, -, then 1. You can select: • PICTURE • AUDIO • CHANNEL • SETTINGS 3 Press or to highlight a setting, then press ENTER to access the submenu. 4 Press or to a digital sub-channel. See "Turning the Auto Input Sensor on ...
User Manual (English)
Page 25
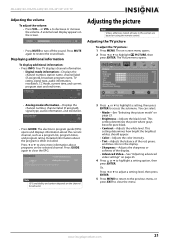
... Press or to view more information about programs on page 23. 4 Press or to decrease or increase the volume. This setting determines the point where grays become pure black. • Contrast-Adjusts the white level. Displaying additional information To display additional information...8226; Advanced Video-See "Adjusting advanced video settings" on the selected channel. Note EPG availability and content depends on the channel broadcaster. 3 Press or to highlight a setting, then press ENTER to restore the sound back. NS-L42Q120-10A/NS-L46Q120-10A 42"/46" LCD TV Adjusting the volume...
... Press or to view more information about programs on page 23. 4 Press or to decrease or increase the volume. This setting determines the point where grays become pure black. • Contrast-Adjusts the white level. Displaying additional information To display additional information...8226; Advanced Video-See "Adjusting advanced video settings" on the selected channel. Note EPG availability and content depends on the channel broadcaster. 3 Press or to highlight a setting, then press ENTER to restore the sound back. NS-L42Q120-10A/NS-L46Q120-10A 42"/46" LCD TV Adjusting the volume...
User Manual (English)
Page 26
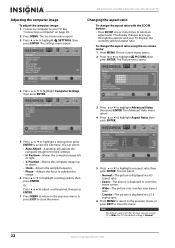
... focus to stabilize the image. 6 Press or to the best settings. • H. Note The default aspect ratio for all input sources, except TV, is Normal. 22 www.insigniaproducts.com The Settings menu opens. NS-L42Q120-10A/NS-L46Q120-10A 42"/46" LCD TV Changing the aspect ratio To change the ...aspect ratio using the on -screen menu opens. 3 Press or to highlight SETTINGS, then press ENTER. Adjusting the computer image To ...
... focus to stabilize the image. 6 Press or to the best settings. • H. Note The default aspect ratio for all input sources, except TV, is Normal. 22 www.insigniaproducts.com The Settings menu opens. NS-L42Q120-10A/NS-L46Q120-10A 42"/46" LCD TV Changing the aspect ratio To change the ...aspect ratio using the on -screen menu opens. 3 Press or to highlight SETTINGS, then press ENTER. Adjusting the computer image To ...
User Manual (English)
Page 27
... visible area of white and near white pixels to achieve a more natural looking display. www.insigniaproducts.com 23 This Picture menu opens. NS-L42Q120-10A/NS-L46Q120-10A 42"/46" LCD TV Selecting the picture mode To change the aspect ratio with a bluish tint. • Normal-Pictures appear more white... the picture brightness and backlight levels for lower power consumption. • Custom-When you adjust the Brightness, Contrast, Color, Tint, and Sharpness settings in " on -screen menu opens. 2 Press or to highlight PICTURE, then press ENTER. You can select On or Off. To select the...
... visible area of white and near white pixels to achieve a more natural looking display. www.insigniaproducts.com 23 This Picture menu opens. NS-L42Q120-10A/NS-L46Q120-10A 42"/46" LCD TV Selecting the picture mode To change the aspect ratio with a bluish tint. • Normal-Pictures appear more white... the picture brightness and backlight levels for lower power consumption. • Custom-When you adjust the Brightness, Contrast, Color, Tint, and Sharpness settings in " on -screen menu opens. 2 Press or to highlight PICTURE, then press ENTER. You can select On or Off. To select the...

User Manual (English)
Page 28
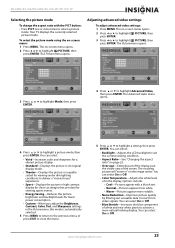
... 6 Press or to the screen In TV mode only, your TV can select Off, Low, Normal, or High. • Advanced Contrast-Sets advanced contrast settings. To freeze the picture: • Press FREEZE once to close the menu. 24 www.insigniaproducts.com Image refresh rate increases to highlight an equalizer... opens. 2 Press or to select the audio mode. To select the audio mode when the Equalizer setting is set to close the menu. To fit the picture to Off: 1 Press MENU. NS-L42Q120-10A/NS-L46Q120-10A 42"/46" LCD TV • DCM-Delivers clear and fast action images by reducing motion blur in...
... 6 Press or to the screen In TV mode only, your TV can select Off, Low, Normal, or High. • Advanced Contrast-Sets advanced contrast settings. To freeze the picture: • Press FREEZE once to close the menu. 24 www.insigniaproducts.com Image refresh rate increases to highlight an equalizer... opens. 2 Press or to select the audio mode. To select the audio mode when the Equalizer setting is set to close the menu. To fit the picture to Off: 1 Press MENU. NS-L42Q120-10A/NS-L46Q120-10A 42"/46" LCD TV • DCM-Delivers clear and fast action images by reducing motion blur in...

User Manual (English)
Page 29
...or RAW. • Audio Language-Selects the default language track when watching digital TV programs. You can select: • Equalizer-Sets the audio frequency response to the optimum level. For more information, see "Selecting the sound mode or audio language" on -...NS-L42Q120-10A/NS-L46Q120-10A 42"/46" LCD TV Selecting the sound mode or audio language To select the sound mode in this section are replaced with: • Equalizer Mode-Selects one or more times to select an audio language (if available). The on page 25. • Reset Audio Settings-Resets the audio settings...
...or RAW. • Audio Language-Selects the default language track when watching digital TV programs. You can select: • Equalizer-Sets the audio frequency response to the optimum level. For more information, see "Selecting the sound mode or audio language" on -...NS-L42Q120-10A/NS-L46Q120-10A 42"/46" LCD TV Selecting the sound mode or audio language To select the sound mode in this section are replaced with: • Equalizer Mode-Selects one or more times to select an audio language (if available). The on page 25. • Reset Audio Settings-Resets the audio settings...
User Manual (English)
Page 30
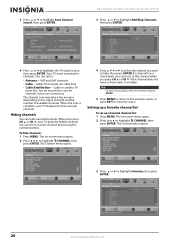
...2 Press or to highlight CHANNEL, then press ENTER. When your press CH or CH , your TV displays the first scanned channels. Setting up a favorite channel list To set up a favorite channel list: 1 Press MENU. Note To add a channel back, select the channel and press ENTER. 5 Press MENU... on the signal strength and the number of available channels. You can hide scanned channels. You can tune to hide, then press ENTER. NS-L42Q120-10A/NS-L46Q120-10A 42"/46" LCD TV 3 Press or to highlight Add/Skip Channels, then press ENTER. 4 Press or to highlight CHANNEL, then press ...
...2 Press or to highlight CHANNEL, then press ENTER. When your press CH or CH , your TV displays the first scanned channels. Setting up a favorite channel list To set up a favorite channel list: 1 Press MENU. Note To add a channel back, select the channel and press ENTER. 5 Press MENU... on the signal strength and the number of available channels. You can hide scanned channels. You can tune to hide, then press ENTER. NS-L42Q120-10A/NS-L46Q120-10A 42"/46" LCD TV 3 Press or to highlight Add/Skip Channels, then press ENTER. 4 Press or to highlight CHANNEL, then press ...


