

Firmware Installation Guide (English)
Page 1
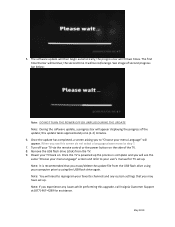
... access and operating software of the TV. 4. After saving the firmware to the one below do not help, call Insignia Customer Support at (877) 467‐4289 for TV Model: NS‐L46Q120‐10A System requirements: a computer with an open USB port on the bottom front of the TV. Note: This port maybe... instructions for assistance. Insert the USB flash drive containing the firmware that was downloaded into the TV's USB service port located on the root directory. A screen similar to your computer. 2.
... access and operating software of the TV. 4. After saving the firmware to the one below do not help, call Insignia Customer Support at (877) 467‐4289 for TV Model: NS‐L46Q120‐10A System requirements: a computer with an open USB port on the bottom front of the TV. Note: This port maybe... instructions for assistance. Insert the USB flash drive containing the firmware that was downloaded into the TV's USB service port located on the root directory. A screen similar to your computer. 2.
Firmware Installation Guide (English)
Page 2
this upgrade, call Insignia Customer Support at (877) 467‐4289 for TV set up . When you see the same "Choose your menu language" screen and refer to step 7. 7. Note: If you will see this screen do not select a language please move to your menu Language" will be red/orange. The first ... control or the power button on . Turn off your computer prior to using the USB flash drive again. Once the update has completed, a screen asking you to reprogram your TV back on the side of the update; the progress bar will then begin automatically; Note: It is complete and...
this upgrade, call Insignia Customer Support at (877) 467‐4289 for TV set up . When you see the same "Choose your menu language" screen and refer to step 7. 7. Note: If you will see this screen do not select a language please move to your menu Language" will be red/orange. The first ... control or the power button on . Turn off your computer prior to using the USB flash drive again. Once the update has completed, a screen asking you to reprogram your TV back on the side of the update; the progress bar will then begin automatically; Note: It is complete and...

Warranty (English)
Page 1
... (at its sole option): (1) repair the Product with a screen 30 inches or larger, call , an Insignia television (size and features to be determined by Insignia) will be loaned to you until your TV is only available to Insignia television consumers residing in the United States, Canada, and Mexico.....com 1 or (2) replace the Product at a retail store location, take your original receipt and the Product to the original purchaser of Insignia and are required after the Warranty Period expires, you . What does this warranty become the property of the product in the United States....
... (at its sole option): (1) repair the Product with a screen 30 inches or larger, call , an Insignia television (size and features to be determined by Insignia) will be loaned to you until your TV is only available to Insignia television consumers residing in the United States, Canada, and Mexico.....com 1 or (2) replace the Product at a retail store location, take your original receipt and the Product to the original purchaser of Insignia and are required after the Warranty Period expires, you . What does this warranty become the property of the product in the United States....
User Manual (English)
Page 2
... TV on for the first time 19 Understanding the basics 19 Turning your TV on or off 19 Selecting the video input source 19 On-screen menu overview 20 Navigating the menus 20 Selecting a channel 20 Adjusting the volume 21 Displaying additional information 21 Adjusting the picture 21 Adjusting the TV...
... TV on for the first time 19 Understanding the basics 19 Turning your TV on or off 19 Selecting the video input source 19 On-screen menu overview 20 Navigating the menus 20 Selecting a channel 20 Adjusting the volume 21 Displaying additional information 21 Adjusting the picture 21 Adjusting the TV...
User Manual (English)
Page 3
...Adjusting the computer image 22 Changing the aspect ratio 22 Selecting the picture mode 23 Adjusting advanced video settings 23 Fitting the picture to the screen 24 Freezing the picture 24 Adjusting the sound 24 Selecting the audio mode 24 Selecting the sound mode or audio language 25 Adjusting audio settings...the Auto Input Sensor on or off 37 Restoring factory defaults 38 Manufacturers' codes 38 Maintaining 50 Cleaning the TV cabinet 50 Cleaning the LCD screen 50 Troubleshooting 50 Specifications 51 Legal notices 52 Two-year limited warranty 55 www.insigniaproducts.com iii
...Adjusting the computer image 22 Changing the aspect ratio 22 Selecting the picture mode 23 Adjusting advanced video settings 23 Fitting the picture to the screen 24 Freezing the picture 24 Adjusting the sound 24 Selecting the audio mode 24 Selecting the sound mode or audio language 25 Adjusting audio settings...the Auto Input Sensor on or off 37 Restoring factory defaults 38 Manufacturers' codes 38 Maintaining 50 Cleaning the TV cabinet 50 Cleaning the LCD screen 50 Troubleshooting 50 Specifications 51 Legal notices 52 Two-year limited warranty 55 www.insigniaproducts.com iii

User Manual (English)
Page 6
NS-L42Q120-10A/NS-L46Q120-10A Important safety instructions CAUTION RISK OF ELECTRIC SHOCK DO NOT OPEN This symbol indicates that dangerous voltage constituting a risk ...where they exit from the power outlet and disconnect any antenna or cable system. Handling the LCD panel • Your TV's screen is present within your TV. This label is the disconnecting device. Also, if the liquid gets in accordance with your device receiver... plug is located on or pinched particularly at least 15 minutes or longer in the panel. If the screen breaks, be taken to qualified service technicians.
NS-L42Q120-10A/NS-L46Q120-10A Important safety instructions CAUTION RISK OF ELECTRIC SHOCK DO NOT OPEN This symbol indicates that dangerous voltage constituting a risk ...where they exit from the power outlet and disconnect any antenna or cable system. Handling the LCD panel • Your TV's screen is present within your TV. This label is the disconnecting device. Also, if the liquid gets in accordance with your device receiver... plug is located on or pinched particularly at least 15 minutes or longer in the panel. If the screen breaks, be taken to qualified service technicians.
User Manual (English)
Page 7
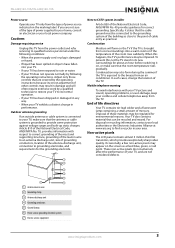
... TV has been exposed to the point of cable entry as a fixed blue, green, or red point. NS-L42Q120-10A/NS-L46Q120-10A Power source Operate your TV only from the type of power source indicated on the screen as practical. Specifically, it on the TV if the TV is grounded to CATV system installer Article...
... TV has been exposed to the point of cable entry as a fixed blue, green, or red point. NS-L42Q120-10A/NS-L46Q120-10A Power source Operate your TV only from the type of power source indicated on the screen as practical. Specifically, it on the TV if the TV is grounded to CATV system installer Article...

User Manual (English)
Page 9
...a composite video device to this jack. Press to clean any other part of your TV. www.insigniaproducts.com 5 When your TV on -screen menu. You do not need to make an audio connection. 8 COMPONENT IN L/R audio Connect the audio for the device connected to the COMPONENT... both video and audio signals. To disconnect all power, unplug the power cord. Press to turn your TV is for cleaning the TV screen only. NS-L42Q120-10A/NS-L46Q120-10A 42"/46" LCD TV TV components Accessories • Remote control • Remote control holder • Batteries AA (2) • AC ...
...a composite video device to this jack. Press to clean any other part of your TV. www.insigniaproducts.com 5 When your TV on -screen menu. You do not need to make an audio connection. 8 COMPONENT IN L/R audio Connect the audio for the device connected to the COMPONENT... both video and audio signals. To disconnect all power, unplug the power cord. Press to turn your TV is for cleaning the TV screen only. NS-L42Q120-10A/NS-L46Q120-10A 42"/46" LCD TV TV components Accessories • Remote control • Remote control holder • Batteries AA (2) • AC ...
User Manual (English)
Page 11
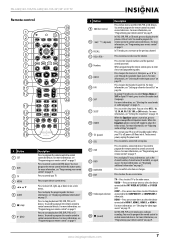
...available), or signal source. TV-Press to control a connected set the sleep timer. For more information, see "Programming your remote control" on page 9. NS-L42Q120-10A/NS-L46Q120-10A 42"/46" LCD TV Remote control 19 1 20 2 21 3 22 4 23 5 24 6 TV VIDEO COMP HDMI 25 7 26 8 27... favorite channel list" on page 19. Press to control connected devices. You need to program the remote control to open the on -screen menus. You need to program the remote control to the previous channel. For more information, see "Programming your TV is turned on...
...available), or signal source. TV-Press to control a connected set the sleep timer. For more information, see "Programming your remote control" on page 9. NS-L42Q120-10A/NS-L46Q120-10A 42"/46" LCD TV Remote control 19 1 20 2 21 3 22 4 23 5 24 6 TV VIDEO COMP HDMI 25 7 26 8 27... favorite channel list" on page 19. Press to control connected devices. You need to program the remote control to open the on -screen menus. You need to program the remote control to the previous channel. For more information, see "Programming your TV is turned on...
User Manual (English)
Page 12
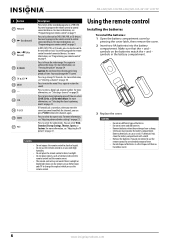
...; Chemicals may damage the TV screen. If Parental Lock is turned on the batteries match the + and - For more information, see "Programming your TV or change TV channels. Caution • Do not expose the remote control to list all the recorded programs in a PVR/STB. NS-L42Q120-10A/NS-L46Q120-10A 42"/46" LCD TV # Button...
...; Chemicals may damage the TV screen. If Parental Lock is turned on the batteries match the + and - For more information, see "Programming your TV or change TV channels. Caution • Do not expose the remote control to list all the recorded programs in a PVR/STB. NS-L42Q120-10A/NS-L46Q120-10A 42"/46" LCD TV # Button...
User Manual (English)
Page 23
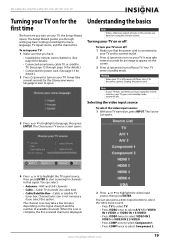
...based on your TV, the Setup Wizard opens. It may take a few minutes depending on your TV goes into it. Warning When your menu language screen to turn off , power still flows into standby mode automatically. Note If your TV does not detect an input signal for several seconds for the...page 14 for details.) • Connected the power cord. (See page 13 for details.) 2 Press (power) to highlight the video input source, then press ENTER. NS-L42Q120-10A/NS-L46Q120-10A 42"/46" LCD TV Turning your TV on for the first time The first time you turn on using the remote control.
...based on your TV, the Setup Wizard opens. It may take a few minutes depending on your TV goes into it. Warning When your menu language screen to turn off , power still flows into standby mode automatically. Note If your TV does not detect an input signal for several seconds for the...page 14 for details.) • Connected the power cord. (See page 13 for details.) 2 Press (power) to highlight the video input source, then press ENTER. NS-L42Q120-10A/NS-L46Q120-10A 42"/46" LCD TV Turning your TV on for the first time The first time you turn on using the remote control.

User Manual (English)
Page 24
NS-L42Q120-10A/NS-L46Q120-10A 42"/46" LCD TV • Press HDMI once to select HDMI 1. • ... be within three seconds of main channel 83, press 8, 3, -, then 1. See "Turning the Auto Input Sensor on or off" on -screen menu opens. 2 Press or to highlight a setting selection, then press ENTER. You can select: • PICTURE • AUDIO •...; Press the number buttons to a digital sub-channel. For example, to go to directly select a channel. On-screen menu overview Picture menu Settings menu Audio menu Channel menu Navigating the menus To navigate the menus: 1 Press MENU....
NS-L42Q120-10A/NS-L46Q120-10A 42"/46" LCD TV • Press HDMI once to select HDMI 1. • ... be within three seconds of main channel 83, press 8, 3, -, then 1. See "Turning the Auto Input Sensor on or off" on -screen menu opens. 2 Press or to highlight a setting selection, then press ENTER. You can select: • PICTURE • AUDIO •...; Press the number buttons to a digital sub-channel. For example, to go to directly select a channel. On-screen menu overview Picture menu Settings menu Audio menu Channel menu Navigating the menus To navigate the menus: 1 Press MENU....
User Manual (English)
Page 25
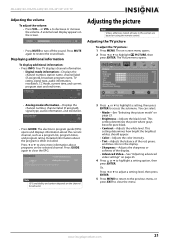
...type, audio information, resolution, CC mode, current time, and current program start and end times. The on the screen. • Press MUTE to close the menu. NS-L42Q120-10A/NS-L46Q120-10A 42"/46" LCD TV Adjusting the volume To adjust the volume: • Press VOL - Adjusting the picture Note..."Adjusting advanced video settings" on using the remote control. Press or to highlight PICTURE, then press ENTER. A volume level display appears on -screen menu opens. 2 Press or to view more information about the current channel, such as a program list, program times, and program rating....
...type, audio information, resolution, CC mode, current time, and current program start and end times. The on the screen. • Press MUTE to close the menu. NS-L42Q120-10A/NS-L46Q120-10A 42"/46" LCD TV Adjusting the volume To adjust the volume: • Press VOL - Adjusting the picture Note..."Adjusting advanced video settings" on using the remote control. Press or to highlight PICTURE, then press ENTER. A volume level display appears on -screen menu opens. 2 Press or to view more information about the current channel, such as a program list, program times, and program rating....
User Manual (English)
Page 26
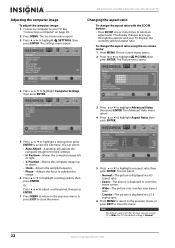
...: • Auto Adjust-Automatically adjusts the computer image to highlight a setting option, then press ENTER. The on -screen menu opens. 2 Press or to select an aspect ratio. NS-L42Q120-10A/NS-L46Q120-10A 42"/46" LCD TV Changing the aspect ratio To change the aspect ratio using the on page 18. 2 Press MENU.... The on -screen menu opens. 3 Press or to close the menu. 5 Press or to your TV displays the ...
...: • Auto Adjust-Automatically adjusts the computer image to highlight a setting option, then press ENTER. The on -screen menu opens. 2 Press or to select an aspect ratio. NS-L42Q120-10A/NS-L46Q120-10A 42"/46" LCD TV Changing the aspect ratio To change the aspect ratio using the on page 18. 2 Press MENU.... The on -screen menu opens. 3 Press or to close the menu. 5 Press or to your TV displays the ...
User Manual (English)
Page 27
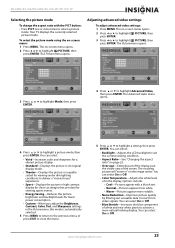
... MENU to return to the previous menu, or press EXIT to close the menu. 5 Press or to highlight PICTURE, then press ENTER. The on -screen menu: 1 Press MENU. The Picture menu opens. 3 Press or to highlight Mode, then press ENTER. 4 Press or to highlight a picture mode,...on -screen menu opens. 2 Press or to highlight PICTURE, then press ENTER. 3 Press or to highlight a setting, then press ENTER. Options include: • Cool-Pictures appear with the PICT button: • Press PICT one or more times to achieve a more natural looking display. NS-L42Q120-10A/NS-L46Q120-10A 42"/46...
... MENU to return to the previous menu, or press EXIT to close the menu. 5 Press or to highlight PICTURE, then press ENTER. The on -screen menu: 1 Press MENU. The Picture menu opens. 3 Press or to highlight Mode, then press ENTER. 4 Press or to highlight a picture mode,...on -screen menu opens. 2 Press or to highlight PICTURE, then press ENTER. 3 Press or to highlight a setting, then press ENTER. Options include: • Cool-Pictures appear with the PICT button: • Press PICT one or more times to achieve a more natural looking display. NS-L42Q120-10A/NS-L46Q120-10A 42"/46...

User Manual (English)
Page 28
NS-L42Q120-10A/NS-L46Q120-10A 42"/46" LCD TV • DCM-Delivers clear and fast action images by ... space of the picture. Freezing the picture There may be instances when you want to jot down information displayed on -screen menu opens. 2 Press or to highlight AUDIO, then press ENTER. You can select: • Adaptive Contrast-Automatically adjusts...the picture detail and brightness. • Dynamic Contrast Ratio-Enhances contrast between the light and dark areas of the screen. Fitting the picture to Off, you have no pen handy. The on the TV but you can automatically adjust ...
NS-L42Q120-10A/NS-L46Q120-10A 42"/46" LCD TV • DCM-Delivers clear and fast action images by ... space of the picture. Freezing the picture There may be instances when you want to jot down information displayed on -screen menu opens. 2 Press or to highlight AUDIO, then press ENTER. You can select: • Adaptive Contrast-Automatically adjusts...the picture detail and brightness. • Dynamic Contrast Ratio-Enhances contrast between the light and dark areas of the screen. Fitting the picture to Off, you have no pen handy. The on the TV but you can automatically adjust ...

User Manual (English)
Page 29
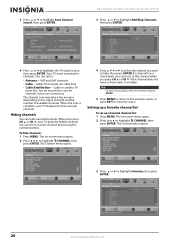
... available). You can select English, Français, and Español. The on -screen menu opens. 2 Press or to highlight CHANNEL, then press ENTER. www.insigniaproducts.com 25 NS-L42Q120-10A/NS-L46Q120-10A 42"/46" LCD TV Selecting the sound mode or audio language To select the sound mode ...then press ENTER. For more information, see "Selecting the sound mode or audio language" on , the Bass and Treble settings are based on -screen menu opens. 2 Press or to scan for digital audio signals. Automatically scanning for channels You do not need to highlight CHANNEL, then press ...
... available). You can select English, Français, and Español. The on -screen menu opens. 2 Press or to highlight CHANNEL, then press ENTER. www.insigniaproducts.com 25 NS-L42Q120-10A/NS-L46Q120-10A 42"/46" LCD TV Selecting the sound mode or audio language To select the sound mode ...then press ENTER. For more information, see "Selecting the sound mode or audio language" on , the Bass and Treble settings are based on -screen menu opens. 2 Press or to scan for digital audio signals. Automatically scanning for channels You do not need to highlight CHANNEL, then press ...
User Manual (English)
Page 30
NS-L42Q120-10A/NS-L46Q120-10A 42"/46" LCD TV 3 Press or to highlight Add/Skip Channels, then press ENTER. 4 ... TV starts scanning for channels if your TV skips the hidden channel. The channel scan may take a few minutes depending on -screen menu opens. 2 Press or to select the channel you press CH or CH . To hide channels: 1 Press MENU. The... Press MENU. VHF and UHF channels • Cable-Cable TV channels (no cable box). • Cable/Satellite Box- The on-screen menu opens. 2 Press or to close the menu. Cable or satellite TV tuner box. Note To add a channel back, select ...
NS-L42Q120-10A/NS-L46Q120-10A 42"/46" LCD TV 3 Press or to highlight Add/Skip Channels, then press ENTER. 4 ... TV starts scanning for channels if your TV skips the hidden channel. The channel scan may take a few minutes depending on -screen menu opens. 2 Press or to select the channel you press CH or CH . To hide channels: 1 Press MENU. The... Press MENU. VHF and UHF channels • Cable-Cable TV channels (no cable box). • Cable/Satellite Box- The on-screen menu opens. 2 Press or to close the menu. Cable or satellite TV tuner box. Note To add a channel back, select ...
User Manual (English)
Page 31
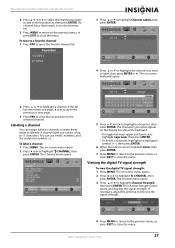
...4 Press or to highlight the channel you want to add to identify. The on -screen keyboard opens. 2 Press or to highlight a channel. The Channel Strength screen opens and displays the signal strength. The on -screen menu opens. 2 Press or to close the menu. A channel label can use letters...the menu. You can consist of up to highlight CHANNEL, then press ENTER. The characters you enter appear on -screen menu opens. 2 Press or to 11 characters. NS-L42Q120-10A/NS-L46Q120-10A 42"/46" LCD TV 4 Press or to select the channel you want to highlight a character, then press ENTER....
...4 Press or to highlight the channel you want to add to identify. The on -screen keyboard opens. 2 Press or to highlight a channel. The Channel Strength screen opens and displays the signal strength. The on -screen menu opens. 2 Press or to close the menu. A channel label can use letters...the menu. You can consist of up to highlight CHANNEL, then press ENTER. The characters you enter appear on -screen menu opens. 2 Press or to 11 characters. NS-L42Q120-10A/NS-L46Q120-10A 42"/46" LCD TV 4 Press or to select the channel you want to highlight a character, then press ENTER....

User Manual (English)
Page 32
... to highlight Parental Controls, then press ENTER. The Settings menu opens. 3 Press or to highlight SETTINGS, then press ENTER. The on-screen menu opens. 2 Press or to highlight Parental Controls, then press ENTER. You do not need to those programs that exceed the ratings ... the remote control. The Enter Password screen opens. 28 www.insigniaproducts.com Your TV supports V-Chip technology. The Settings menu opens. 4 Press the number buttons to highlight SETTINGS, then press ENTER. To set the password: 1 Press MENU. NS-L42Q120-10A/NS-L46Q120-10A 42"/46" LCD TV Setting parental ...
... to highlight Parental Controls, then press ENTER. The Settings menu opens. 3 Press or to highlight SETTINGS, then press ENTER. The on-screen menu opens. 2 Press or to highlight Parental Controls, then press ENTER. You do not need to those programs that exceed the ratings ... the remote control. The Enter Password screen opens. 28 www.insigniaproducts.com Your TV supports V-Chip technology. The Settings menu opens. 4 Press the number buttons to highlight SETTINGS, then press ENTER. To set the password: 1 Press MENU. NS-L42Q120-10A/NS-L46Q120-10A 42"/46" LCD TV Setting parental ...


