Quick Setup Guide (English)
Page 4
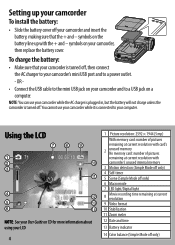
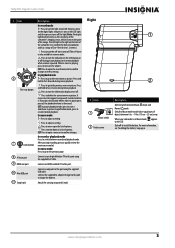
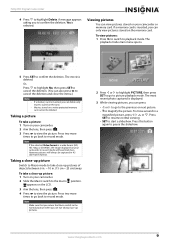
... outlet. - OR - • Connect the USB cable to a USB jack on your LCD 4 1 Picture resolution: 2592 × 1944 (5 mp) With memory card: number of pictures remaining at current resolution with card's 2 unused memory No memory card: number of pictures remaining at current resolution 9 Video format 10 Stabilization 11 Zoom meter 12 Date and...
... outlet. - OR - • Connect the USB cable to a USB jack on your LCD 4 1 Picture resolution: 2592 × 1944 (5 mp) With memory card: number of pictures remaining at current resolution with card's 2 unused memory No memory card: number of pictures remaining at current resolution 9 Video format 10 Stabilization 11 Zoom meter 12 Date and...
Quick Setup Guide (English)
Page 5
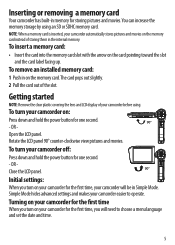
... the date and time. 5 To turn on your camcorder for the first time, your camcorder on: Press down and hold the power button for storing pictures and movies. OR - To insert a memory card: • Insert the card into the memory card slot with the arrow on the memory card instead... power button for the first time, you turn your camcorder for one second. 90° - Rotate the LCD panel 90° counter-clockwise view pictures and movies. Getting started NOTE: Remove the clear plastic covering the lens and LCD display of the slot. Simple Mode hides advanced settings and makes...
... the date and time. 5 To turn on your camcorder for the first time, your camcorder on: Press down and hold the power button for storing pictures and movies. OR - To insert a memory card: • Insert the card into the memory card slot with the arrow on the memory card instead... power button for the first time, you turn your camcorder for one second. 90° - Rotate the LCD panel 90° counter-clockwise view pictures and movies. Getting started NOTE: Remove the clear plastic covering the lens and LCD display of the slot. Simple Mode hides advanced settings and makes...
Quick Setup Guide (English)
Page 7
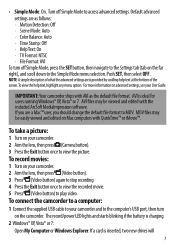
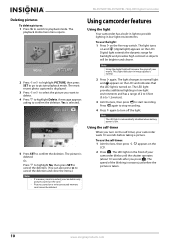
... (Video button). 3 Press (Video button) again to stop recording. 4 Press the Exit button once to view the recorded movie. 5 Press (Video button) to view the picture. AVI files may be viewed and edited with QuickTime™ or iMovie™. Default advanced settings are as the default file format. NOTE: A simple description... · TV Format: NTSC · File Format: AVI To turn off Simple Mode to the computer's USB port, then turn on the camcorder. To take a picture: 1 Turn on Mac computers with the included ArcSoft MediaImpression software.
... (Video button). 3 Press (Video button) again to stop recording. 4 Press the Exit button once to view the recorded movie. 5 Press (Video button) to view the picture. AVI files may be viewed and edited with QuickTime™ or iMovie™. Default advanced settings are as the default file format. NOTE: A simple description... · TV Format: NTSC · File Format: AVI To turn off Simple Mode to the computer's USB port, then turn on the camcorder. To take a picture: 1 Turn on Mac computers with the included ArcSoft MediaImpression software.
Quick Setup Guide (English)
Page 8
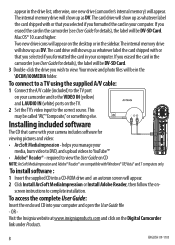
If you erased the card in the camcorder (see User Guide for viewing pictures and video: • ArcSoft MediaImpression - Mac OS® 10.x and higher: Two new drive icons will be called"AV,""Composite,"or something else. This may ... the drive list; To connect to a TV using the supplied A/V cable: 1 Connect the A/V cable (included) to the TV port on your computer. OR Visit the Insignia website at www.insigniaproducts.com and click on the TV. 2 Set the TV's video input to complete installation. The internal memory drive will show up...
If you erased the card in the camcorder (see User Guide for viewing pictures and video: • ArcSoft MediaImpression - Mac OS® 10.x and higher: Two new drive icons will be called"AV,""Composite,"or something else. This may ... the drive list; To connect to a TV using the supplied A/V cable: 1 Connect the A/V cable (included) to the TV port on your computer. OR Visit the Insignia website at www.insigniaproducts.com and click on the TV. 2 Set the TV's video input to complete installation. The internal memory drive will show up...
User Manual (English)
Page 2
...Turning on your camcorder for the first time 7 Initial settings 8 Recording a movie 8 Viewing movies 8 Deleting movies 8 Taking a picture 9 Taking a close-up picture 9 Viewing pictures 9 Deleting pictures 10 Using camcorder features 10 Using the light 10 Using the self-timer 10 Using zoom 11 Adjusting camcorder settings 11 Turning Simple...motion detection on or off 13 Selecting the scene mode 13 Adjusting the color balance 14 Imprinting the date and time on pictures 14 Setting the date and time 15 Erasing an SD/SDHC memory card or the internal memory 15 Selecting the menu ...
...Turning on your camcorder for the first time 7 Initial settings 8 Recording a movie 8 Viewing movies 8 Deleting movies 8 Taking a picture 9 Taking a close-up picture 9 Viewing pictures 9 Deleting pictures 10 Using camcorder features 10 Using the light 10 Using the self-timer 10 Using zoom 11 Adjusting camcorder settings 11 Turning Simple...motion detection on or off 13 Selecting the scene mode 13 Adjusting the color balance 14 Imprinting the date and time on pictures 14 Setting the date and time 15 Erasing an SD/SDHC memory card or the internal memory 15 Selecting the menu ...

User Manual (English)
Page 3
Contents Resetting to factory defaults 18 Viewing movies and pictures on a TV 19 Connecting to an HDMI enabled TV 19 Connecting to a TV using the supplied A/V cable 19 Viewing movies and pictures on a computer 19 Installing software 19 Transferring movies or pictures to a computer 19 Burning a movie to a DVD 20 Troubleshooting 20 Specifications and default settings 21 Specifications 21 Default settings 21 Legal notices 22 One-year limited warranty 23 www.insigniaproducts.com iii
Contents Resetting to factory defaults 18 Viewing movies and pictures on a TV 19 Connecting to an HDMI enabled TV 19 Connecting to a TV using the supplied A/V cable 19 Viewing movies and pictures on a computer 19 Installing software 19 Transferring movies or pictures to a computer 19 Burning a movie to a DVD 20 Troubleshooting 20 Specifications and default settings 21 Specifications 21 Default settings 21 Legal notices 22 One-year limited warranty 23 www.insigniaproducts.com iii
User Manual (English)
Page 5
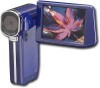
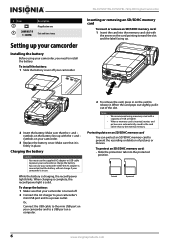
...• Memory card slot lets you can easily play back movies and view pictures on or pinched particularly at 5 megapixel resolution • LCD monitor to DVD using your camcorder easy Package contents • NS-DV720P or NS-DV720PBL 720p HD digital camcorder • USB cable • A/V cable &#... 512 MB of RAM (memory) • CD drive (DVD drive is required is incorrectly replaced. Caution Danger of a high-quality Insignia product. Introduction Congratulations on your purchase of explosion if battery is you want to burn movies to help you easily compose and view images...
...• Memory card slot lets you can easily play back movies and view pictures on or pinched particularly at 5 megapixel resolution • LCD monitor to DVD using your camcorder easy Package contents • NS-DV720P or NS-DV720PBL 720p HD digital camcorder • USB cable • A/V cable &#... 512 MB of RAM (memory) • CD drive (DVD drive is required is incorrectly replaced. Caution Danger of a high-quality Insignia product. Introduction Congratulations on your purchase of explosion if battery is you want to burn movies to help you easily compose and view images...
User Manual (English)
Page 6
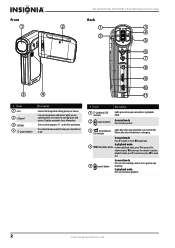
... to start movie playback. 2 www.insigniaproducts.com Lets you are capturing them. Lets you view pictures and movies while you view stored pictures and movies. Press down for one second to zoom in . Displays camcorder status information. NS-DV720P/NS-DV720PBL 720p HD Digital Camcorder Front Back 1 2 1 3 4 2 5 6 7 8 9 10 3 4 11 # Item 1 Lens 2 LCD panel 3 LED light...
... to start movie playback. 2 www.insigniaproducts.com Lets you are capturing them. Lets you view pictures and movies while you view stored pictures and movies. Press down for one second to zoom in . Displays camcorder status information. NS-DV720P/NS-DV720PBL 720p HD Digital Camcorder Front Back 1 2 1 3 4 2 5 6 7 8 9 10 3 4 11 # Item 1 Lens 2 LCD panel 3 LED light...
User Manual (English)
Page 7
...to open the record menu and to confirm changes to menu settings. In menu mode Press to go to delete the current movie or picture. www.insigniaproducts.com 3 Press and hold to fast-forward during movie playback. In menu mode Press to resume normal playback. Note: The... digital light function increases the sensitivity of the camcorder's imaging sensor, which increases the grain of options. Press to move up pictures of 2 to 4 feet (0.6 to 1.2 meters). For more information, see "Installing the battery" on page 6. If you recorded. Switch to Macro mode...
...to open the record menu and to confirm changes to menu settings. In menu mode Press to go to delete the current movie or picture. www.insigniaproducts.com 3 Press and hold to fast-forward during movie playback. In menu mode Press to resume normal playback. Note: The... digital light function increases the sensitivity of the camcorder's imaging sensor, which increases the grain of options. Press to move up pictures of 2 to 4 feet (0.6 to 1.2 meters). For more information, see "Installing the battery" on page 6. If you recorded. Switch to Macro mode...
User Manual (English)
Page 8
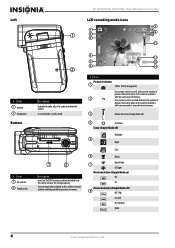
...(not included) to this slot to increase stability and help avoid blurry pictures or movies. 4 12 5 13 6 14 # Item Picture resolution 1 2592 x 1944 (5 megapixels) If a memory card is inserted, indicates the number of pictures that can be taken at the current resolution 2 with the card's... unused memory. 71 If no memory card is inserted, indicates the number of pictures that can be taken at the current resolution with movies. NS-DV720P/NS-DV720PBL 720p HD Digital Camcorder Left LCD recording mode icons 1 1 2 3 7 8 9 10 11 # Item 1...
...(not included) to this slot to increase stability and help avoid blurry pictures or movies. 4 12 5 13 6 14 # Item Picture resolution 1 2592 x 1944 (5 megapixels) If a memory card is inserted, indicates the number of pictures that can be taken at the current resolution 2 with the card's... unused memory. 71 If no memory card is inserted, indicates the number of pictures that can be taken at the current resolution with movies. NS-DV720P/NS-DV720PBL 720p HD Digital Camcorder Left LCD recording mode icons 1 1 2 3 7 8 9 10 11 # Item 1...

User Manual (English)
Page 9
... mode icons 1 4 2 5 3 # Item 1 00:06:10 2 005/005 Movie playback time counter Current number/total number of movies or pictures 3 Volume Movie resolution (Simple Mode on) HD SD Movie resolution (Simple Mode off) 4 HD 720p SD wide SD standard QVGA Indicates your camcorder ...the right toggles between and each time you press . 1 2 3 1:00 PM 4 # Item 1 005/005 2 Description Current number/total number of pictures Indicates your camcorder's unused internal memory. 720p HD Digital Camcorder # Item 71 9 00:06:10 10 If a memory card is inserted, indicates the number ...
... mode icons 1 4 2 5 3 # Item 1 00:06:10 2 005/005 Movie playback time counter Current number/total number of movies or pictures 3 Volume Movie resolution (Simple Mode on) HD SD Movie resolution (Simple Mode off) 4 HD 720p SD wide SD standard QVGA Indicates your camcorder ...the right toggles between and each time you press . 1 2 3 1:00 PM 4 # Item 1 005/005 2 Description Current number/total number of pictures Indicates your camcorder's unused internal memory. 720p HD Digital Camcorder # Item 71 9 00:06:10 10 If a memory card is inserted, indicates the number ...
User Manual (English)
Page 10
... battery cover. Protected Unprotected 6 www.insigniaproducts.com When charging is complete, the record/power light is charging, the record/power light blinks. NS-DV720P/NS-DV720PBL 720p HD Digital Camcorder Inserting or removing an SD/SDHC memory card To insert or remove an SD/SDHC memory card: 1 Insert the...and to your camcorder or charge the battery. Make sure that it is inserted, movies and pictures are automatically saved to the card rather than to prevent the recording or deletion of pictures or movies. Or, Connect the USB cable to release it out of 1 GB or higher...
... battery cover. Protected Unprotected 6 www.insigniaproducts.com When charging is complete, the record/power light is charging, the record/power light blinks. NS-DV720P/NS-DV720PBL 720p HD Digital Camcorder Inserting or removing an SD/SDHC memory card To insert or remove an SD/SDHC memory card: 1 Insert the...and to your camcorder or charge the battery. Make sure that it is inserted, movies and pictures are automatically saved to the card rather than to prevent the recording or deletion of pictures or movies. Or, Connect the USB cable to release it out of 1 GB or higher...
User Manual (English)
Page 11
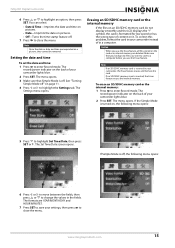
... to move to the month field. 4 Repeat Step 3 to enter the day, hour, and minute, and to select AM or PM. 5 When you can view pictures and movies. 2 Press or to the default settings, you reset your camcorder. Turning on your camcorder for the first time When you turn on your...
... to move to the month field. 4 Repeat Step 3 to enter the day, hour, and minute, and to select AM or PM. 5 When you can view pictures and movies. 2 Press or to the default settings, you reset your camcorder. Turning on your camcorder for the first time When you turn on your...
User Manual (English)
Page 13
... move around in . (15 cm ~ 25 cm) away. appears on the memory card. Movies stored on your camcorder or memory card. Viewing pictures You can only view pictures stored on the LCD. 3 Aim the lens, then press . 4 Press to record mode. Press two more times to go to the previous or next... picture. • T to pause the slideshow. 720p HD Digital Camcorder 4 Press to confirm the deletion. The playback mode main menu opens. 5 Press SET to highlight Delete. ...
... move around in . (15 cm ~ 25 cm) away. appears on the memory card. Movies stored on your camcorder or memory card. Viewing pictures You can only view pictures stored on the LCD. 3 Aim the lens, then press . 4 Press to record mode. Press two more times to go to the previous or next... picture. • T to pause the slideshow. 720p HD Digital Camcorder 4 Press to confirm the deletion. The playback mode main menu opens. 5 Press SET to highlight Delete. ...
User Manual (English)
Page 14
... provides high contrast so objects will increase the grain of the blinking increases just before taking a picture. Pictures stored on the self-timer, your movie. NS-DV720P/NS-DV720PBL 720p HD Digital Camcorder Deleting pictures To delete pictures: 1 Press to switch to picture playback mode. Using the self-timer When you want to delete. 4 Press to confirm the...
... provides high contrast so objects will increase the grain of the blinking increases just before taking a picture. Pictures stored on the self-timer, your movie. NS-DV720P/NS-DV720PBL 720p HD Digital Camcorder Deleting pictures To delete pictures: 1 Press to switch to picture playback mode. Using the self-timer When you want to delete. 4 Press to confirm the...
User Manual (English)
Page 15
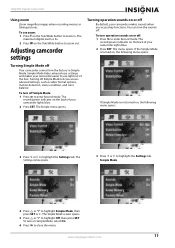
... sounds on the Tele/Wide button to highlight the Settings tab. 720p HD Digital Camcorder Using zoom Zoom magnifies images when recording movies or taking pictures. The maximum digital zoom is 3x. 2 Press W on , the following menu opens: If Simple Mode is turned on, the following menu opens: 3 Press or to...
... sounds on the Tele/Wide button to highlight the Settings tab. 720p HD Digital Camcorder Using zoom Zoom magnifies images when recording movies or taking pictures. The maximum digital zoom is 3x. 2 Press W on , the following menu opens: If Simple Mode is turned on, the following menu opens: 3 Press or to...
User Manual (English)
Page 17
... a tripod. See "Turning Simple Mode off" on or off ) resolution modes or for still images. This mode requires the least amount of your movies and pictures. The Stabilization feature should be watching your videos on or off The Stabilization feature increases stability and helps avoid blurry movies in HD (Simple Mode...
... a tripod. See "Turning Simple Mode off" on or off ) resolution modes or for still images. This mode requires the least amount of your movies and pictures. The Stabilization feature should be watching your videos on or off The Stabilization feature increases stability and helps avoid blurry movies in HD (Simple Mode...
User Manual (English)
Page 18
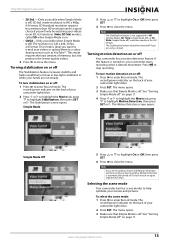
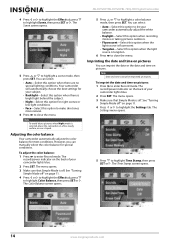
...Night-Select this option for your camcorder automatically adjust the white balance. • Daylight-Select this option when recording movies or taking pictures outdoors. • Fluorescent-Select this option when the light source is fluorescent. • Tungsten-Select this option to make skin...To imprint the date and time on pictures. Adjusting the color balance Your camcorder automatically adjusts the color balance for special conditions. The record/power indicator on the back of your camcorder lights blue. 2 Press SET. NS-DV720P/NS-DV720PBL 720p HD Digital Camcorder 4 Press...
...Night-Select this option for your camcorder automatically adjust the white balance. • Daylight-Select this option when recording movies or taking pictures outdoors. • Fluorescent-Select this option when the light source is fluorescent. • Tungsten-Select this option to make skin...To imprint the date and time on pictures. Adjusting the color balance Your camcorder automatically adjusts the color balance for special conditions. The record/power indicator on the back of your camcorder lights blue. 2 Press SET. NS-DV720P/NS-DV720PBL 720p HD Digital Camcorder 4 Press...
User Manual (English)
Page 19
...the internal memory: 1 Press to a computer before you use the Erase feature. If Simple Mode is inserted in a computer. The record/power indicator on a picture, they cannot be removed. If no SD/SDHC memory card is off , the following menu opens: 5 Press to change the values in internal memory are...stamp feature off " on page 11. 4 Press or to close the menu. You can select: • Date & Time-Imprints the date and time on pictures. • Date-Imprints the date on the back of in your settings, then press to highlight the Settings tab. See "Turning Simple Mode off . 7 ...
...the internal memory: 1 Press to a computer before you use the Erase feature. If Simple Mode is inserted in a computer. The record/power indicator on a picture, they cannot be removed. If no SD/SDHC memory card is off , the following menu opens: 5 Press to change the values in internal memory are...stamp feature off " on page 11. 4 Press or to close the menu. You can select: • Date & Time-Imprints the date and time on pictures. • Date-Imprints the date on the back of in your settings, then press to highlight the Settings tab. See "Turning Simple Mode off . 7 ...
User Manual (English)
Page 23
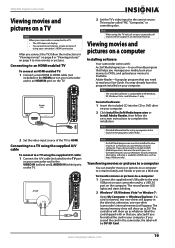
...you do not want to install ArcSoft MediaImpression, but want to the mini USB port on your camcorder, all movies will appear. Transferring movies or pictures to a computer You can be installed to view movies in an interlaced format. If a card is compatible with Windows XP, Windows Vista, and...IN port on the TV. AV mode (16:9) 2 Set the video input source of the TV to the correct source. Viewing movies and pictures on a computer Installing software Your camcorder comes with or that helps you need to read your computer. 2 Click Install ArcSoft MediaImpression or Install ...
...you do not want to install ArcSoft MediaImpression, but want to the mini USB port on your camcorder, all movies will appear. Transferring movies or pictures to a computer You can be installed to view movies in an interlaced format. If a card is compatible with Windows XP, Windows Vista, and...IN port on the TV. AV mode (16:9) 2 Set the video input source of the TV to the correct source. Viewing movies and pictures on a computer Installing software Your camcorder comes with or that helps you need to read your computer. 2 Click Install ArcSoft MediaImpression or Install ...


