Quick Setup Guide (English)
Page 1
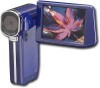
Use this guide for reliable and trouble-free performance. Your NS-DV720P or NS-DV720PBL is designed for initial setup of a high-quality Insignia product. Package contents • Insignia 720p digital camcorder • USB cable • A/V cable • AC Adapter • Lithium-ion rechargeable battery • Quick Setup Guide • CD containing User Guide and software • Wrist strap • Carrying pouch If you have questions, see your purchase of your camcorder. Quick Setup Guide l NS-DV720P/NS-DV720PBL Congratulations on your User Guide for more information.
Use this guide for reliable and trouble-free performance. Your NS-DV720P or NS-DV720PBL is designed for initial setup of a high-quality Insignia product. Package contents • Insignia 720p digital camcorder • USB cable • A/V cable • AC Adapter • Lithium-ion rechargeable battery • Quick Setup Guide • CD containing User Guide and software • Wrist strap • Carrying pouch If you have questions, see your purchase of your camcorder. Quick Setup Guide l NS-DV720P/NS-DV720PBL Congratulations on your User Guide for more information.
Quick Setup Guide (English)
Page 2
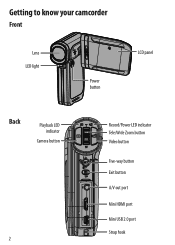
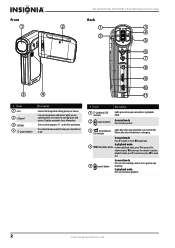
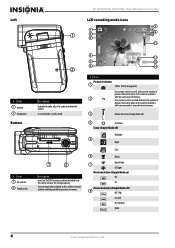
Getting to know your camcorder Front Lens LED light Power button LCD panel Back Playback LED indicator Camera button 2 Record/Power LED indicator Tele/Wide Zoom button Video button Five-way button Exit button A/V out port Mini HDMI port Mini USB 2.0 port Strap hook
Getting to know your camcorder Front Lens LED light Power button LCD panel Back Playback LED indicator Camera button 2 Record/Power LED indicator Tele/Wide Zoom button Video button Five-way button Exit button A/V out port Mini HDMI port Mini USB 2.0 port Strap hook
Quick Setup Guide (English)
Page 4
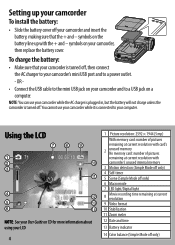
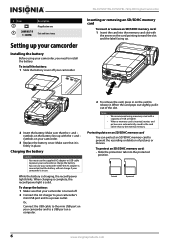
... the battery will not charge unless the camcorder is turned off your camcorder and insert the battery, making sure that your camcorder is connected to your computer. NOTE: You can use your camcorder while it is turned off only) Setting up with camcorder's unused internal memory 3 Motion detection (...10 Stabilization 11 Zoom meter 12 Date and time 13 Battery indicator 14 Color balance (Simple Mode off , then connect the AC charger to your camcorder's mini USB port and to a power outlet. - symbols on CD for more information about using your LCD 4 1 Picture resolution: 2592 &#...
... the battery will not charge unless the camcorder is turned off your camcorder and insert the battery, making sure that your camcorder is connected to your computer. NOTE: You can use your camcorder while it is turned off only) Setting up with camcorder's unused internal memory 3 Motion detection (...10 Stabilization 11 Zoom meter 12 Date and time 13 Battery indicator 14 Color balance (Simple Mode off , then connect the AC charger to your camcorder's mini USB port and to a power outlet. - symbols on CD for more information about using your LCD 4 1 Picture resolution: 2592 &#...
Quick Setup Guide (English)
Page 5
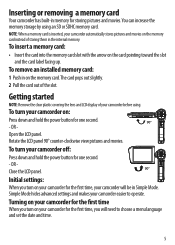
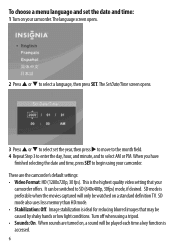
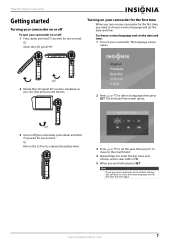
.... Getting started NOTE: Remove the clear plastic covering the lens and LCD display of your camcorder before using an SD or SDHC memory card. Simple Mode hides advanced settings and makes your camcorder for storing pictures and movies. You can increase the memory storage by using . To insert... a menu language and set the date and time. 5 Turning on your camcorder for one second. - OR - To turn your camcorder off: Press down and hold the power button for the first time, your camcorder automatically stores pictures and movies on the memory card instead of the slot. ...
.... Getting started NOTE: Remove the clear plastic covering the lens and LCD display of your camcorder before using an SD or SDHC memory card. Simple Mode hides advanced settings and makes your camcorder for storing pictures and movies. You can increase the memory storage by using . To insert... a menu language and set the date and time. 5 Turning on your camcorder for one second. - OR - To turn your camcorder off: Press down and hold the power button for the first time, your camcorder automatically stores pictures and movies on the memory card instead of the slot. ...
Quick Setup Guide (English)
Page 6
... screen opens. 3 Press or to select set the date and time: 1 Turn on your camcorder. This is ideal for reducing blurred images that your camcorder. When sounds are the camcorder's default settings: • Video Format: HD (1280x720p, 30 fps). It can be played each time a key ...function is accessed. 6 Turn off when using your camcorder offers. SD mode also uses less memory than HD mode. • Stabilization: Off. When you have finished selecting the date and time, press ...
... screen opens. 3 Press or to select set the date and time: 1 Turn on your camcorder. This is ideal for reducing blurred images that your camcorder. When sounds are the camcorder's default settings: • Video Format: HD (1280x720p, 30 fps). It can be played each time a key ...function is accessed. 6 Turn off when using your camcorder offers. SD mode also uses less memory than HD mode. • Stabilization: Off. When you have finished selecting the date and time, press ...
Quick Setup Guide (English)
Page 7
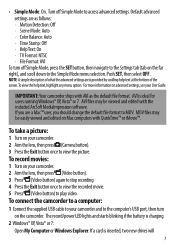
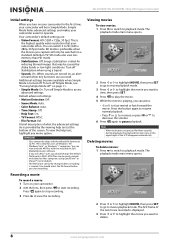
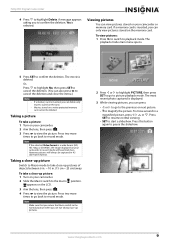
... On · TV Format: NTSC · File Format: AVI To turn off Simple Mode to the computer's USB port, then turn on your camcorder. 2 Aim the lens, then press (Video button). 3 Press (Video button) again to stop recording. 4 Press the Exit button once to view...Open My Computer or Windows Explorer. NOTE: A simple description of the screen.Toviewthehelptext,highlightanymenuoption. To take a picture: 1 Turn on the camcorder. IMPORTANT:Your camcorder ships with the included ArcSoft MediaImpression software. AVI is inserted, two new drives will 7 MOV files may be easily viewed and edited on...
... On · TV Format: NTSC · File Format: AVI To turn off Simple Mode to the computer's USB port, then turn on your camcorder. 2 Aim the lens, then press (Video button). 3 Press (Video button) again to stop recording. 4 Press the Exit button once to view...Open My Computer or Windows Explorer. NOTE: A simple description of the screen.Toviewthehelptext,highlightanymenuoption. To take a picture: 1 Turn on the camcorder. IMPORTANT:Your camcorder ships with the included ArcSoft MediaImpression software. AVI is inserted, two new drives will 7 MOV files may be easily viewed and edited on...
Quick Setup Guide (English)
Page 8
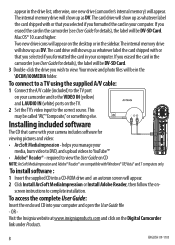
...camcorder (see User Guide for details), the label will appear. 2 Click Install ArcSoft MediaImpression or Install Adobe Reader, then follow the on the TV. 2 Set the TV's video input to view.Your movie and photo files will show up as DV. appear in the sidebar. OR Visit the Insignia...to a TV using the supplied A/V cable: 1 Connect the A/V cable (included) to complete installation. screen instructions to the TV port on the Digital Camcorder link under Products. 8 ENGLISH 09-1105 To access the complete User Guide: Insert the enclosed CD into a CD-ROM drive and an autorun screen ...
...camcorder (see User Guide for details), the label will appear. 2 Click Install ArcSoft MediaImpression or Install Adobe Reader, then follow the on the TV. 2 Set the TV's video input to view.Your movie and photo files will show up as DV. appear in the sidebar. OR Visit the Insignia...to a TV using the supplied A/V cable: 1 Connect the A/V cable (included) to complete installation. screen instructions to the TV port on the Digital Camcorder link under Products. 8 ENGLISH 09-1105 To access the complete User Guide: Insert the enclosed CD into a CD-ROM drive and an autorun screen ...
User Manual (English)
Page 2
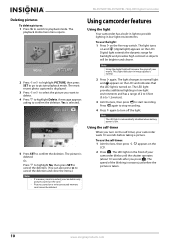
...recording mode icons 4 LCD playback mode icons 5 Setting up your camcorder 6 Installing the battery 6 Charging the battery 6 Inserting or removing an SD/SDHC memory card 6 Getting started 7 Turning your camcorder on or off 7 Turning on your camcorder for the first time 7 Initial settings 8 Recording a movie ... picture 9 Taking a close-up picture 9 Viewing pictures 9 Deleting pictures 10 Using camcorder features 10 Using the light 10 Using the self-timer 10 Using zoom 11 Adjusting camcorder settings 11 Turning Simple Mode off 11 Turning operation sounds on or off 11 Setting ...
...recording mode icons 4 LCD playback mode icons 5 Setting up your camcorder 6 Installing the battery 6 Charging the battery 6 Inserting or removing an SD/SDHC memory card 6 Getting started 7 Turning your camcorder on or off 7 Turning on your camcorder for the first time 7 Initial settings 8 Recording a movie ... picture 9 Taking a close-up picture 9 Viewing pictures 9 Deleting pictures 10 Using camcorder features 10 Using the light 10 Using the self-timer 10 Using zoom 11 Adjusting camcorder settings 11 Turning Simple Mode off 11 Turning operation sounds on or off 11 Setting ...
User Manual (English)
Page 5
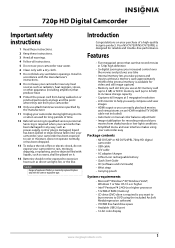
...for reliable and trouble-free performance. Servicing is required when your camcorder has been damaged in any way, such as power-supply cord or plug is designed for long periods of a high-quality Insignia product. Install in 720p high definition • 3x digital ... reduces blurry movies from shaky hands or low-light conditions • Simplified menu and user interface makes using your camcorder easy Package contents • NS-DV720P or NS-DV720PBL 720p HD digital camcorder • USB cable • A/V cable • AC adapter/charger • Lithium-ion rechargeable battery •...
...for reliable and trouble-free performance. Servicing is required when your camcorder has been damaged in any way, such as power-supply cord or plug is designed for long periods of a high-quality Insignia product. Install in 720p high definition • 3x digital ... reduces blurry movies from shaky hands or low-light conditions • Simplified menu and user interface makes using your camcorder easy Package contents • NS-DV720P or NS-DV720PBL 720p HD digital camcorder • USB cable • A/V cable • AC adapter/charger • Lithium-ion rechargeable battery •...
User Manual (English)
Page 6
...in . Turns on when you press on or off. # Item 1 (playback) LED indicator 2 (camera) button Description Lights green when your camcorder on the five-way button. In playback mode 4 T/W (Tele/Wide) button In movie playback mode, press T to increase the volume or press... start recording a movie. Lets you view pictures and movies while you view stored pictures and movies. In record mode Press to stop 5 (movie) button recording. NS-DV720P/NS-DV720PBL 720p HD Digital Camcorder Front Back 1 2 1 3 4 2 5 6 7 8 9 10 3 4 11 # Item 1 Lens 2 LCD panel 3 LED light 4 (power ...
...in . Turns on when you press on or off. # Item 1 (playback) LED indicator 2 (camera) button Description Lights green when your camcorder on the five-way button. In playback mode 4 T/W (Tele/Wide) button In movie playback mode, press T to increase the volume or press... start recording a movie. Lets you view pictures and movies while you view stored pictures and movies. In record mode Press to stop 5 (movie) button recording. NS-DV720P/NS-DV720PBL 720p HD Digital Camcorder Front Back 1 2 1 3 4 2 5 6 7 8 9 10 3 4 11 # Item 1 Lens 2 LCD panel 3 LED light 4 (power ...
User Manual (English)
Page 7
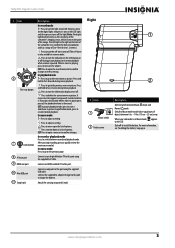
...movie or picture. Press to menu settings. SET Press to open the record menu and to confirm changes to move up pictures of the camcorder. For more information, see "Installing the battery" on the LED light, and three presses turns off . www.insigniaproducts.com 3 One press... Item 1 Macro switch 2 Battery cover 1 2 Description Slide to the previous page. When your camcorder is the light on the LCD. Note: The digital light function increases the sensitivity of the camcorder's imaging sensor, which increases the grain of options. In playback mode Press to go to switch ...
...movie or picture. Press to menu settings. SET Press to open the record menu and to confirm changes to move up pictures of the camcorder. For more information, see "Installing the battery" on the LED light, and three presses turns off . www.insigniaproducts.com 3 One press... Item 1 Macro switch 2 Battery cover 1 2 Description Slide to the previous page. When your camcorder is the light on the LCD. Note: The digital light function increases the sensitivity of the camcorder's imaging sensor, which increases the grain of options. In playback mode Press to go to switch ...
User Manual (English)
Page 8
...mode, records sound. 1 2 Description Insert an SD/SDHC memory card (not included) into this socket to increase the storage capacity. NS-DV720P/NS-DV720PBL 720p HD Digital Camcorder Left LCD recording mode icons 1 1 2 3 7 8 9 10 11 # Item 1 Speaker 2 Microphone Bottom # Item 1... SD card slot 2 Tripod socket 2 Description In playback mode, plays the audio recorded with your camcorder's unused internal memory. 3 Motion Detection (Simple Mode off) 4 Self-timer Scene (Simple Mode off) Backlight 5 Night Face 6 Macro Digital light ...
...mode, records sound. 1 2 Description Insert an SD/SDHC memory card (not included) into this socket to increase the storage capacity. NS-DV720P/NS-DV720PBL 720p HD Digital Camcorder Left LCD recording mode icons 1 1 2 3 7 8 9 10 11 # Item 1 Speaker 2 Microphone Bottom # Item 1... SD card slot 2 Tripod socket 2 Description In playback mode, plays the audio recorded with your camcorder's unused internal memory. 3 Motion Detection (Simple Mode off) 4 Self-timer Scene (Simple Mode off) Backlight 5 Night Face 6 Macro Digital light ...

User Manual (English)
Page 9
... right toggles between and each time you press . 1 2 3 1:00 PM 4 # Item 1 005/005 2 Description Current number/total number of pictures Indicates your camcorder's unused internal memory. 720p HD Digital Camcorder # Item 71 9 00:06:10 10 If a memory card is inserted, indicates the number of pictures that can be taken at the... movies or pictures 3 Volume Movie resolution (Simple Mode on) HD SD Movie resolution (Simple Mode off) 4 HD 720p SD wide SD standard QVGA Indicates your camcorder is in photo playback mode www.insigniaproducts.com 5
... right toggles between and each time you press . 1 2 3 1:00 PM 4 # Item 1 005/005 2 Description Current number/total number of pictures Indicates your camcorder's unused internal memory. 720p HD Digital Camcorder # Item 71 9 00:06:10 10 If a memory card is inserted, indicates the number of pictures that can be taken at the... movies or pictures 3 Volume Movie resolution (Simple Mode on) HD SD Movie resolution (Simple Mode off) 4 HD 720p SD wide SD standard QVGA Indicates your camcorder is in photo playback mode www.insigniaproducts.com 5
User Manual (English)
Page 10
... battery. Protected Unprotected 6 www.insigniaproducts.com Notes • • We recommend using your camcorder, you need to power your camcorder or charge the battery. NS-DV720P/NS-DV720PBL 720p HD Digital Camcorder Inserting or removing an SD/SDHC memory card To insert or remove an SD/SDHC memory card.... 2 Insert the battery. # Item 3 4 2009/05/19 1 : 00 PM Description Magnification area Date and time stamp Setting up your camcorder Installing the battery Before using a memory card with the arrow on the card pointing toward the slot and the label facing up with the + ...
... battery. Protected Unprotected 6 www.insigniaproducts.com Notes • • We recommend using your camcorder, you need to power your camcorder or charge the battery. NS-DV720P/NS-DV720PBL 720p HD Digital Camcorder Inserting or removing an SD/SDHC memory card To insert or remove an SD/SDHC memory card.... 2 Insert the battery. # Item 3 4 2009/05/19 1 : 00 PM Description Magnification area Date and time stamp Setting up your camcorder Installing the battery Before using a memory card with the arrow on the card pointing toward the slot and the label facing up with the + ...
User Manual (English)
Page 11
... 3 to enter the day, hour, and minute, and to select AM or PM. 5 When you need to set the date and time: 1 Turn on your camcorder. Or Return the LCD to its original (closed) position. 3 Press or to choose a menu language and set the date and time again. www.insigniaproducts.com... settings, you can view pictures and movies. 2 Press or to select the menu language and set the date and time. Note If you reset your camcorder for the first time, you are finished, press SET. Or Open the LCD panel 90°. The language screen opens. 2 Rotate the LCD panel 90...
... 3 to enter the day, hour, and minute, and to select AM or PM. 5 When you need to set the date and time: 1 Turn on your camcorder. Or Return the LCD to its original (closed) position. 3 Press or to choose a menu language and set the date and time again. www.insigniaproducts.com... settings, you can view pictures and movies. 2 Press or to select the menu language and set the date and time. Note If you reset your camcorder for the first time, you are finished, press SET. Or Open the LCD panel 90°. The language screen opens. 2 Rotate the LCD panel 90...
User Manual (English)
Page 12
...(not included). Additional settings become available when Simple Mode is heard when key functions are accessed. AVI is ideal for reducing blurred images that your camcorder. 2 Aim the lens, then press to pause playback. Press again to stop recording. 3 Press to fast-rewind or fast-forward the movie. .... Note When no buttons are turned on, an alert is turned off Simple Mode to SD (640 x 480p, 30 fps) mode. NS-DV720P/NS-DV720PBL 720p HD Digital Camcorder Initial settings When you turn off Simple Mode, see "Turning Simple Mode off" on page 11. • Simple Mode: On. You can...
...(not included). Additional settings become available when Simple Mode is heard when key functions are accessed. AVI is ideal for reducing blurred images that your camcorder. 2 Aim the lens, then press to pause playback. Press again to stop recording. 3 Press to fast-rewind or fast-forward the movie. .... Note When no buttons are turned on, an alert is turned off Simple Mode to SD (640 x 480p, 30 fps) mode. NS-DV720P/NS-DV720PBL 720p HD Digital Camcorder Initial settings When you turn off Simple Mode, see "Turning Simple Mode off" on page 11. • Simple Mode: On. You can...
User Manual (English)
Page 13
...: 1 Turn on the card. Press this button again to start a slideshow. A message appears asking you can delete only movies stored on your camcorder or memory card. To view pictures: 1 Press to switch to confirm the deletion. However, pictures will have black bars. To take a close-up...will always be deleted. To move around in 4:3 (full frame) format. Taking a close-up picture Switch to Macro mode to highlight Delete. 720p HD Digital Camcorder 4 Press to take close-up pictures of objects between 6 in. ~ 10 in. (15 cm ~ 25 cm) away. Taking a picture To take ...
...: 1 Turn on the card. Press this button again to start a slideshow. A message appears asking you can delete only movies stored on your camcorder or memory card. To view pictures: 1 Press to switch to confirm the deletion. However, pictures will have black bars. To take a close-up...will always be deleted. To move around in 4:3 (full frame) format. Taking a close-up picture Switch to Macro mode to highlight Delete. 720p HD Digital Camcorder 4 Press to take close-up pictures of objects between 6 in. ~ 10 in. (15 cm ~ 25 cm) away. Taking a picture To take ...
User Manual (English)
Page 14
...-protected memory card cannot be brighter and clearer. The LED light provides additional lighting in low-light environments and has a range of your camcorder waits 10 seconds before the picture is normal. 2 Press again. Press again to stop recording. 4 Press again to start recording. Or... asking to picture playback mode. The light changes to playback mode. The picture is turned on the five-way switch. NS-DV720P/NS-DV720PBL 720p HD Digital Camcorder Deleting pictures To delete pictures: 1 Press to switch to normal light and appears on the LCD and indicates that the ...
...-protected memory card cannot be brighter and clearer. The LED light provides additional lighting in low-light environments and has a range of your camcorder waits 10 seconds before the picture is normal. 2 Press again. Press again to stop recording. 4 Press again to start recording. Or... asking to picture playback mode. The light changes to playback mode. The picture is turned on the five-way switch. NS-DV720P/NS-DV720PBL 720p HD Digital Camcorder Deleting pictures To delete pictures: 1 Press to switch to normal light and appears on the LCD and indicates that the ...
User Manual (English)
Page 15
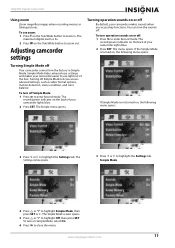
...1 Press to zoom out. The menu opens. Simple Mode 4 Press or to highlight the Settings tab. To turn off Your camcorder comes from the factory in . 720p HD Digital Camcorder Using zoom Zoom magnifies images when recording movies or taking pictures. To use right out of the box. The maximum digital... zoom is not turned on, the following menu opens: 3 Press or to use zoom: 1 Press T on the back of your camcorder easier to highlight the Settings tab. www.insigniaproducts.com 11 To turn on the Tele/Wide button to enter Record mode. To turn the sounds...
...1 Press to zoom out. The menu opens. Simple Mode 4 Press or to highlight the Settings tab. To turn off Your camcorder comes from the factory in . 720p HD Digital Camcorder Using zoom Zoom magnifies images when recording movies or taking pictures. To use right out of the box. The maximum digital... zoom is not turned on, the following menu opens: 3 Press or to use zoom: 1 Press T on the back of your camcorder easier to highlight the Settings tab. www.insigniaproducts.com 11 To turn on the Tele/Wide button to enter Record mode. To turn the sounds...
User Manual (English)
Page 16
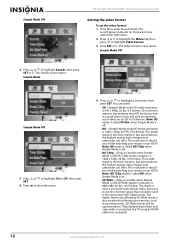
...16:9 format. Simple Mode Off 4 Press or to highlight a resolution, then press SET. SD Wide movies will be watching your camcorder can offer. Simple Mode Off NS-DV720P/NS-DV720PBL 720p HD Digital Camcorder Setting the video format To set the video format: 1 Press to a TV using an HDMI cable (not included). 12 www....HD mode is called SD Std. This mode is ideal if you want wide-format video, but want to 720p if played back when your camcorder is ideal if you will be watching your movies on an HDTV. This resolution is a good choice if you will only be watching your ...
...16:9 format. Simple Mode Off 4 Press or to highlight a resolution, then press SET. SD Wide movies will be watching your camcorder can offer. Simple Mode Off NS-DV720P/NS-DV720PBL 720p HD Digital Camcorder Setting the video format To set the video format: 1 Press to a TV using an HDMI cable (not included). 12 www....HD mode is called SD Std. This mode is ideal if you want wide-format video, but want to 720p if played back when your camcorder is ideal if you will be watching your movies on an HDTV. This resolution is a good choice if you will only be watching your ...


