Quick Setup Guide (English)
Page 4
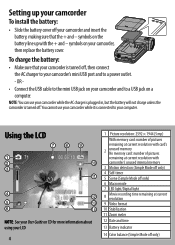
... card's 2 unused memory No memory card: number of pictures remaining at current resolution 9 Video format 10 Stabilization 11 Zoom meter 12 Date and time 13 Battery indicator 14 Color balance (Simple Mode off your camcorder and insert the battery, making sure that your camcorder is connected to a USB jack on a computer. NOTE: You can use your camcorder while the AC charger is plugged in, but the battery will not charge unless the camcorder is turned off.You cannot use...
... card's 2 unused memory No memory card: number of pictures remaining at current resolution 9 Video format 10 Stabilization 11 Zoom meter 12 Date and time 13 Battery indicator 14 Color balance (Simple Mode off your camcorder and insert the battery, making sure that your camcorder is connected to a USB jack on a computer. NOTE: You can use your camcorder while the AC charger is plugged in, but the battery will not charge unless the camcorder is turned off.You cannot use...
Quick Setup Guide (English)
Page 7
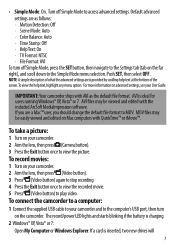
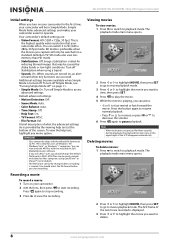
... SET button, then navigate to the Simple Mode menu selection. Push SET, then select OFF. To connect the camcorder to a computer: 1 Connect the supplied USB cable to your camcorder. 2 Aim the lens, then press (Video button). 3 Press (Video button) again to stop recording. 4 Press the Exit button once to view the recorded movie. 5 Press (Video button) to MOV. • Simple Mode: On. Formoreinformationonadvancedsettings,seeyourUserGuide. If you are a Mac™ user, you should change the default file format to play video. To take a picture: 1 Turn...
... SET button, then navigate to the Simple Mode menu selection. Push SET, then select OFF. To connect the camcorder to a computer: 1 Connect the supplied USB cable to your camcorder. 2 Aim the lens, then press (Video button). 3 Press (Video button) again to stop recording. 4 Press the Exit button once to view the recorded movie. 5 Press (Video button) to MOV. • Simple Mode: On. Formoreinformationonadvancedsettings,seeyourUserGuide. If you are a Mac™ user, you should change the default file format to play video. To take a picture: 1 Turn...
Quick Setup Guide (English)
Page 8
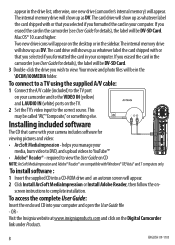
... TV. 2 Set the TV's video input to complete installation. Mac OS® 10.x and higher: Two new drive icons will appear. This may be called"AV,""Composite,"or something else. To install software : 1 Insert the supplied CD into your camcorder and to the VIDEO IN (yellow) and L AUDIO IN (white) ports on your computer and open the UserGuide file - The internal memory drive will appear. 2 Click Install ArcSoft...
... TV. 2 Set the TV's video input to complete installation. Mac OS® 10.x and higher: Two new drive icons will appear. This may be called"AV,""Composite,"or something else. To install software : 1 Insert the supplied CD into your camcorder and to the VIDEO IN (yellow) and L AUDIO IN (white) ports on your computer and open the UserGuide file - The internal memory drive will appear. 2 Click Install ArcSoft...
User Manual (English)
Page 2
...LCD playback mode icons 5 Setting up your camcorder 6 Installing the battery 6 Charging the battery 6 Inserting or removing an SD/SDHC memory card 6 Getting started 7 Turning your camcorder on or off 7 Turning on your camcorder for the first time 7 Initial settings 8 Recording a movie 8 Viewing movies 8 Deleting movies 8 Taking a picture 9 Taking a close-up picture 9 Viewing pictures 9 Deleting pictures 10 Using camcorder features 10 Using the light 10 Using the self-timer 10 Using zoom 11 Adjusting camcorder settings 11 Turning Simple Mode off 11 Turning operation sounds...
...LCD playback mode icons 5 Setting up your camcorder 6 Installing the battery 6 Charging the battery 6 Inserting or removing an SD/SDHC memory card 6 Getting started 7 Turning your camcorder on or off 7 Turning on your camcorder for the first time 7 Initial settings 8 Recording a movie 8 Viewing movies 8 Deleting movies 8 Taking a picture 9 Taking a close-up picture 9 Viewing pictures 9 Deleting pictures 10 Using camcorder features 10 Using the light 10 Using the self-timer 10 Using zoom 11 Adjusting camcorder settings 11 Turning Simple Mode off 11 Turning operation sounds...

User Manual (English)
Page 3
Contents Resetting to factory defaults 18 Viewing movies and pictures on a TV 19 Connecting to an HDMI enabled TV 19 Connecting to a TV using the supplied A/V cable 19 Viewing movies and pictures on a computer 19 Installing software 19 Transferring movies or pictures to a computer 19 Burning a movie to a DVD 20 Troubleshooting 20 Specifications and default settings 21 Specifications 21 Default settings 21 Legal notices 22 One-year limited warranty 23 www.insigniaproducts.com iii
Contents Resetting to factory defaults 18 Viewing movies and pictures on a TV 19 Connecting to an HDMI enabled TV 19 Connecting to a TV using the supplied A/V cable 19 Viewing movies and pictures on a computer 19 Installing software 19 Transferring movies or pictures to a computer 19 Burning a movie to a DVD 20 Troubleshooting 20 Specifications and default settings 21 Specifications 21 Default settings 21 Legal notices 22 One-year limited warranty 23 www.insigniaproducts.com iii
User Manual (English)
Page 5
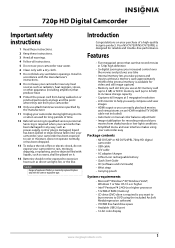
... for video and still image capture) • Memory card slot lets you can that produce heat. 9 Protect the power cord from being walked on your purchase of time. 12 Refer all instructions. 5 Do not use your camcorder near any way, such as power-supply cord or plug is you want to burn movies to DVD using your camcorder easy Package contents • NS-DV720P or NS-DV720PBL 720p HD digital camcorder • USB cable • A/V cable...
... for video and still image capture) • Memory card slot lets you can that produce heat. 9 Protect the power cord from being walked on your purchase of time. 12 Refer all instructions. 5 Do not use your camcorder near any way, such as power-supply cord or plug is you want to burn movies to DVD using your camcorder easy Package contents • NS-DV720P or NS-DV720PBL 720p HD digital camcorder • USB cable • A/V cable...
User Manual (English)
Page 7
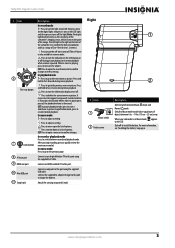
... AC adapter/charger to this port using the supplied A/V cable. Press to install the battery. If you recorded. Slide off to delete the current movie or picture. SET Press to open a menu or to resume normal playback. A movie must be stopped (not paused) in . (15 cm ~ 25 cm) away. Connect an HDMI-enabled TV to this hook. For more information, see "Installing the battery" on the LED light, and three presses turns...
... AC adapter/charger to this port using the supplied A/V cable. Press to install the battery. If you recorded. Slide off to delete the current movie or picture. SET Press to open a menu or to resume normal playback. A movie must be stopped (not paused) in . (15 cm ~ 25 cm) away. Connect an HDMI-enabled TV to this hook. For more information, see "Installing the battery" on the LED light, and three presses turns...
User Manual (English)
Page 8
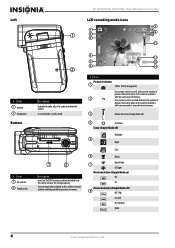
NS-DV720P/NS-DV720PBL 720p HD Digital Camcorder Left LCD recording mode icons 1 1 2 3 7 8 9 10 11 # Item 1 Speaker 2 Microphone Bottom # Item 1 SD card slot 2 Tripod socket 2 Description In playback mode, plays the audio recorded with your camcorder's unused internal memory. 3 Motion Detection (Simple Mode off) 4 Self-timer Scene (Simple Mode off) Backlight 5 Night Face 6 Macro Digital light 7 LED light Movie resolution (Simple Mode on) HD SD Movie resolution (Simple Mode off) 8 HD 720p SD wide SD standard QVGA 4 www.insigniaproducts...
NS-DV720P/NS-DV720PBL 720p HD Digital Camcorder Left LCD recording mode icons 1 1 2 3 7 8 9 10 11 # Item 1 Speaker 2 Microphone Bottom # Item 1 SD card slot 2 Tripod socket 2 Description In playback mode, plays the audio recorded with your camcorder's unused internal memory. 3 Motion Detection (Simple Mode off) 4 Self-timer Scene (Simple Mode off) Backlight 5 Night Face 6 Macro Digital light 7 LED light Movie resolution (Simple Mode on) HD SD Movie resolution (Simple Mode off) 8 HD 720p SD wide SD standard QVGA 4 www.insigniaproducts...

User Manual (English)
Page 9
Movie recording time remaining at the current resolution Stabilization 11 Zoom meter: 3x digital zoom 12 2009/05/19 1 : 00 PM Date and time Battery power full Battery power medium 13 Battery power low Battery power depleted Color balance (Simple Mode off) AUTO Auto 14 Daylight Fluorescent Tungsten LCD playback mode icons 1 4 2 5 3 # Item 1 00:06:10 2 005/005 Movie playback time counter Current number/total number of movies or pictures 3 Volume Movie resolution (Simple Mode on) HD SD Movie resolution (Simple Mode off) 4 HD 720p SD wide...
Movie recording time remaining at the current resolution Stabilization 11 Zoom meter: 3x digital zoom 12 2009/05/19 1 : 00 PM Date and time Battery power full Battery power medium 13 Battery power low Battery power depleted Color balance (Simple Mode off) AUTO Auto 14 Daylight Fluorescent Tungsten LCD playback mode icons 1 4 2 5 3 # Item 1 00:06:10 2 005/005 Movie playback time counter Current number/total number of movies or pictures 3 Volume Movie resolution (Simple Mode on) HD SD Movie resolution (Simple Mode off) 4 HD 720p SD wide...
User Manual (English)
Page 10
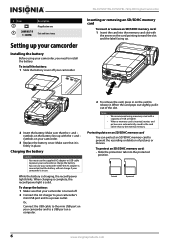
... the internal memory. When a memory card is charging, the record/power light blinks. Protected Unprotected 6 www.insigniaproducts.com NS-DV720P/NS-DV720PBL 720p HD Digital Camcorder Inserting or removing an SD/SDHC memory card To insert or remove an SD/SDHC memory card: 1 Insert the card into the protected position. While the battery is inserted, movies and pictures are automatically saved to the card rather than to a power outlet. To install the battery: 1 Slide the battery cover off . 2 Connect the AC charger...
... the internal memory. When a memory card is charging, the record/power light blinks. Protected Unprotected 6 www.insigniaproducts.com NS-DV720P/NS-DV720PBL 720p HD Digital Camcorder Inserting or removing an SD/SDHC memory card To insert or remove an SD/SDHC memory card: 1 Insert the card into the protected position. While the battery is inserted, movies and pictures are automatically saved to the card rather than to a power outlet. To install the battery: 1 Slide the battery cover off . 2 Connect the AC charger...
User Manual (English)
Page 12
... movie. Turn off Simple Mode to playback mode. You can view and edit AVI files with the default file format set to operate. The file format cannot be watched on your camcorder easier to AVI. Note When no buttons are pressed for the first time, your camcorder will only be changed after a recording is playing, you can switch it to play the movie. 5 While the movie is created. Deleting movies To delete movies: 1 Press to switch to access advanced settings. Viewing movies To view movies...
... movie. Turn off Simple Mode to playback mode. You can view and edit AVI files with the default file format set to operate. The file format cannot be watched on your camcorder easier to AVI. Note When no buttons are pressed for the first time, your camcorder will only be changed after a recording is playing, you can switch it to play the movie. 5 While the movie is created. Deleting movies To delete movies: 1 Press to switch to access advanced settings. Viewing movies To view movies...
User Manual (English)
Page 14
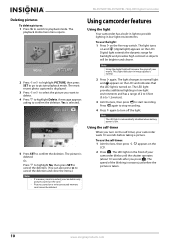
NS-DV720P/NS-DV720PBL 720p HD Digital Camcorder Deleting pictures To delete pictures: 1 Press to switch to confirm the deletion. The most recent photo captured is deleted. Notes Using the digital light will be deleted. To use the light: 1 Press on the LCD. The LED light on the 2 Press . A message appears asking to playback mode. The picture is displayed. 3 Press or to select the picture you press . The light changes to highlight Delete. The LED light provides additional lighting in low-light environments. The playback mode main...
NS-DV720P/NS-DV720PBL 720p HD Digital Camcorder Deleting pictures To delete pictures: 1 Press to switch to confirm the deletion. The most recent photo captured is deleted. Notes Using the digital light will be deleted. To use the light: 1 Press on the LCD. The LED light on the 2 Press . A message appears asking to playback mode. The picture is displayed. 3 Press or to select the picture you press . The light changes to highlight Delete. The LED light provides additional lighting in low-light environments. The playback mode main...
User Manual (English)
Page 16
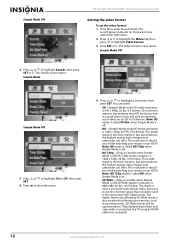
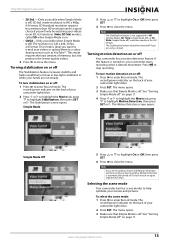
... connected to highlight Sounds, then press SET or . SD Wide movies will be used in the camcorder's HD (720p) mode. The Sounds screen opens. This mode requires the most memory, but want to use less memory space than HD resolution and is on an SD, 4:3 television. Simple Mode Off NS-DV720P/NS-DV720PBL 720p HD Digital Camcorder Setting the video format To set the video format: 1 Press to highlight a resolution, then press SET. Simple Mode Simple Mode Off 5 Press SET...
... connected to highlight Sounds, then press SET or . SD Wide movies will be used in the camcorder's HD (720p) mode. The Sounds screen opens. This mode requires the most memory, but want to use less memory space than HD resolution and is on an SD, 4:3 television. Simple Mode Off NS-DV720P/NS-DV720PBL 720p HD Digital Camcorder Setting the video format To set the video format: 1 Press to highlight a resolution, then press SET. Simple Mode Simple Mode Off 5 Press SET...
User Manual (English)
Page 17
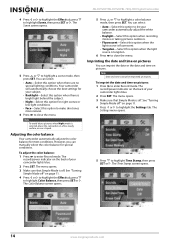
... videos. 5 Press to a video sharing service such as YouTube™. The record/power indicator on , your movies and pictures. The Motion Detection screen opens. The menu opens. 3 Make sure that Simple Mode is off ) resolution modes or for still images. 720p HD Digital Camcorder • SD Std.-(Only accessible when Simple Mode is off . mode resolution is automatically turned off " on . • QVGA-(Only accessible when Simple Mode is 320 x 240, 30 fps, 4:3 format. mode...
... videos. 5 Press to a video sharing service such as YouTube™. The record/power indicator on , your movies and pictures. The Motion Detection screen opens. The menu opens. 3 Make sure that Simple Mode is off ) resolution modes or for still images. 720p HD Digital Camcorder • SD Std.-(Only accessible when Simple Mode is off . mode resolution is automatically turned off " on . • QVGA-(Only accessible when Simple Mode is 320 x 240, 30 fps, 4:3 format. mode...
User Manual (English)
Page 18
... Time Stamp, then press SET or . The record/power indicator on page 11. 4 Press or to close the menu. The menu opens. 3 Make sure that Simple Mode is bright light behind the subject. • Night-Select this option for your camcorder lights blue. 2 Press SET. The Color Balance screen opens. 5 Press or to let your camcorder lights blue. 2 Press SET. You can manually select the color balance for most conditions. See "Turning Simple Mode...
... Time Stamp, then press SET or . The record/power indicator on page 11. 4 Press or to close the menu. The menu opens. 3 Make sure that Simple Mode is bright light behind the subject. • Night-Select this option for your camcorder lights blue. 2 Press SET. The Color Balance screen opens. 5 Press or to let your camcorder lights blue. 2 Press SET. You can manually select the color balance for most conditions. See "Turning Simple Mode...
User Manual (English)
Page 19
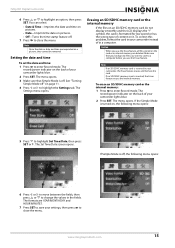
... Record mode. To correct this problem, format the card in your camcorder lights blue. 2 Press SET. Make sure that Simple Mode is inserted in a computer. Note Once the date or date and time are imprinted on an SD/SDHC memory card do not display smoothly and the LCD displays the "!" See "Turning Simple Mode off . To erase an SD/SDHC memory card or the internal memory: 1 Press to enter Record mode. www.insigniaproducts.com 15 The record/power...
... Record mode. To correct this problem, format the card in your camcorder lights blue. 2 Press SET. Make sure that Simple Mode is inserted in a computer. Note Once the date or date and time are imprinted on an SD/SDHC memory card do not display smoothly and the LCD displays the "!" See "Turning Simple Mode off . To erase an SD/SDHC memory card or the internal memory: 1 Press to enter Record mode. www.insigniaproducts.com 15 The record/power...
User Manual (English)
Page 22
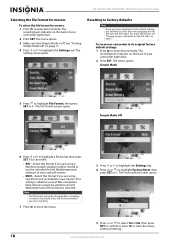
... SET. NS-DV720P/NS-DV720PBL 720p HD Digital Camcorder Selecting the file format for movies To select the file format for users of Mac computers. For more information, see "Turning on your camcorder for the first time" on the back of your camcorder to its original factory default settings: 1 Press to highlight Factory Reset, then press SET or . Simple Mode Off 6 Press or to highlight File Format, then press SET or . The record/power indicator on page 7. The menu opens...
... SET. NS-DV720P/NS-DV720PBL 720p HD Digital Camcorder Selecting the file format for movies To select the file format for users of Mac computers. For more information, see "Turning on your camcorder for the first time" on the back of your camcorder to its original factory default settings: 1 Press to highlight Factory Reset, then press SET or . Simple Mode Off 6 Press or to highlight File Format, then press SET or . The record/power indicator on page 7. The menu opens...
User Manual (English)
Page 23
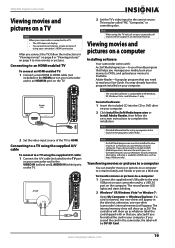
... DV-SD Card. If you manage your media, burn your movies to DVDs, and upload your movies to YouTube. AV mode 2 Set the TV's video input to HDMI. The internal memory drive will be found in an interlaced format. 720p HD Digital Camcorder Viewing movies and pictures on a TV Note When your camcorder is connected to a TV: • The LCD does not display. • You cannot record movies or take pictures if using the supplied A/V cable: 1 Connect the A/V cable (included...
... DV-SD Card. If you manage your media, burn your movies to DVDs, and upload your movies to YouTube. AV mode 2 Set the TV's video input to HDMI. The internal memory drive will be found in an interlaced format. 720p HD Digital Camcorder Viewing movies and pictures on a TV Note When your camcorder is connected to a TV: • The LCD does not display. • You cannot record movies or take pictures if using the supplied A/V cable: 1 Connect the A/V cable (included...
User Manual (English)
Page 24
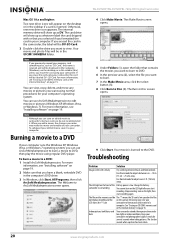
... (2), select the file you start recording again. Burning a movie to a DVD If your card instead of the Battery power is inserted. For more information, see "Installing software" on page 19. The Make Movie screen opens. 5 Under Folders (1), open the folder that you erase the card using regular DVD player. Troubleshooting Problem Solution Image on the LED light after you want to burn to Disc (4). camcorder is not working You cannot turn on the memory card do not...
... (2), select the file you start recording again. Burning a movie to a DVD If your card instead of the Battery power is inserted. For more information, see "Installing software" on page 19. The Make Movie screen opens. 5 Under Folders (1), open the folder that you erase the card using regular DVD player. Troubleshooting Problem Solution Image on the LED light after you want to burn to Disc (4). camcorder is not working You cannot turn on the memory card do not...
User Manual (English)
Page 25
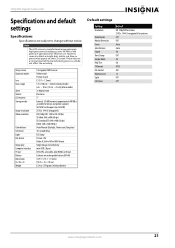
... format Single image and slideshow mini USB 2.0 port NTSC/PAL selectable, mini HDMI, or AV out Lithium-ion rechargeable battery (NP-60) 4.29 × 3.15 × 1.1 inches (10.9 × 8 × 2.8 cm) 6.24 oz (170 grams) without notice. Note The LCD screen is available for movie and picture capture) SD/SDHC card support (up to change without battery Default settings Setting Resolution Stabilization Motion Detection Scene Color Balance Sound Time Stamp Simple Mode Help Text TV Format File Format Volume Level Light...
... format Single image and slideshow mini USB 2.0 port NTSC/PAL selectable, mini HDMI, or AV out Lithium-ion rechargeable battery (NP-60) 4.29 × 3.15 × 1.1 inches (10.9 × 8 × 2.8 cm) 6.24 oz (170 grams) without notice. Note The LCD screen is available for movie and picture capture) SD/SDHC card support (up to change without battery Default settings Setting Resolution Stabilization Motion Detection Scene Color Balance Sound Time Stamp Simple Mode Help Text TV Format File Format Volume Level Light...


