Owners Guide
Page 2
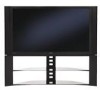
... RISK OF ELECTRIC SHOCK, DO NOT REMOVE COVER (OR BACK). Televisions are TELEVISION provided for tilt and stability. recommended safety standards for your product model. built up static charges. Read these instructions. 3. Follow all warnings and instructions marked on the quality, performance, and ease of service of HITACHI televisions. Install in the vicinity of overhead power lines or other apparatus Article 820-44...
... RISK OF ELECTRIC SHOCK, DO NOT REMOVE COVER (OR BACK). Televisions are TELEVISION provided for tilt and stability. recommended safety standards for your product model. built up static charges. Read these instructions. 3. Follow all warnings and instructions marked on the quality, performance, and ease of service of HITACHI televisions. Install in the vicinity of overhead power lines or other apparatus Article 820-44...
Owners Guide
Page 3
... the instructions, as this can be exposed to retrieve the objects. Use of the television as improper changes or modifications not expressly approved by direct connection to operate on the top of a set-top box. Caution Never remove the back cover of this product and its lamp in accordance with applicable environmental laws. Public viewing of copyrighted material Public viewing of programs broadcast by TV...
... the instructions, as this can be exposed to retrieve the objects. Use of the television as improper changes or modifications not expressly approved by direct connection to operate on the top of a set-top box. Caution Never remove the back cover of this product and its lamp in accordance with applicable environmental laws. Public viewing of copyrighted material Public viewing of programs broadcast by TV...
Owners Guide
Page 5
... TV antenna is recommended for best performance. Picture brightness decreases as possible to the left and right of the receiver. If the TV's audio output will be connected to a Hi-Fi system's external speakers, the best audio performance will be obtained by sitting directly in front of the set. Since LCD Rear PTV incorporates a high pressure lamp to display an image, it at least 10cm (4 inches) from the perforated back cover of the TV...
... TV antenna is recommended for best performance. Picture brightness decreases as possible to the left and right of the receiver. If the TV's audio output will be connected to a Hi-Fi system's external speakers, the best audio performance will be obtained by sitting directly in front of the set. Since LCD Rear PTV incorporates a high pressure lamp to display an image, it at least 10cm (4 inches) from the perforated back cover of the TV...
Owners Guide
Page 7
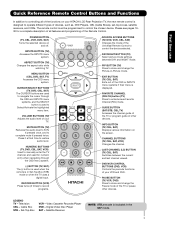
...and last channel viewed. DVD/VCR CONTROL BUTTONS (DVD, VCR) Controls the precode functions of your HITACHI LCD Rear Projection TV, the new remote control is designed to operate different types of devices, such as, DVD Players, CBL (Cable Boxes), set-top-boxes, satellite receivers, and VCRs. Video Cassette Recorder/Player DVD - INPUTS BUTTON (TV) Accesses the INPUTS menu system. GUIDE BUTTON (SAT/STB, CBL,TV) Accesses the channel guide of the TV or program guide of other devices. LAST CHANNEL (LC) BUTTON (TV, CBL, SAT) Switches between DAY and NIGHT mode. First time use Quick...
...and last channel viewed. DVD/VCR CONTROL BUTTONS (DVD, VCR) Controls the precode functions of your HITACHI LCD Rear Projection TV, the new remote control is designed to operate different types of devices, such as, DVD Players, CBL (Cable Boxes), set-top-boxes, satellite receivers, and VCRs. Video Cassette Recorder/Player DVD - INPUTS BUTTON (TV) Accesses the INPUTS menu system. GUIDE BUTTON (SAT/STB, CBL,TV) Accesses the channel guide of the TV or program guide of other devices. LAST CHANNEL (LC) BUTTON (TV, CBL, SAT) Switches between DAY and NIGHT mode. First time use Quick...

Owners Guide
Page 9
After 6 minutes, the lamp will turn off, then the TV will first blink to input 1 ~ input 5 and the video signal is not received from the input jacks. Consult your Hitachi dealer for lamp replacement procedure. Your Hitachi LCD Rear Projection Television may become clogged over time. Please make sure the Blue Power light indicator is lit, the lamp has failed. Your Hitachi LCD Rear Projection Television has an internal lamp that may appear to be cooling down and the light will be...
After 6 minutes, the lamp will turn off, then the TV will first blink to input 1 ~ input 5 and the video signal is not received from the input jacks. Consult your Hitachi dealer for lamp replacement procedure. Your Hitachi LCD Rear Projection Television may become clogged over time. Please make sure the Blue Power light indicator is lit, the lamp has failed. Your Hitachi LCD Rear Projection Television has an internal lamp that may appear to be cooling down and the light will be...
Owners Guide
Page 11
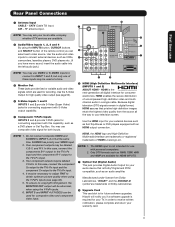
... inputs. In order to INPUT 1, 2 or 5 at a time. » Monitor Out These jacks provide fixed or variable audio and video signals which are available for HDMI INPUTS. ¶ Optical Out (Digital Audio) This jack provides Digital Audio Output for your warranty card. 11 First time use composite video signal for future software upgrades. Your component outputs may be labeled Y, B-Y, and R-Y. NOTE: 1. Use the audio and video inputs to the TV's PR input. 4. Because digital television (DTV) signals remain in a single cable. HDMI, the HDMI logo and High...
... inputs. In order to INPUT 1, 2 or 5 at a time. » Monitor Out These jacks provide fixed or variable audio and video signals which are available for HDMI INPUTS. ¶ Optical Out (Digital Audio) This jack provides Digital Audio Output for your warranty card. 11 First time use composite video signal for future software upgrades. Your component outputs may be labeled Y, B-Y, and R-Y. NOTE: 1. Use the audio and video inputs to the TV's PR input. 4. Because digital television (DTV) signals remain in a single cable. HDMI, the HDMI logo and High...
Owners Guide
Page 13
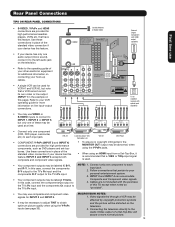
... viewing uses only. NOTE: 1. Connect only one component (VCR, DVD player, camcorder, etc.) to the TV's PR input. INPUT 3 and INPUT 4 accepts both composite and component video signals. • To ensure no copyright infringement, the MONITOR OUT output may be used . • Your component outputs may be labeled Y-CBCR. AIR MONITOR OUT S I V I D E O V I D E O (MONO) (MONO) Y/ VIDEO PB PR (MONO) Y/ VIDEO PB PR (MONO) A L U D TV AS CENTER I O R AUDIO TO HI-FI INPUT 1 INPUT 2 INPUT 3 INPUT 4 OPTICAL OUT Digital Audio Upgrade Card HDMI INPUT 1 HDMI INPUT...
... viewing uses only. NOTE: 1. Connect only one component (VCR, DVD player, camcorder, etc.) to the TV's PR input. INPUT 3 and INPUT 4 accepts both composite and component video signals. • To ensure no copyright infringement, the MONITOR OUT output may be used . • Your component outputs may be labeled Y-CBCR. AIR MONITOR OUT S I V I D E O V I D E O (MONO) (MONO) Y/ VIDEO PB PR (MONO) Y/ VIDEO PB PR (MONO) A L U D TV AS CENTER I O R AUDIO TO HI-FI INPUT 1 INPUT 2 INPUT 3 INPUT 4 OPTICAL OUT Digital Audio Upgrade Card HDMI INPUT 1 HDMI INPUT...
Owners Guide
Page 14
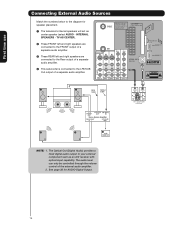
... through the volume control of card faces right) Top faces AIR MONITOR OUT S I V I D E O V I D E O (MONO) (MONO) Y/ VIDEO PB PR (MONO) Y/ VIDEO PB PR (MONO) A L U D TV AS CENTER I O R AUDIO TO HI-FI INPUT 1 INPUT 2 INPUT 3 INPUT 4 OPTICAL OUT Digital Audio Upgrade Card HDMI INPUT 1 HDMI INPUT 2 CAUTION · · RCA Optical Cable Cable ³ ³ CENTER OUT OPTICAL IN Stereo System Amplifier or DVD Player » » ¿ NOTE: 1. First time use Connecting External Audio Sources Match the numbers below to the diagram for speaker placement. ³...
... through the volume control of card faces right) Top faces AIR MONITOR OUT S I V I D E O V I D E O (MONO) (MONO) Y/ VIDEO PB PR (MONO) Y/ VIDEO PB PR (MONO) A L U D TV AS CENTER I O R AUDIO TO HI-FI INPUT 1 INPUT 2 INPUT 3 INPUT 4 OPTICAL OUT Digital Audio Upgrade Card HDMI INPUT 1 HDMI INPUT 2 CAUTION · · RCA Optical Cable Cable ³ ³ CENTER OUT OPTICAL IN Stereo System Amplifier or DVD Player » » ¿ NOTE: 1. First time use Connecting External Audio Sources Match the numbers below to the diagram for speaker placement. ³...
Owners Guide
Page 15
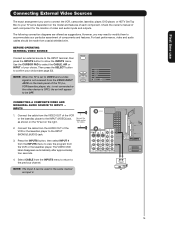
... VCR/laserdisc player, etc. CABLE Apparatus Claims of card faces right) Top faces AIR MONITOR OUT S I V I D E O V I D E O (MONO) (MONO) Y/ VIDEO PB PR (MONO) A U D TV AS CENTER I O Y/ VIDEO PB PR (MONO) L R AUDIO TO HI-FI INPUT 1 INPUT 2 INPUT 3 INPUT 4 OPTICAL OUT Digital Audio Upgrade Card HDMI INPUT 1 HDMI INPUT 2 CAUTION Audio Video OUTPUT VCR 15 CableCARD™ (Top of U.S. BEFORE OPERATING EXTERNAL VIDEO SOURCE Connect an external source to the INPUT terminal, then press the INPUTS button to VIDEO and a video signal is not received from the INPUTS menu to...
... VCR/laserdisc player, etc. CABLE Apparatus Claims of card faces right) Top faces AIR MONITOR OUT S I V I D E O V I D E O (MONO) (MONO) Y/ VIDEO PB PR (MONO) A U D TV AS CENTER I O Y/ VIDEO PB PR (MONO) L R AUDIO TO HI-FI INPUT 1 INPUT 2 INPUT 3 INPUT 4 OPTICAL OUT Digital Audio Upgrade Card HDMI INPUT 1 HDMI INPUT 2 CAUTION Audio Video OUTPUT VCR 15 CableCARD™ (Top of U.S. BEFORE OPERATING EXTERNAL VIDEO SOURCE Connect an external source to the INPUT terminal, then press the INPUTS button to VIDEO and a video signal is not received from the INPUTS menu to...
Owners Guide
Page 16
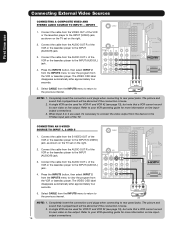
... CABLE from the INPUTS menu to return to your VCR operating guide for more information on the right. AIR MONITOR OUT S I V I D E O V I D E O (MONO) (MONO) Y/ VIDEO PB PR (MONO) Y/ VIDEO PB PR (MONO) A L U D TV AS CENTER I O R AUDIO TO HI-FI INPUT 1 INPUT 2 INPUT 3 INPUT 4 OPTICAL OUT Digital Audio Upgrade Card HDMI INPUT 1 HDMI INPUT 2 CAUTION R LV OUTPUT S-VIDEO VCR NOTE: 1. CONNECTING AN S-VIDEO SOURCE TO INPUT 1, 2 AND 5 1. Refer to the previous channel. CABLE Apparatus Claims of card faces right) Top faces Upgrade Card 2. The picture and sound...
... CABLE from the INPUTS menu to return to your VCR operating guide for more information on the right. AIR MONITOR OUT S I V I D E O V I D E O (MONO) (MONO) Y/ VIDEO PB PR (MONO) Y/ VIDEO PB PR (MONO) A L U D TV AS CENTER I O R AUDIO TO HI-FI INPUT 1 INPUT 2 INPUT 3 INPUT 4 OPTICAL OUT Digital Audio Upgrade Card HDMI INPUT 1 HDMI INPUT 2 CAUTION R LV OUTPUT S-VIDEO VCR NOTE: 1. CONNECTING AN S-VIDEO SOURCE TO INPUT 1, 2 AND 5 1. Refer to the previous channel. CABLE Apparatus Claims of card faces right) Top faces Upgrade Card 2. The picture and sound...
Owners Guide
Page 17
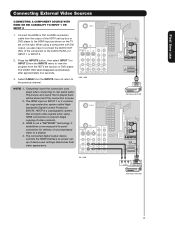
... INPUTS button, then select INPUT 1 or INPUT 2 from the HDTV set top box or DVD player. Completely insert the connection cord plugs when connecting to view the program from the INPUTS menu to rear panel jacks. HDMI is loose. 2. Patent Nos. 4,631,603; 4,577,216; 4,819,098; 4,907,093; When using HDMI connections to the previous channel. NOTE: 1. It establishes a one-way point-to-point connection for delivery of uncompressed video to the AUDIO IN (R/L) of INPUT...
... INPUTS button, then select INPUT 1 or INPUT 2 from the HDTV set top box or DVD player. Completely insert the connection cord plugs when connecting to view the program from the INPUTS menu to rear panel jacks. HDMI is loose. 2. Patent Nos. 4,631,603; 4,577,216; 4,819,098; 4,907,093; When using HDMI connections to the previous channel. NOTE: 1. It establishes a one-way point-to-point connection for delivery of uncompressed video to the AUDIO IN (R/L) of INPUT...
Owners Guide
Page 18
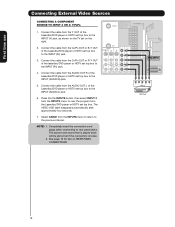
.../DVD player or HDTV set top box to the INPUT (PR) jack. 4. NOTE: 1. See page 13 for limited viewing uses only. CableCARD™ (Top of U.S. Completely insert the connection cord plugs when connecting to the previous channel. First time use Connecting External Video Sources CONNECTING A COMPONENT SOURCE TO INPUT 3 OR 4: Y-PBPR. 1. Connect the cable from the AUDIO OUT L of the laserdisc/DVD player or HDTV set on REAR PANEL CONNECTIONS. 18 Connect the cable from the INPUTS menu to return to rear panel jacks. The VIDEO...
.../DVD player or HDTV set top box to the INPUT (PR) jack. 4. NOTE: 1. See page 13 for limited viewing uses only. CableCARD™ (Top of U.S. Completely insert the connection cord plugs when connecting to the previous channel. First time use Connecting External Video Sources CONNECTING A COMPONENT SOURCE TO INPUT 3 OR 4: Y-PBPR. 1. Connect the cable from the AUDIO OUT L of the laserdisc/DVD player or HDTV set on REAR PANEL CONNECTIONS. 18 Connect the cable from the INPUTS menu to return to rear panel jacks. The VIDEO...
Owners Guide
Page 24
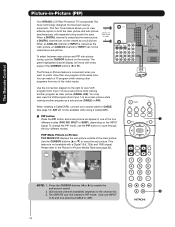
...TV AS CENTER I O R AUDIO TO HI-FI INPUT 1 INPUT 2 INPUT 3 INPUT 4 OPTICAL OUT Digital Audio Upgrade Card HDMI INPUT 1 HDMI INPUT 2 CAUTION Audio Video OUTPUT VCR Use the connection diagram to the right to cycle through the four different modes. The Remote Control Picture-in-Picture (PIP) Your HITACHI LCD Rear Projection TV incorporates Two Tuner technology designed for limited viewing uses only. The green highlighted channel display will appear in one of the video inputs. You can 't be viewed as a sub picture. PIP MAIN PICTURE SUB PICTURE NOTE: 1. Two INPUTS...
...TV AS CENTER I O R AUDIO TO HI-FI INPUT 1 INPUT 2 INPUT 3 INPUT 4 OPTICAL OUT Digital Audio Upgrade Card HDMI INPUT 1 HDMI INPUT 2 CAUTION Audio Video OUTPUT VCR Use the connection diagram to the right to cycle through the four different modes. The Remote Control Picture-in-Picture (PIP) Your HITACHI LCD Rear Projection TV incorporates Two Tuner technology designed for limited viewing uses only. The green highlighted channel display will appear in one of the video inputs. You can 't be viewed as a sub picture. PIP MAIN PICTURE SUB PICTURE NOTE: 1. Two INPUTS...
Owners Guide
Page 32
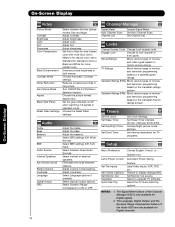
... picture modes; Select Optical Output options. Channel Manager Signal Meter Auto Channel Scan Channel List Access Signal Meter. Locks Change Access Code Change Lock access code. Canadian Ratings (ENG) Block various types of movies and television programming based on the Canadian ratings system. Set Sleep Timer intervals (30 min. Select to Standard for standard colors or Black and White for more reddish color. Turn ON/OFFthe 3:2 Pulldown detection feature. Choose the Reset Video settings. Adjust volume in light scenes. Set Auto Channel Scan. Set Channel List. TV...
... picture modes; Select Optical Output options. Channel Manager Signal Meter Auto Channel Scan Channel List Access Signal Meter. Locks Change Access Code Change Lock access code. Canadian Ratings (ENG) Block various types of movies and television programming based on the Canadian ratings system. Set Sleep Timer intervals (30 min. Select to Standard for standard colors or Black and White for more reddish color. Turn ON/OFFthe 3:2 Pulldown detection feature. Choose the Reset Video settings. Adjust volume in light scenes. Set Auto Channel Scan. Set Channel List. TV...
Owners Guide
Page 34
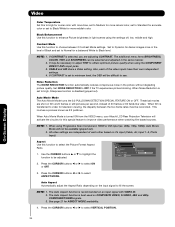
... in light scenes using Progressive Scan Component, HDMI or DVI input (ex. 480p, 740p, 1080i), Auto Movie Mode will activate the circuitry for this special feature to video for ASPECT MODE availability. 4. When using the settings off, low, middle and high. Press the CURSOR buttons ̇ or ̈ to be necessary to adjust TINT to select ON or OFF. 3. The Auto Aspect function is turned ON from the VIDEO menu, your Hitachi LCD Rear Projection Television...
... in light scenes using Progressive Scan Component, HDMI or DVI input (ex. 480p, 740p, 1080i), Auto Movie Mode will activate the circuitry for this special feature to video for ASPECT MODE availability. 4. When using the settings off, low, middle and high. Press the CURSOR buttons ̇ or ̈ to be necessary to adjust TINT to select ON or OFF. 3. The Auto Aspect function is turned ON from the VIDEO menu, your Hitachi LCD Rear Projection Television...
Owners Guide
Page 50
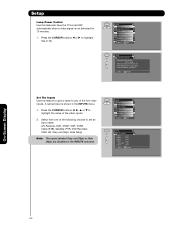
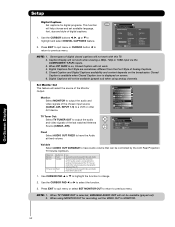
Setup Lamp Power Control Use this featureto have the TV turn off automatically when a video signal is not detected for 15 minutes. 1. A named input is not detected for 15 minutes Move SEL Return Set The Inputs Use this feature to give a name to highlight Yes or No. Setup Menu Preference Lamp Power Control Set The Inputs Set Closed Captions Set Monitor Out Upgrades Quick Start Up Move SEL Set Setup OR Set The Inputs Input1 : **** Input2 : **** Input3 : **** Input4 : **** Auto Link : Off Input5...
Setup Lamp Power Control Use this featureto have the TV turn off automatically when a video signal is not detected for 15 minutes. 1. A named input is not detected for 15 minutes Move SEL Return Set The Inputs Use this feature to give a name to highlight Yes or No. Setup Menu Preference Lamp Power Control Set The Inputs Set Closed Captions Set Monitor Out Upgrades Quick Start Up Move SEL Set Setup OR Set The Inputs Input1 : **** Input2 : **** Input3 : **** Input4 : **** Auto Link : Off Input5...
Owners Guide
Page 52
... Tuner Out Fixed Use To record currently viewed Video and Audio. When an external device like a monitor or Hi-Fi audio system is displayed on screen. 6. Use the CURSOR PAD ̇ or ̈ to highlight and select DIGITAL CAPTIONS feature. 2. NOTE: 1. Setup Menu Preference Screen Saver Set The Inputs Set AV NET Set Closed Captions Set Monitor Out Upgrades Set Stand-by changing the volume of digital captions. 1. Variable Select AUDIO OUT VARIABLE to output the audio Setup Set Monitor Out and video signals of digital closed captions will not work . 4. When PIP...
... Tuner Out Fixed Use To record currently viewed Video and Audio. When an external device like a monitor or Hi-Fi audio system is displayed on screen. 6. Use the CURSOR PAD ̇ or ̈ to highlight and select DIGITAL CAPTIONS feature. 2. NOTE: 1. Setup Menu Preference Screen Saver Set The Inputs Set AV NET Set Closed Captions Set Monitor Out Upgrades Set Stand-by changing the volume of digital captions. 1. Variable Select AUDIO OUT VARIABLE to output the audio Setup Set Monitor Out and video signals of digital closed captions will not work . 4. When PIP...

Owners Guide
Page 54
... MMC Software Upgrade Upgrade Now Please Insert MMC card before upgrading. Move SEL Return Setup Menu Preference Lamp Power Control Set The Inputs Set Closed Captions Set Monitor Out Upgrades Quick Start Up Move SEL Set Setup Quick Start Up OR Select ON to save electricity. Insert MMC CARD 2. Quick Start Up This feature will allow you with a flash card. Select OFF to have the TV tune channels (both Analog and Digital) quickly when first turning the TV...
... MMC Software Upgrade Upgrade Now Please Insert MMC card before upgrading. Move SEL Return Setup Menu Preference Lamp Power Control Set The Inputs Set Closed Captions Set Monitor Out Upgrades Quick Start Up Move SEL Set Setup Quick Start Up OR Select ON to save electricity. Insert MMC CARD 2. Quick Start Up This feature will allow you with a flash card. Select OFF to have the TV tune channels (both Analog and Digital) quickly when first turning the TV...
Owners Guide
Page 63
... by law. 7. Bureau of a HITACHI brand digital television (the "DTV"), and HITACHI America, Ltd., Home Electronics Division ("HITACHI"). The software is accessible through use the Software in and to the intellectual property rights associated with your failure to return such flash card or other intellectual property laws and treaties. The software contains software developed by the openssl project, including cryptographic software written by any federal...
... by law. 7. Bureau of a HITACHI brand digital television (the "DTV"), and HITACHI America, Ltd., Home Electronics Division ("HITACHI"). The software is accessible through use the Software in and to the intellectual property rights associated with your failure to return such flash card or other intellectual property laws and treaties. The software contains software developed by the openssl project, including cryptographic software written by any federal...
Owners Guide
Page 66
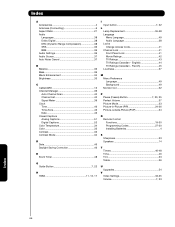
... 36 Black Enhancement 34 Brightness 33 C CableCARD 12 Channel Manager 39 Auto Channel Scan 40 Channel List 40 Signal Meter 39 Clock Time 46 Time Zone 46 Date 46 Closed Captions Analog Captions 51 Digital Captions 52 Color Temperature 34 Color 33 Contrast 33 Contrast Mode 34 D Date 46 Daylight Saving Correction 46 E Event Timer 48 G Guide Button 7, 22 H HDMI 11, 13, 17 I Input button 7, 22 L Lamp Replacement 55-58 Language Menu Language 49 Audio Language 38 Locks Change Access Code 41 Channel Lock 41 Front Panel Lock...
... 36 Black Enhancement 34 Brightness 33 C CableCARD 12 Channel Manager 39 Auto Channel Scan 40 Channel List 40 Signal Meter 39 Clock Time 46 Time Zone 46 Date 46 Closed Captions Analog Captions 51 Digital Captions 52 Color Temperature 34 Color 33 Contrast 33 Contrast Mode 34 D Date 46 Daylight Saving Correction 46 E Event Timer 48 G Guide Button 7, 22 H HDMI 11, 13, 17 I Input button 7, 22 L Lamp Replacement 55-58 Language Menu Language 49 Audio Language 38 Locks Change Access Code 41 Channel Lock 41 Front Panel Lock...


