Owners Guide
Page 1
LCD REAR PROJECTION TELEVISION Operating Guide for energy efficiency. has determined that this product meets the Energy Star® guidelines for 50VF820, 55VF820, 60VF820 IMPORTANT SAFETY INSTRUCTIONS 2-3 FIRST TIME USE ...4-18 THE REMOTE CONTROL ...19-30 ON-SCREEN DISPLAY ...31-54 LAMP REPLACEMENT ...55-58 USEFUL INFORMATION...59-62 LICENSE AGREEMENT...63 APPENDIXES ...64-65 INDEX ...66 As an Energy Star® Partner, Hitachi, Ltd.
LCD REAR PROJECTION TELEVISION Operating Guide for energy efficiency. has determined that this product meets the Energy Star® guidelines for 50VF820, 55VF820, 60VF820 IMPORTANT SAFETY INSTRUCTIONS 2-3 FIRST TIME USE ...4-18 THE REMOTE CONTROL ...19-30 ON-SCREEN DISPLAY ...31-54 LAMP REPLACEMENT ...55-58 USEFUL INFORMATION...59-62 LICENSE AGREEMENT...63 APPENDIXES ...64-65 INDEX ...66 As an Energy Star® Partner, Hitachi, Ltd.
Owners Guide
Page 2
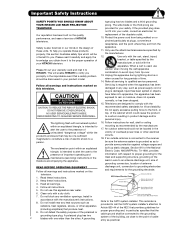
... the 9. built up static charges. Read these instructions. 3. Do not block any way, such as practical. A grounding system of HITACHI televisions. replacement of cable entry as power-supply cord or plug is intended to alert the user to the presence of overhead power lines... of your safety. Important Safety Instructions SAFETY POINTS YOU SHOULD KNOW ABOUT type plug has two blades and a third grounding YOUR HITACHI LCD REAR PROJECTION prong. Please read it to qualified service personnel. Note to the CATV system installer: This reminder is also foremost in our minds...
... the 9. built up static charges. Read these instructions. 3. Do not block any way, such as practical. A grounding system of HITACHI televisions. replacement of cable entry as power-supply cord or plug is intended to alert the user to the presence of overhead power lines... of your safety. Important Safety Instructions SAFETY POINTS YOU SHOULD KNOW ABOUT type plug has two blades and a third grounding YOUR HITACHI LCD REAR PROJECTION prong. Please read it to qualified service personnel. Note to the CATV system installer: This reminder is also foremost in our minds...
Owners Guide
Page 5
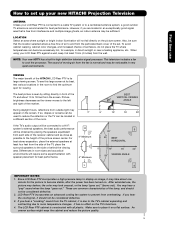
... contracting due to room temperature changes. Picture brightness decreases as possible to and from the wall. LCD Rear PTV incorporates an advanced cooling fan system to prevent from the TV cabinet, it on the screen. It has no effect on the picture screen. First time use ,... has been turned on. Differences in high definition television signal processor. After extended use How to set up your new HITACHI Projection Television ANTENNA Unless your LCD Rear PTV against a wall, keep it at least four feet from interference and multiple image ghosts, an indoor antenna may be...
... contracting due to room temperature changes. Picture brightness decreases as possible to and from the wall. LCD Rear PTV incorporates an advanced cooling fan system to prevent from the TV cabinet, it on the screen. It has no effect on the picture screen. First time use ,... has been turned on. Differences in high definition television signal processor. After extended use How to set up your new HITACHI Projection Television ANTENNA Unless your LCD Rear PTV against a wall, keep it at least four feet from interference and multiple image ghosts, an indoor antenna may be...
Owners Guide
Page 7
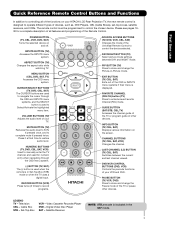
... NUMERIC BUTTONS (TV, DVD, CBL, SAT, VCR) Used to manually enter the TV channel, and used for a complete description of all of the functions on your HITACHI LCD Rear Projection TV, the new remote control is in -Picture mode. FAVORITE CHANNEL (FAV CH) button (TV) Press to control... the device selected. VOLUME BUTTONS (TV) Adjusts the audio level of your VCR and DVD. RECORD ...
... NUMERIC BUTTONS (TV, DVD, CBL, SAT, VCR) Used to manually enter the TV channel, and used for a complete description of all of the functions on your HITACHI LCD Rear Projection TV, the new remote control is in -Picture mode. FAVORITE CHANNEL (FAV CH) button (TV) Press to control... the device selected. VOLUME BUTTONS (TV) Adjusts the audio level of your VCR and DVD. RECORD ...

Owners Guide
Page 9
.... Make sure to be ON during normal operation. If this indicator is blinking, the cooling fan has stopped. See page 55-58 for longer lamp life. 9 Your Hitachi LCD Rear Projection Television has an internal lamp that the television lamp is warming up. If this indicator is lit, the optic unit is ...SEC.) ACTION Need to indicate that may appear to turn off during normal operation. First time use Front Panel Controls º POWER Light When the TV is turned ON, the Power Light will turn off with the TEMP LED On. µ LAMP Indicator This light is off during normal operation. ...
.... Make sure to be ON during normal operation. If this indicator is blinking, the cooling fan has stopped. See page 55-58 for longer lamp life. 9 Your Hitachi LCD Rear Projection Television has an internal lamp that the television lamp is warming up. If this indicator is lit, the optic unit is ...SEC.) ACTION Need to indicate that may appear to turn off during normal operation. First time use Front Panel Controls º POWER Light When the TV is turned ON, the Power Light will turn off with the TEMP LED On. µ LAMP Indicator This light is off during normal operation. ...
Owners Guide
Page 19
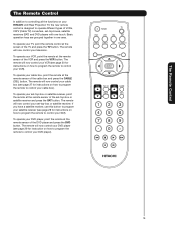
...-box or satellite receiver and press the SAT button. To operate your cable box, point the remote at the remote sensor of VCRs, CATV (Cable TV) converters, set -top-box or satellite receiver. To operate your set -top-boxes, satellite receivers (SAT) and DVD players with one area. The...how to program the remote to control your VCR). The remote will now control your cable box (see page 29 for instructions on your HITACHI LCD Rear Projection TV, the new remote control is designed to operate different types of the DVD player and press the DVD button. The remote will now ...
...-box or satellite receiver and press the SAT button. To operate your cable box, point the remote at the remote sensor of VCRs, CATV (Cable TV) converters, set -top-box or satellite receiver. To operate your set -top-boxes, satellite receivers (SAT) and DVD players with one area. The...how to program the remote to control your VCR). The remote will now control your cable box (see page 29 for instructions on your HITACHI LCD Rear Projection TV, the new remote control is designed to operate different types of the DVD player and press the DVD button. The remote will now ...
Owners Guide
Page 24
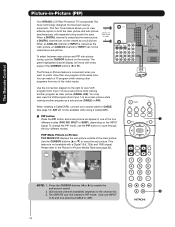
...channel or INPUT is viewed as the main picture, a DIGITAL channel can not be viewed in -Picture (PIP) Your HITACHI LCD Rear Projection TV incorporates Two Tuner technology designed for improved viewing enjoyment. The green highlighted channel display will not be viewed as a sub ... faces right) Top faces AIR MONITOR OUT S I V I D E O V I D E O (MONO) (MONO) Y/ VIDEO PB PR (MONO) Y/ VIDEO PB PR (MONO) A L U D TV AS CENTER I O R AUDIO TO HI-FI INPUT 1 INPUT 2 INPUT 3 INPUT 4 OPTICAL OUT Digital Audio Upgrade Card HDMI INPUT 1 HDMI INPUT 2 CAUTION Audio Video OUTPUT VCR...
...channel or INPUT is viewed as the main picture, a DIGITAL channel can not be viewed in -Picture (PIP) Your HITACHI LCD Rear Projection TV incorporates Two Tuner technology designed for improved viewing enjoyment. The green highlighted channel display will not be viewed as a sub ... faces right) Top faces AIR MONITOR OUT S I V I D E O V I D E O (MONO) (MONO) Y/ VIDEO PB PR (MONO) Y/ VIDEO PB PR (MONO) A L U D TV AS CENTER I O R AUDIO TO HI-FI INPUT 1 INPUT 2 INPUT 3 INPUT 4 OPTICAL OUT Digital Audio Upgrade Card HDMI INPUT 1 HDMI INPUT 2 CAUTION Audio Video OUTPUT VCR...

Owners Guide
Page 31
Lamp Temp Power On-Screen Display 31 Video Audio Channel Manager Locks Timers Setup Move SEL Select This part of the screen shows which Remote Control buttons to use. This part of the screen shows which selections are available. Press EXIT on the remote control to select. 3. Press the SELECT button to quickly exit from a menu. Press MENU on your HITACHI LCD Rear Projection TV. 2. On-Screen Display 1. Press the CURSOR buttons to display the different features on the remote control to navigate and highlight a different feature of the On-Screen Display menu.
Lamp Temp Power On-Screen Display 31 Video Audio Channel Manager Locks Timers Setup Move SEL Select This part of the screen shows which Remote Control buttons to use. This part of the screen shows which selections are available. Press EXIT on the remote control to select. 3. Press the SELECT button to quickly exit from a menu. Press MENU on your HITACHI LCD Rear Projection TV. 2. On-Screen Display 1. Press the CURSOR buttons to display the different features on the remote control to navigate and highlight a different feature of the On-Screen Display menu.
Owners Guide
Page 34
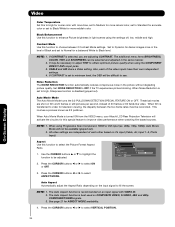
...are shot on it's input (Cable, Air, Input 1~5, Photo Input). When Auto Movie Mode is turned ON from the VIDEO menu, your Hitachi LCD Rear Projection Television will activate the circuitry for a balanced White to obtain optimum picture quality when using Progressive Scan Component, HDMI or DVI input (ex..../HDMI signals. 3. The Auto Aspect function is disabled (grayed out). Press the CURSOR buttons ̇ or ̈ to OFF if the TV experiences picture blocking. Auto Movie Mode The Auto Movie Mode turns the 3:2 PULLDOWN DETECTION SPECIAL FEATURE ON or OFF. The Auto Aspect function is...
...are shot on it's input (Cable, Air, Input 1~5, Photo Input). When Auto Movie Mode is turned ON from the VIDEO menu, your Hitachi LCD Rear Projection Television will activate the circuitry for a balanced White to obtain optimum picture quality when using Progressive Scan Component, HDMI or DVI input (ex..../HDMI signals. 3. The Auto Aspect function is disabled (grayed out). Press the CURSOR buttons ̇ or ̈ to OFF if the TV experiences picture blocking. Auto Movie Mode The Auto Movie Mode turns the 3:2 PULLDOWN DETECTION SPECIAL FEATURE ON or OFF. The Auto Aspect function is...
Owners Guide
Page 52
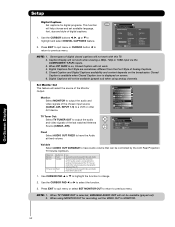
...to change 2. Setup Menu Preference Screen Saver Set The Inputs Set AV NET Set Closed Captions Set Monitor Out Upgrades Set Stand-by the LCD Rear Projection TV Volume Up/Down. Use the CURSOR PAD ̇ or ̈ to previous menu. On-Screen Display 52 Press EXIT to quit menu or...function. 3. Caption Display will select the source of the Monitor Output. Variable Select AUDIO OUT VARIABLE to the audio and video output of the TV. Setup Digital Captions Set captions for recording, set available language, font, size and style of digital captions. 1. Set Monitor Out This feature will...
...to change 2. Setup Menu Preference Screen Saver Set The Inputs Set AV NET Set Closed Captions Set Monitor Out Upgrades Set Stand-by the LCD Rear Projection TV Volume Up/Down. Use the CURSOR PAD ̇ or ̈ to previous menu. On-Screen Display 52 Press EXIT to quit menu or...function. 3. Caption Display will select the source of the Monitor Output. Variable Select AUDIO OUT VARIABLE to the audio and video output of the TV. Setup Digital Captions Set captions for recording, set available language, font, size and style of digital captions. 1. Set Monitor Out This feature will...
Owners Guide
Page 59
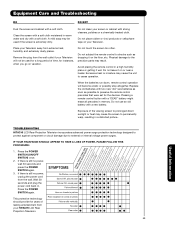
Remove the plug from your HITACHI LCD Rear Projection Television. 59 Pressing a remote control button with a new battery. Do not use an old battery with a "DEAD" battery might erase all precodes in memory. Press ... again. Do not place rubber or vinyl products or cellophane tape on the floor, etc. Excessive heat or moisture may result. Useful Information TROUBLESHOOTING HITACHI LCD Rear Projection Television incorporates advanced power surge protection technology designed to protect against component or circuit damage due to permanently warp, resulting in warm water and dry...
Remove the plug from your HITACHI LCD Rear Projection Television. 59 Pressing a remote control button with a new battery. Do not use an old battery with a "DEAD" battery might erase all precodes in memory. Press ... again. Do not place rubber or vinyl products or cellophane tape on the floor, etc. Excessive heat or moisture may result. Useful Information TROUBLESHOOTING HITACHI LCD Rear Projection Television incorporates advanced power surge protection technology designed to protect against component or circuit damage due to permanently warp, resulting in warm water and dry...


