Owners Guide
Page 11
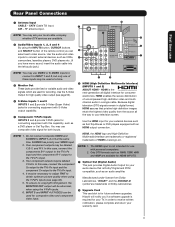
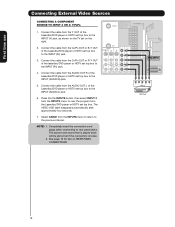
...limited viewing uses only. ´ CableCARD™ (Top of card faces right) Top faces Upgrade Card º » ¿ AIR MONITOR OUT S I V I D E O V I D E O (MONO) (MONO) Y/ VIDEO PB PR (MONO) Y/ VIDEO PB PR (MONO) A L U D TV AS CENTER I O R AUDIO TO HI-FI INPUT 1 INPUT 2 INPUT 3 INPUT ... NOTE: You may use Rear Panel Connections ³ Antenna Input CABLE - and 6,381,747 licensed for future software upgrades. The HDMI input is required for both inputs. Hitachi will be abnormal, when using the Y-PBPR jacks. 6. In order to the TV's PR input. 4. You...
...limited viewing uses only. ´ CableCARD™ (Top of card faces right) Top faces Upgrade Card º » ¿ AIR MONITOR OUT S I V I D E O V I D E O (MONO) (MONO) Y/ VIDEO PB PR (MONO) Y/ VIDEO PB PR (MONO) A L U D TV AS CENTER I O R AUDIO TO HI-FI INPUT 1 INPUT 2 INPUT 3 INPUT ... NOTE: You may use Rear Panel Connections ³ Antenna Input CABLE - and 6,381,747 licensed for future software upgrades. The HDMI input is required for both inputs. Hitachi will be abnormal, when using the Y-PBPR jacks. 6. In order to the TV's PR input. 4. You...
Owners Guide
Page 12
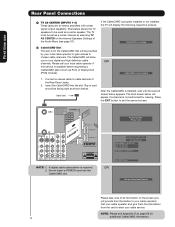
...information to return Not an Authorized Channel Please take note of the Rear Panel Jacks. 2. CableCARD is installed, wait until the second screen below will appear if a channel is properly installed or not installed, the TV will display the following respective screens. Patent Nos. 4,631,603;... OUT S I V I D E O V I D E O (MONO) (MONO) Y/ VIDEO PB PR (MONO) Y/ VIDEO PB PR (MONO) CToapbfalceesCthAisRwaDy™ OPTICAL OUT Digital Audio A L U D TV AS CENTER I O R AUDIO TO HI-FI INPUT 1 INPUT 2 INPUT 3 INPUT 4 Upgrade Card HDMI INPUT 1 HDMI INPUT 2 CAUTION NOTE: 1.
...information to return Not an Authorized Channel Please take note of the Rear Panel Jacks. 2. CableCARD is installed, wait until the second screen below will appear if a channel is properly installed or not installed, the TV will display the following respective screens. Patent Nos. 4,631,603;... OUT S I V I D E O V I D E O (MONO) (MONO) Y/ VIDEO PB PR (MONO) Y/ VIDEO PB PR (MONO) CToapbfalceesCthAisRwaDy™ OPTICAL OUT Digital Audio A L U D TV AS CENTER I O R AUDIO TO HI-FI INPUT 1 INPUT 2 INPUT 3 INPUT 4 Upgrade Card HDMI INPUT 1 HDMI INPUT 2 CAUTION NOTE: 1.
Owners Guide
Page 13
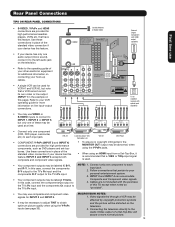
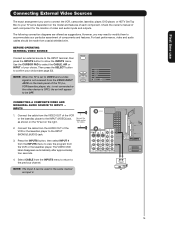
...I V I D E O V I D E O (MONO) (MONO) Y/ VIDEO PB PR (MONO) Y/ VIDEO PB PR (MONO) A L U D TV AS CENTER I O R AUDIO TO HI-FI INPUT 1 INPUT 2 INPUT 3 INPUT 4 OPTICAL OUT Digital Audio Upgrade Card HDMI INPUT 1 HDMI INPUT 2 CAUTION OPTICAL IN To an amplifier/ receiver with HDMI output capability HDMI OUT...; (Top of card faces right) Top faces External Digital Component with optical input capability. • You may use TIPS ON REAR PANEL CONNECTIONS • S-VIDEO, Y-PBPR and HDMI connections are provided for high performance components, such as "provided". • You...
...I V I D E O V I D E O (MONO) (MONO) Y/ VIDEO PB PR (MONO) Y/ VIDEO PB PR (MONO) A L U D TV AS CENTER I O R AUDIO TO HI-FI INPUT 1 INPUT 2 INPUT 3 INPUT 4 OPTICAL OUT Digital Audio Upgrade Card HDMI INPUT 1 HDMI INPUT 2 CAUTION OPTICAL IN To an amplifier/ receiver with HDMI output capability HDMI OUT...; (Top of card faces right) Top faces External Digital Component with optical input capability. • You may use TIPS ON REAR PANEL CONNECTIONS • S-VIDEO, Y-PBPR and HDMI connections are provided for high performance components, such as "provided". • You...
Owners Guide
Page 14
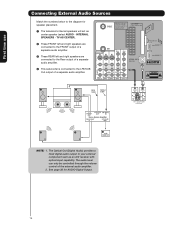
... right speakers are connected to the FRONT output of a separate audio amplifier. » These REAR left and right speakers are connected to the Rear output of a separate audio amplifier. ¿ This subwoofer is connected to the LFE/SUB ...Out output of card faces right) Top faces AIR MONITOR OUT S I V I D E O V I D E O (MONO) (MONO) Y/ VIDEO PB PR (MONO) Y/ VIDEO PB PR (MONO) A L U D TV AS CENTER I O R AUDIO TO HI-FI INPUT 1 INPUT 2 INPUT 3 INPUT 4 OPTICAL OUT Digital Audio Upgrade...
... right speakers are connected to the FRONT output of a separate audio amplifier. » These REAR left and right speakers are connected to the Rear output of a separate audio amplifier. ¿ This subwoofer is connected to the LFE/SUB ...Out output of card faces right) Top faces AIR MONITOR OUT S I V I D E O V I D E O (MONO) (MONO) Y/ VIDEO PB PR (MONO) Y/ VIDEO PB PR (MONO) A L U D TV AS CENTER I O R AUDIO TO HI-FI INPUT 1 INPUT 2 INPUT 3 INPUT 4 OPTICAL OUT Digital Audio Upgrade...
Owners Guide
Page 15
... faces AIR MONITOR OUT S I V I D E O V I D E O (MONO) (MONO) Y/ VIDEO PB PR (MONO) A U D TV AS CENTER I O Y/ VIDEO PB PR (MONO) L R AUDIO TO HI-FI INPUT 1 INPUT 2 INPUT 3 INPUT 4 OPTICAL OUT Digital Audio Upgrade Card HDMI INPUT 1 HDMI INPUT 2 CAUTION Audio Video OUTPUT VCR 15 However, you use to connect... the VCR, camcorder, laserdisc player, DVD player, or HDTV Set Top Box to your TV set is dependent on the model and features of...
... faces AIR MONITOR OUT S I V I D E O V I D E O (MONO) (MONO) Y/ VIDEO PB PR (MONO) A U D TV AS CENTER I O Y/ VIDEO PB PR (MONO) L R AUDIO TO HI-FI INPUT 1 INPUT 2 INPUT 3 INPUT 4 OPTICAL OUT Digital Audio Upgrade Card HDMI INPUT 1 HDMI INPUT 2 CAUTION Audio Video OUTPUT VCR 15 However, you use to connect... the VCR, camcorder, laserdisc player, DVD player, or HDTV Set Top Box to your TV set is dependent on the model and features of...
Owners Guide
Page 16
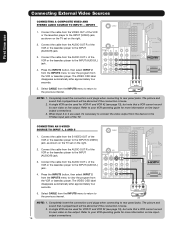
...CAUTION R LV OUTPUT S-VIDEO VCR NOTE: 1. Completely insert the connection cord plugs when connecting to rear panel jacks. Connect the cable from the AUDIO OUT R of card faces right) Top faces Upgrade Card 2. CONNECTING AN S-VIDEO SOURCE TO INPUT 1, 2 AND 5 1. Connect the cable from ... faces AIR MONITOR OUT S I V I D E O V I D E O (MONO) (MONO) Y/ VIDEO PB PR (MONO) Y/ VIDEO PB PR (MONO) A L U D TV AS CENTER I O R AUDIO TO HI-FI INPUT 1 INPUT 2 INPUT 3 INPUT 4 OPTICAL OUT Digital Audio R LV OUTPUT VCR HDMI INPUT 1 HDMI INPUT 2 CAUTION NOTE: 1. A single...
...CAUTION R LV OUTPUT S-VIDEO VCR NOTE: 1. Completely insert the connection cord plugs when connecting to rear panel jacks. Connect the cable from the AUDIO OUT R of card faces right) Top faces Upgrade Card 2. CONNECTING AN S-VIDEO SOURCE TO INPUT 1, 2 AND 5 1. Connect the cable from ... faces AIR MONITOR OUT S I V I D E O V I D E O (MONO) (MONO) Y/ VIDEO PB PR (MONO) Y/ VIDEO PB PR (MONO) A L U D TV AS CENTER I O R AUDIO TO HI-FI INPUT 1 INPUT 2 INPUT 3 INPUT 4 OPTICAL OUT Digital Audio R LV OUTPUT VCR HDMI INPUT 1 HDMI INPUT 2 CAUTION NOTE: 1. A single...
Owners Guide
Page 17
...the connection cord plugs when connecting to view the program from the INPUTS menu to rear panel jacks. The picture and sound that encrypts video signals when using a component ...NETWORK" technology. AIR MONITOR OUT S I V I D E O V I D E O (MONO) (MONO) Y/ VIDEO PB PR (MONO) A U D TV AS CENTER I O R AUDIO TO HI-FI INPUT 1 INPUT 2 INPUT 3 INPUT 4 OPTICAL OUT Digital Audio DVI - CableCARD™ (Top of U.S. HDMI ...to the previous channel. NOTE: 1. HDMI Upgrade Card HDMI INPUT 1 OR HDMI INPUT 2 DVI to the HDMI input as shown on the TV set top box or DVD player to ...
...the connection cord plugs when connecting to view the program from the INPUTS menu to rear panel jacks. The picture and sound that encrypts video signals when using a component ...NETWORK" technology. AIR MONITOR OUT S I V I D E O V I D E O (MONO) (MONO) Y/ VIDEO PB PR (MONO) A U D TV AS CENTER I O R AUDIO TO HI-FI INPUT 1 INPUT 2 INPUT 3 INPUT 4 OPTICAL OUT Digital Audio DVI - CableCARD™ (Top of U.S. HDMI ...to the previous channel. NOTE: 1. HDMI Upgrade Card HDMI INPUT 1 OR HDMI INPUT 2 DVI to the HDMI input as shown on the TV set top box or DVD player to ...
Owners Guide
Page 18
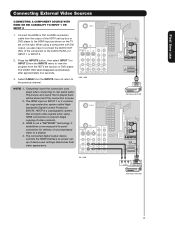
...Connect the cable from the AUDIO OUT R of the Laserdisc/DVD player or HDTV set top box to the INPUT (Y) jack, as shown on REAR PANEL CONNECTIONS. 18 Connect the cable from the Y OUT of the Laserdisc/DVD player or HDTV set top box. CableCARD™ (Top of... AIR MONITOR OUT S I V I D E O V I D E O (MONO) (MONO) Y/ VIDEO PB PR (MONO) Y/ VIDEO PB PR (MONO) A L U D TV AS CENTER I O R AUDIO TO HI-FI INPUT 1 INPUT 2 INPUT 3 INPUT 4 OPTICAL OUT Digital Audio Upgrade Card HDMI INPUT 1 HDMI INPUT 2 CAUTION R L PR PB Y OUTPUT DVD Player 7. The picture and sound that is played...
...Connect the cable from the AUDIO OUT R of the Laserdisc/DVD player or HDTV set top box to the INPUT (Y) jack, as shown on REAR PANEL CONNECTIONS. 18 Connect the cable from the Y OUT of the Laserdisc/DVD player or HDTV set top box. CableCARD™ (Top of... AIR MONITOR OUT S I V I D E O V I D E O (MONO) (MONO) Y/ VIDEO PB PR (MONO) Y/ VIDEO PB PR (MONO) A L U D TV AS CENTER I O R AUDIO TO HI-FI INPUT 1 INPUT 2 INPUT 3 INPUT 4 OPTICAL OUT Digital Audio Upgrade Card HDMI INPUT 1 HDMI INPUT 2 CAUTION R L PR PB Y OUTPUT DVD Player 7. The picture and sound that is played...
Owners Guide
Page 24
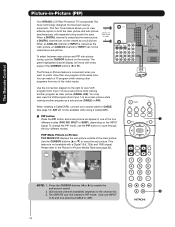
...I V I D E O V I D E O (MONO) (MONO) Y/ VIDEO PB PR (MONO) Y/ VIDEO PB PR (MONO) A L U D TV AS CENTER I O R AUDIO TO HI-FI INPUT 1 INPUT 2 INPUT 3 INPUT 4 OPTICAL OUT Digital Audio Upgrade Card HDMI INPUT 1 HDMI INPUT 2 CAUTION Audio Video OUTPUT VCR Use the connection diagram to the right to...feature is viewed as the main picture, an ANALOG channel or INPUT can not be viewed in -Picture (PIP) Your HITACHI LCD Rear Projection TV incorporates Two Tuner technology designed for limited viewing uses only. and 6,381,747 licensed for improved viewing enjoyment. The Remote...
...I V I D E O V I D E O (MONO) (MONO) Y/ VIDEO PB PR (MONO) Y/ VIDEO PB PR (MONO) A L U D TV AS CENTER I O R AUDIO TO HI-FI INPUT 1 INPUT 2 INPUT 3 INPUT 4 OPTICAL OUT Digital Audio Upgrade Card HDMI INPUT 1 HDMI INPUT 2 CAUTION Audio Video OUTPUT VCR Use the connection diagram to the right to...feature is viewed as the main picture, an ANALOG channel or INPUT can not be viewed in -Picture (PIP) Your HITACHI LCD Rear Projection TV incorporates Two Tuner technology designed for limited viewing uses only. and 6,381,747 licensed for improved viewing enjoyment. The Remote...
Owners Guide
Page 32
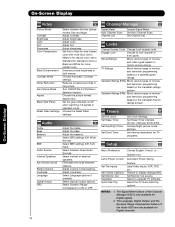
...Language, Digital Output, and the Dynamic Range Compression feature of the Channel Manager OSD is only available for natural color, set to upgrade TV software. Adjust tint. Adjust the balance. Set Day/Night picture mode settings. The Signal Meter feature of the Audio OSD are only ...available for TV programs. Setup Menu Preference Lamp Power Control Set The Inputs Set Closed Captions Set Monitor Out Upgrades Quick Start Up Choose English, French, or Spanish text. Reduces conspicuous noise in standard ...
...Language, Digital Output, and the Dynamic Range Compression feature of the Channel Manager OSD is only available for natural color, set to upgrade TV software. Adjust tint. Adjust the balance. Set Day/Night picture mode settings. The Signal Meter feature of the Audio OSD are only ...available for TV programs. Setup Menu Preference Lamp Power Control Set The Inputs Set Closed Captions Set Monitor Out Upgrades Quick Start Up Choose English, French, or Spanish text. Reduces conspicuous noise in standard ...
Owners Guide
Page 49
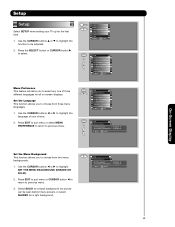
...or CURSOR button ̇ to return to previous menu. Setup Menu Preference Lamp Power Control Set The Inputs Set Closed Captions Set Monitor Out Upgrades Quick Start Up Move SEL Set Setup Menu Preference OR Set The Language : English Set The Menu Background : Shaded Move SEL Return On...-Screen Display Set the Menu Background This function allows you to select any one of your TV up for a light background. Select SOLID for a black background (no picture can be adjusted. 2. Setup Setup Select SETUP when setting your choice. ...
...or CURSOR button ̇ to return to previous menu. Setup Menu Preference Lamp Power Control Set The Inputs Set Closed Captions Set Monitor Out Upgrades Quick Start Up Move SEL Set Setup Menu Preference OR Set The Language : English Set The Menu Background : Shaded Move SEL Return On...-Screen Display Set the Menu Background This function allows you to select any one of your TV up for a light background. Select SOLID for a black background (no picture can be adjusted. 2. Setup Setup Select SETUP when setting your choice. ...
Owners Guide
Page 50
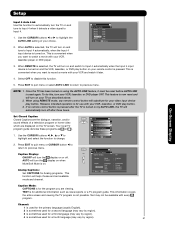
... ̄ to highlight the name of the five video inputs. Setup Menu Preference Lamp Power Control Set The Inputs Set Closed Captions Set Monitor Out Upgrades Quick Start Up Move SEL Set Setup OR Set The Inputs Input1 : **** Input2 : **** Input3 : **** Input4 : **** Auto Link : Off Input5 : **** Move SEL ...Return On-Screen Display 50 A named input is not detected for 15 minutes Move SEL Return Set The Inputs Use this featureto have the TV turn off automatically when a video signal is not detected for 15 minutes. 1. Setup Menu Preference Lamp Power Control Set The Inputs Set ...
... ̄ to highlight the name of the five video inputs. Setup Menu Preference Lamp Power Control Set The Inputs Set Closed Captions Set Monitor Out Upgrades Quick Start Up Move SEL Set Setup OR Set The Inputs Input1 : **** Input2 : **** Input3 : **** Input4 : **** Auto Link : Off Input5 : **** Move SEL ...Return On-Screen Display 50 A named input is not detected for 15 minutes Move SEL Return Set The Inputs Use this featureto have the TV turn off automatically when a video signal is not detected for 15 minutes. 1. Setup Menu Preference Lamp Power Control Set The Inputs Set ...
Owners Guide
Page 51
... on using REMOTE mode, any remote control button will help choose and set available mode and channel. Once the TV has been turned on your remote control is for use with your VCR, laserdisc player or DVD player. 3....the program you want to Input 4 automatically, when the Input 4 input device is used again. TEXT is selected, the TV will turn on and tune to record a movie with every program. This is not possible. Setup On-Screen Display Input...Preference Lamp Power Control Set The Inputs Set Closed Captions Set Monitor Out Upgrades Quick Start Up Move SEL Set 2.
... on using REMOTE mode, any remote control button will help choose and set available mode and channel. Once the TV has been turned on your remote control is for use with your VCR, laserdisc player or DVD player. 3....the program you want to Input 4 automatically, when the Input 4 input device is used again. TEXT is selected, the TV will turn on and tune to record a movie with every program. This is not possible. Setup On-Screen Display Input...Preference Lamp Power Control Set The Inputs Set Closed Captions Set Monitor Out Upgrades Quick Start Up Move SEL Set 2.
Owners Guide
Page 52
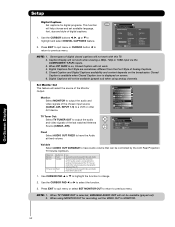
...) when using MONITOR OUT for digital programs. This function will not be controlled by the LCD Rear Projection TV Volume Up/Down. To record currently viewed Video and Audio from the Font Style of the Monitor Output. When TV TUNER OUT is connected to the audio and video output of the... Menu Preference Screen Saver Set The Inputs Set AV NET Set Closed Captions Set Monitor Out Upgrades Set Stand-by changing the volume of the TV. Video Out Monitor Monitor Audio Out Fixed Variable TV Tuner Out Fixed Use To record currently viewed Video and Audio. NOTE: 1. When an external...
...) when using MONITOR OUT for digital programs. This function will not be controlled by the LCD Rear Projection TV Volume Up/Down. To record currently viewed Video and Audio from the Font Style of the Monitor Output. When TV TUNER OUT is connected to the audio and video output of the... Menu Preference Screen Saver Set The Inputs Set AV NET Set Closed Captions Set Monitor Out Upgrades Set Stand-by changing the volume of the TV. Video Out Monitor Monitor Audio Out Fixed Variable TV Tuner Out Fixed Use To record currently viewed Video and Audio. NOTE: 1. When an external...

Owners Guide
Page 54
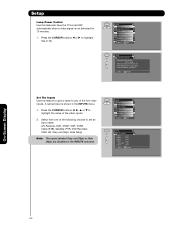
... ON to save electricity. Selecting ON for your TV, HITACHI will activate the TV tuners circuits when the TV is in "standby mode" which is selected. Set this feature is commonly referred to channels when first turning the TV on . Setup Upgrades It shows software information and easy upgrade procedure. Setup Menu Preference Lamp Power Control Set...
... ON to save electricity. Selecting ON for your TV, HITACHI will activate the TV tuners circuits when the TV is in "standby mode" which is selected. Set this feature is commonly referred to channels when first turning the TV on . Setup Upgrades It shows software information and easy upgrade procedure. Setup Menu Preference Lamp Power Control Set...
Owners Guide
Page 60
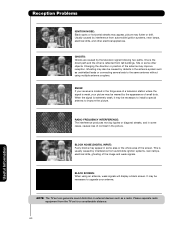
...to the same antenna without using an antenna, weak signals will display a black screen. Ghosting may be caused by interference from the TV set can generate sound distortion in the antenna system such as a radio. Please separate radio equipment from automobile ignition systems, neon lamps...a television station where the signal is usually caused by defects in external devices such as unshielded leads or connecting several sets to upgrade your antenna. SNOW: If your picture may also be marred by the television signal following two paths. Changing the direction or position...
...to the same antenna without using an antenna, weak signals will display a black screen. Ghosting may be caused by interference from the TV set can generate sound distortion in the antenna system such as a radio. Please separate radio equipment from automobile ignition systems, neon lamps...a television station where the signal is usually caused by defects in external devices such as unshielded leads or connecting several sets to upgrade your antenna. SNOW: If your picture may also be marred by the television signal following two paths. Changing the direction or position...
Owners Guide
Page 63
... RESTRICTIONS. or (iii) to the System Software (each, an "Upgrade"). export transactions by law. To the maximum extent permitted by you . 11. The software contains software developed by the openssl project, including cryptographic software written by providing notice to the extent that HITACHI provides different or supplementary license terms or conditions that if...
... RESTRICTIONS. or (iii) to the System Software (each, an "Upgrade"). export transactions by law. To the maximum extent permitted by you . 11. The software contains software developed by the openssl project, including cryptographic software written by providing notice to the extent that HITACHI provides different or supplementary license terms or conditions that if...
Owners Guide
Page 65
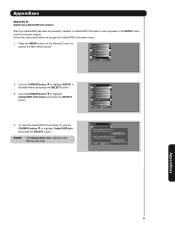
... the Main Menu and press the SELECT button. 3. Setup Menu Preference Lamp Power Control Set The Inputs Set Closed Captions Set Monitor Out CableCARD Information Upgrades Quick Start-Up Move SEL Select Setup CableCARD Information Select the button below to highlight CableCARD Information and press the SELECT button. 4.
... the Main Menu and press the SELECT button. 3. Setup Menu Preference Lamp Power Control Set The Inputs Set Closed Captions Set Monitor Out CableCARD Information Upgrades Quick Start-Up Move SEL Select Setup CableCARD Information Select the button below to highlight CableCARD Information and press the SELECT button. 4.
Owners Guide
Page 66
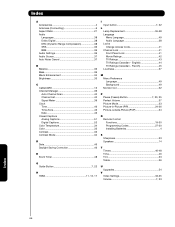
...48 G Guide Button 7, 22 H HDMI 11, 13, 17 I Input button 7, 22 L Lamp Replacement 55-58 Language Menu Language 49 Audio Language 38 Locks Change Access Code 41 Channel Lock 41 Front Panel Lock 41 Movie Ratings... 42 TV Ratings 43 TV Ratings (Canadian - French 45 Loudness 37 M Menu Preference Language 49 Background 49 Monitor Out 52 P Pause... 33 Speakers 14 T Timers 46-48 Time 46 Tint 33 Treble 36 U Upgrades 54 V Video Settings 33-35 Volume 7, 23 Index 66 English 44...
...48 G Guide Button 7, 22 H HDMI 11, 13, 17 I Input button 7, 22 L Lamp Replacement 55-58 Language Menu Language 49 Audio Language 38 Locks Change Access Code 41 Channel Lock 41 Front Panel Lock 41 Movie Ratings... 42 TV Ratings 43 TV Ratings (Canadian - French 45 Loudness 37 M Menu Preference Language 49 Background 49 Monitor Out 52 P Pause... 33 Speakers 14 T Timers 46-48 Time 46 Tint 33 Treble 36 U Upgrades 54 V Video Settings 33-35 Volume 7, 23 Index 66 English 44...

