Owners Guide
Page 5
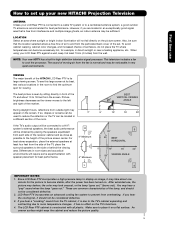
... it on the picture screen. VIEWING The major benefit of set failure, do not place the TV where temperatures can become stable, after the power has been turned on. Differences in front of the set. After extended use How to set up your new HITACHI Projection Television ANTENNA Unless your LCD Rear PTV against a wall...
... it on the picture screen. VIEWING The major benefit of set failure, do not place the TV where temperatures can become stable, after the power has been turned on. Differences in front of the set. After extended use How to set up your new HITACHI Projection Television ANTENNA Unless your LCD Rear PTV against a wall...
Owners Guide
Page 6
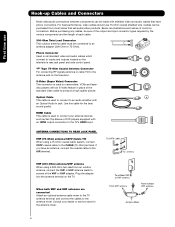
... the cables to the antenna jack on the TV. "F" Type 75-Ohm Coaxial Antenna Connector For connecting RF signals (antenna or cable TV) to the antenna mixer. HDMI Cable This cable is used to connect to produce a high quality picture. ANTENNA CONNECTIONS TO REAR JACK PANEL VHF (75-Ohm) antenna/CATV ...(Cable TV) When using a 300-Ohm twin lead from most stores that have an antenna, connect the coaxial cable to connect your dealer...
... the cables to the antenna jack on the TV. "F" Type 75-Ohm Coaxial Antenna Connector For connecting RF signals (antenna or cable TV) to the antenna mixer. HDMI Cable This cable is used to connect to produce a high quality picture. ANTENNA CONNECTIONS TO REAR JACK PANEL VHF (75-Ohm) antenna/CATV ...(Cable TV) When using a 300-Ohm twin lead from most stores that have an antenna, connect the coaxial cable to connect your dealer...
Owners Guide
Page 7
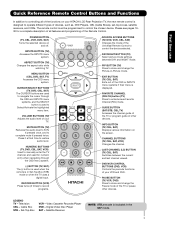
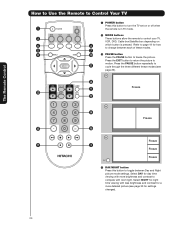
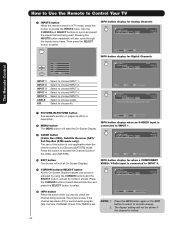
... Exits out of the OSD or INPUTS menu systems if their menu is used for a complete description of all of the functions on your HITACHI LCD Rear Projection TV, the new remote control is designed to operate different types of devices, such as, DVD Players, CBL (Cable Boxes), set-top-boxes, .... Set-Top-Box VCR - Satellite Receiver NOTE: STB precode is in -Picture mode. CHANNEL BUTTONS (TV, CBL, SAT, VCR) Changes the channel. PAUSE BUTTON (TV, VCR, DVD) Press to show and change the Freeze mode of the TV or pause other devices. Press it a third time to enter/access Favorite ...
... Exits out of the OSD or INPUTS menu systems if their menu is used for a complete description of all of the functions on your HITACHI LCD Rear Projection TV, the new remote control is designed to operate different types of devices, such as, DVD Players, CBL (Cable Boxes), set-top-boxes, .... Set-Top-Box VCR - Satellite Receiver NOTE: STB precode is in -Picture mode. CHANNEL BUTTONS (TV, CBL, SAT, VCR) Changes the channel. PAUSE BUTTON (TV, VCR, DVD) Press to show and change the Freeze mode of the TV or pause other devices. Press it a third time to enter/access Favorite ...
Owners Guide
Page 10
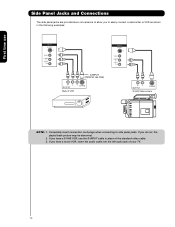
... a convenience to allow you have a S-VHS VCR, use Side Panel Jacks and Connections The side panel jacks are provided as shown in place of your TV. 10 Completely insert connection cord plugs when connecting to side panel jacks. First time use the S-INPUT cable in the following examples: INPUT 5 S-VIDEO VIDEO... you have a mono VCR, insert the audio cable into the left audio jack of the standard video cable. 3. If you do not, the played back picture may be abnormal. 2.
... a convenience to allow you have a S-VHS VCR, use Side Panel Jacks and Connections The side panel jacks are provided as shown in place of your TV. 10 Completely insert connection cord plugs when connecting to side panel jacks. First time use the S-INPUT cable in the following examples: INPUT 5 S-VIDEO VIDEO... you have a mono VCR, insert the audio cable into the left audio jack of the standard video cable. 3. If you do not, the played back picture may be abnormal. 2.
Owners Guide
Page 11
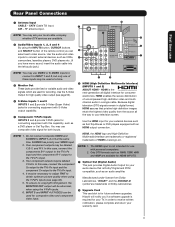
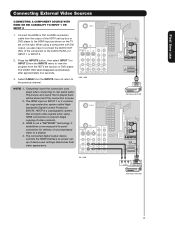
... (If you if a software upgrade is the next-generation all the way to the TV's PR input. 4. Hitachi will be used for composite video and component video input. ³ µ CABLE ... HDMI input is for future software upgrades. Do not connect composite VIDEO and S-VIDEO to obtain optimum picture quality when using the Y-PBPR jacks. 6. Because digital television (DTV) signals remain in a single ...have mono sound, insert the audio cable into the left audio jack.) NOTE: You may use Rear Panel Connections ³ Antenna Input CABLE - INPUT 3 and INPUT 4 (Y/VIDEO) can select ...
... (If you if a software upgrade is the next-generation all the way to the TV's PR input. 4. Hitachi will be used for composite video and component video input. ³ µ CABLE ... HDMI input is for future software upgrades. Do not connect composite VIDEO and S-VIDEO to obtain optimum picture quality when using the Y-PBPR jacks. 6. Because digital television (DTV) signals remain in a single ...have mono sound, insert the audio cable into the left audio jack.) NOTE: You may use Rear Panel Connections ³ Antenna Input CABLE - INPUT 3 and INPUT 4 (Y/VIDEO) can select ...
Owners Guide
Page 13
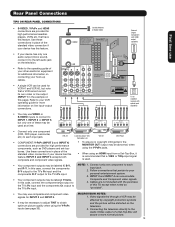
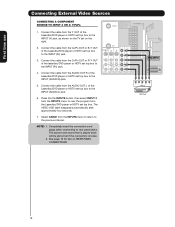
... be labeled Y-CBCR. AIR MONITOR OUT S I V I D E O V I D E O (MONO) (MONO) Y/ VIDEO PB PR (MONO) Y/ VIDEO PB PR (MONO) A L U D TV AS CENTER I O R AUDIO TO HI-FI INPUT 1 INPUT 2 INPUT 3 INPUT 4 OPTICAL OUT Digital Audio Upgrade Card HDMI INPUT 1 HDMI INPUT 2 CAUTION OPTICAL IN To an...player, camcorder, etc.) to your VCR operating guide for more normal picture. 13 MACROVISION NOTES: 1. In this feature. Follow connections that have this page). Rear Panel Connections First time use TIPS ON REAR PANEL CONNECTIONS • S-VIDEO, Y-PBPR and HDMI connections are provided ...
... be labeled Y-CBCR. AIR MONITOR OUT S I V I D E O V I D E O (MONO) (MONO) Y/ VIDEO PB PR (MONO) Y/ VIDEO PB PR (MONO) A L U D TV AS CENTER I O R AUDIO TO HI-FI INPUT 1 INPUT 2 INPUT 3 INPUT 4 OPTICAL OUT Digital Audio Upgrade Card HDMI INPUT 1 HDMI INPUT 2 CAUTION OPTICAL IN To an...player, camcorder, etc.) to your VCR operating guide for more normal picture. 13 MACROVISION NOTES: 1. In this feature. Follow connections that have this page). Rear Panel Connections First time use TIPS ON REAR PANEL CONNECTIONS • S-VIDEO, Y-PBPR and HDMI connections are provided ...
Owners Guide
Page 16
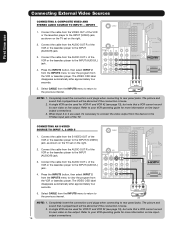
... 2. CABLE Apparatus Claims of U.S. AIR MONITOR OUT S I V I D E O V I D E O (MONO) (MONO) Y/ VIDEO PB PR (MONO) Y/ VIDEO PB PR (MONO) A L U D TV AS CENTER I O R AUDIO TO HI-FI INPUT 1 INPUT 2 INPUT 3 INPUT 4 OPTICAL OUT Digital Audio Upgrade Card HDMI INPUT 1 HDMI INPUT 2 CAUTION R LV OUTPUT S-VIDEO VCR...is loose. 2. Connect the cable from the S-VIDEO OUT of the VCR or the laserdisc player to rear panel jacks. CABLE Apparatus Claims of U.S. INPUT5 1. The picture and sound that is played back will be used , it's necessary to connect the video output from...
... 2. CABLE Apparatus Claims of U.S. AIR MONITOR OUT S I V I D E O V I D E O (MONO) (MONO) Y/ VIDEO PB PR (MONO) Y/ VIDEO PB PR (MONO) A L U D TV AS CENTER I O R AUDIO TO HI-FI INPUT 1 INPUT 2 INPUT 3 INPUT 4 OPTICAL OUT Digital Audio Upgrade Card HDMI INPUT 1 HDMI INPUT 2 CAUTION R LV OUTPUT S-VIDEO VCR...is loose. 2. Connect the cable from the S-VIDEO OUT of the VCR or the laserdisc player to rear panel jacks. CABLE Apparatus Claims of U.S. INPUT5 1. The picture and sound that is played back will be used , it's necessary to connect the video output from...
Owners Guide
Page 17
... Audio DVI - CableCARD™ (Top of INPUT 1 or INPUT 2. 2. The picture and sound that is played back will be abnormal if the connection is a cryptographic ...to-point connection for limited viewing uses only. HDMI Upgrade Card HDMI INPUT 1 OR HDMI INPUT 2 DVI to rear panel jacks. When using HDMI connections to prevent illegal copying of card faces right) Top faces AIR MONITOR OUT ... O V I D E O (MONO) (MONO) Y/ VIDEO PB PR (MONO) Y/ VIDEO PB PR (MONO) A L U D TV AS CENTER I O Y/ VIDEO PB PR (MONO) L R AUDIO TO HI-FI INPUT 1 INPUT 2 INPUT 3 INPUT 4 OPTICAL OUT ...
... Audio DVI - CableCARD™ (Top of INPUT 1 or INPUT 2. 2. The picture and sound that is played back will be abnormal if the connection is a cryptographic ...to-point connection for limited viewing uses only. HDMI Upgrade Card HDMI INPUT 1 OR HDMI INPUT 2 DVI to rear panel jacks. When using HDMI connections to prevent illegal copying of card faces right) Top faces AIR MONITOR OUT ... O V I D E O (MONO) (MONO) Y/ VIDEO PB PR (MONO) Y/ VIDEO PB PR (MONO) A L U D TV AS CENTER I O Y/ VIDEO PB PR (MONO) L R AUDIO TO HI-FI INPUT 1 INPUT 2 INPUT 3 INPUT 4 OPTICAL OUT ...
Owners Guide
Page 18
...OUT of the Laserdisc/DVD player or HDTV set top box to the INPUT (Y) jack, as shown on the TV set top box to the INPUT (PR) jack. 4. NOTE: 1. Press the the INPUTS button, then select... top box. Connect the cable from the Y OUT of the Laserdisc/DVD player or HDTV set on REAR PANEL CONNECTIONS. 18 and 6,381,747 licensed for tips on the right. 2. Completely insert the connection ...AUDIO/R) jack. 5. Patent Nos. 4,631,603; 4,577,216; 4,819,098; 4,907,093; The picture and sound that is played back will be abnormal if the connection is loose. 2. Connect the cable from the INPUTS...
...OUT of the Laserdisc/DVD player or HDTV set top box to the INPUT (Y) jack, as shown on the TV set top box to the INPUT (PR) jack. 4. NOTE: 1. Press the the INPUTS button, then select... top box. Connect the cable from the Y OUT of the Laserdisc/DVD player or HDTV set on REAR PANEL CONNECTIONS. 18 and 6,381,747 licensed for tips on the right. 2. Completely insert the connection ...AUDIO/R) jack. 5. Patent Nos. 4,631,603; 4,577,216; 4,819,098; 4,907,093; The picture and sound that is played back will be abnormal if the connection is loose. 2. Connect the cable from the INPUTS...
Owners Guide
Page 20
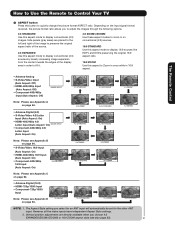
... repeatedly to cycle through the three different freeze modes (see page 33 for how to change between Day and Night picture mode settings. Select DAY for day time viewing with more detailed picture (see page 25). ƹ ¾ Freeze Ƹ ¹ ƹ ƺ ƻ Freeze Ƽ ...» Freeze Freeze Freeze EXIT ¿ DAY/NIGHT button Press this button to turn the TV set on ² ¿ which button is in TV mode. · MODE ...
... repeatedly to cycle through the three different freeze modes (see page 33 for how to change between Day and Night picture mode settings. Select DAY for day time viewing with more detailed picture (see page 25). ƹ ¾ Freeze Ƹ ¹ ƹ ƺ ƻ Freeze Ƽ ...» Freeze Freeze Freeze EXIT ¿ DAY/NIGHT button Press this button to turn the TV set on ² ¿ which button is in TV mode. · MODE ...
Owners Guide
Page 21
... setting you choose 4:3 EXPANDED/ZOOM1/ZOOM2 or 16:9 ZOOM aspect style (see Appendix D on page 64. Depending on the input signal format received, the picture format ratio allows you to adjust the images through the following options. 4:3 STANDARD Use this aspect mode to Zoom-in once while in on page... mode to display 16:9 sources like HDTV and DVD's preserving the original 16:9 aspect ratio. 16:9 ZOOM Use this button to quickly change the picture format ASPECT ratio. However, all five video inputs have independent Aspect Style settings. 2. How to Use the Remote to Control Your...
... setting you choose 4:3 EXPANDED/ZOOM1/ZOOM2 or 16:9 ZOOM aspect style (see Appendix D on page 64. Depending on the input signal format received, the picture format ratio allows you to adjust the images through the following options. 4:3 STANDARD Use this aspect mode to Zoom-in once while in on page... mode to display 16:9 sources like HDTV and DVD's preserving the original 16:9 aspect ratio. 16:9 ZOOM Use this button to quickly change the picture format ASPECT ratio. However, all five video inputs have independent Aspect Style settings. 2. How to Use the Remote to Control Your...
Owners Guide
Page 22
The Remote Control ¶ PICTURE-IN-PICTURE button See separate section on pages 24-26 for numeric entries. Press this button to select. INFO Show Name 3:00PM-̈3:30PM ST TV-G 480i S-IN: 1 KXYZ-HD 3:17PM Day Off 16:9 Standard µ EXIT button This button will be in this area of the (CBL), ...Y-PBPR: 3 KXYZ-HD 3:17PM ¹ INFO button Press this button when you want to scroll and select the inputs that are being received, the picture source, if the channel has stereo (ST) or second audio program (SA), the time, CHANNEL ID and if the TIMER is set or adjusted by...
The Remote Control ¶ PICTURE-IN-PICTURE button See separate section on pages 24-26 for numeric entries. Press this button to select. INFO Show Name 3:00PM-̈3:30PM ST TV-G 480i S-IN: 1 KXYZ-HD 3:17PM Day Off 16:9 Standard µ EXIT button This button will be in this area of the (CBL), ...Y-PBPR: 3 KXYZ-HD 3:17PM ¹ INFO button Press this button when you want to scroll and select the inputs that are being received, the picture source, if the channel has stereo (ST) or second audio program (SA), the time, CHANNEL ID and if the TIMER is set or adjusted by...
Owners Guide
Page 24
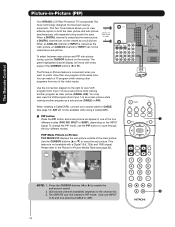
... connection diagram to the right to cycle through the four different modes. Use the CURSOR buttons (̆ or ̄) to the Picture-in-Picture Modes Table (see page 12). The Remote Control Picture-in-Picture (PIP) Your HITACHI LCD Rear Projection TV incorporates Two Tuner technology designed for limited viewing uses only. CABLE Apparatus Claims of the main...
... connection diagram to the right to cycle through the four different modes. Use the CURSOR buttons (̆ or ̄) to the Picture-in-Picture Modes Table (see page 12). The Remote Control Picture-in-Picture (PIP) Your HITACHI LCD Rear Projection TV incorporates Two Tuner technology designed for limited viewing uses only. CABLE Apparatus Claims of the main...

Owners Guide
Page 25
...- - - - 480i 16x9/4x3 YES YES - - - - - YES YES YES YES YES 540p 4x3 - - To prevent a pattern burn, occasionally move the sub-picture using the CURSOR buttons. Press the EXIT button to enable your chosen channel and return to normal viewing. 1 2 3 4 5 6 7 8 9 10 11 12 13 ...PIP 1080i ANT Digital 16x9 - - - - Picture-in-Picture (PIP) PIP Mode Picture-in memory) and displays them as PIP subpictures or Thumbnail channels. MAIN PICTURE SUB PICTURE The Remote Control SURF Mode Picture-in-Picture Surf Mode PIP automatically scans all active channels (those...
...- - - - 480i 16x9/4x3 YES YES - - - - - YES YES YES YES YES 540p 4x3 - - To prevent a pattern burn, occasionally move the sub-picture using the CURSOR buttons. Press the EXIT button to enable your chosen channel and return to normal viewing. 1 2 3 4 5 6 7 8 9 10 11 12 13 ...PIP 1080i ANT Digital 16x9 - - - - Picture-in-Picture (PIP) PIP Mode Picture-in memory) and displays them as PIP subpictures or Thumbnail channels. MAIN PICTURE SUB PICTURE The Remote Control SURF Mode Picture-in-Picture Surf Mode PIP automatically scans all active channels (those...
Owners Guide
Page 26
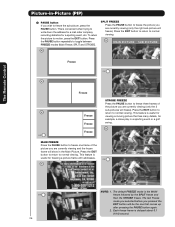
...NOTE: 1. The last Freeze mode you selected before you pressed the EXIT button will be the one frame of the picture you are currently viewing (only the right sub-picture will freeze). Each freeze frame is the MAIN freeze followed by the SPLIT freeze and then the STROBE freeze. To return... modes (Main Freeze, SPLIT and STROBE). Press the EXIT button to return to freeze the sub-picture, press the PAUSE button. The default FREEZE mode is delayed about 0.1 (1/10) second. The Remote Control Picture-in-Picture (PIP) · PAUSE button If you wish to normal viewing. Press the EXIT button to...
...NOTE: 1. The last Freeze mode you selected before you pressed the EXIT button will be the one frame of the picture you are currently viewing (only the right sub-picture will freeze). Each freeze frame is the MAIN freeze followed by the SPLIT freeze and then the STROBE freeze. To return... modes (Main Freeze, SPLIT and STROBE). Press the EXIT button to return to freeze the sub-picture, press the PAUSE button. The default FREEZE mode is delayed about 0.1 (1/10) second. The Remote Control Picture-in-Picture (PIP) · PAUSE button If you wish to normal viewing. Press the EXIT button to...
Owners Guide
Page 32
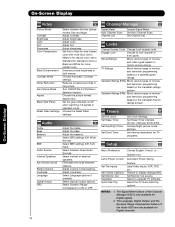
... panel. Adjust contrast. Adjust sharpness. Enhance picture brightness in the picture. Adjust volume in standard mode. Label Video Inputs, VCR, DVD, etc. Choose Automatic Contrast settings. Select Language options if available. Select the TV Quick Start Up options. The Signal Meter feature...FRN) Block various types of movies and television programming based on motion picture ratings. Set Day/Night picture mode settings. Set the gray side bars on the Canadian French ratings system. TV Ratings Block various types of movies and television programming based on /off ...
... panel. Adjust contrast. Adjust sharpness. Enhance picture brightness in the picture. Adjust volume in standard mode. Label Video Inputs, VCR, DVD, etc. Choose Automatic Contrast settings. Select Language options if available. Select the TV Quick Start Up options. The Signal Meter feature...FRN) Block various types of movies and television programming based on motion picture ratings. Set Day/Night picture mode settings. Set the gray side bars on the Canadian French ratings system. TV Ratings Block various types of movies and television programming based on /off ...
Owners Guide
Page 33
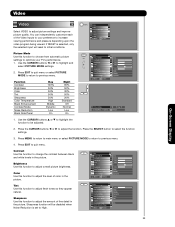
...Middle Contrast Mode Dynamic Move SEL Select Picture Mode Next/Prev Select Day SEL Return 1. Sharpness Use this function to your TV's performance. 1. Brightness Use this function to choose from automatic picture settings to optimize your preference to adjust overall picture brightness. Sharpness function will reset to...adjust the function. If RESET is set to High. MENU Video Audio Channel Manager Locks Timers Setup Move SEL Select Picture Mode Use this function to increase viewing performance and pleasure depending upon the video program being viewed. Press MENU to return...
...Middle Contrast Mode Dynamic Move SEL Select Picture Mode Next/Prev Select Day SEL Return 1. Sharpness Use this function to your TV's performance. 1. Brightness Use this function to choose from automatic picture settings to optimize your preference to adjust overall picture brightness. Sharpness function will reset to...adjust the function. If RESET is set to High. MENU Video Audio Channel Manager Locks Timers Setup Move SEL Select Picture Mode Use this function to increase viewing performance and pleasure depending upon the video program being viewed. Press MENU to return...
Owners Guide
Page 34
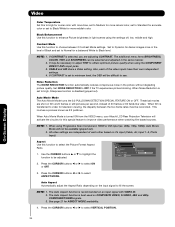
...DETECTION SPECIAL FEATURE ON or OFF. Theatrical movies are adjusting CONTRAST. When film is turned ON from the VIDEO menu, your Hitachi LCD Rear Projection Television will activate the circuitry for ASPECT MODE availability. 4. The Auto Aspect function is selected, you are shot on COMPOSITE...and high. CABLE and AIR share a Video setting. NOTE: 1. Press the CURSOR buttons ̇ or ̈ to OFF if the TV experiences picture blocking. NOTE: 1. The additional menu items BRIGHTNESS, COLOR, TINT, and SHARPNESS can be adjusted. Press the CURSOR buttons ̇ or ...
...DETECTION SPECIAL FEATURE ON or OFF. Theatrical movies are adjusting CONTRAST. When film is turned ON from the VIDEO menu, your Hitachi LCD Rear Projection Television will activate the circuitry for ASPECT MODE availability. 4. The Auto Aspect function is selected, you are shot on COMPOSITE...and high. CABLE and AIR share a Video setting. NOTE: 1. Press the CURSOR buttons ̇ or ̈ to OFF if the TV experiences picture blocking. NOTE: 1. The additional menu items BRIGHTNESS, COLOR, TINT, and SHARPNESS can be adjusted. Press the CURSOR buttons ̇ or ...
Owners Guide
Page 35
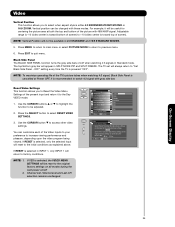
...the next power on all modes after Power "ON". No Yes Move SEL Return On-Screen Display 35 NOTE: To maximize operating life of the TV's picture tubes when watching 4:3 signal, Black Side Panel is selected, the VIDEO MENU SETTINGS will be reset to the original factory settings on /off ... to increase viewing performance and pleasure, depending upon the video program being viewed. If YES is cancelled at both the top and bottom of the picture with gray side bar. NOTE: 1. 2. Adjustable range is -10 (video center is toward top of the Video Inputs to your preference to the...
...the next power on all modes after Power "ON". No Yes Move SEL Return On-Screen Display 35 NOTE: To maximize operating life of the TV's picture tubes when watching 4:3 signal, Black Side Panel is selected, the VIDEO MENU SETTINGS will be reset to the original factory settings on /off ... to increase viewing performance and pleasure, depending upon the video program being viewed. If YES is cancelled at both the top and bottom of the picture with gray side bar. NOTE: 1. 2. Adjustable range is -10 (video center is toward top of the Video Inputs to your preference to the...

Owners Guide
Page 41
... sound for a scheduled time period that you set individually. If you can also be used in -Picture will be blocked automatically (see page 42). When TV RATINGS is selected, you forget your ACCESS CODE NUMBER, use the factory code 7777 to erase your preference. The code to enter the ...a new four digit number. 3. When SET CHANNEL LOCK is turned on, all buttons on motion picture ratings. When SET FRONT PANEL LOCK is turned on the two rating systems used to keep the TV from being viewed for the chosen channel will also be blocked out. Press the SELECT button to...
... sound for a scheduled time period that you set individually. If you can also be used in -Picture will be blocked automatically (see page 42). When TV RATINGS is selected, you forget your ACCESS CODE NUMBER, use the factory code 7777 to erase your preference. The code to enter the ...a new four digit number. 3. When SET CHANNEL LOCK is turned on, all buttons on motion picture ratings. When SET FRONT PANEL LOCK is turned on the two rating systems used to keep the TV from being viewed for the chosen channel will also be blocked out. Press the SELECT button to...


