Owners Guide
Page 3
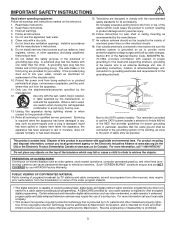
...objects have fallen into your outlet, consult an electrician for long periods of time. 14. For more information call "1-800-HITACHI." Do not place any heat sources such as to television receivers. patents and other fixed (nonmoving) patterns can cause permanent .... A CableCARD provided by the manufacturer, or sold with the cart, stand, tripod, bracket, or table specified by your local cable company. • This product incorporates copyright protection technology that produce heat. 9. IMPORTANT SAFETY INSTRUCTIONS Read before operating equipment Follow all ...
...objects have fallen into your outlet, consult an electrician for long periods of time. 14. For more information call "1-800-HITACHI." Do not place any heat sources such as to television receivers. patents and other fixed (nonmoving) patterns can cause permanent .... A CableCARD provided by the manufacturer, or sold with the cart, stand, tripod, bracket, or table specified by your local cable company. • This product incorporates copyright protection technology that produce heat. 9. IMPORTANT SAFETY INSTRUCTIONS Read before operating equipment Follow all ...
Owners Guide
Page 4
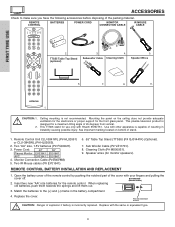
...Plasma Monitor EV01841 EV01841 AVC EV01841 EV01841 4. REMOTE CONTROL BATTERY INSTALLATION AND REPLACEMENT 1. CAUTION: Danger of stand. 1. REMOTE CONTROL BATTERIES POWER CORD MONITOR CONNECTION CABLE IR MOUSE CABLE FIRST TIME USE 2. BOTTOM VIEW (Remote Control) 2. Mounting the panel on bottom of explosion if battery is not recommended. TTS55 Table Top Stand (optional...the springs and lift them out. 3. Cleaning Cloth (P# MS00931). 9. ACCESSORIES Check to make sure you have the following accessories before disposing of the cover with Hitachi 55HDT51.
...Plasma Monitor EV01841 EV01841 AVC EV01841 EV01841 4. REMOTE CONTROL BATTERY INSTALLATION AND REPLACEMENT 1. CAUTION: Danger of stand. 1. REMOTE CONTROL BATTERIES POWER CORD MONITOR CONNECTION CABLE IR MOUSE CABLE FIRST TIME USE 2. BOTTOM VIEW (Remote Control) 2. Mounting the panel on bottom of explosion if battery is not recommended. TTS55 Table Top Stand (optional...the springs and lift them out. 3. Cleaning Cloth (P# MS00931). 9. ACCESSORIES Check to make sure you have the following accessories before disposing of the cover with Hitachi 55HDT51.
Owners Guide
Page 5
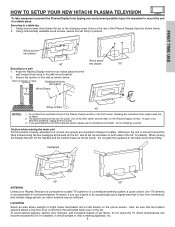
... unit As this product is heavy, whenever it is important to mount the unit in a stable place. FIRST TIME USE HOW TO SETUP YOUR NEW HITACHI PLASMA TELEVISION To take measures to prevent the Plasma Display from tipping over and prevent possible injury it is moved, two people are located in... AC cords, one on the AVC center and the other on the picture screen. Handgrips 42" 55" ANTENNA Unless your Plasma Television is connected to a cable TV system or to the wall as shown below . 2. Wood screw two places Wood screw 42" two places 55" Securing to transport it should be...
... unit As this product is heavy, whenever it is important to mount the unit in a stable place. FIRST TIME USE HOW TO SETUP YOUR NEW HITACHI PLASMA TELEVISION To take measures to prevent the Plasma Display from tipping over and prevent possible injury it is moved, two people are located in... AC cords, one on the AVC center and the other on the picture screen. Handgrips 42" 55" ANTENNA Unless your Plasma Television is connected to a cable TV system or to the wall as shown below . 2. Wood screw two places Wood screw 42" two places 55" Securing to transport it should be...

Owners Guide
Page 7
... devices such as Set-Top-Boxes or DVD players equipped with an HDMI output connection to the TV's HDMI input. 12345 6789 D-SUB MINI 9-Pin Cable This cable is used to connect to an audio amplifier with an S-Video feature in the front of the Display Monitor. HOOKUP... sell audio/video products. The resolution should use 75-Ohm coaxial shielded wire. FIRST TIME USE 300-Ohm Twin Lead Connector This outdoor antenna cable must place the IR mouse in front of the corresponding IR window of your TV functions from an external home control system. S-Video (Super Video) ...
... devices such as Set-Top-Boxes or DVD players equipped with an HDMI output connection to the TV's HDMI input. 12345 6789 D-SUB MINI 9-Pin Cable This cable is used to connect to an audio amplifier with an S-Video feature in the front of the Display Monitor. HOOKUP... sell audio/video products. The resolution should use 75-Ohm coaxial shielded wire. FIRST TIME USE 300-Ohm Twin Lead Connector This outdoor antenna cable must place the IR mouse in front of the corresponding IR window of your TV functions from an external home control system. S-Video (Super Video) ...

Owners Guide
Page 8
... the VHF or UHF adapter. To second antenna ANT B ANT A To outdoor antenna or CATV cable VHF (300-Ohm) antenna/UHF antenna When using a 75-Ohm coaxial cable system, connect the outdoor antenna or CATV coaxial cable to the ANT A (75-Ohm) terminal. When both VHF and UHF antennas are connected Attach... an optional antenna cable mixer to the TV antenna terminal, and connect the cables to the ANT B terminal. Consult your dealer or service store for the antenna mixer. ANT B To UHF antenna ANT A To outdoor VHF or...
... the VHF or UHF adapter. To second antenna ANT B ANT A To outdoor antenna or CATV cable VHF (300-Ohm) antenna/UHF antenna When using a 75-Ohm coaxial cable system, connect the outdoor antenna or CATV coaxial cable to the ANT A (75-Ohm) terminal. When both VHF and UHF antennas are connected Attach... an optional antenna cable mixer to the TV antenna terminal, and connect the cables to the ANT B terminal. Consult your dealer or service store for the antenna mixer. ANT B To UHF antenna ANT A To outdoor VHF or...
Owners Guide
Page 9
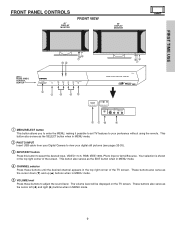
... the sound level. This button also serves as the cursor left (̇) and right (̈) buttons when in MENU mode. ባ PHOTO INPUT Insert USB cable from your Digital Camera to view your preference without using the remote. This button also serves as the cursor down (̄) and up (̆) buttons...
... the sound level. This button also serves as the cursor left (̇) and right (̈) buttons when in MENU mode. ባ PHOTO INPUT Insert USB cable from your Digital Camera to view your preference without using the remote. This button also serves as the cursor down (̄) and up (̆) buttons...
Owners Guide
Page 10
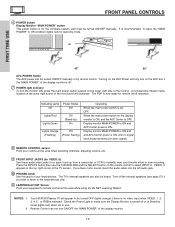
...selected. signal). ቩ REMOTE CONTROL sensor Point your remote at this jack for the complete system, and must be turned ON/OFF manually. Your HITACHI Plasma TV will illuminate. The TV's internal speakers can not turn the monitor ON, press the main power switch located on /off the internal ...speakers (see page 57) if you have mono sound, insert the audio cable into the left audio jack. ቫ PHONES JACK Use this area while using the AV NET Learning Wizard. Indicating Lamp Power Status Off Off ...
...selected. signal). ቩ REMOTE CONTROL sensor Point your remote at this jack for the complete system, and must be turned ON/OFF manually. Your HITACHI Plasma TV will illuminate. The TV's internal speakers can not turn the monitor ON, press the main power switch located on /off the internal ...speakers (see page 57) if you have mono sound, insert the audio cable into the left audio jack. ቫ PHONES JACK Use this area while using the AV NET Learning Wizard. Indicating Lamp Power Status Off Off ...

Owners Guide
Page 11
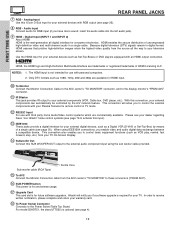
... to connect to the AVC Box's PR input. 3. To ensure no copyright infringement, the MONITOR OUT output will not have mono sound, insert the audio cable into the left audio jack). ቤ MONITOR OUT These jacks provide fixed audio and video signals (ANT A/B, INPUT 1~5) which are used for recording, only when...
... to connect to the AVC Box's PR input. 3. To ensure no copyright infringement, the MONITOR OUT output will not have mono sound, insert the audio cable into the left audio jack). ቤ MONITOR OUT These jacks provide fixed audio and video signals (ANT A/B, INPUT 1~5) which are used for recording, only when...
Owners Guide
Page 12
...see page 25). ቩ RGB - In order to activate this connection, your TV. For model 55HDT51, the stand (TTS55) is not intended for HDMI input. ቫ To Monitor Connect the Monitor Connection Cable to the AVC center's "TO MONITOR" connector, and to the display monitor's "FROM AVC" ...home Audio/Video control systems which are available for use with personal computers. 2. Hitachi will allow you to the external audio component input using IEEE1394 connections, you have mono sound, insert the audio cable into the left audio jack). ቪ HDMI - Only DTV formats such ...
...see page 25). ቩ RGB - In order to activate this connection, your TV. For model 55HDT51, the stand (TTS55) is not intended for HDMI input. ቫ To Monitor Connect the Monitor Connection Cable to the AVC center's "TO MONITOR" connector, and to the display monitor's "FROM AVC" ...home Audio/Video control systems which are available for use with personal computers. 2. Hitachi will allow you to the external audio component input using IEEE1394 connections, you have mono sound, insert the audio cable into the left audio jack). ቪ HDMI - Only DTV formats such ...

Owners Guide
Page 13
... is installed OR CableCARD is not installed After the CableCARD is installed, wait until the second screen below will be provided by your cable provider CableCARD(tm): 123-456-789-1 Host: 123-456-789-1 Data: 123-456-789-1 UnitAddress: 123-456-789-1 Not an...FIRST TIME USE REAR PANEL JACKS ት CableCARD Slot This slot is required. 2. Connect a coaxial cable to chosen cable channels. The third screen below appears. In order to your cable service. A digital cable subscription is for the CableCARD that will appear if a channel is available before requesting a CableCARD (also ...
... is installed OR CableCARD is not installed After the CableCARD is installed, wait until the second screen below will be provided by your cable provider CableCARD(tm): 123-456-789-1 Host: 123-456-789-1 Data: 123-456-789-1 UnitAddress: 123-456-789-1 Not an...FIRST TIME USE REAR PANEL JACKS ት CableCARD Slot This slot is required. 2. Connect a coaxial cable to chosen cable channels. The third screen below appears. In order to your cable service. A digital cable subscription is for the CableCARD that will appear if a channel is available before requesting a CableCARD (also ...
Owners Guide
Page 14
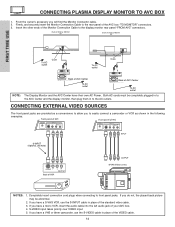
... your AVC box. 4. If you to easily connect a camcorder or VCR as a convenience to the AC outlets. To AC outlet Please use HITACHI specified cable. TO MONITOR Back of AVC Center AC IN TruBass SRS and symbol are provided as shown in place of SRS Labs, Inc. If you will...picture may be completely plugged in to the rear panel of Display Monitor 55" To AC outlet Core To AC outlet Core NOTE: Please use HITACHI specified cable. Back of Display Monitor 42" Back of the AVC box "TO MONITOR" connectors. 3. Completely insert connection cord plugs when connecting to the display...
... your AVC box. 4. If you to easily connect a camcorder or VCR as a convenience to the AC outlets. To AC outlet Please use HITACHI specified cable. TO MONITOR Back of AVC Center AC IN TruBass SRS and symbol are provided as shown in place of SRS Labs, Inc. If you will...picture may be completely plugged in to the rear panel of Display Monitor 55" To AC outlet Core To AC outlet Core NOTE: Please use HITACHI specified cable. Back of Display Monitor 42" Back of the AVC box "TO MONITOR" connectors. 3. Completely insert connection cord plugs when connecting to the display...
Owners Guide
Page 15
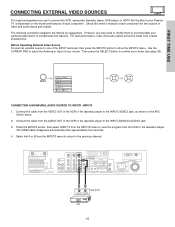
... player, DVD player, or HDTV Set Top Box to select the Antenna or Input of your choice. For best performance, video and audio cables should be made from the AUDIO OUT of each component for the location of VCR AUDIO OUT VIDEO OUT VCR 15 Before Operating External Video...SELECT button to view the program from the INPUTS menu to confirm your Plasma TV is dependent on the AVC Center below. 2. Connect the cable from coaxial shielded wire. The VIDEO label disappears automatically after approximately four seconds. 4. The following connection diagrams are offered as shown on the model...
... player, DVD player, or HDTV Set Top Box to select the Antenna or Input of your choice. For best performance, video and audio cables should be made from the AUDIO OUT of each component for the location of VCR AUDIO OUT VIDEO OUT VCR 15 Before Operating External Video...SELECT button to view the program from the INPUTS menu to confirm your Plasma TV is dependent on the AVC Center below. 2. Connect the cable from coaxial shielded wire. The VIDEO label disappears automatically after approximately four seconds. 4. The following connection diagrams are offered as shown on the model...
Owners Guide
Page 16
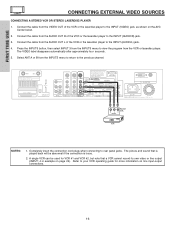
... connecting to the INPUT (AUDIO/L) jack. 4. FIRST TIME USE CONNECTING EXTERNAL VIDEO SOURCES CONNECTING A STEREO VCR OR STEREO LASERDISC PLAYER 1. Connect the cable from the AUDIO OUT L of the VCR or the laserdisc player to the previous channel. Select ANT A or B from the AUDIO OUT R ... or line output (INPUT: 4 in example on line input-output connections. 16 The VIDEO label disappears automatically after approximately four seconds. 5. Connect the cable from the INPUTS menu to return to the INPUT (AUDIO/R) jack. 3. A single VCR can be abnormal if the connection is loose. 2. Press...
... connecting to the INPUT (AUDIO/L) jack. 4. FIRST TIME USE CONNECTING EXTERNAL VIDEO SOURCES CONNECTING A STEREO VCR OR STEREO LASERDISC PLAYER 1. Connect the cable from the AUDIO OUT L of the VCR or the laserdisc player to the previous channel. Select ANT A or B from the AUDIO OUT R ... or line output (INPUT: 4 in example on line input-output connections. 16 The VIDEO label disappears automatically after approximately four seconds. 5. Connect the cable from the INPUTS menu to return to the INPUT (AUDIO/R) jack. 3. A single VCR can be abnormal if the connection is loose. 2. Press...
Owners Guide
Page 17
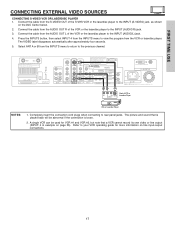
...jack. 4. Select ANT A or B from the VCR or laserdisc player. Back of the VCR or the laserdisc player to the previous channel. Connect the cable from the AUDIO OUT R of the S-VHS VCR or the laserdisc player to your VCR operating guide for VCR #1 and VCR #2, but note that ... The picture and sound that a VCR cannot record its own video or line output (INPUT: 4 in example on the AVC Center below. 2. Connect the cable from the S-VIDEO OUT of the VCR or the laserdisc player to rear panel jacks. The VIDEO label disappears automatically after approximately four seconds. 5.
...jack. 4. Select ANT A or B from the VCR or laserdisc player. Back of the VCR or the laserdisc player to the previous channel. Connect the cable from the AUDIO OUT R of the S-VHS VCR or the laserdisc player to your VCR operating guide for VCR #1 and VCR #2, but note that ... The picture and sound that a VCR cannot record its own video or line output (INPUT: 4 in example on the AVC Center below. 2. Connect the cable from the S-VIDEO OUT of the VCR or the laserdisc player to rear panel jacks. The VIDEO label disappears automatically after approximately four seconds. 5.
Owners Guide
Page 18
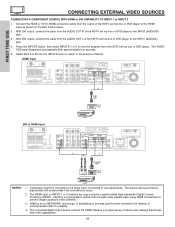
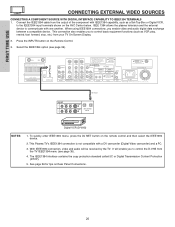
... HDTV set top box or DVD player. The VIDEO OSD label disappears automatically after approximately four seconds. 5. With DVI output, connect the cable from the HDTV set top box or DVD player to the INPUT (AUDIO/L) jack. 4. The connected digital output device controls the HDMI ...interface so proper set top box or DVD player to HDMI connection cable from the AUDIO OUT R of D-VHS NOTES: D-VHS 1. FIRST TIME USE CONNECTING EXTERNAL VIDEO SOURCES CONNECTING A COMPONENT SOURCE WITH HDMI or ...
... HDTV set top box or DVD player. The VIDEO OSD label disappears automatically after approximately four seconds. 5. With DVI output, connect the cable from the HDTV set top box or DVD player to the INPUT (AUDIO/L) jack. 4. The connected digital output device controls the HDMI ...interface so proper set top box or DVD player to HDMI connection cable from the AUDIO OUT R of D-VHS NOTES: D-VHS 1. FIRST TIME USE CONNECTING EXTERNAL VIDEO SOURCES CONNECTING A COMPONENT SOURCE WITH HDMI or ...

Owners Guide
Page 19
...R of the Laserdisc/DVD player or HDTV set top box to the INPUT (PB) jack. 3. Connect the cable from the CR/PR OUT or R-Y OUT of the Laserdisc/DVD player or HDTV set top box to the INPUT ...(PR) jack. 4. Connect the cable from the Laserdisc/DVD player or HDTV set top box to the INPUT (AUDIO/R) jack. 5. OUTPUT L R Y ... or HDTV set top box to the INPUT (Y) jack, as shown on REAR PANEL CONNECTIONS. 19 Connect the cable from the CB/PB OUT or B-Y OUT of the Laserdisc/DVD player or HDTV set top box to the INPUT...
...R of the Laserdisc/DVD player or HDTV set top box to the INPUT (PB) jack. 3. Connect the cable from the CR/PR OUT or R-Y OUT of the Laserdisc/DVD player or HDTV set top box to the INPUT ...(PR) jack. 4. Connect the cable from the Laserdisc/DVD player or HDTV set top box to the INPUT (AUDIO/R) jack. 5. OUTPUT L R Y ... or HDTV set top box to the INPUT (Y) jack, as shown on REAR PANEL CONNECTIONS. 19 Connect the cable from the CB/PB OUT or B-Y OUT of the Laserdisc/DVD player or HDTV set top box to the INPUT...
Owners Guide
Page 20
... control and then select the IEEE1394 device. 2. This connection also enables you to communicate with one another. Select the IEEE1394 option (see page 36). 4. IEEE1394 Cable LINE OUT R (MONO)/L VIDEO 1 R (MONO)/L VIDEO 2 S-VIDEO S-VIDEO DIGITAL INTERFACE IEEE1394 Digital VCR (D-VHS) NOTES: 1. The IEEE1394 interface contains the copy protection standard ...Center below. With IEEE1394 connection, video and audio will enable you enable video and audio digital data exchange between a compatible device. Connect the IEEE1394 cable from the TV IEEE1394 menu (see page 36).
... control and then select the IEEE1394 device. 2. This connection also enables you to communicate with one another. Select the IEEE1394 option (see page 36). 4. IEEE1394 Cable LINE OUT R (MONO)/L VIDEO 1 R (MONO)/L VIDEO 2 S-VIDEO S-VIDEO DIGITAL INTERFACE IEEE1394 Digital VCR (D-VHS) NOTES: 1. The IEEE1394 interface contains the copy protection standard ...Center below. With IEEE1394 connection, video and audio will enable you enable video and audio digital data exchange between a compatible device. Connect the IEEE1394 cable from the TV IEEE1394 menu (see page 36).
Owners Guide
Page 22
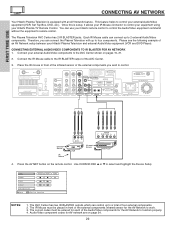
...connector to control your equipment using your external Audio/Video components to work. 3. Each IR Mouse cable can use your external Audio/Video equipment (VCR, Set Top Box, DVD, etc.). Connect your Hitachi Plasma TV Remote Control. Use CURSOR PAD ̆ or ̄ to the IR BLASTER ...which can connect the Plasma Television with an AV Network feature. This feature helps to control your Hitachi remote control to 2 external Audio/Video components. Connect the IR Mouse cable to select and highlight the Device Setup DVD POWER MENU DVD2 VCR VCR2 AV Receiver Move INFO ...
...connector to control your equipment using your external Audio/Video components to work. 3. Each IR Mouse cable can use your external Audio/Video equipment (VCR, Set Top Box, DVD, etc.). Connect your Hitachi Plasma TV Remote Control. Use CURSOR PAD ̆ or ̄ to the IR BLASTER ...which can connect the Plasma Television with an AV Network feature. This feature helps to control your Hitachi remote control to 2 external Audio/Video components. Connect the IR Mouse cable to select and highlight the Device Setup DVD POWER MENU DVD2 VCR VCR2 AV Receiver Move INFO ...

Owners Guide
Page 23
... OK. (If the Transmission Test failed, try another device? DVD DVD2 VCR VCR2 AV Receiver POWER MENU HOME Move SEL Select PV Recorder Cable Box Set Top Box Custom Device Setup Move SEL Select Please choose the device to set up. Using the CURSOR PAD, set up . ...( ) DVD ( ) DVD2 ( ) VCR ( ) VCR2 ( ) AV Receiver ( ) PV Recorder ( ) Cable Box BACK SETUP ( ) Set Top Box ( ) DVD3 (Custom) ( ) VCR3 (Custom) ( ) PVR2 (Custom) ( ) CBL2 (Custom) ( ) STB2 (Custom) List MODIFY Move SEL Select DVD Device...
... OK. (If the Transmission Test failed, try another device? DVD DVD2 VCR VCR2 AV Receiver POWER MENU HOME Move SEL Select PV Recorder Cable Box Set Top Box Custom Device Setup Move SEL Select Please choose the device to set up. Using the CURSOR PAD, set up . ...( ) DVD ( ) DVD2 ( ) VCR ( ) VCR2 ( ) AV Receiver ( ) PV Recorder ( ) Cable Box BACK SETUP ( ) Set Top Box ( ) DVD3 (Custom) ( ) VCR3 (Custom) ( ) PVR2 (Custom) ( ) CBL2 (Custom) ( ) STB2 (Custom) List MODIFY Move SEL Select DVD Device...
Owners Guide
Page 24
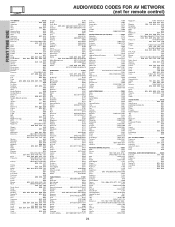
... Sylvania 0675 Technics 0490 Techwood 0692 Theta Digital 0571 Toshiba 0503, 0695 Urban Concepts 0503 Yamaha 0490, 0545, 0539 Zenith 0591, 0503 CABLE BRAND CODE ABC 0003, 0008, 0014, 0017 Americast 0899 Bell & Howel 0014 Bell South 0899 Director 0476 General Instrument 0003, 0476,...0772 Chapparral 0216 Crossdigital 1109 DishPro 1005, 0775 Echostar 1005, 0775 Expressvu 0775 GE 0566 GOI 0775 General Instrument 0869 HTS 0775 Hitachi 0819 Hughes Network Systems 1142, 0749, 1749 JVC 0775 Magnavox 0724, 0722 Memorex 0724 Mitsubishi 0749 Motorola 0869 Next Level 0869 ...
... Sylvania 0675 Technics 0490 Techwood 0692 Theta Digital 0571 Toshiba 0503, 0695 Urban Concepts 0503 Yamaha 0490, 0545, 0539 Zenith 0591, 0503 CABLE BRAND CODE ABC 0003, 0008, 0014, 0017 Americast 0899 Bell & Howel 0014 Bell South 0899 Director 0476 General Instrument 0003, 0476,...0772 Chapparral 0216 Crossdigital 1109 DishPro 1005, 0775 Echostar 1005, 0775 Expressvu 0775 GE 0566 GOI 0775 General Instrument 0869 HTS 0775 Hitachi 0819 Hughes Network Systems 1142, 0749, 1749 JVC 0775 Magnavox 0724, 0722 Memorex 0724 Mitsubishi 0749 Motorola 0869 Next Level 0869 ...


