Owners Guide
Page 1
has determined that this product meets the ENERGY STAR® guidelines for 42HDT51, 55HDT51 IMPORTANT SAFETY INSTRUCTIONS 2-3 FIRST TIME USE ...4-26 THE REMOTE CONTROL 27-49 ON-SCREEN DISPLAY...50-77 USING THE RGB INPUT OF THE PLASMA TV 78-87 CARE OF YOUR HITACHI PLASMA TV & REMOTE CONTROL 88 RECEPTION PROBLEMS ...89 USEFUL INFORMATION/INDEX 90-98 As an ENERGY STAR® Partner, Hitachi, Ltd. PLASMA TELEVISION AVC (Audio Video Control Center) & Plasma Display Monitor Operating Guide for energy efficiency.
has determined that this product meets the ENERGY STAR® guidelines for 42HDT51, 55HDT51 IMPORTANT SAFETY INSTRUCTIONS 2-3 FIRST TIME USE ...4-26 THE REMOTE CONTROL 27-49 ON-SCREEN DISPLAY...50-77 USING THE RGB INPUT OF THE PLASMA TV 78-87 CARE OF YOUR HITACHI PLASMA TV & REMOTE CONTROL 88 RECEPTION PROBLEMS ...89 USEFUL INFORMATION/INDEX 90-98 As an ENERGY STAR® Partner, Hitachi, Ltd. PLASMA TELEVISION AVC (Audio Video Control Center) & Plasma Display Monitor Operating Guide for energy efficiency.
Owners Guide
Page 4
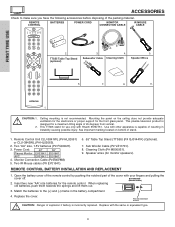
... down and slide back to make sure you have the following accessories before disposing of the cover with Hitachi 55HDT51. CAUTION: Danger of 45 degrees from vertical. Cleaning Cloth (P# MS00931). 9. Speaker wires (for the remote control. TTS55 Table Top Stand (optional) 3. 4. Use with the same or equivalent type. 4 See important marking located on...
... down and slide back to make sure you have the following accessories before disposing of the cover with Hitachi 55HDT51. CAUTION: Danger of 45 degrees from vertical. Cleaning Cloth (P# MS00931). 9. Speaker wires (for the remote control. TTS55 Table Top Stand (optional) 3. 4. Use with the same or equivalent type. 4 See important marking located on...
Owners Guide
Page 9
... pictures (see pages 33-35). ቤ INPUT/EXIT button Press this button to select the desired input, VIDEO 1 to view your preference without using the remote.
... pictures (see pages 33-35). ቤ INPUT/EXIT button Press this button to select the desired input, VIDEO 1 to view your preference without using the remote.
Owners Guide
Page 10
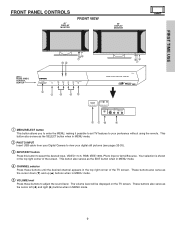
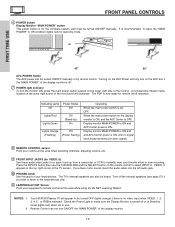
... is ON and AVC Center power is for a quick hook-up from a camcorder or VCR to select INPUT 5. When the main power switch on the remote control to instantly view your head-phones. Indicating Lamp Power Status Off Off Lights Red Lights Green Off (Stand-by mode (lights red) when not...'s internal speakers can not turn on the AVC box if the "MAIN POWER" of the TV screen. Check the Power Light to be heard. Your HITACHI Plasma TV will only turn ON/OFF the "MAIN POWER" of the monitor. FRONT PANEL CONTROLS ቧ POWER button Display Monitor "MAIN POWER" button This...
... is ON and AVC Center power is for a quick hook-up from a camcorder or VCR to select INPUT 5. When the main power switch on the remote control to instantly view your head-phones. Indicating Lamp Power Status Off Off Lights Red Lights Green Off (Stand-by mode (lights red) when not...'s internal speakers can not turn on the AVC box if the "MAIN POWER" of the TV screen. Check the Power Light to be heard. Your HITACHI Plasma TV will only turn ON/OFF the "MAIN POWER" of the monitor. FRONT PANEL CONTROLS ቧ POWER button Display Monitor "MAIN POWER" button This...

Owners Guide
Page 11
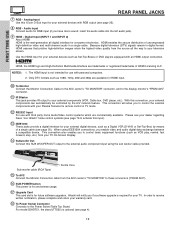
...4714; ቫ ትታ ብ ቤ ባ ቧ ቭ ቮቩ 42" Monitor Bottom View 55" Monitor Bottom View ቢ Antenna Input The remote control allows you to the AVC Box's PR input. 3. NOTES: 1. NOTES: 1. In this capability, such as a sub-picture). ባ Audio/Video Inputs 1, 2, 3 ... have monitor output. ብ Optical Out (Digital Audio) This jack provides Digital Audio Output for your audio device that is of the remote control, you can be necessary to adjust TINT to the AVC Box's PR input. 4. ANT A input can select each video source....
...4714; ቫ ትታ ብ ቤ ባ ቧ ቭ ቮቩ 42" Monitor Bottom View 55" Monitor Bottom View ቢ Antenna Input The remote control allows you to the AVC Box's PR input. 3. NOTES: 1. NOTES: 1. In this capability, such as a sub-picture). ባ Audio/Video Inputs 1, 2, 3 ... have monitor output. ብ Optical Out (Digital Audio) This jack provides Digital Audio Output for your audio device that is of the remote control, you can be necessary to adjust TINT to the AVC Box's PR input. 4. ANT A input can select each video source....
Owners Guide
Page 12
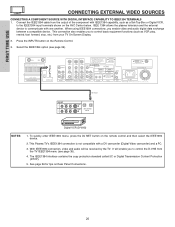
..., etc.). Audio Input Connect audio for your television screen. When using the sub woofer cable provided. Hitachi will allow you to activate this SUB WOOFER OUT output to your external components can automatically be controlled ...all digital interface for future software upgrades. HDMI enables the secure distribution of HDMI Licensing LLC. For model 55HDT51, the stand (TTS55) is required for your TV. Because digital television (DTV) signals remain in digital ... written notification, please complete and return your Plasma Television's remote control in a single cable.
..., etc.). Audio Input Connect audio for your television screen. When using the sub woofer cable provided. Hitachi will allow you to activate this SUB WOOFER OUT output to your external components can automatically be controlled ...all digital interface for future software upgrades. HDMI enables the secure distribution of HDMI Licensing LLC. For model 55HDT51, the stand (TTS55) is required for your TV. Because digital television (DTV) signals remain in digital ... written notification, please complete and return your Plasma Television's remote control in a single cable.
Owners Guide
Page 20
Select the IEEE1394 option (see page 36). 4. See page 26 for tips on the Remote Control. 3. When using IEEE1394 connections, you to control basic equipment functions (such as a Set-Top-Box or Digital VCR, to communicate with one another. ... audio digital data exchange between a compatible device. IEEE 1394 allows the plasma television and the external device to the IEEE1394 input terminals shown on the remote control and then select the IEEE1394 device. 2. This Plasma TV's IEEE1394 connection is not compatible with IEEE1394 capability, such as VCR play, rewind, fast ...
Select the IEEE1394 option (see page 36). 4. See page 26 for tips on the Remote Control. 3. When using IEEE1394 connections, you to control basic equipment functions (such as a Set-Top-Box or Digital VCR, to communicate with one another. ... audio digital data exchange between a compatible device. IEEE 1394 allows the plasma television and the external device to the IEEE1394 input terminals shown on the remote control and then select the IEEE1394 device. 2. This Plasma TV's IEEE1394 connection is not compatible with IEEE1394 capability, such as VCR play, rewind, fast ...
Owners Guide
Page 22
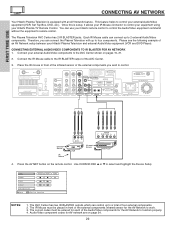
... AV Network feature. The correct codes must be entered for each of an AV Network setup between your Hitachi remote control to control the Audio/Video equipment command without the equipment's remote control. Use CURSOR PAD ̆ or ̄ to a total of the external components you can... control up to four components. FIRST TIME USE CONNECTING AV NETWORK Your Hitachi Plasma Television is setup, it allows your IR Mouse connector to control your equipment using your Hitachi Plasma TV Remote Control. Once this is equipped with up to select and highlight the Device...
... AV Network feature. The correct codes must be entered for each of an AV Network setup between your Hitachi remote control to control the Audio/Video equipment command without the equipment's remote control. Use CURSOR PAD ̆ or ̄ to a total of the external components you can... control up to four components. FIRST TIME USE CONNECTING AV NETWORK Your Hitachi Plasma Television is setup, it allows your IR Mouse connector to control your equipment using your Hitachi Plasma TV Remote Control. Once this is equipped with up to select and highlight the Device...

Owners Guide
Page 23
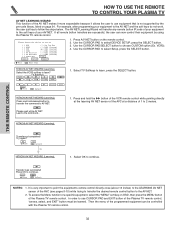
... press the SELECT button on the left appears, then goes back to finish and the following screen appears. 1. Press the A/V Net button on the remote control. 1. Using the CURSOR PAD, set up another device? If the device responds, then it here 1. Select OK. (If the Transmission Test ... Not Setup Not Setup Not Setup Not Setup EXIT SEL Select 1. Follow the steps below ). Press the SELECT button on the remote control. 1. Congratulations! See Remote Control AV NET button usage on page 24. 2. DVD DVD2 VCR VCR2 AV Receiver POWER MENU HOME Move SEL Select PV Recorder...
... press the SELECT button on the left appears, then goes back to finish and the following screen appears. 1. Press the A/V Net button on the remote control. 1. Using the CURSOR PAD, set up another device? If the device responds, then it here 1. Select OK. (If the Transmission Test ... Not Setup Not Setup Not Setup Not Setup EXIT SEL Select 1. Follow the steps below ). Press the SELECT button on the remote control. 1. Congratulations! See Remote Control AV NET button usage on page 24. 2. DVD DVD2 VCR VCR2 AV Receiver POWER MENU HOME Move SEL Select PV Recorder...
Owners Guide
Page 24
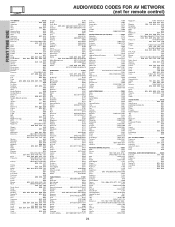
AUDIO/VIDEO CODES FOR AV NETWORK (not for remote control) FIRST TIME USE VCR BRAND CODE Admiral 0048, 0209...Video 0432 GoldStar 0037, 0038, 1237 Gradiente 0000 HI-Q 0047 Harley Davidson 0000 Harman/Kardon 0038, 0081 Harwood 0072 Hitachi 0000, 0041, 0042 Hughes Network Systems 0042 JVC 0067, 0041 Jensen 0041 KEC 0037, 0278 KLH 0072 Kenwood ...1109 DishPro 1005, 0775 Echostar 1005, 0775 Expressvu 0775 GE 0566 GOI 0775 General Instrument 0869 HTS 0775 Hitachi 0819 Hughes Network Systems 1142, 0749, 1749 JVC 0775 Magnavox 0724, 0722 Memorex 0724 Mitsubishi 0749 Motorola...
AUDIO/VIDEO CODES FOR AV NETWORK (not for remote control) FIRST TIME USE VCR BRAND CODE Admiral 0048, 0209...Video 0432 GoldStar 0037, 0038, 1237 Gradiente 0000 HI-Q 0047 Harley Davidson 0000 Harman/Kardon 0038, 0081 Harwood 0072 Hitachi 0000, 0041, 0042 Hughes Network Systems 0042 JVC 0067, 0041 Jensen 0041 KEC 0037, 0278 KLH 0072 Kenwood ...1109 DishPro 1005, 0775 Echostar 1005, 0775 Expressvu 0775 GE 0566 GOI 0775 General Instrument 0869 HTS 0775 Hitachi 0819 Hughes Network Systems 1142, 0749, 1749 JVC 0775 Magnavox 0724, 0722 Memorex 0724 Mitsubishi 0749 Motorola...
Owners Guide
Page 27
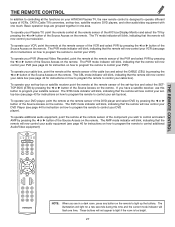
... SETTOP-BOX (STB) by pressing the ̇ or ̈ button of the Source Access on the remote. THE REMOTE CONTROL THE REMOTE CONTROL In addition to controlling all the functions on your HITACHI Plasma TV, the new remote control is too bright. 27 The TV mode indicator will blink, indicating that the... remote will now control your television. If you wish to control and select AMP by pressing the ̇ or ̈ ...
... SETTOP-BOX (STB) by pressing the ̇ or ̈ button of the Source Access on the remote. THE REMOTE CONTROL THE REMOTE CONTROL In addition to controlling all the functions on your HITACHI Plasma TV, the new remote control is too bright. 27 The TV mode indicator will blink, indicating that the... remote will now control your television. If you wish to control and select AMP by pressing the ̇ or ̈ ...

Owners Guide
Page 28
...; ባ ቤ ብ ቦ ቧ ቩ ቨ ቯ ቪ A/V NET ቭ ቮ ቫ ቱ GUIDE ተ ቲ ታ ታ ቴ ት THE REMOTE CONTROL ቢ POWER button Press this button while entering your device code to motion. Press the PAUSE button repeatedly to cycle through the three different... mode. ብ SOURCE ACCESS (ENT) button Hold down this button to turn the TV set on or off when the remote is in an optional Input access feature (see page 47). ቦ PAUSE button Press the PAUSE button to freeze the picture. ...
...; ባ ቤ ብ ቦ ቧ ቩ ቨ ቯ ቪ A/V NET ቭ ቮ ቫ ቱ GUIDE ተ ቲ ታ ታ ቴ ት THE REMOTE CONTROL ቢ POWER button Press this button while entering your device code to motion. Press the PAUSE button repeatedly to cycle through the three different... mode. ብ SOURCE ACCESS (ENT) button Hold down this button to turn the TV set on or off when the remote is in an optional Input access feature (see page 47). ቦ PAUSE button Press the PAUSE button to freeze the picture. ...

Owners Guide
Page 29
...can be missing. 29 Lack of information can be seen in 16:9 aspect. (1) NTSC/480i/480P Input 4:3 INPUT 4:3 STANDARD 4:3 EXPANDED 4:3 ZOOM1 THE REMOTE CONTROL 16:9 ZOOM (2) 480i/480P Input 16:9 INPUT 4:3 STANDARD 16:9 STANDARD 4:3 EXPANDED 4:3 ZOOM2 4:3 ZOOM1 16:9 ZOOM (3) 720P/1080i Input 16...through the following options. 4:3 STANDARD Use this aspect mode to quickly change the picture format ASPECT ratio. HOW TO USE THE REMOTE TO CONTROL YOUR PLASMA TV ቧ ASPECT button Press this button to display conventional (4:3) images. Depending on conventional (4:3) sources....
...can be missing. 29 Lack of information can be seen in 16:9 aspect. (1) NTSC/480i/480P Input 4:3 INPUT 4:3 STANDARD 4:3 EXPANDED 4:3 ZOOM1 THE REMOTE CONTROL 16:9 ZOOM (2) 480i/480P Input 16:9 INPUT 4:3 STANDARD 16:9 STANDARD 4:3 EXPANDED 4:3 ZOOM2 4:3 ZOOM1 16:9 ZOOM (3) 720P/1080i Input 16...through the following options. 4:3 STANDARD Use this aspect mode to quickly change the picture format ASPECT ratio. HOW TO USE THE REMOTE TO CONTROL YOUR PLASMA TV ቧ ASPECT button Press this button to display conventional (4:3) images. Depending on conventional (4:3) sources....
Owners Guide
Page 30
... (example: KPBS-HD). Press the CURSOR PAD toward desired direction and press the SELECT button to compete with room light. HOW TO USE THE REMOTE TO CONTROL YOUR PLASMA TV ቨ DAY/NIGHT button Press this button to display available program information. NOTE: For automatic DAY/NIGHT picture mode...of choice. Select Night for night time viewing with more detailed picture (see Auto Channel Scan on pages 39-40 for settings changes). THE REMOTE CONTROL 30 Press the GUIDE button again to return to toggle between Day and Night picture mode settings. The CURSOR PAD will start the ...
... (example: KPBS-HD). Press the CURSOR PAD toward desired direction and press the SELECT button to compete with room light. HOW TO USE THE REMOTE TO CONTROL YOUR PLASMA TV ቨ DAY/NIGHT button Press this button to display available program information. NOTE: For automatic DAY/NIGHT picture mode...of choice. Select Night for night time viewing with more detailed picture (see Auto Channel Scan on pages 39-40 for settings changes). THE REMOTE CONTROL 30 Press the GUIDE button again to return to toggle between Day and Night picture mode settings. The CURSOR PAD will start the ...
Owners Guide
Page 31
...̄ VOL ̆ Inputs: SOURCE1 SOURCE2 SOURCE3 SOURCE4 SOURCE5 SOURCE6 SOURCE7 SOURCE8 Move SEL Select ORIGINAL MENU OF EQUIPMENT Move AV NET Return THE REMOTE CONTROL PV Recorder Cable Box Set Top Box Custom Device Setup POWER CH ̄ CH ̆ MENU TV/VCR INFO GUIDE MORE Move SEL ...Select MORE.. The window will replace the first device. 31 Devices will be replaced with the Plasma TV's remote control. The AV Net allows the user to start. The Custom option only accepts one device at a time. Select Device Setup to control ...
...̄ VOL ̆ Inputs: SOURCE1 SOURCE2 SOURCE3 SOURCE4 SOURCE5 SOURCE6 SOURCE7 SOURCE8 Move SEL Select ORIGINAL MENU OF EQUIPMENT Move AV NET Return THE REMOTE CONTROL PV Recorder Cable Box Set Top Box Custom Device Setup POWER CH ̄ CH ̆ MENU TV/VCR INFO GUIDE MORE Move SEL ...Select MORE.. The window will replace the first device. 31 Devices will be replaced with the Plasma TV's remote control. The AV Net allows the user to start. The Custom option only accepts one device at a time. Select Device Setup to control ...
Owners Guide
Page 32
...user to learn , press the SELECT button. Press A/V NET button on OSD, then press the MENU button of the Plasma TV remote control. Move SEL Next Step HITACHI AV NET WIZARD (Learning) Select the VCR3 softkey to use CURSOR PAD and EXIT button of 1 to select Setup, press the ...SELECT button. Select TV Softkeys to continue. Try again? THE REMOTE CONTROL Transfer was successfull Press OK to learn ? BACK Move OK SEL Select NOTES: 1. HITACHI AV NET WIZARD (Learning) Press and hold the ̈̈ button of the VCR...
...user to learn , press the SELECT button. Press A/V NET button on OSD, then press the MENU button of the Plasma TV remote control. Move SEL Next Step HITACHI AV NET WIZARD (Learning) Select the VCR3 softkey to use CURSOR PAD and EXIT button of 1 to select Setup, press the ...SELECT button. Select TV Softkeys to continue. Try again? THE REMOTE CONTROL Transfer was successfull Press OK to learn ? BACK Move OK SEL Select NOTES: 1. HITACHI AV NET WIZARD (Learning) Press and hold the ̈̈ button of the VCR...
Owners Guide
Page 33
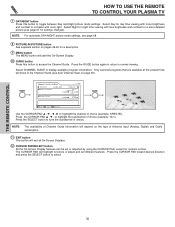
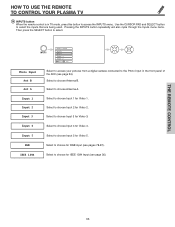
... CONTROL YOUR PLASMA TV ተ INPUTS button When the remote control is in the front panel of the AVC (see pages 78-87). Photo Input Ant B Ant A Input 1 Input 2 Input 3 Input 4 Input 5 RGB IEEE 1394 ...Photo Input Ant B Ant A Input 1 Input 2 Move SEL Sel. Select to access the INPUTS menu. THE REMOTE CONTROL 33 Select to choose for Video 3. Select to choose Input 3 for RGB input (see page 34). Select to choose Antenna B. Select to select the...
... CONTROL YOUR PLASMA TV ተ INPUTS button When the remote control is in the front panel of the AVC (see pages 78-87). Photo Input Ant B Ant A Input 1 Input 2 Input 3 Input 4 Input 5 RGB IEEE 1394 ...Photo Input Ant B Ant A Input 1 Input 2 Move SEL Sel. Select to access the INPUTS menu. THE REMOTE CONTROL 33 Select to choose for Video 3. Select to choose Input 3 for RGB input (see page 34). Select to choose Antenna B. Select to select the...

Owners Guide
Page 34
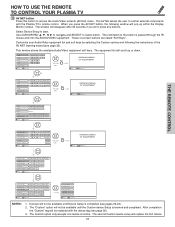
...digital Photos that can be displayed is fully loaded. Please wait 1 or 2 minutes before checking your Photo Input connections. 8. HOW TO USE THE REMOTE TO CONTROL YOUR PLASMA TV PHOTO INPUT This feature is useful for more than 3 minutes. 2. Jump Slideshow Rotate Jump 7 0 Please Enter Picture Number... "Input device not detected" if the digital camera's large capacity memory is 999. 3. Photo Input Ant B Ant A Input 1 Input 2 THE REMOTE CONTROL No. 7/10 03/04/03 1632x1232 Vacation Picture No. Digital photos recorded on a DVD-RAM disc may not work with this Photo Input. 5.
...digital Photos that can be displayed is fully loaded. Please wait 1 or 2 minutes before checking your Photo Input connections. 8. HOW TO USE THE REMOTE TO CONTROL YOUR PLASMA TV PHOTO INPUT This feature is useful for more than 3 minutes. 2. Jump Slideshow Rotate Jump 7 0 Please Enter Picture Number... "Input device not detected" if the digital camera's large capacity memory is 999. 3. Photo Input Ant B Ant A Input 1 Input 2 THE REMOTE CONTROL No. 7/10 03/04/03 1632x1232 Vacation Picture No. Digital photos recorded on a DVD-RAM disc may not work with this Photo Input. 5.

Owners Guide
Page 35
...a "dcim" file name format. 3. ROTATE Select this menu item to start a slideshow of the slideshow. Jump Slideshow Rotate Rotate 1/10 THE REMOTE CONTROL 1/10 1/10 NOTES: 1. Automatic contrast reduction also applies during SLIDESHOW, then press any button to 8th: numbers. ABCD1234.jpg). 1st character... should be 8 characters (Ex. Each press will resume, or press SELECT again to continue the slideshow. HOW TO USE THE REMOTE TO CONTROL YOUR PLASMA TV SLIDESHOW Select this menu item to rotate selected photos either clockwise (CURSOR PAD ̈) and counterclockwise (...
...a "dcim" file name format. 3. ROTATE Select this menu item to start a slideshow of the slideshow. Jump Slideshow Rotate Rotate 1/10 THE REMOTE CONTROL 1/10 1/10 NOTES: 1. Automatic contrast reduction also applies during SLIDESHOW, then press any button to 8th: numbers. ABCD1234.jpg). 1st character... should be 8 characters (Ex. Each press will resume, or press SELECT again to continue the slideshow. HOW TO USE THE REMOTE TO CONTROL YOUR PLASMA TV SLIDESHOW Select this menu item to rotate selected photos either clockwise (CURSOR PAD ̈) and counterclockwise (...

Owners Guide
Page 36
... available when DVHS is not compatible with other manufacturers devices should be brought to power on CURSOR PAD to select D-VHS operation. THE REMOTE CONTROL HOW TO USE THE REMOTE TO CONTROL YOUR PLASMA TV IEEE1394 Use this TV. Use CURSOR PAD cursors to highlight POWER. The digital device will be used.
... available when DVHS is not compatible with other manufacturers devices should be brought to power on CURSOR PAD to select D-VHS operation. THE REMOTE CONTROL HOW TO USE THE REMOTE TO CONTROL YOUR PLASMA TV IEEE1394 Use this TV. Use CURSOR PAD cursors to highlight POWER. The digital device will be used.


