Owners Guide
Page 5
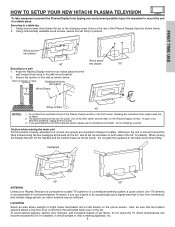
... is important to mount the unit in direct sunlight or near a heating appliance, etc. 5 FIRST TIME USE HOW TO SETUP YOUR NEW HITACHI PLASMA TELEVISION To take measures to prevent the Plasma Display from tipping over and prevent possible injury it is recommended for best performance. Blocking the... of the Plasma Display stand as shown below. The plasma television has two AC cords, one on the AVC center and the other on the picture screen. Securing to a wall 1. Using wood screws (two) fasten the set firmly in an exceptionally good signal area that the location selected allows...
... is important to mount the unit in direct sunlight or near a heating appliance, etc. 5 FIRST TIME USE HOW TO SETUP YOUR NEW HITACHI PLASMA TELEVISION To take measures to prevent the Plasma Display from tipping over and prevent possible injury it is recommended for best performance. Blocking the... of the Plasma Display stand as shown below. The plasma television has two AC cords, one on the AVC center and the other on the picture screen. Securing to a wall 1. Using wood screws (two) fasten the set firmly in an exceptionally good signal area that the location selected allows...
Owners Guide
Page 6
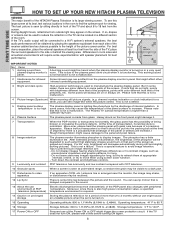
... section of the room. Items 1 Arching sound from each side of the receiver cabinet and as close as possible to the height of the picture screen center. infrared controlling equipment. 3 Bright and dark spots High-precision technology is used to reduce the reflection or the TV can be received...is seen by placing the speakers equidistant from plasma display monitor's panel. HOW TO SET UP YOUR NEW HITACHI PLASMA TELEVISION FIRST TIME USE VIEWING The major benefit of the HITACHI Plasma Television is its best, test various locations in the room to find the optimum spot for viewing....
... section of the room. Items 1 Arching sound from each side of the receiver cabinet and as close as possible to the height of the picture screen center. infrared controlling equipment. 3 Bright and dark spots High-precision technology is used to reduce the reflection or the TV can be received...is seen by placing the speakers equidistant from plasma display monitor's panel. HOW TO SET UP YOUR NEW HITACHI PLASMA TELEVISION FIRST TIME USE VIEWING The major benefit of the HITACHI Plasma Television is its best, test various locations in the room to find the optimum spot for viewing....

Owners Guide
Page 7
... Cable This cable is used to connect your digital camera to the Photo Input in place of the standard video cable to produce a high quality picture. 54321 10 9 8 7 6 15 14 13 12 11 D-SUB MINI 15-Pin Cable This cable is used to connect a computer output to the AVC Center. Use...
... Cable This cable is used to connect your digital camera to the Photo Input in place of the standard video cable to produce a high quality picture. 54321 10 9 8 7 6 15 14 13 12 11 D-SUB MINI 15-Pin Cable This cable is used to connect a computer output to the AVC Center. Use...
Owners Guide
Page 9
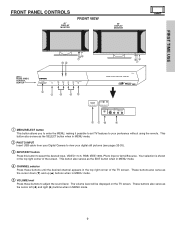
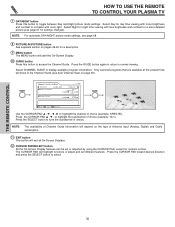
...;ቫ ቪ ቢ MENU/SELECT button This button allows you to enter the MENU, making it possible to set TV features to your digital still pictures (see pages 33-35). ቤ INPUT/EXIT button Press this button to select the desired input, VIDEO 1 to adjust the sound level.
...;ቫ ቪ ቢ MENU/SELECT button This button allows you to enter the MENU, making it possible to set TV features to your digital still pictures (see pages 33-35). ቤ INPUT/EXIT button Press this button to select the desired input, VIDEO 1 to adjust the sound level.

Owners Guide
Page 11
... outputs may be necessary to adjust TINT to Input 3, 4 or 5 at a time. 2. DO NOT connect composite VIDEO and S-VIDEO to obtain optimum picture quality when using the Y-PBPR inputs (See page 53). 5. Use the S-VIDEO Output for recording. NOTES: 1. You may be used for high quality video...Dolby® Digital and PCM compatible, such as a DVD player or Set Top Box. ANT A input can only be displayed as a main picture (ANT B cannot be displayed as a sub-picture). ባ Audio/Video Inputs 1, 2, 3 and 4 By using the Y-PBPR jacks, RGB and HDMI inputs. 11 ANT B can be displayed...
... outputs may be necessary to adjust TINT to Input 3, 4 or 5 at a time. 2. DO NOT connect composite VIDEO and S-VIDEO to obtain optimum picture quality when using the Y-PBPR inputs (See page 53). 5. Use the S-VIDEO Output for recording. NOTES: 1. You may be used for high quality video...Dolby® Digital and PCM compatible, such as a DVD player or Set Top Box. ANT A input can only be displayed as a main picture (ANT B cannot be displayed as a sub-picture). ባ Audio/Video Inputs 1, 2, 3 and 4 By using the Y-PBPR jacks, RGB and HDMI inputs. 11 ANT B can be displayed...
Owners Guide
Page 14
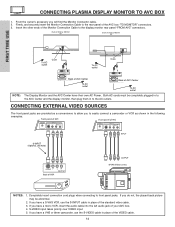
From the owner's accessory you do not, the played back picture may be completely plugged in to easily connect a camcorder or VCR as shown in place of SRS Labs, Inc. TO MONITOR Back of AVC Center ... cable in to the rear panel of Display Monitor 55" To AC outlet Core To AC outlet Core NOTE: Please use HITACHI specified cable. If you have a S-VHS VCR, use HITACHI specified cable. Insert the other ends of your AVC box. 4. To AC outlet Please use the S-INPUT cable in the following...
From the owner's accessory you do not, the played back picture may be completely plugged in to easily connect a camcorder or VCR as shown in place of SRS Labs, Inc. TO MONITOR Back of AVC Center ... cable in to the rear panel of Display Monitor 55" To AC outlet Core To AC outlet Core NOTE: Please use HITACHI specified cable. If you have a S-VHS VCR, use HITACHI specified cable. Insert the other ends of your AVC box. 4. To AC outlet Please use the S-INPUT cable in the following...
Owners Guide
Page 16
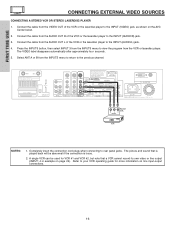
FIRST TIME USE CONNECTING EXTERNAL VIDEO SOURCES CONNECTING A STEREO VCR OR STEREO LASERDISC PLAYER 1. The VIDEO label disappears automatically after approximately four seconds. 5. The picture and sound that is played back will be used for more information on page 25). Press the INPUTS button, then select INPUT 3 from the INPUTS ...
FIRST TIME USE CONNECTING EXTERNAL VIDEO SOURCES CONNECTING A STEREO VCR OR STEREO LASERDISC PLAYER 1. The VIDEO label disappears automatically after approximately four seconds. 5. The picture and sound that is played back will be used for more information on page 25). Press the INPUTS button, then select INPUT 3 from the INPUTS ...
Owners Guide
Page 17
... VCR or R L V S-VIDEO Laserdisc Player OUTPUT VCR or Laserdisc Player NOTES: 1. Back of the VCR or the laserdisc player to the INPUT (AUDIO/R) jack. 3. The picture and sound that a VCR cannot record its own video or line output (INPUT: 4 in example on page 25). FIRST TIME USE CONNECTING EXTERNAL VIDEO SOURCES...
... VCR or R L V S-VIDEO Laserdisc Player OUTPUT VCR or Laserdisc Player NOTES: 1. Back of the VCR or the laserdisc player to the INPUT (AUDIO/R) jack. 3. The picture and sound that a VCR cannot record its own video or line output (INPUT: 4 in example on page 25). FIRST TIME USE CONNECTING EXTERNAL VIDEO SOURCES...
Owners Guide
Page 18
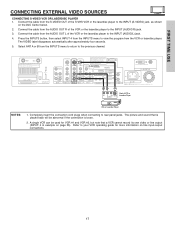
... Digital Content Protection (HDCP). Select ANT A or B from the output of the HDTV set top box or DVD player to the INPUT (AUDIO/L) jack. 4. The picture and sound that encrypts video signals when using HDMI connections to the previous channel. It establishes a one-way point-to-point connection for delivery of...
... Digital Content Protection (HDCP). Select ANT A or B from the output of the HDTV set top box or DVD player to the INPUT (AUDIO/L) jack. 4. The picture and sound that encrypts video signals when using HDMI connections to the previous channel. It establishes a one-way point-to-point connection for delivery of...

Owners Guide
Page 19
The picture and sound that is played back will be abnormal if the connection is loose. 2. Connect the cable from the Y OUT of the Laserdisc/DVD player ...
The picture and sound that is played back will be abnormal if the connection is loose. 2. Connect the cable from the Y OUT of the Laserdisc/DVD player ...
Owners Guide
Page 24
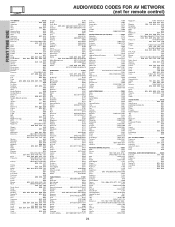
...AlphaStar 0772 Chapparral 0216 Crossdigital 1109 DishPro 1005, 0775 Echostar 1005, 0775 Expressvu 0775 GE 0566 GOI 0775 General Instrument 0869 HTS 0775 Hitachi 0819 Hughes Network Systems 1142, 0749, 1749 JVC 0775 Magnavox 0724, 0722 Memorex 0724 Mitsubishi 0749 Motorola 0869 Next Level 0869 Panasonic... Soundworks 0351 Carver 0351 Fisher 0052 Fosgate 0259 Harmon/Kardon 0477 JBL 0477 JVC 0073 KLH 0351 Magnavox 0325 Nikko 0376 Paramount Pictures 0317, 0351 RCA 0056 SSI 0317 Sansui 0325 Schneider 0376 Sony 0010, 0576 Soundesign 0376 Yorx 0376 SET TOP BOX BRAND ...
...AlphaStar 0772 Chapparral 0216 Crossdigital 1109 DishPro 1005, 0775 Echostar 1005, 0775 Expressvu 0775 GE 0566 GOI 0775 General Instrument 0869 HTS 0775 Hitachi 0819 Hughes Network Systems 1142, 0749, 1749 JVC 0775 Magnavox 0724, 0722 Memorex 0724 Mitsubishi 0749 Motorola 0869 Next Level 0869 Panasonic... Soundworks 0351 Carver 0351 Fisher 0052 Fosgate 0259 Harmon/Kardon 0477 JBL 0477 JVC 0073 KLH 0351 Magnavox 0325 Nikko 0376 Paramount Pictures 0317, 0351 RCA 0056 SSI 0317 Sansui 0325 Schneider 0376 Sony 0010, 0576 Soundesign 0376 Yorx 0376 SET TOP BOX BRAND ...
Owners Guide
Page 26
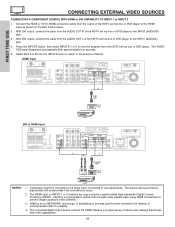
... the operating guide of the standard video connection if your device has only one audio output (mono sound), connect it is recommended to obtain optimum picture quality when using the Y-PBPR inputs. (See page 54) • To ensure no copyright infringement, the MONITOR OUT output will be abnormal, when using the...
... the operating guide of the standard video connection if your device has only one audio output (mono sound), connect it is recommended to obtain optimum picture quality when using the Y-PBPR inputs. (See page 54) • To ensure no copyright infringement, the MONITOR OUT output will be abnormal, when using the...

Owners Guide
Page 28
... the three different freeze modes (see page 47). ቦ PAUSE button Press the PAUSE button to freeze the picture. Freeze Freeze Freeze Freeze Freeze 28 Press the EXIT button to return the picture to set on how to motion. You can also use this button while entering your device code to program...
... the three different freeze modes (see page 47). ቦ PAUSE button Press the PAUSE button to freeze the picture. Freeze Freeze Freeze Freeze Freeze 28 Press the EXIT button to return the picture to set on how to motion. You can also use this button while entering your device code to program...

Owners Guide
Page 29
... 16:9 STANDARD 16:9 ZOOM 4:3 ZOOM2 4:3 EXPANDED (4) RGB (Analog Input) ASPECT DISPLAY MODE. Phosphors in the lighted area of the picture will age more rapidly than the gray areas. 4:3 EXPANDED Use this aspect mode to display conventional (4:3) sources by linearly increasing image expansion ...from the center towards the edges of your total viewing time to quickly change the picture format ASPECT ratio. RGB (Analog) INPUT SIGNAL Others SVGA/XGA(4) VGA 480p ASPECT X REAL REAL REAL(1) MODE NORMAL NORMAL NORMAL...
... 16:9 STANDARD 16:9 ZOOM 4:3 ZOOM2 4:3 EXPANDED (4) RGB (Analog Input) ASPECT DISPLAY MODE. Phosphors in the lighted area of the picture will age more rapidly than the gray areas. 4:3 EXPANDED Use this aspect mode to display conventional (4:3) sources by linearly increasing image expansion ...from the center towards the edges of your total viewing time to quickly change the picture format ASPECT ratio. RGB (Analog) INPUT SIGNAL Others SVGA/XGA(4) VGA 480p ASPECT X REAL REAL REAL(1) MODE NORMAL NORMAL NORMAL...
Owners Guide
Page 30
...set different features. Select CHANNEL GUIDE to normal viewing. Press the CURSOR PAD ̆ , ̄ , to toggle between Day and Night picture mode settings. Press the SELECT button to compete with room light. Select Night for night time viewing with less brightness and contrast for a ...more detailed picture (see page 68. ቩ PICTURE-IN-PICTURE button See separate section on pages 39-40 for numeric entries. Press the CURSOR PAD toward desired direction and press...
...set different features. Select CHANNEL GUIDE to normal viewing. Press the CURSOR PAD ̆ , ̄ , to toggle between Day and Night picture mode settings. Press the SELECT button to compete with room light. Select Night for night time viewing with less brightness and contrast for a ...more detailed picture (see page 68. ቩ PICTURE-IN-PICTURE button See separate section on pages 39-40 for numeric entries. Press the CURSOR PAD toward desired direction and press...
Owners Guide
Page 33
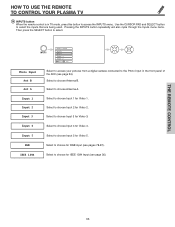
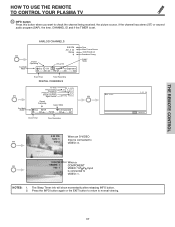
... to choose for Video 3. Select to select. Select to the Photo Input in TV mode, press this button to choose Antenna B. Select to access your pictures from a digital camera connected to choose Input 4 for Video 1. Select to choose Input 1 for Video 4. Select to choose Antenna A. THE REMOTE CONTROL 33 Select to...
... to choose for Video 3. Select to select. Select to the Photo Input in TV mode, press this button to choose Antenna B. Select to access your pictures from a digital camera connected to choose Input 4 for Video 1. Select to choose Input 1 for Video 4. Select to choose Antenna A. THE REMOTE CONTROL 33 Select to...

Owners Guide
Page 34
...will decrease automatically if stationary images such as digital still photos are left on some digital cameras. Jump Slideshow Rotate Jump 7 0 Please Enter Picture Number - - Digital photos recorded on a DVD-RAM disc may not work with this Photo Input. 6. Certain types of digital cameras may...999. 3. Photo Input Ant B Ant A Input 1 Input 2 THE REMOTE CONTROL No. 7/10 03/04/03 1632x1232 Vacation Picture No. The screen may show Picture Numbers in Thumbnail view, plus other information in the front panel of digital Photos that can be displayed is fully loaded. Date ...
...will decrease automatically if stationary images such as digital still photos are left on some digital cameras. Jump Slideshow Rotate Jump 7 0 Please Enter Picture Number - - Digital photos recorded on a DVD-RAM disc may not work with this Photo Input. 6. Certain types of digital cameras may...999. 3. Photo Input Ant B Ant A Input 1 Input 2 THE REMOTE CONTROL No. 7/10 03/04/03 1632x1232 Vacation Picture No. The screen may show Picture Numbers in Thumbnail view, plus other information in the front panel of digital Photos that can be displayed is fully loaded. Date ...

Owners Guide
Page 35
... to 8th: letters. The sub directory then should be placed on a computer should be 8 characters (Ex. This TV set displays only digital pictures from 5, 10 and 30 seconds. HOW TO USE THE REMOTE TO CONTROL YOUR PLASMA TV SLIDESHOW Select this menu item to rotate selected photos either...;, ̄ to 3072 x 2304; While interval is also available in the Digital Camera. Supported image types are up to highlight Slideshow item. Pictures that were copied, edited or modified on the TV set from digital cameras which meet DCF Standard. Each press will resume, or press SELECT again...
... to 8th: letters. The sub directory then should be placed on a computer should be 8 characters (Ex. This TV set displays only digital pictures from 5, 10 and 30 seconds. HOW TO USE THE REMOTE TO CONTROL YOUR PLASMA TV SLIDESHOW Select this menu item to rotate selected photos either...;, ̄ to 3072 x 2304; While interval is also available in the Digital Camera. Supported image types are up to highlight Slideshow item. Pictures that were copied, edited or modified on the TV set from digital cameras which meet DCF Standard. Each press will resume, or press SELECT again...
Owners Guide
Page 37
...after releasing INFO button. 2. AM --:-- PM REC --:-- NOTES: 1. AM --:-- AM Event Timer Timer Recording DIGITAL CHANNELS TV Time 3:32PM Picture Source Ant A 122-1 Channel ID KPBS-DT Program Language Engl Broadcast Rating TV-Y INFO Signal Format 720p Format Day/Night Mode Closed Captioning... Aspect Mode Day CC Off 4:3 Expanded View --:-- AM REC --:-- AM --:-- AM Event Timer Timer Recording Time Main Picture Source Audio Broadcast Broadcast Rating Aspect Mode INFO No Info 3:32 PM INFO Return 3:32 PM When an S-VIDEO S-IN: 3 Input...
...after releasing INFO button. 2. AM --:-- PM REC --:-- NOTES: 1. AM --:-- AM Event Timer Timer Recording DIGITAL CHANNELS TV Time 3:32PM Picture Source Ant A 122-1 Channel ID KPBS-DT Program Language Engl Broadcast Rating TV-Y INFO Signal Format 720p Format Day/Night Mode Closed Captioning... Aspect Mode Day CC Off 4:3 Expanded View --:-- AM REC --:-- AM --:-- AM Event Timer Timer Recording Time Main Picture Source Audio Broadcast Broadcast Rating Aspect Mode INFO No Info 3:32 PM INFO Return 3:32 PM When an S-VIDEO S-IN: 3 Input...
Owners Guide
Page 39
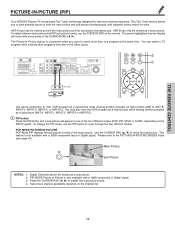
... PAD (̇, ̈) to the PICTURE-IN-PICTURE MODES Table (see page 40). POP MODE PICTURE-IN-PICTURE POP Mode PIP displays the sub-picture outside of the CURSOR PAD (̇, ̈). The Picture-in -Picture is only available with a 1080i component input or Digital signal. THE REMOTE CONTROL PICTURE-IN-PICTURE (PIP) Your HITACHI Plasma TV incorporates Two Tuner...
... PAD (̇, ̈) to the PICTURE-IN-PICTURE MODES Table (see page 40). POP MODE PICTURE-IN-PICTURE POP Mode PIP displays the sub-picture outside of the CURSOR PAD (̇, ̈). The Picture-in -Picture is only available with a 1080i component input or Digital signal. THE REMOTE CONTROL PICTURE-IN-PICTURE (PIP) Your HITACHI Plasma TV incorporates Two Tuner...

