Owners Guide
Page 2
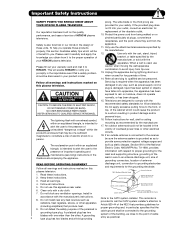
... you operate these units. Do not block any heat sources such as power-supply cord or plug is required when the apparatus has been damaged in any way, such as provided to call the CATV system installer's attention to an antenna discharge unit, size of grounding connectors, location of HITACHI plasma televisions. Install in wire to radiators, heat registers, stoves, or other apparatus...
... you operate these units. Do not block any heat sources such as power-supply cord or plug is required when the apparatus has been damaged in any way, such as provided to call the CATV system installer's attention to an antenna discharge unit, size of grounding connectors, location of HITACHI plasma televisions. Install in wire to radiators, heat registers, stoves, or other apparatus...
Owners Guide
Page 3
... interactive digital cable services such as video games, stock market quotations, computer generated graphics, and other sources, may require the use the plasma television's (polarized) plug with paragraph 15.119 and 15.122 of screen damages Continuous on-screen displays such as video-on the television. Prevention of the FCC rules. Dispose of the plasma television. Caution Adjust only those controls that any changes or modifications made to view encrypted digital programming. Modifications...
... interactive digital cable services such as video games, stock market quotations, computer generated graphics, and other sources, may require the use the plasma television's (polarized) plug with paragraph 15.119 and 15.122 of screen damages Continuous on-screen displays such as video-on the television. Prevention of the FCC rules. Dispose of the plasma television. Caution Adjust only those controls that any changes or modifications made to view encrypted digital programming. Modifications...
Owners Guide
Page 5
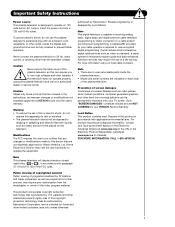
... (12 inches) from the wall except when mounted using the wall mount bracket. 2. C D NOTE: The Table Top Stand and Power Swivel cable for model 55HDS52 are required to transport it safely. Using wood screws (two) fasten the set . Wood screw two places Securing to the wall as shown in position. Secure the television to a Wall 1. A B LOCATION Select an area where sunlight or bright indoor illumination will not be used , the Plasma television should be...
... (12 inches) from the wall except when mounted using the wall mount bracket. 2. C D NOTE: The Table Top Stand and Power Swivel cable for model 55HDS52 are required to transport it safely. Using wood screws (two) fasten the set . Wood screw two places Securing to the wall as shown in position. Secure the television to a Wall 1. A B LOCATION Select an area where sunlight or bright indoor illumination will not be used , the Plasma television should be...
Owners Guide
Page 8
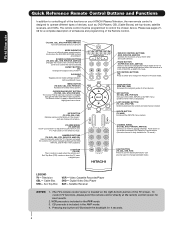
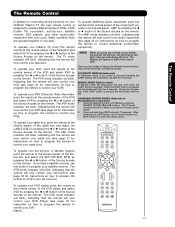
... mode of your HITACHI Plasma Television, the new remote control is used to change channel. To control TV functions, please point the remote control directly at the remote control sensor for 4 seconds. 8 Push down to control the device selected. Also used to adjust the audio level of the Remote Control. First time use the back light feature. PAUSE BUTTON (TV,PVR/VCR, DVD, AMP/CD) Press to operate different types of the TV screen. INPUTS BUTTON (TV, AMP) Accesses the INPUTS menu system. Television CBL - Digital Video...
... mode of your HITACHI Plasma Television, the new remote control is used to change channel. To control TV functions, please point the remote control directly at the remote control sensor for 4 seconds. 8 Push down to control the device selected. Also used to adjust the audio level of the Remote Control. First time use the back light feature. PAUSE BUTTON (TV,PVR/VCR, DVD, AMP/CD) Press to operate different types of the TV screen. INPUTS BUTTON (TV, AMP) Accesses the INPUTS menu system. Television CBL - Digital Video...
Owners Guide
Page 9
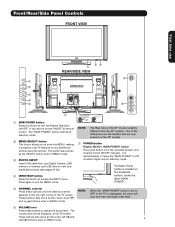
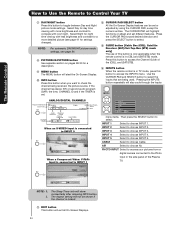
...). ብ INPUT/EXIT button Press this button to turn the Plasma Television ON/OFF. The volume level will stop and may eventually reset itself. ቧ VOLUME level Press these buttons until the desired channel appears in MENU mode. ቤ PHOTO INPUT Insert USB cable from the 42" models. Press again to the claw. NOTE: When the "MAIN POWER" button is set to OFF or the TV is for stand-by remote control. These buttons also...
...). ብ INPUT/EXIT button Press this button to turn the Plasma Television ON/OFF. The volume level will stop and may eventually reset itself. ቧ VOLUME level Press these buttons until the desired channel appears in MENU mode. ቤ PHOTO INPUT Insert USB cable from the 42" models. Press again to the claw. NOTE: When the "MAIN POWER" button is set to OFF or the TV is for stand-by remote control. These buttons also...
Owners Guide
Page 10
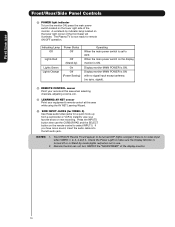
First time use Front/Rear/Side Panel Controls ቩ POWER light indicator To turn ON/OFF the "MAIN POWER" of the display monitor. 10 Indicating Lamp Power Status Off Off Lights Red Lights Green Lights Orange Off (Stand-by) On Off (Power Saving) Operating When the main power switch is ON. Display monitor MAIN POWER is set to OFF. Press the INPUTS button then use . 2. NOTES: 1. Check the Power Light to select INPUT 5. A red stand-by mode (lights red) when not in use the CURSOR PAD and the...
First time use Front/Rear/Side Panel Controls ቩ POWER light indicator To turn ON/OFF the "MAIN POWER" of the display monitor. 10 Indicating Lamp Power Status Off Off Lights Red Lights Green Lights Orange Off (Stand-by) On Off (Power Saving) Operating When the main power switch is ON. Display monitor MAIN POWER is set to OFF. Press the INPUTS button then use . 2. NOTES: 1. Check the Power Light to select INPUT 5. A red stand-by mode (lights red) when not in use the CURSOR PAD and the...
Owners Guide
Page 11
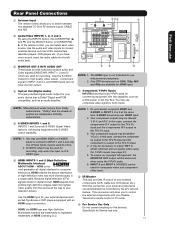
... HDMI - HDMI output connection. ቪ For Service Use Only HDMI, the HDMI logo and High-Definition Multimedia Interface are available for HDMI input. ብ Optical Out (Digital Audio) This jack provides Digital Audio Output for your external components can be necessary to adjust TINT to your Plasma Television's remote control in a single cable. Only DTV formats such as VCRs, camcorders, ቪ ቭ laserdisc players, DVD players etc. (if you can select each video source. S-VIDEO has priority over VIDEO input. 2. In this connection...
... HDMI - HDMI output connection. ቪ For Service Use Only HDMI, the HDMI logo and High-Definition Multimedia Interface are available for HDMI input. ብ Optical Out (Digital Audio) This jack provides Digital Audio Output for your external components can be necessary to adjust TINT to your Plasma Television's remote control in a single cable. Only DTV formats such as VCRs, camcorders, ቪ ቭ laserdisc players, DVD players etc. (if you can select each video source. S-VIDEO has priority over VIDEO input. 2. In this connection...
Owners Guide
Page 13
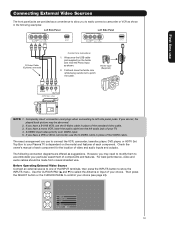
... the Antenna or Input of the INPUT terminals, then press the INPUTS button to show the INPUTS menu. First time use Connecting External Video Sources The front panel jacks are offered as shown in the following connection diagrams are provided as a convenience to allow you may be made from coaxial shielded wire. Wrap once the USB cable (not supplied) on the model and features of video and audio inputs and outputs. Fold and close the...
... the Antenna or Input of the INPUT terminals, then press the INPUTS button to show the INPUTS menu. First time use Connecting External Video Sources The front panel jacks are offered as shown in the following connection diagrams are provided as a convenience to allow you may be made from coaxial shielded wire. Wrap once the USB cable (not supplied) on the model and features of video and audio inputs and outputs. Fold and close the...
Owners Guide
Page 17
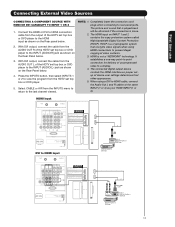
... the connection cord plugs when connecting to a display. 4. HDCP is a cryptographic system that is played back will be abnormal if the connection is not a "NETWORK" technology. The connected digital output device controls the HDMI interface so proper setup of HDTV Set-Top-Box or DVD Player HDTV Set-Top-Box or DVD Player 17 The HDMI input on the Rear panel below . 3. With DVI output, connect the cable from the AUDIO OUT R of uncompressed video to rear panel jacks. The picture and sound that encrypts video signals when using a DVI to the INPUT (AUDIO...
... the connection cord plugs when connecting to a display. 4. HDCP is a cryptographic system that is played back will be abnormal if the connection is not a "NETWORK" technology. The connected digital output device controls the HDMI interface so proper setup of HDTV Set-Top-Box or DVD Player HDTV Set-Top-Box or DVD Player 17 The HDMI input on the Rear panel below . 3. With DVI output, connect the cable from the AUDIO OUT R of uncompressed video to rear panel jacks. The picture and sound that encrypts video signals when using a DVI to the INPUT (AUDIO...
Owners Guide
Page 18
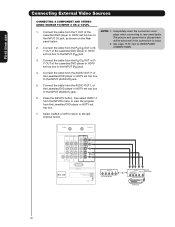
... connection cord Laserdisc/DVD player or HDTV set top box to plugs when connecting to view the program from the INPUTS menu to rear panel jacks. First time use Connecting External Video Sources CONNECTING A COMPONENT AND STEREO AUIDO SOURCE TO INPUT 3 OR 4: Y-PBPR. 1. See page 15 for tips on the Rear The picture and sound that is loose. 2. Press the INPUTS button, then select INPUT 4 from the Laserdisc/DVD player or HDTV set top box to the INPUT (AUDIO/L) jack. 6. Connect the cable from the Y OUT of the Laserdisc/DVD player...
... connection cord Laserdisc/DVD player or HDTV set top box to plugs when connecting to view the program from the INPUTS menu to rear panel jacks. First time use Connecting External Video Sources CONNECTING A COMPONENT AND STEREO AUIDO SOURCE TO INPUT 3 OR 4: Y-PBPR. 1. See page 15 for tips on the Rear The picture and sound that is loose. 2. Press the INPUTS button, then select INPUT 4 from the Laserdisc/DVD player or HDTV set top box to the INPUT (AUDIO/L) jack. 6. Connect the cable from the Y OUT of the Laserdisc/DVD player...
Owners Guide
Page 20
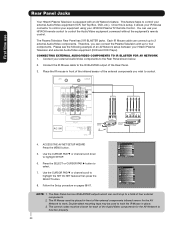
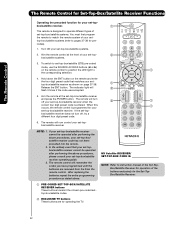
... using your HITACHI Plasma TV Remote Control. Therefore, you wish to select. 7. CONNECTING EXTERNAL AUDIO/VIDEO COMPONENTS TO IR BLASTER FOR AV NETWORK 1. Infrared Sensor IR Mouse V L R OUTPUT VCR Infrared Sensor OUTPUT Y PB/CB PR/CR R L DVD Player 4. Follow the Setup procedure on pages 58-67. Video Audio Channel Manager Locks Timers Setup Power Swivel Move SEL Select Setup Menu Preference Screen Saver Set The Inputs Set AV NET Set Closed Captions Set Monitor Out Upgrades Quick Start Up Move SEL Return NOTE: 1. Double-sided mounting...
... using your HITACHI Plasma TV Remote Control. Therefore, you wish to select. 7. CONNECTING EXTERNAL AUDIO/VIDEO COMPONENTS TO IR BLASTER FOR AV NETWORK 1. Infrared Sensor IR Mouse V L R OUTPUT VCR Infrared Sensor OUTPUT Y PB/CB PR/CR R L DVD Player 4. Follow the Setup procedure on pages 58-67. Video Audio Channel Manager Locks Timers Setup Power Swivel Move SEL Select Setup Menu Preference Screen Saver Set The Inputs Set AV NET Set Closed Captions Set Monitor Out Upgrades Quick Start Up Move SEL Return NOTE: 1. Double-sided mounting...
Owners Guide
Page 21
... DVD player). 21 The AMP mode indicator will blink, indicating that the remote will now control your television. The TV mode indicator will light a few seconds during this button to program your set-top-box or satellite receiver A/V NET point the remote at the remote sensor of the VCR and select PVR by using the SOURCE ACCESS ̇ and ̈ buttons. The TV mode indicator will blink, indicating that the remote will now control your audio...
... DVD player). 21 The AMP mode indicator will blink, indicating that the remote will now control your television. The TV mode indicator will light a few seconds during this button to program your set-top-box or satellite receiver A/V NET point the remote at the remote sensor of the VCR and select PVR by using the SOURCE ACCESS ̇ and ̈ buttons. The TV mode indicator will blink, indicating that the remote will now control your audio...
Owners Guide
Page 24
... time viewing with room light. Press the CURSOR PAD toward desired direction and press the SELECT button to select. ቯ GUIDE button [Cable Box (CBL), Satellite Receiver (SAT)/Set-Top-Box (STB) mode only] The use of the Plasma TV. INPUT 2 Select to choose INPUT 4. INPUT 4 Select to choose INPUT 2. The Sleep Timer info will also cycle through the Inputs ANALOG/DIGITAL CHANNELS Program Information Event Timer INFO Day/Night Mode No Info --:-- The Remote Control How to Use...
... time viewing with room light. Press the CURSOR PAD toward desired direction and press the SELECT button to select. ቯ GUIDE button [Cable Box (CBL), Satellite Receiver (SAT)/Set-Top-Box (STB) mode only] The use of the Plasma TV. INPUT 2 Select to choose INPUT 4. INPUT 4 Select to choose INPUT 2. The Sleep Timer info will also cycle through the Inputs ANALOG/DIGITAL CHANNELS Program Information Event Timer INFO Day/Night Mode No Info --:-- The Remote Control How to Use...
Owners Guide
Page 28
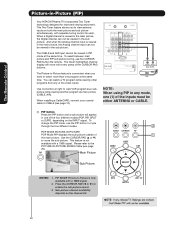
... Digital channel can watch more than one of the inputs must be viewed in any of the CURSOR PAD buttons. AUDIO OUT VIDEO OUT Back of VCR VCR NOTE: When using PIP in PIP mode at right to view antenna inputs on both the main picture and sub picture simultaneously, with a 1080i signal. Use the CURSOR PAD (̆ or ̄) to enable the sub-picture sound. 3. PIP MODE Picture-in -Picture (PIP) Your HITACHI Plasma TV incorporates Two Tuner...
... Digital channel can watch more than one of the inputs must be viewed in any of the CURSOR PAD buttons. AUDIO OUT VIDEO OUT Back of VCR VCR NOTE: When using PIP in PIP mode at right to view antenna inputs on both the main picture and sub picture simultaneously, with a 1080i signal. Use the CURSOR PAD (̆ or ̄) to enable the sub-picture sound. 3. PIP MODE Picture-in -Picture (PIP) Your HITACHI Plasma TV incorporates Two Tuner...
Owners Guide
Page 32
... set-top-box/satellite systems. You must first program the remote to match the remote system of your set -top- The remote will ባ flash 3 times if the code was accepted. 5. If your set-top-box/satellite receiver cannot be operated after performing the above procedures, please consult your set -top-box/satellite (STB) pre-coded mode, use the SOURCE ACCESS buttons (̇ or ̈) on the remote control to position the LED light...
... set-top-box/satellite systems. You must first program the remote to match the remote system of your set -top- The remote will ባ flash 3 times if the code was accepted. 5. If your set-top-box/satellite receiver cannot be operated after performing the above procedures, please consult your set -top-box/satellite (STB) pre-coded mode, use the SOURCE ACCESS buttons (̇ or ̈) on the remote control to position the LED light...
Owners Guide
Page 40
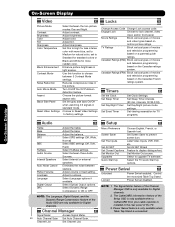
... Timer intervals (30 min. Select to lock channel, video input, and/or front panel. Select the TV Quick Start Up options. Control the motorized Table Top Stand Locked Power Swivel disabled. Adjust the bass. Select Dynamic Range Compression to prevent screen burn. Set Monitor Out source. NOTE: 1. Set this function to Standard for standard colors or Black and White for TV programs. On-Screen Display AudAiuodio Treble Bass Balance SRS BBE TruBass Audio Source Internal Speakers Auto Noise Cancel Perfect Volume...
... Timer intervals (30 min. Select to lock channel, video input, and/or front panel. Select the TV Quick Start Up options. Control the motorized Table Top Stand Locked Power Swivel disabled. Adjust the bass. Select Dynamic Range Compression to prevent screen burn. Set Monitor Out source. NOTE: 1. Set this function to Standard for standard colors or Black and White for TV programs. On-Screen Display AudAiuodio Treble Bass Balance SRS BBE TruBass Audio Source Internal Speakers Auto Noise Cancel Perfect Volume...
Owners Guide
Page 58
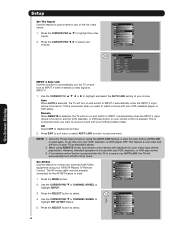
... AUTO LINK setting of the live video inputs. 1. This is convenient when you want to watch it detects a video signal to INPUT 4. 1. Once the TV has been turned on using the AUTO LINK feature, it must be reset before AUTO LINK is turned on and the VCR, laserdisc, or DVD play button. 3. Set AV Net Use this feature to control your external Audio/Video equipment using REMOTE mode, any of your VCR, laserdisc, or DVD player OFF. Video Audio Channel Manager Locks Timers Setup Power...
... AUTO LINK setting of the live video inputs. 1. This is convenient when you want to watch it detects a video signal to INPUT 4. 1. Once the TV has been turned on using the AUTO LINK feature, it must be reset before AUTO LINK is turned on and the VCR, laserdisc, or DVD play button. 3. Set AV Net Use this feature to control your external Audio/Video equipment using REMOTE mode, any of your VCR, laserdisc, or DVD player OFF. Video Audio Channel Manager Locks Timers Setup Power...
Owners Guide
Page 69
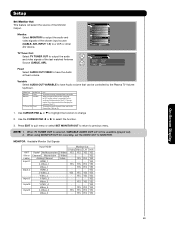
...-Screen Display 69 Setup Menu Preference Screen Saver Set The Inputs Set AV NET Set Closed Captions Set Monitor Out Upgrades Set Stand-by Mode Move SEL Select TV Tuner Out: Select TV TUNER OUT to change 2. When an external device like a monitor or Hi-Fi audio system is selected, VARIABLE AUDIO OUT will select the source of the TV. Use CURSOR PAD ̆ or ̄ to highlight the function to output the audio Setup Set Monitor Out and video signals of the last watched Antenna OR Video...
...-Screen Display 69 Setup Menu Preference Screen Saver Set The Inputs Set AV NET Set Closed Captions Set Monitor Out Upgrades Set Stand-by Mode Move SEL Select TV Tuner Out: Select TV TUNER OUT to change 2. When an external device like a monitor or Hi-Fi audio system is selected, VARIABLE AUDIO OUT will select the source of the TV. Use CURSOR PAD ̆ or ̄ to highlight the function to output the audio Setup Set Monitor Out and video signals of the last watched Antenna OR Video...
Owners Guide
Page 76
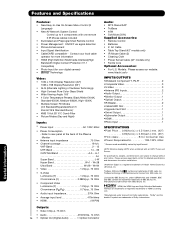
... HDMI Licensing LLC. *Manufactured under license from BBE Sound, Inc. Licensed by input format HDTV Monitors display HDTV when combined with one remote 2 IR Mouse cables included • Illuminated and Preprogrammed Remote Control • Power Management: ON/OFF via signal detection • Picture Enhancement • Input Signal Identification • CableCARD compatible - Models: Please access our website: www.hitachi.us/tv INPUTS/OUTPUTS •Wideband Component Y, Pb,Pr 2 •Composite Video 3 •S-Video 3 •Antenna (RF) Inputs 2 •Audio Output...
... HDMI Licensing LLC. *Manufactured under license from BBE Sound, Inc. Licensed by input format HDTV Monitors display HDTV when combined with one remote 2 IR Mouse cables included • Illuminated and Preprogrammed Remote Control • Power Management: ON/OFF via signal detection • Picture Enhancement • Input Signal Identification • CableCARD compatible - Models: Please access our website: www.hitachi.us/tv INPUTS/OUTPUTS •Wideband Component Y, Pb,Pr 2 •Composite Video 3 •S-Video 3 •Antenna (RF) Inputs 2 •Audio Output...
Owners Guide
Page 79
... OF ANY DIFFERENT OR SUPPLEMENTARY LICENSE THAT MAY ACCOMPANY SUCH UPGRADE, (A) DO NOT USE ANY HITACHI-PROVIDED FLASH CARD OR OTHER MEDIA, (B) DO NOT PERFORM INSTALL ANY HITACHI-PROVIDED UPGRADE SOFTWARE ON YOUR DTV, AND (C) PROMPTLY RETURN SUCH FLASH CARD OR OTHER MEDIA TO HITACHI. 5. Bureau of this Agreement, except to the extent that HITACHI provides different or supplementary license terms or conditions that you...
... OF ANY DIFFERENT OR SUPPLEMENTARY LICENSE THAT MAY ACCOMPANY SUCH UPGRADE, (A) DO NOT USE ANY HITACHI-PROVIDED FLASH CARD OR OTHER MEDIA, (B) DO NOT PERFORM INSTALL ANY HITACHI-PROVIDED UPGRADE SOFTWARE ON YOUR DTV, AND (C) PROMPTLY RETURN SUCH FLASH CARD OR OTHER MEDIA TO HITACHI. 5. Bureau of this Agreement, except to the extent that HITACHI provides different or supplementary license terms or conditions that you...


