Owners Guide
Page 3
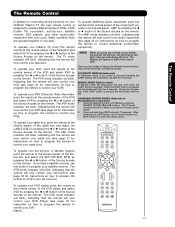
... television does not operate properly, unplug the plasma television and call your TV screen. Modifications The FCC requires the user to be fully inserted to prevent blade exposure. Caution Never remove the back cover of the plasma television as video-on back side of programs broadcast by HITACHI could void the user's warranty. Home...
... television does not operate properly, unplug the plasma television and call your TV screen. Modifications The FCC requires the user to be fully inserted to prevent blade exposure. Caution Never remove the back cover of the plasma television as video-on back side of programs broadcast by HITACHI could void the user's warranty. Home...
Owners Guide
Page 4
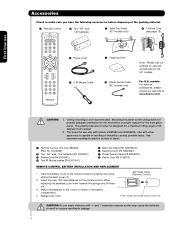
...electronics or proper support for the 55" models. Match the batteries to the (+) and (-) marks in leakage. 4 CAUTION: Do not insert batteries with Hitachi 42HDS52 and 42HDS52A. This stand ...Replace the cover. models: For optional accessories, please access our web site at: www.hitachi.us/tv CAUTION: 1. Ceiling mounting is capable of resulting in instability causing possible injury. REMOTE CONTROL...Open the battery cover of the remote control by pushing down and slide back to remove. This plasma television product is designed for the remote control. HL02066). · Two "AA" size, 1....
...electronics or proper support for the 55" models. Match the batteries to the (+) and (-) marks in leakage. 4 CAUTION: Do not insert batteries with Hitachi 42HDS52 and 42HDS52A. This stand ...Replace the cover. models: For optional accessories, please access our web site at: www.hitachi.us/tv CAUTION: 1. Ceiling mounting is capable of resulting in instability causing possible injury. REMOTE CONTROL...Open the battery cover of the remote control by pushing down and slide back to remove. This plasma television product is designed for the remote control. HL02066). · Two "AA" size, 1....
Owners Guide
Page 5
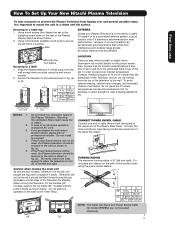
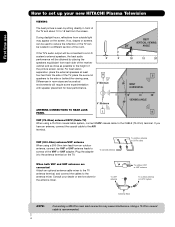
... the TV where temperatures can become excessively hot, for model 55HDS52 are located in fig. (a). 5. Do not place any objects on the picture screen. Wire ANTENNA Unless your Plasma Television ...below . 2. Secure the television to a table-top 1. In case of the Plasma Television. If you are not included (Optional). 42" 55" 5 Do not install by yourself. 4. To avoid cabinet warping, cabinet color... perforated back cover of the Plasma Rear Panel. First time use How To Set Up Your New Hitachi Plasma Television To take measures to prevent the Plasma Television from the wall except...
... the TV where temperatures can become excessively hot, for model 55HDS52 are located in fig. (a). 5. Do not place any objects on the picture screen. Wire ANTENNA Unless your Plasma Television ...below . 2. Secure the television to a table-top 1. In case of the Plasma Television. If you are not included (Optional). 42" 55" 5 Do not install by yourself. 4. To avoid cabinet warping, cabinet color... perforated back cover of the Plasma Rear Panel. First time use How To Set Up Your New Hitachi Plasma Television To take measures to prevent the Plasma Television from the wall except...
Owners Guide
Page 6
... the adapter into the antenna terminal on the screen. Consult your new HITACHI Plasma Television VIEWING The best picture is recommended. If the TV's audio output will be used to the height of the TV and about 10 to the side or behind the viewing area. Using a 75-Ohm coaxial cable...is seen by placing the speakers equidistant from each side of the receiver cabinet and as close as possible to reduce the reflection or the TV can be connected to a Hi-Fi system's external speakers, the best audio performance will require some experimentation with speaker placement for the antenna...
... the adapter into the antenna terminal on the screen. Consult your new HITACHI Plasma Television VIEWING The best picture is recommended. If the TV's audio output will be used to the height of the TV and about 10 to the side or behind the viewing area. Using a 75-Ohm coaxial cable...is seen by placing the speakers equidistant from each side of the receiver cabinet and as close as possible to reduce the reflection or the TV can be connected to a Hi-Fi system's external speakers, the best audio performance will require some experimentation with speaker placement for the antenna...
Owners Guide
Page 7
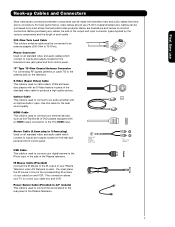
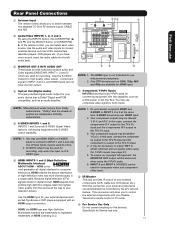
...Cable This outdoor antenna cable must place the IR mouse in the side of your Plasma Television when A/V Network is used . "F" Type 75-Ohm Coaxial Antenna Connector For connecting RF signals (antenna or cable TV) to the antenna jack on camcorders, VCRs and laserdisc players with an S-Video feature...AUDIO OUT 3.8mm STEREO MINI-PLUG 2 RCA TYPE PLUGS 7 Below are illustrations and names of the Plasma Television. Use this cable for the best sound quality. This connection allows your TV to the rear panel of common connectors. USB Cable This cable is used to connect the swivel stand ...
...Cable This outdoor antenna cable must place the IR mouse in the side of your Plasma Television when A/V Network is used . "F" Type 75-Ohm Coaxial Antenna Connector For connecting RF signals (antenna or cable TV) to the antenna jack on camcorders, VCRs and laserdisc players with an S-Video feature...AUDIO OUT 3.8mm STEREO MINI-PLUG 2 RCA TYPE PLUGS 7 Below are illustrations and names of the Plasma Television. Use this cable for the best sound quality. This connection allows your TV to the rear panel of common connectors. USB Cable This cable is used to connect the swivel stand ...
Owners Guide
Page 8
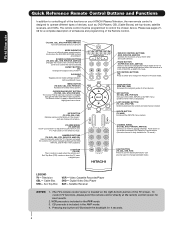
..., and VCRs. GUIDE BUTTON (STB, CBL, PVR) Accesses the program guide of the TV. Can also be programmed to pause other devices. ASPECT BUTTON (TV) Changes the aspect ratio of other devices when the remote is located on your HITACHI Plasma Television, the new remote control is in -Picture mode. Push down on or...
..., and VCRs. GUIDE BUTTON (STB, CBL, PVR) Accesses the program guide of the TV. Can also be programmed to pause other devices. ASPECT BUTTON (TV) Changes the aspect ratio of other devices when the remote is located on your HITACHI Plasma Television, the new remote control is in -Picture mode. Push down on or...
Owners Guide
Page 9
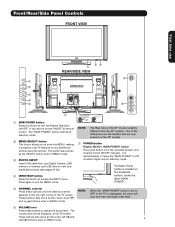
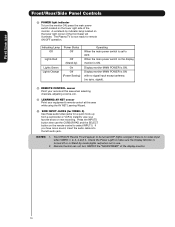
...the cursor down (̄) and up (̆) buttons when in the top right corner of the 55" model is slightly different from your Digital Camera, USB memory or memory card USB drive to view...the desired channel appears in MENU mode. Press again to the claw. NOTE: The Rear View of the TV screen. NOTE: When the "MAIN POWER" button is for stand-by mode. ባ MENU/SELECT ...possible to set to OFF or the TV is located on the broadside bottom, under the label "MAIN POWER". ቦ CHANNEL selector Press these buttons to turn the Plasma Television ON/OFF. The Main Power...
...the cursor down (̄) and up (̆) buttons when in the top right corner of the 55" model is slightly different from your Digital Camera, USB memory or memory card USB drive to view...the desired channel appears in MENU mode. Press again to the claw. NOTE: The Rear View of the TV screen. NOTE: When the "MAIN POWER" button is for stand-by mode. ባ MENU/SELECT ...possible to set to OFF or the TV is located on the broadside bottom, under the label "MAIN POWER". ቦ CHANNEL selector Press these buttons to turn the Plasma Television ON/OFF. The Main Power...
Owners Guide
Page 10
Display monitor MAIN POWER is ON with no signal input except antenna (no video input when VIDEO: 1, 2, 3, 4 and 5. Your HITACHI Plasma TV will illuminate. Display monitor MAIN POWER is ON. The Plasma TV is set to OFF. Remote Control can not turn the monitor ON, press the main power switch located on the lower right side...
Display monitor MAIN POWER is ON with no signal input except antenna (no video input when VIDEO: 1, 2, 3, 4 and 5. Your HITACHI Plasma TV will illuminate. Display monitor MAIN POWER is ON. The Plasma TV is set to OFF. Remote Control can not turn the monitor ON, press the main power switch located on the lower right side...
Owners Guide
Page 11
.... This connection will allow you can select each video source. trademarks of the remote control, you to your Plasma Television's remote control in TV mode. NOTE: *Manufactured under license from the source all digital interface for both inputs. Your component outputs may...to INPUT 1 and 2, but only one of SVIDEO type. "Dolby" and the double-D symbol are trademarks or registered Do not connect anything to the TV's PR input. 4. INPUT 3 and INPUT 4 (Y/VIDEO) can automatically be labeled NOTE: 1. Because digital television (DTV) signals remain in a single cable...
.... This connection will allow you can select each video source. trademarks of the remote control, you to your Plasma Television's remote control in TV mode. NOTE: *Manufactured under license from the source all digital interface for both inputs. Your component outputs may...to INPUT 1 and 2, but only one of SVIDEO type. "Dolby" and the double-D symbol are trademarks or registered Do not connect anything to the TV's PR input. 4. INPUT 3 and INPUT 4 (Y/VIDEO) can automatically be labeled NOTE: 1. Because digital television (DTV) signals remain in a single cable...
Owners Guide
Page 12
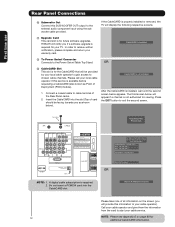
HITACHI will display the following respective screens. ቭ Upgrade Card This card slot is for ... slot is for viewing. Insert the CableCARD into the CableCARD slot. If the CableCARD is properly installed or removed, the TV will notify you if a software upgrade is required for your local cable operator if this service is available before requesting a...-789-1 Data: 123-456-789-1 Unit Address: 123-456-789-1 Press EXIT to exit the second screen. Please call your TV. Press the EXIT button to return NOTE: 1. Do not insert a PCMCIA card into the slot (Top of the Rear Panel...
HITACHI will display the following respective screens. ቭ Upgrade Card This card slot is for ... slot is for viewing. Insert the CableCARD into the CableCARD slot. If the CableCARD is properly installed or removed, the TV will notify you if a software upgrade is required for your local cable operator if this service is available before requesting a...-789-1 Data: 123-456-789-1 Unit Address: 123-456-789-1 Press EXIT to exit the second screen. Please call your TV. Press the EXIT button to return NOTE: 1. Do not insert a PCMCIA card into the slot (Top of the Rear Panel...
Owners Guide
Page 13
... offered as shown. 2. If you have a VHS or 8mm camcorder, use the S-VIDEO cable in place of each component for the location of your TV. 4. The exact arrangement you may be made from coaxial shielded wire. For best performance, video and audio cables should be abnormal. 2. Ferrite Core (...If you have a S-VHS VCR, use to connect the VCR, camcorder, laserdisc player, DVD player, or HDTV Set Top Box to confirm your Plasma TV is dependent on the ferrite core near the Photo Input as suggestions. Fold and close the ferrite core while being careful not to left audio...
... offered as shown. 2. If you have a VHS or 8mm camcorder, use the S-VIDEO cable in place of each component for the location of your TV. 4. The exact arrangement you may be made from coaxial shielded wire. For best performance, video and audio cables should be abnormal. 2. Ferrite Core (...If you have a S-VHS VCR, use to connect the VCR, camcorder, laserdisc player, DVD player, or HDTV Set Top Box to confirm your Plasma TV is dependent on the ferrite core near the Photo Input as suggestions. Fold and close the ferrite core while being careful not to left audio...
Owners Guide
Page 14
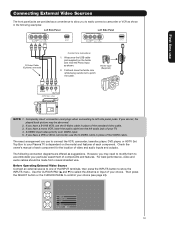
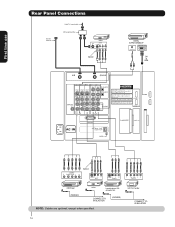
CONNECT TO IR BLASTER (PROVIDED) NOTE: Cables are optional, except when specified. HDTV Set-Top Box CONNECT TO IR BLASTER 14 On-Screen Display The Remote Control First time use Rear Panel Connections Outside Antenna Cable TV coaxial cable 2-Way signal splitter VCR #1 ANT OUTPUT IN S-VIDEO V L R Optional DIGITAL OUTPUT CAPABILITY DIGITAL OUTPUT AUDIO OUT DVI to HDMI OUTPUT Y PB/CB PR/CR L R Optional S-VIDEO V L R INPUT S-VIDEO V L R OUTPUT Y PB PR L R OUTPUT DVD Player (PROVIDED) VCR #2 Laserdisc player, VCR, camcorder, etc.
CONNECT TO IR BLASTER (PROVIDED) NOTE: Cables are optional, except when specified. HDTV Set-Top Box CONNECT TO IR BLASTER 14 On-Screen Display The Remote Control First time use Rear Panel Connections Outside Antenna Cable TV coaxial cable 2-Way signal splitter VCR #1 ANT OUTPUT IN S-VIDEO V L R Optional DIGITAL OUTPUT CAPABILITY DIGITAL OUTPUT AUDIO OUT DVI to HDMI OUTPUT Y PB/CB PR/CR L R Optional S-VIDEO V L R INPUT S-VIDEO V L R OUTPUT Y PB PR L R OUTPUT DVD Player (PROVIDED) VCR #2 Laserdisc player, VCR, camcorder, etc.
Owners Guide
Page 15
...• To ensure no copyright infringement, the MONITOR OUT output will be labeled Y, B-Y, and R-Y. In this case, connect the components B-Y output to the TV's PB input and the components R-Y output to your VCR operating guide for more normal picture. 15 Connecting the television directly to the Audio /Video output...Use these connections in the example on connecting your device has this case, connect the components CB output to the TV's PB input and the components CR output to the TV's PR input. • It may be necessary to adjust TINT to the operating guide of the standard video ...
...• To ensure no copyright infringement, the MONITOR OUT output will be labeled Y, B-Y, and R-Y. In this case, connect the components B-Y output to the TV's PB input and the components R-Y output to your VCR operating guide for more normal picture. 15 Connecting the television directly to the Audio /Video output...Use these connections in the example on connecting your device has this case, connect the components CB output to the TV's PB input and the components CR output to the TV's PR input. • It may be necessary to adjust TINT to the operating guide of the standard video ...
Owners Guide
Page 16
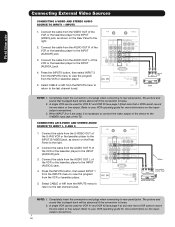
... be used , it is loose. 2. CONNECTING AN S-VIDEO AND STEREO AUDIO SOURCE TO INPUT 1, 2 AND 5 1. Select CABLE or AIR from the AUDIO OUT R of the TV. Connect the cable from the INPUTS menu to return to the INPUT (VIDEO) jack, as shown on line inputoutput connections. 16
... be used , it is loose. 2. CONNECTING AN S-VIDEO AND STEREO AUDIO SOURCE TO INPUT 1, 2 AND 5 1. Select CABLE or AIR from the AUDIO OUT R of the TV. Connect the cable from the INPUTS menu to return to the INPUT (VIDEO) jack, as shown on line inputoutput connections. 16

Owners Guide
Page 19
... Panel. Connect the cable from the AUDIO OUT of the amplifier is a fixed output. Connect the cable from the VIDEO INPUT of the Plasma TV to the OUTPUT (AUDIO/R) jack on the right. 2. The OPTICAL OUT terminal outputs all audio sources with Optical IN capability. 1. NOTE: When making ...video connections, connect S-Video only or Video only. Select CABLE or AIR from the Rear Panel is controlled by the amplifier, not by the Plasma Television. Connecting Video: Connect the cable from the VIDEO OUT of the VCR or the laserdisc player to an external audio amplifier, connect the...
... Panel. Connect the cable from the AUDIO OUT of the amplifier is a fixed output. Connect the cable from the VIDEO INPUT of the Plasma TV to the OUTPUT (AUDIO/R) jack on the right. 2. The OPTICAL OUT terminal outputs all audio sources with Optical IN capability. 1. NOTE: When making ...video connections, connect S-Video only or Video only. Select CABLE or AIR from the Rear Panel is controlled by the amplifier, not by the Plasma Television. Connecting Video: Connect the cable from the VIDEO OUT of the VCR or the laserdisc player to an external audio amplifier, connect the...
Owners Guide
Page 20
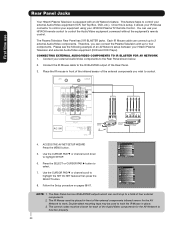
.... The Rear Panel has two IR BLASTER outputs which can use Rear Panel Jacks Your Hitachi Plasma Television is setup, it allows your IR Mouse connector to control your equipment using your HITACHI Plasma TV Remote Control. Double-sided mounting tape may be used to a total of the external... components infrared sensor for the AV Network to highlight the SET AV NET features then press the SELECT button. 8. The Plasma Television Rear Panel has 2 IR...
.... The Rear Panel has two IR BLASTER outputs which can use Rear Panel Jacks Your Hitachi Plasma Television is setup, it allows your IR Mouse connector to control your equipment using your HITACHI Plasma TV Remote Control. Double-sided mounting tape may be used to a total of the external... components infrared sensor for the AV Network to highlight the SET AV NET features then press the SELECT button. 8. The Plasma Television Rear Panel has 2 IR...
Owners Guide
Page 21
... control your DVD Player (see page 34 for instruction on how to program the remote to control your DVD player). 21 To operate your Plasma TV, point the remote control at the remote sensor of the VCR and select PVR by pressing the ̇ or ̈ button of the...of the set- The Remote Control The Remote Control In addition to controlling all the functions on your HITACHI Plasma TV, the new remote control is designed to operate different types of VCRs, CATV (Cable TV) converters, set-top-box, satellite receiver, DVD players, and other audio/video equipment with one area....
... control your DVD Player (see page 34 for instruction on how to program the remote to control your DVD player). 21 To operate your Plasma TV, point the remote control at the remote sensor of the VCR and select PVR by pressing the ̇ or ̈ button of the...of the set- The Remote Control The Remote Control In addition to controlling all the functions on your HITACHI Plasma TV, the new remote control is designed to operate different types of VCRs, CATV (Cable TV) converters, set-top-box, satellite receiver, DVD players, and other audio/video equipment with one area....
Owners Guide
Page 22
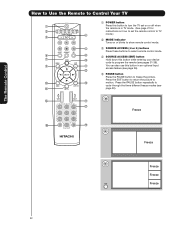
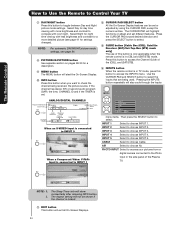
... picture to freeze the picture. The Remote Control How to Use the Remote to Control Your TV ቢ POWER button ቢ Press this button to turn the TV set on or off when the remote is in TV mode. (See page 21 for ባ instructions on how to set the remote control to... TV ቤ ብ mode.) ባ MODE Indicator Turns on or blinks to show remote control mode. ቦ ቤ SOURCE ACCESS (̇ or ̈) buttons Press these ...
... picture to freeze the picture. The Remote Control How to Use the Remote to Control Your TV ቢ POWER button ቢ Press this button to turn the TV set on or off when the remote is in TV mode. (See page 21 for ባ instructions on how to set the remote control to... TV ቤ ብ mode.) ባ MODE Indicator Turns on or blinks to show remote control mode. ቦ ቤ SOURCE ACCESS (̇ or ̈) buttons Press these ...
Owners Guide
Page 23
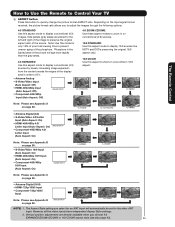
...: 1. However, all five video inputs have independent Aspect Style settings. 2. Note: Please see Appendix D on page 80. How to Use the Remote to Control Your TV ቧ ASPECT button Press this aspect mode to display conventional (4:3) images. Depending on conventional (4:3) sources. 16:9 STANDARD Use this aspect mode to display 16:9 sources...
...: 1. However, all five video inputs have independent Aspect Style settings. 2. Note: Please see Appendix D on page 80. How to Use the Remote to Control Your TV ቧ ASPECT button Press this aspect mode to display conventional (4:3) images. Depending on conventional (4:3) sources. 16:9 STANDARD Use this aspect mode to display 16:9 sources...
Owners Guide
Page 24
... Channel Guide of the (CBL), and (SAT/STB). ተ INPUTS button When the remote control is in TV mode, press this button is only applicable when the remote control is connected to choose INPUT 3. INPUT 3 Select... Receiver (SAT)/Set-Top-Box (STB) mode only] The use of the Plasma TV. The Remote Control How to Use the Remote to Control Your TV ቨ DAY/NIGHT button Press this button when you want to check the channel... being used. PM ST TV-14 V Audio Broadcast Broadcast Rating Closed Captioning Day CC Off Cable 6 11:00PM...
... Channel Guide of the (CBL), and (SAT/STB). ተ INPUTS button When the remote control is in TV mode, press this button is only applicable when the remote control is connected to choose INPUT 3. INPUT 3 Select... Receiver (SAT)/Set-Top-Box (STB) mode only] The use of the Plasma TV. The Remote Control How to Use the Remote to Control Your TV ቨ DAY/NIGHT button Press this button when you want to check the channel... being used. PM ST TV-14 V Audio Broadcast Broadcast Rating Closed Captioning Day CC Off Cable 6 11:00PM...


