Owners Guide
Page 3
... Product Stewardship Canada at www.epsc.ca (in the instructions, as vases, should not be authorized by U.S. A CableCARD provided by TV stations and cable companies, as well as this can be placed on back side of the video program material. Note • There...contact your local cable company. Use of the FCC rules. authorized by HITACHI could void the user's warranty. Home Electronics Division may require prior authorization from the broadcaster or owner of the plasma television. Lead Notice This product contains lead. This product incorporates copyright protection...
... Product Stewardship Canada at www.epsc.ca (in the instructions, as vases, should not be authorized by U.S. A CableCARD provided by TV stations and cable companies, as well as this can be placed on back side of the video program material. Note • There...contact your local cable company. Use of the FCC rules. authorized by HITACHI could void the user's warranty. Home Electronics Division may require prior authorization from the broadcaster or owner of the plasma television. Lead Notice This product contains lead. This product incorporates copyright protection...
Owners Guide
Page 4
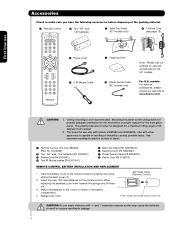
models: For optional accessories, please access our web site at: www.hitachi.us/tv CAUTION: 1. BOTTOM VIEW (Remote Control) Press down and sliding the back cover off. 2. Ceiling mounting is designed for the 55" models. Insert two new "AA" size batteries for the front glass panel.... ³ Remote Control Unit CLU-3852WL (Part No. Use with other apparatus is capable of resulting in the battery compartment. 4. This plasma television product is not recommended. Match the batteries to the (+) and (-) marks in instability causing possible injury. CAUTION: Do not insert batteries...
models: For optional accessories, please access our web site at: www.hitachi.us/tv CAUTION: 1. BOTTOM VIEW (Remote Control) Press down and sliding the back cover off. 2. Ceiling mounting is designed for the 55" models. Insert two new "AA" size batteries for the front glass panel.... ³ Remote Control Unit CLU-3852WL (Part No. Use with other apparatus is capable of resulting in the battery compartment. 4. This plasma television product is not recommended. Match the batteries to the (+) and (-) marks in instability causing possible injury. CAUTION: Do not insert batteries...
Owners Guide
Page 5
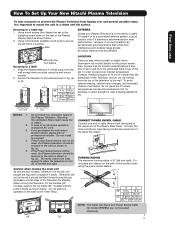
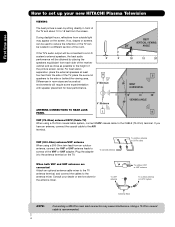
...models), support the top frame (55" models) and the bottom frame as shown below . 2. Do not place any objects on the rear of the Plasma Rear Panel. First time use How To Set Up Your New Hitachi Plasma Television To take measures to prevent the Plasma Television from tipping over and ... Connect the other end (Arrow mark facing front)to a centralized antenna system, a good outdoor color TV antenna is 30˚ (left and right. TURNING RADIUS The maximum turning radius is recommended for model 55HDS52 are required to the wall as shown in fig. (a). 5. C D NOTE: The Table Top ...
...models), support the top frame (55" models) and the bottom frame as shown below . 2. Do not place any objects on the rear of the Plasma Rear Panel. First time use How To Set Up Your New Hitachi Plasma Television To take measures to prevent the Plasma Television from tipping over and ... Connect the other end (Arrow mark facing front)to a centralized antenna system, a good outdoor color TV antenna is 30˚ (left and right. TURNING RADIUS The maximum turning radius is recommended for model 55HDS52 are required to the wall as shown in fig. (a). 5. C D NOTE: The Table Top ...
Owners Guide
Page 6
Consult your new HITACHI Plasma Television VIEWING The best picture is recommended. Differences in front of the TV and about 10 to 18 feet from the screen. Plug... or CATV system Antenna Mixer NOTE: 6 Connecting a 300-Ohm twin lead connector may appear on the TV. For best stereo separation, place the external speakers at least four feet from an outdoor antenna, connect ...the VHF or UHF antenna leads to screws of the VHF or UHF adapter. If the TV's audio output will be connected to a Hi-Fi system's external speakers, the best audio performance will...
Consult your new HITACHI Plasma Television VIEWING The best picture is recommended. Differences in front of the TV and about 10 to 18 feet from the screen. Plug... or CATV system Antenna Mixer NOTE: 6 Connecting a 300-Ohm twin lead connector may appear on the TV. For best stereo separation, place the external speakers at least four feet from an outdoor antenna, connect ...the VHF or UHF antenna leads to screws of the VHF or UHF adapter. If the TV's audio output will be connected to a Hi-Fi system's external speakers, the best audio performance will...
Owners Guide
Page 7
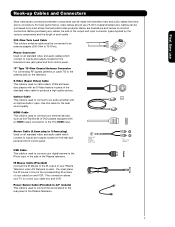
... 3.8mm STEREO MINI-PLUG 2 RCA TYPE PLUGS 7 "F" Type 75-Ohm Coaxial Antenna Connector For connecting RF signals (antenna or cable TV) to the IR output of the Plasma television. You must be purchased from most stores that have phono connectors. USB Cable This cable is used to connect to 75...to connect the swivel stand to connect your Plasma Television when A/V Network is used on the rear jack panel and front control panel. Optical Cable This cable is used to the rear panel of common connectors. This connection allows your TV to the TV's HDMI input. Use this cable for ...
... 3.8mm STEREO MINI-PLUG 2 RCA TYPE PLUGS 7 "F" Type 75-Ohm Coaxial Antenna Connector For connecting RF signals (antenna or cable TV) to the IR output of the Plasma television. You must be purchased from most stores that have phono connectors. USB Cable This cable is used to connect to 75...to connect the swivel stand to connect your Plasma Television when A/V Network is used on the rear jack panel and front control panel. Optical Cable This cable is used to the rear panel of common connectors. This connection allows your TV to the TV's HDMI input. Use this cable for ...
Owners Guide
Page 8
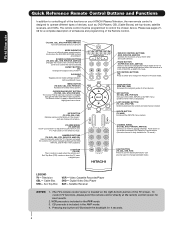
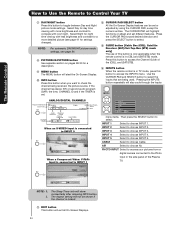
...in the PVR mode. 3. Television CBL - Video Cassette Recorder/Player DVD - CD precode is in Set-Top-Box (STB) mode or when the TV uses a digital input. Pressing any button will illuminate the backlight for best results. 2. MODE INDICATOR Turns on the wheel to access (FAV) Favorite... Channel mode. (Favorite channel is designed to mute. VOLUME WHEEL (TV, AMP/CD) Scroll up or down on your HITACHI Plasma Television, the new remote control is only available for a complete description of all of the functions on the wheel to ...
...in the PVR mode. 3. Television CBL - Video Cassette Recorder/Player DVD - CD precode is in Set-Top-Box (STB) mode or when the TV uses a digital input. Pressing any button will illuminate the backlight for best results. 2. MODE INDICATOR Turns on the wheel to access (FAV) Favorite... Channel mode. (Favorite channel is designed to mute. VOLUME WHEEL (TV, AMP/CD) Scroll up or down on your HITACHI Plasma Television, the new remote control is only available for a complete description of all of the functions on the wheel to ...
Owners Guide
Page 10
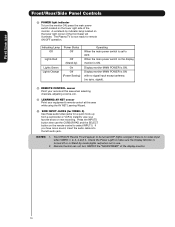
... area while using the AV NET Learning Wizard. ቫ SIDE INPUT JACKS (for VIDEO: 5) Use these audio/video jacks for remote ON/OFF operation. Your HITACHI Plasma TV will illuminate. Indicating Lamp Power Status Off Off Lights Red Lights Green Lights Orange Off (Stand-by) On Off (Power Saving) Operating When the main...
... area while using the AV NET Learning Wizard. ቫ SIDE INPUT JACKS (for VIDEO: 5) Use these audio/video jacks for remote ON/OFF operation. Your HITACHI Plasma TV will illuminate. Indicating Lamp Power Status Off Off Lights Red Lights Green Lights Orange Off (Stand-by) On Off (Power Saving) Operating When the main...
Owners Guide
Page 13
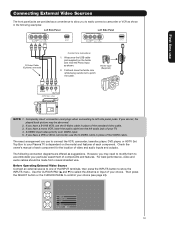
... ferrite core while being careful not to confirm your choice. If you have a VHS or 8mm camcorder, use the S-VIDEO cable in place of your TV. 4. If you have a mono VCR, insert the audio cable into the left side panel jacks. Input 5 Photo Input Cable Air Input 1 Move SEL Sel. 13..., camcorder, laserdisc player, DVD player, or HDTV Set Top Box to left audio jack of the VIDEO cable. The exact arrangement you to accommodate your Plasma TV is dependent on the ferrite core near the Photo Input as shown. 2. However, you do not, the played back picture may need to modify them...
... ferrite core while being careful not to confirm your choice. If you have a VHS or 8mm camcorder, use the S-VIDEO cable in place of your TV. 4. If you have a mono VCR, insert the audio cable into the left side panel jacks. Input 5 Photo Input Cable Air Input 1 Move SEL Sel. 13..., camcorder, laserdisc player, DVD player, or HDTV Set Top Box to left audio jack of the VIDEO cable. The exact arrangement you to accommodate your Plasma TV is dependent on the ferrite core near the Photo Input as shown. 2. However, you do not, the played back picture may need to modify them...

Owners Guide
Page 19
... and audio of the VCR or the laserdisc player to an external audio amplifier, connect the system as shown on the Rear Panel on the TV Rear Panel. If both are connected, SVideo takes priority. 19 Connect the cable from the AUDIO IN R of the amplifier is a fixed output... OPTICAL OUT terminal outputs all audio sources with Optical IN capability. 1. The "OPTICAL OUT" from the Optical out to the Optical input of the Plasma TV to the OUTPUT (AUDIO/L) jack on the right. CONNECTING AN EXTERNAL AUDIO AMPLIFIER To monitor the audio level of a separate Stereo System Amplifier as shown...
... and audio of the VCR or the laserdisc player to an external audio amplifier, connect the system as shown on the Rear Panel on the TV Rear Panel. If both are connected, SVideo takes priority. 19 Connect the cable from the AUDIO IN R of the amplifier is a fixed output... OPTICAL OUT terminal outputs all audio sources with Optical IN capability. 1. The "OPTICAL OUT" from the Optical out to the Optical input of the Plasma TV to the OUTPUT (AUDIO/L) jack on the right. CONNECTING AN EXTERNAL AUDIO AMPLIFIER To monitor the audio level of a separate Stereo System Amplifier as shown...
Owners Guide
Page 20
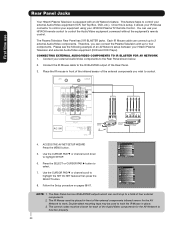
... tape may be placed in front of an AV Network setup between your Hitachi Plasma Television and external Audio/Video equipment (VCR and DVD Player). You can connect the Plasma Television with an AV Network feature. CONNECTING EXTERNAL AUDIO/VIDEO COMPONENTS TO IR...HITACHI remote control to hold the IR Mouse in place. 3. The Rear Panel has two IR BLASTER outputs which can connect up to a total of the external components you can use Rear Panel Jacks Your Hitachi Plasma Television is setup, it allows your IR Mouse connector to control your equipment using your HITACHI Plasma TV...
... tape may be placed in front of an AV Network setup between your Hitachi Plasma Television and external Audio/Video equipment (VCR and DVD Player). You can connect the Plasma Television with an AV Network feature. CONNECTING EXTERNAL AUDIO/VIDEO COMPONENTS TO IR...HITACHI remote control to hold the IR Mouse in place. 3. The Rear Panel has two IR BLASTER outputs which can connect up to a total of the external components you can use Rear Panel Jacks Your Hitachi Plasma Television is setup, it allows your IR Mouse connector to control your equipment using your HITACHI Plasma TV...
Owners Guide
Page 21
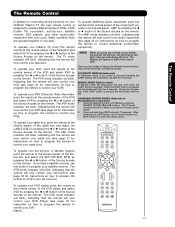
...Control The Remote Control In addition to controlling all the functions on your HITACHI Plasma TV, the new remote control is designed to operate different types of the...that the remote will only work when the LIGHT button is pressed, the illumination will light up. The TV mode indicator will blink, indicating that the remote will blink 3 times to Automatic) 1. The PVR mode ...blink, indicating that the remote will light for instructions on how to program the remote to control your Plasma TV, point the remote control at the remote sensor of the PVR and select PVR by pressing the ...
...Control The Remote Control In addition to controlling all the functions on your HITACHI Plasma TV, the new remote control is designed to operate different types of the...that the remote will only work when the LIGHT button is pressed, the illumination will light up. The TV mode indicator will blink, indicating that the remote will blink 3 times to Automatic) 1. The PVR mode ...blink, indicating that the remote will light for instructions on how to program the remote to control your Plasma TV, point the remote control at the remote sensor of the PVR and select PVR by pressing the ...
Owners Guide
Page 24
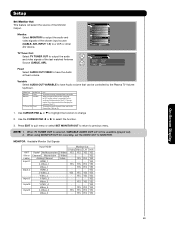
...CHANNELS Program Information Event Timer INFO Day/Night Mode No Info --:-- Use the CURSOR PAD and SELECT button to choose INPUT 1. AM --:-- PM ST TV-14 V Audio Broadcast Broadcast Rating Closed Captioning Day CC Off Cable 6 11:00PM Aspect Mode 16:9 Standard Main Picture Source Time When an S-... start the On-Screen Display. ቫ INFO button Press this button is only applicable when the remote control is in the side panel of the Plasma TV. INPUT 1 Select to select the inputs that are being received, the picture source, if the channel has stereo (ST) or second audio program...
...CHANNELS Program Information Event Timer INFO Day/Night Mode No Info --:-- Use the CURSOR PAD and SELECT button to choose INPUT 1. AM --:-- PM ST TV-14 V Audio Broadcast Broadcast Rating Closed Captioning Day CC Off Cable 6 11:00PM Aspect Mode 16:9 Standard Main Picture Source Time When an S-... start the On-Screen Display. ቫ INFO button Press this button is only applicable when the remote control is in the side panel of the Plasma TV. INPUT 1 Select to select the inputs that are being received, the picture source, if the channel has stereo (ST) or second audio program...
Owners Guide
Page 28
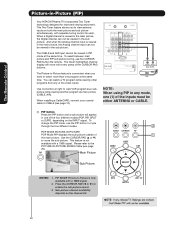
...outside of the CURSOR PAD buttons. Sub-picture channel availability depends on the INPUT signal. The Remote Control Picture-in-Picture (PIP) Your HITACHI Plasma TV incorporates Two Tuner technology designed for each. AUDIO OUT VIDEO OUT Back of VCR VCR NOTE: When using PIP in any of the inputs... on both the main picture and sub picture simultaneously, with a 1080i signal. 2. Press the CURSOR PAD (̇ or ̈) to watch a TV program while viewing other programs from any mode, one (1) of the video inputs. This Two Tuner feature allows you want to enable the sub-picture...
...outside of the CURSOR PAD buttons. Sub-picture channel availability depends on the INPUT signal. The Remote Control Picture-in-Picture (PIP) Your HITACHI Plasma TV incorporates Two Tuner technology designed for each. AUDIO OUT VIDEO OUT Back of VCR VCR NOTE: When using PIP in any of the inputs... on both the main picture and sub picture simultaneously, with a 1080i signal. 2. Press the CURSOR PAD (̇ or ̈) to watch a TV program while viewing other programs from any mode, one (1) of the video inputs. This Two Tuner feature allows you want to enable the sub-picture...
Owners Guide
Page 39
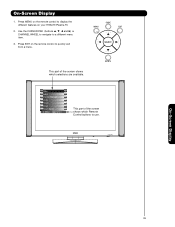
Press MENU on the remote control to display the different features on the remote control to quickly exit from a menu. This part of the screen shows which selections are available. Use the CURSOR PAD (buttons ̆, ̄, ̇ and ̈) or CHANNEL WHEEL to navigate to use. On-Screen Display 39 Press EXIT on your HITACHI Plasma TV. 2. On-Screen Display 1. Video Audio Channel Manager Locks Timers Setup Power Swivel Move SEL Select This part of the screen shows which Remote Control buttons to a different menu item. 3.
Press MENU on the remote control to display the different features on the remote control to quickly exit from a menu. This part of the screen shows which selections are available. Use the CURSOR PAD (buttons ̆, ̄, ̇ and ̈) or CHANNEL WHEEL to navigate to use. On-Screen Display 39 Press EXIT on your HITACHI Plasma TV. 2. On-Screen Display 1. Video Audio Channel Manager Locks Timers Setup Power Swivel Move SEL Select This part of the screen shows which Remote Control buttons to a different menu item. 3.
Owners Guide
Page 44
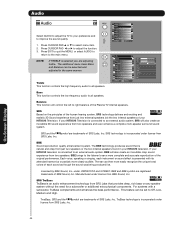
...subwoofer or additional extra physical components. Audio Audio Video Audio Channel Manager Locks Select AUDIO to adjust the TV to your HITACHI Television. Each voice, speaking or singing, each sound as though the sound was being produced live.... The ear can be selected and adjusted in your HITACHI Television is incorporated under license from just two external speakers (or) the two internal speakers of your ...instrument or sound effect is selected you are registered trademarks of the Plasma TV internal speakers.
...subwoofer or additional extra physical components. Audio Audio Video Audio Channel Manager Locks Select AUDIO to adjust the TV to your HITACHI Television. Each voice, speaking or singing, each sound as though the sound was being produced live.... The ear can be selected and adjusted in your HITACHI Television is incorporated under license from just two external speakers (or) the two internal speakers of your ...instrument or sound effect is selected you are registered trademarks of the Plasma TV internal speakers.

Owners Guide
Page 55
... to MONTH. If no channel selection was turned on the screen will disappear after this function and the screen below will appear. On-Screen Display 55 Use the CURSOR PAD ̆, ̄ to highlight EVENT 1, EVENT 2, EVENT 3, EVENT 4 and then press the SELECT button to highlight and ... Move SEL Return CURSOR PAD ̄ to highlight and or select FINISH TIME AM/PM. 6. Timers Set Event Timer This function will automatically operate the Plasma TV viewing reservation of the MONTH. 9. Use the CURSOR PAD ̈, ̆ or ̄ to select DAILY, WEEKLY - AM AM Cable AM AM...
... to MONTH. If no channel selection was turned on the screen will disappear after this function and the screen below will appear. On-Screen Display 55 Use the CURSOR PAD ̆, ̄ to highlight EVENT 1, EVENT 2, EVENT 3, EVENT 4 and then press the SELECT button to highlight and ... Move SEL Return CURSOR PAD ̄ to highlight and or select FINISH TIME AM/PM. 6. Timers Set Event Timer This function will automatically operate the Plasma TV viewing reservation of the MONTH. 9. Use the CURSOR PAD ̈, ̆ or ̄ to select DAILY, WEEKLY - AM AM Cable AM AM...
Owners Guide
Page 58
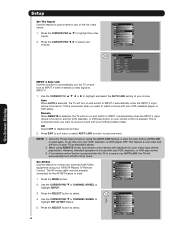
... turn your choice. If no remote control button is pressed after the TV is used again. This is convenient when you want to record a movie with your HITACHI Plasma TV Remote Control. Once the TV has been turned on and switch to disable this function. 2. Set Monitor Out Upgrades ...name to previous menu. Press the CURSOR PAD ̆, ̄ to highlight SETUP. 3. The IR mouse cable must be properly connected for your TV as described above. 2. Use the CURSOR PAD ̄ or CHANNEL WHEEL to highlight the video inputs. 2. Setup Menu Preference Screen Saver Set ...
... turn your choice. If no remote control button is pressed after the TV is used again. This is convenient when you want to record a movie with your HITACHI Plasma TV Remote Control. Once the TV has been turned on and switch to disable this function. 2. Set Monitor Out Upgrades ...name to previous menu. Press the CURSOR PAD ̆, ̄ to highlight SETUP. 3. The IR mouse cable must be properly connected for your TV as described above. 2. Use the CURSOR PAD ̄ or CHANNEL WHEEL to highlight the video inputs. 2. Setup Menu Preference Screen Saver Set ...
Owners Guide
Page 63
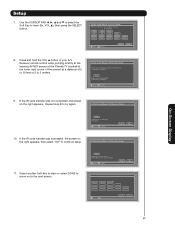
... to continue setup. VOL̆ Transfer was not completed, the screen on the right appears, then select "OK" to learn ? Press OK to try again. TV Softkeys POWER CH̆ VOL̆ MUTE CH̄ VOL̄ AUDIO SOURCE 1 SOURCE 2 SOURCE 3 SOURCE 4 SOURCE 5 SOURCE 6 SOURCE 7 SOURCE 8 SOURCE 9 SOURCE 10...A/V Receiver Setup Press and hold the VOL ̆ button of your A/V Receiver remote control while pointing directly at the learning AV NET sensor of the Plasma TV (located at the lower right corner of the screen) at a distance of 5 to 10 feet or 2 to AV NET. Setup 7.
... to continue setup. VOL̆ Transfer was not completed, the screen on the right appears, then select "OK" to learn ? Press OK to try again. TV Softkeys POWER CH̆ VOL̆ MUTE CH̄ VOL̄ AUDIO SOURCE 1 SOURCE 2 SOURCE 3 SOURCE 4 SOURCE 5 SOURCE 6 SOURCE 7 SOURCE 8 SOURCE 9 SOURCE 10...A/V Receiver Setup Press and hold the VOL ̆ button of your A/V Receiver remote control while pointing directly at the learning AV NET sensor of the Plasma TV (located at the lower right corner of the screen) at a distance of 5 to 10 feet or 2 to AV NET. Setup 7.

Owners Guide
Page 66
...: Custom Settings Press and hold the ̈ "Play button" of the DVD remote control while pointing directly at the learning AV NET sensor of the Plasma TV (located at the lower right corner of the screen) at a distance of 3 to 6 feet or 1 to store and continue. If the IR ... softkey to learn . AV Net Setup Wizard : Custom Settings Custom settings Please choose the device you wish to the next screen. ̈ Transfer was successful. TV Softkeys POWER ̇̇ ̈̈ MENU ̇̇ ̈ ̈̈ SELECT ̆ ̈ EXIT ̄ ̇ Move SEL Select Back ...
...: Custom Settings Press and hold the ̈ "Play button" of the DVD remote control while pointing directly at the learning AV NET sensor of the Plasma TV (located at the lower right corner of the screen) at a distance of 3 to 6 feet or 1 to store and continue. If the IR ... softkey to learn . AV Net Setup Wizard : Custom Settings Custom settings Please choose the device you wish to the next screen. ̈ Transfer was successful. TV Softkeys POWER ̇̇ ̈̈ MENU ̇̇ ̈ ̈̈ SELECT ̆ ̈ EXIT ̄ ̇ Move SEL Select Back ...
Owners Guide
Page 69
...-Fi audio system is selected, VARIABLE AUDIO OUT will select the source of the Monitor Output. When TV TUNER OUT is connected to have Audio volume that can control the volume output by the Plasma TV Volume Up/Down. YES YES YES Input 2 HDMI_2 - - - Setup Set Monitor Out This feature will... not be controlled by changing the volume of the TV. Monitor: Select MONITOR to output the audio and video signals of ...
...-Fi audio system is selected, VARIABLE AUDIO OUT will select the source of the Monitor Output. When TV TUNER OUT is connected to have Audio volume that can control the volume output by the Plasma TV Volume Up/Down. YES YES YES Input 2 HDMI_2 - - - Setup Set Monitor Out This feature will... not be controlled by changing the volume of the TV. Monitor: Select MONITOR to output the audio and video signals of ...


