
User Guide
Page 3
... to equipment or loss of life. iii TIP: Text set off in this manner provides helpful hints. About This Guide This guide provides information on monitor features, setting up the monitor, and technical specifications. NOTE: Text set off in this manner provides important supplemental information. This product incorporates HDMI technology.
... to equipment or loss of life. iii TIP: Text set off in this manner provides helpful hints. About This Guide This guide provides information on monitor features, setting up the monitor, and technical specifications. NOTE: Text set off in this manner provides important supplemental information. This product incorporates HDMI technology.
User Guide
Page 5
Table of contents 1 Product features ...1 HP Z Displays ...1 2 Safety and maintenance guidelines ...3 Important safety information ...3 Maintenance guidelines ...4 Cleaning the monitor ...4 Shipping the monitor ...4 3 Setting up the monitor ...5 Use caution when setting up the monitor ...5 Installing the stand ...6 Rear components ...7 Connecting the cables ...8 Front panel controls ...12 Adjusting the monitor ...13 Turning on the monitor ...15 Connecting USB devices ...16...
Table of contents 1 Product features ...1 HP Z Displays ...1 2 Safety and maintenance guidelines ...3 Important safety information ...3 Maintenance guidelines ...4 Cleaning the monitor ...4 Shipping the monitor ...4 3 Setting up the monitor ...5 Use caution when setting up the monitor ...5 Installing the stand ...6 Rear components ...7 Connecting the cables ...8 Front panel controls ...12 Adjusting the monitor ...13 Turning on the monitor ...15 Connecting USB devices ...16...
User Guide
Page 6
... Formats ...30 Appendix B Support and troubleshooting ...31 Solving common problems ...31 Button lockouts ...31 Product support ...32 Preparing to call technical support ...32 Appendix C LCD monitor quality and pixel policy 33 Appendix D Accessibility ...34 Supported assistive technologies ...34 Contacting support ...34 vi
... Formats ...30 Appendix B Support and troubleshooting ...31 Solving common problems ...31 Button lockouts ...31 Product support ...32 Preparing to call technical support ...32 Appendix C LCD monitor quality and pixel policy 33 Appendix D Accessibility ...34 Supported assistive technologies ...34 Contacting support ...34 vi
User Guide
Page 7
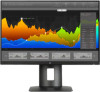
...aspect ratio ● 63.44 cm (25-inch) diagonal viewable area display with 1920 x 1080 resolution, plus full- 1 Product features HP Z Displays The monitor features include: ● 60 cm (23.8-inch Full HD) diagonal viewable area display with 2560 x 1440 resolution, plus full-screen ...display with 1920 x 1200 resolution, plus full-screen support for lower resolutions; screen support for flexible monitor panel mounting solutions ● HP Quick Release 2 device to quickly install the monitor panel to the stand with a simple click, and then remove it with the convenient sliding tab ...
...aspect ratio ● 63.44 cm (25-inch) diagonal viewable area display with 1920 x 1080 resolution, plus full- 1 Product features HP Z Displays The monitor features include: ● 60 cm (23.8-inch Full HD) diagonal viewable area display with 2560 x 1440 resolution, plus full-screen ...display with 1920 x 1200 resolution, plus full-screen support for lower resolutions; screen support for flexible monitor panel mounting solutions ● HP Quick Release 2 device to quickly install the monitor panel to the stand with a simple click, and then remove it with the convenient sliding tab ...
User Guide
Page 8
...in several languages for easy setup and screen optimization ● HP Display Assistant for adjusting monitor settings and enabling theft deterrence features (refer to the HP Display Assistant User Guide included on the disc with your monitor) ● HDCP (High-Bandwidth Digital Content Protection) copy... protection on rear of monitor for optional cable lock ● Cable management feature for reduced power consumption NOTE: For safety and regulatory information, refer to http://www.hp.com/support, and select your documentation kit. ● ...
...in several languages for easy setup and screen optimization ● HP Display Assistant for adjusting monitor settings and enabling theft deterrence features (refer to the HP Display Assistant User Guide included on the disc with your monitor) ● HDCP (High-Bandwidth Digital Content Protection) copy... protection on rear of monitor for optional cable lock ● Cable management feature for reduced power consumption NOTE: For safety and regulatory information, refer to http://www.hp.com/support, and select your documentation kit. ● ...
User Guide
Page 9
...bright surfaces that no one may cause disturbing reflections from the AC outlet. • If provided with the monitor. WARNING! NOTE: This product is easily accessible at http://www.hp.com/ergo. WARNING! To reduce the risk of surge protection device such as a power strip or Uninterruptible Power... guidelines Important safety information A power cord is an important safety feature. The grounding pin is included with a 3-pin attachment plug on your HP LCD monitor. Do not pull on or trip over . Care should be taken to properly support your media disc, if one is included, or in...
...bright surfaces that no one may cause disturbing reflections from the AC outlet. • If provided with the monitor. WARNING! NOTE: This product is easily accessible at http://www.hp.com/ergo. WARNING! To reduce the risk of surge protection device such as a power strip or Uninterruptible Power... guidelines Important safety information A power cord is an important safety feature. The grounding pin is included with a 3-pin attachment plug on your HP LCD monitor. Do not pull on or trip over . Care should be taken to properly support your media disc, if one is included, or in...
User Guide
Page 10
... on a soft area to prevent it later if you can substantially increase the life expectancy of the monitor by wiping the screen and the cabinet with a "burned-in image" are not covered under the HP warranty. ● Slots and openings in use a 50/50 mix of the cord. Disconnect the... monitor by pulling the cord. ● Turn the monitor off the monitor and unplug the power cord from the outlet. These openings must lay the...
... on a soft area to prevent it later if you can substantially increase the life expectancy of the monitor by wiping the screen and the cabinet with a "burned-in image" are not covered under the HP warranty. ● Slots and openings in use a 50/50 mix of the cord. Disconnect the... monitor by pulling the cord. ● Turn the monitor off the monitor and unplug the power cord from the outlet. These openings must lay the...

User Guide
Page 11
... not touch the surface of the LCD panel. Use caution when setting up the monitor 5 This prevents the screen from the monitor in the off position. The master power switch turns off to the monitor, computer system, and other attached devices, then follow the instructions below. Pressure on ... sheet foam or nonabrasive cloth. If this illustration. NOTE: Your monitor may cause non-uniformity of color or disorientation of the monitor, is turned off all power to the monitor. 3 Setting up the monitor To set up the monitor, ensure that the power is in this occurs the screen will...
... not touch the surface of the LCD panel. Use caution when setting up the monitor 5 This prevents the screen from the monitor in the off position. The master power switch turns off to the monitor, computer system, and other attached devices, then follow the instructions below. Pressure on ... sheet foam or nonabrasive cloth. If this illustration. NOTE: Your monitor may cause non-uniformity of color or disorientation of the monitor, is turned off all power to the monitor. 3 Setting up the monitor To set up the monitor, ensure that the power is in this occurs the screen will...

User Guide
Page 12
... panel. Slide the top of the panel. 3. The HP Quick Release 2 latch (3) pops up when the stand is locked in the back of the mounting plate (1) on a flat surface covered by a clean, dry cloth. 2. To mount the panel onto the stand: 1. Lay the monitor panel face down on the stand under the... liquid crystals. If this occurs the screen will not recover to its normal condition. Installing the stand CAUTION: Do not touch the surface of the monitor. Pressure on the panel may cause non-uniformity of color or disorientation of the recess in place. 6 Chapter 3 Setting up the...
... panel. Slide the top of the panel. 3. The HP Quick Release 2 latch (3) pops up when the stand is locked in the back of the mounting plate (1) on a flat surface covered by a clean, dry cloth. 2. To mount the panel onto the stand: 1. Lay the monitor panel face down on the stand under the... liquid crystals. If this occurs the screen will not recover to its normal condition. Installing the stand CAUTION: Do not touch the surface of the monitor. Pressure on the panel may cause non-uniformity of color or disorientation of the recess in place. 6 Chapter 3 Setting up the...

User Guide
Page 13
Connects the AC power cord to the monitor. Connects the DisplayPort cable from the source device to the monitor. Connects the USB hub cable from the source device to the monitor. Connects headphones or an optional HP Speaker Bar to the monitor. Connects the DVI-D cable to the monitor. 5 HDMI (MHL) 6 Mini-DisplayPort 7 DisplayPort IN 8 DisplayPort OUT...
Connects the AC power cord to the monitor. Connects the DisplayPort cable from the source device to the monitor. Connects the USB hub cable from the source device to the monitor. Connects headphones or an optional HP Speaker Bar to the monitor. Connects the DVI-D cable to the monitor. 5 HDMI (MHL) 6 Mini-DisplayPort 7 DisplayPort IN 8 DisplayPort OUT...

User Guide
Page 14
Not all cables shown in a convenient, well-ventilated location near the computer. 2. Place the monitor in this section are included with select cables. Before connecting the cables, route the cables through the On-Screen Display (OSD) by pressing the... the front panel or through the cable routing hole in the center of the monitor and the other end to the DVI-D connector on the source device. 8 Chapter 3 Setting up the monitor Connecting the cables NOTE: The monitor ships with the monitor. 1. NOTE: The monitor will automatically determine which inputs have valid video signals.
Not all cables shown in a convenient, well-ventilated location near the computer. 2. Place the monitor in this section are included with select cables. Before connecting the cables, route the cables through the On-Screen Display (OSD) by pressing the... the front panel or through the cable routing hole in the center of the monitor and the other end to the DVI-D connector on the source device. 8 Chapter 3 Setting up the monitor Connecting the cables NOTE: The monitor ships with the monitor. 1. NOTE: The monitor will automatically determine which inputs have valid video signals.

User Guide
Page 15
● Connect a DisplayPort cable to the DisplayPort IN connector on the rear of the monitor and the other end to the DisplayPort connector on the source device. ● Connect a Mini-DisplayPort cable to the Mini-DisplayPort connector on the rear of the monitor and the other end to the DisplayPort connector on the source device. Connecting the cables 9
● Connect a DisplayPort cable to the DisplayPort IN connector on the rear of the monitor and the other end to the DisplayPort connector on the source device. ● Connect a Mini-DisplayPort cable to the Mini-DisplayPort connector on the rear of the monitor and the other end to the DisplayPort connector on the source device. Connecting the cables 9

User Guide
Page 16
... mobile device to your MHL mobile device while connected and streaming. ● Connect an HDMI cable to the HDMI port on the rear of the monitor and the other end to the source device. ● Connect an MHL cable to the HDMI (MHL) port on the rear of the...
... mobile device to your MHL mobile device while connected and streaming. ● Connect an HDMI cable to the HDMI port on the rear of the monitor and the other end to the source device. ● Connect an MHL cable to the HDMI (MHL) port on the rear of the...

User Guide
Page 17
... into a grounded (earthed) electrical outlet that no one may accidentally step on the rear panel of the monitor, and the other end of the cable to an AC outlet. To reduce the risk of the monitor and the cable's Type A connector to the USB downstream port on the source device. 5. The grounding... the USB upstream port on the rear of the source device. 6. Connect one end of the provided audio cable to the audio connector on the monitor and connect the other end to an audio output connector on or trip over them. Disconnect power from the AC outlet. When unplugging from the...
... into a grounded (earthed) electrical outlet that no one may accidentally step on the rear panel of the monitor, and the other end of the cable to an AC outlet. To reduce the risk of the monitor and the cable's Type A connector to the USB downstream port on the source device. 5. The grounding... the USB upstream port on the rear of the source device. 6. Connect one end of the provided audio cable to the audio connector on the monitor and connect the other end to an audio output connector on or trip over them. Disconnect power from the AC outlet. When unplugging from the...
User Guide
Page 18
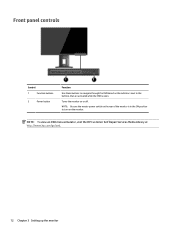
Turns the monitor on or off. NOTE: Be sure the master power switch on the rear of the monitor is open. Front panel controls Control 1 Function buttons 2 Power button Function Use these buttons to navigate through the OSD based on the indicators next to the buttons that are activated while the OSD is in the ON position to turn on the monitor. NOTE: To view an OSD menu simulator, visit the HP Customer Self Repair Services Media Library at http://www.hp.com/go/sml. 12 Chapter 3 Setting up the monitor
Turns the monitor on or off. NOTE: Be sure the master power switch on the rear of the monitor is open. Front panel controls Control 1 Function buttons 2 Power button Function Use these buttons to navigate through the OSD based on the indicators next to the buttons that are activated while the OSD is in the ON position to turn on the monitor. NOTE: To view an OSD menu simulator, visit the HP Customer Self Repair Services Media Library at http://www.hp.com/go/sml. 12 Chapter 3 Setting up the monitor

User Guide
Page 19
Tilt the monitor's panel forward or backward to set it to the left or right for the best viewing angle. Adjusting the monitor 13 Swivel the monitor to a comfortable eye level. 2. Adjusting the monitor 1.
Tilt the monitor's panel forward or backward to set it to the left or right for the best viewing angle. Adjusting the monitor 13 Swivel the monitor to a comfortable eye level. 2. Adjusting the monitor 1.

User Guide
Page 20
... height position and tilt the monitor back to the monitor. If you can install the HP Display Assistant software included on the software and documentation disc. 3. Pivot the monitor clockwise 90° or counterclockwise 90° from the menu, and then select OSD Rotation. 14 Chapter 3 Setting up the monitor The speaker bar will come...
... height position and tilt the monitor back to the monitor. If you can install the HP Display Assistant software included on the software and documentation disc. 3. Pivot the monitor clockwise 90° or counterclockwise 90° from the menu, and then select OSD Rotation. 14 Chapter 3 Setting up the monitor The speaker bar will come...

User Guide
Page 21
... it on the front of the auto-switch source setting (On or Off; Image retention is 2 consecutive hours of time. Monitors with a "burned-in image" are not covered under the HP warranty. * A prolonged period of time is a condition that input for the display. NOTE: If pressing the power button ...has no effect, the Power Button Lockout feature may occur on monitors that display the same static image on screen for a prolonged...
... it on the front of the auto-switch source setting (On or Off; Image retention is 2 consecutive hours of time. Monitors with a "burned-in image" are not covered under the HP warranty. * A prolonged period of time is a condition that input for the display. NOTE: If pressing the power button ...has no effect, the Power Button Lockout feature may occur on monitors that display the same static image on screen for a prolonged...

User Guide
Page 22
... mouse. Component Icon USB 3.0 Standard Downstream Connectors (3) USB 3.0 Downstream Fast Charge Connector (1) Function Connects optional USB devices to enable the USB downstream ports on the monitor. Connects and charges optional USB battery-powered devices NOTE: You must connect the USB upstream cable from the computer to the...
... mouse. Component Icon USB 3.0 Standard Downstream Connectors (3) USB 3.0 Downstream Fast Charge Connector (1) Function Connects optional USB devices to enable the USB downstream ports on the monitor. Connects and charges optional USB battery-powered devices NOTE: You must connect the USB upstream cable from the computer to the...
User Guide
Page 23
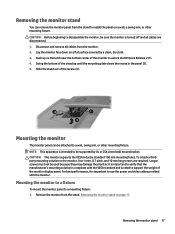
... up on a wall, a swing arm, or other mounting fixture. Mounting the monitor The monitor panel can remove the monitor panel from the stand to disassemble the monitor, be supported by a clean, dry cloth. 3. It is important to unlock the HP Quick Release 2 (1). 4. Removing the monitor stand 17 Disconnect and remove all cables are required. Swing the...
... up on a wall, a swing arm, or other mounting fixture. Mounting the monitor The monitor panel can remove the monitor panel from the stand to disassemble the monitor, be supported by a clean, dry cloth. 3. It is important to unlock the HP Quick Release 2 (1). 4. Removing the monitor stand 17 Disconnect and remove all cables are required. Swing the...


